


最近回归公司项目的时候,感觉目前定位时用户体验稍差,稍作考虑,还是决定参考一下高德地图的用法。
在使用高德地图的时候,如果我们故意的将定位权限关闭,那么在使用它进行定位的时候,它会给我们一个友好提示,当点击设置的时候就会跳到当前App的设置界面,不仅增强了用户的体验而且提高了代码的健壮性,图例如下:

由于多个控制器都会用到此方法,所以决定在基类中实现如下类目:
//实现控制器基类的一个类目
@implementation BaseViewController (CLLocationManager)

- (void)checkLocationStatus:(void (^)(void))authorizedBlock
{
    //对定位权限进行判定
    switch ([CLLocationManager authorizationStatus])
    {
        //表示定位允许
        case kCLAuthorizationStatusAuthorizedWhenInUse:
        case kCLAuthorizationStatusAuthorizedAlways:
        {
            //执行回调
            authorizedBlock();
        }
            break;

        //表示定位不允许,需要弹出Alert
        case kCLAuthorizationStatusDenied:
        case kCLAuthorizationStatusRestricted:
        {
            UIAlertView * signAlertView = [[UIAlertView alloc]initWithTitle:@"请打开系统设置中“隐私→定位服务”,允许“XX”使用您的位置。"
                                                                    message:nil
                                                                   delegate:self
                                                          cancelButtonTitle:nil
                                                          otherButtonTitles:@"取消",@"设置", nil];
            [signAlertView show];
        }
            break;
        default:
            break;
    }
}
实现当前AlertView的Delegate(因为项目适配iOS7,所以懒得用UIAlertController了0.0)
#pragma mark - *************** <UIAlertViewDelegate>

//实现UIAlertViewDelegate方法
-(void)alertView:(UIAlertView *)alertView clickedButtonAtIndex:(NSInteger)buttonIndex
{
    if (buttonIndex == 1)//点击设置
    {
#ifdef __IPHONE_8_0
        //跳入当前App设置界面,因为URLWithString:UIApplicationOpenSettingsURLString是iOS8之后新增的
        [[UIApplication sharedApplication]openURL:[NSURL URLWithString:UIApplicationOpenSettingsURLString]];
#else
        //适配iOS7 ,跳入系统设置界面
        [[UIApplication sharedApplication]openURL:[NSURL URLWithString:@"prefs:General&path=Reset"]];

#endif
    }
}
为了适配一下iOS8之前的操作,还需在Target->Info->URL Types中添加一个字段,如下:
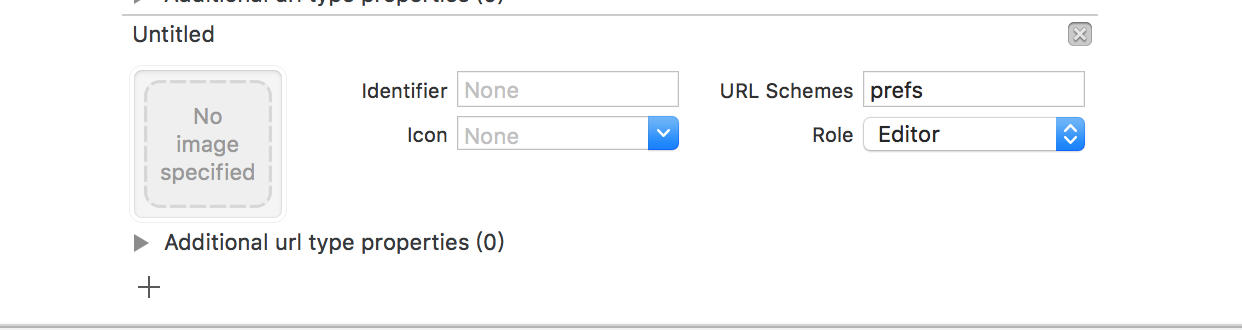
下面是跳转至其他的设置界面的URL:
更加详细内容请参考博文App跳转至系统Settings
Notification — prefs:root=NOTIFICATI_ID
Phone — prefs:root=Phone
Photos — prefs:root=Photos
Profile — prefs:root=General&path=ManagedConfigurationList
Reset — prefs:root=General&path=Reset
Safari — prefs:root=Safari
Siri — prefs:root=General&path=Assistant
Sounds — prefs:root=Sounds
Software Update — prefs:root=General&path=SOFTWARE_UPDATE_LINK
Store — prefs:root=STORE
Twitter — prefs:root=TWITTER
Usage — prefs:root=General&path=USAGE
VPN — prefs:root=General&path=Network/VPN
Wallpaper — prefs:root=Wallpaper
Wi-Fi — prefs:root=WIFI
———-更新 2016-10-19————
iOS10之后的路径似乎发生了许变化,如下(摘自cyanzhong/app-tutorials/schemes.md):
电池电量 Prefs:root=BATTERY_USAGE
通用设置 Prefs:root=General
存储空间 Prefs:root=General&path=STORAGE_ICLOUD_USAGE/DEVICE_STORAGE
蜂窝数据 Prefs:root=MOBILE_DATA_SETTINGS_ID
Wi-Fi 设置 Prefs:root=WIFI
蓝牙设置 Prefs:root=Bluetooth
定位设置 Prefs:root=Privacy&path=LOCATION
辅助功能 Prefs:root=General&path=ACCESSIBILITY
关于手机 Prefs:root=General&path=About
键盘设置 Prefs:root=General&path=Keyboard
显示设置 Prefs:root=DISPLAY
声音设置 Prefs:root=Sounds
App Store 设置 Prefs:root=STORE
墙纸设置 Prefs:root=Wallpaper
打开电话 Mobilephone://
世界时钟 Clock-worldclock://
闹钟 Clock-alarm://
秒表 Clock-stopwatch://
倒计时 Clock-timer://
打开相册 Photos://
最后祝大家节日快乐啊O(∩_∩)O


 1万+
1万+


 被折叠的 条评论
为什么被折叠?
被折叠的 条评论
为什么被折叠?
 到【灌水乐园】发言


