


是单点登录?
我想肯定有一部分人“望文生义”的认为单点登录就是一个用户只能在一处登录,其实这是错误的理解(我记得我第一次也是这么理解的)。
单点登录指的是多个子系统只需要登录一个,其他系统不需要登录了(一个浏览器内)。一个子系统退出,其他子系统也全部是退出状态。
如果你还是不明白,我们举个实际的例子把。比如博客园首页:https://www.cnblogs.com,和博客园的找找看http://zzk.cnblogs.com。这就是两个系统(不同的域名)。如果你登录其中一个,另一个也是登录状态。如果你退出一个,另一个也是退出状态了。
那么这是怎么实现的呢?这就是我们今天要分析的问题了。
单点登录(SSO)原理
-
首先我们需要一个认证中心(Service),和两个子系统(Client)。
-
当浏览器第一次访问Client1时,处于未登录状态 -> 302到认证中心(Service) -> 在Service的登录页面登录(写入Cookie记录登录信息) -> 302到Client1(写入Cookie记录登录信息)
-
第二次访问Client1 -> 读取Client1中Cookie登录信息 -> Client1为登录状态
-
第一次访问Client2 -> 读取Client2中Cookie中的登录信息 -> Client2为未登录状态 -> 302到在Service(读取Service中的Cookie为登录状态) -> 302到Client2(写入Cookie记录登录信息)
我们发现在访问Client2的时候,中间时间经过了几次302重定向,并没有输入用户名密码去登录。用户完全感觉不到,直接就是登录状态了。
图解:

手撸一个SSO
环境:.NET Framework 4.5.2
Service:
/// <summary>
/// 登录
/// </summary>
/// <param name="name"></param>
/// <param name="passWord"></param>
/// <param name="backUrl"></param>
/ <returns></returns>
[HttpPost]
public string Login(string name, string passWord, string backUrl){
   if (true)//TODO:验证用户名密码登录
    {        //用Session标识会话是登录状态
        Session["user"] = "XX已经登录";        //在认证中心 保存客户端Client的登录认证码
        TokenIds.Add(Session.SessionID, Guid.NewGuid());
    }    else//验证失败重新登录
    {        return "/Home/Login";
    }    return backUrl + "?tokenId=" + TokenIds[Session.SessionID];//生成一个tokenId 发放到客户端}
Client:
public static List<string> Tokens = new List<string>();

public async Task<ActionResult> Index(){
 var tokenId = Request.QueryString["tokenId"];    //如果tokenId不为空,则是由Service302过来的。
    if (tokenId != null)
    {
        using (HttpClient http = new HttpClient())
        {            //验证Tokend是否有效
            var isValid = await http.GetStringAsync("http://localhost:8018/Home/TokenIdIsValid?tokenId=" + tokenId);
          if (bool.Parse(isValid.ToString()))
            {
                 if (!Tokens.Contains(tokenId))
                {                    //记录登录过的Client (主要是为了可以统一登出)
                    Tokens.Add(tokenId);
                 }
                Session["token"] = tokenId;
            }
        }
    }    //判断是否是登录状态
    if (Session["token"] == null || !Tokens.Contains(Session["token"].ToString()))
    {        return Redirect("http://localhost:8018/Home/Verification?backUrl=http://localhost:26756/Home");
    }
    else
    {        if (Session["token"] != null)
            Session["token"] = null;
    }    return View();
}
效果图:

当然,这只是用较少的代码撸了一个较简单的SSO。仅用来理解,勿用于实际应用。
IdentityServer4实现SSO
环境:.NET Core 2.0
上面我们手撸了一个SSO,接下来我们看看.NET里的IdentityServer4怎么来使用SSO。
首先建一个IdentityServer4_SSO_Service(MVC项目),再建两个IdentityServer4_SSO_Client(MVC项目)
在Service项目中用nuget导入IdentityServer4 2.0.2、IdentityServer4.AspNetIdentity 2.0.0、IdentityServer4.EntityFramework 2.0.0
在Client项目中用nuget导入IdentityModel 2.14.0
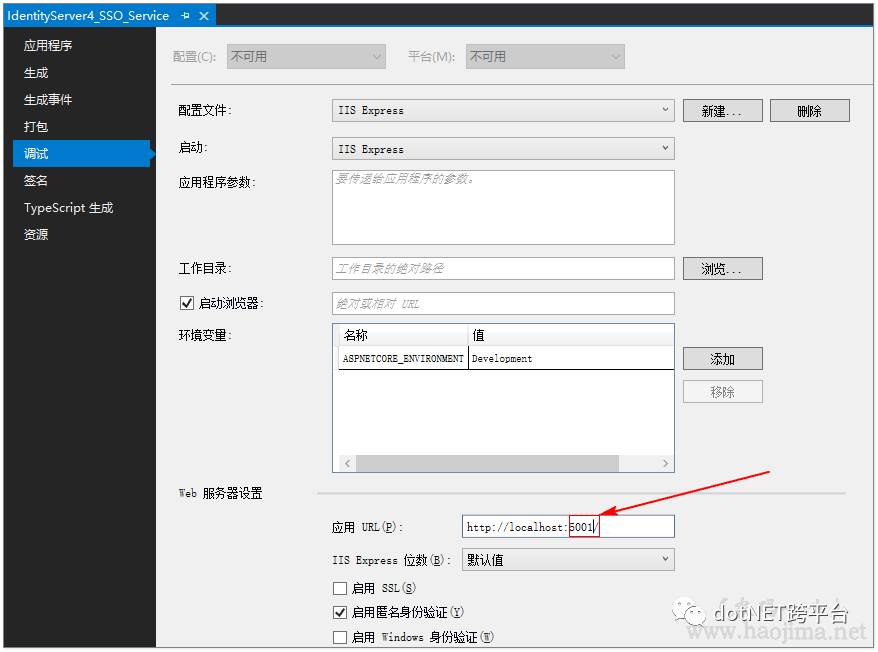
然后分别设置Service和Client项目启动端口为 5001(Service)、5002(Client1)、5003(Client2)
在Service中新建一个类Config:
public class Config{
public static IEnumerable<IdentityResource> GetIdentityResources() { return new List<IdentityResource>
{ new IdentityResources.OpenId(), new IdentityResources.Profile(),
};
} public static IEnumerable<ApiResource> GetApiResources() { return new List<ApiResource>
{ new ApiResource("api1", "My API")
};
} // 可以访问的客户端
public static IEnumerable<Client> GetClients() {
return new List<Client>
{
// OpenID Connect hybrid flow and client credentials client (MVC)
//Client1
new Client
{
ClientId = "mvc1",
ClientName = "MVC Client1",
AllowedGrantTypes = GrantTypes.HybridAndClientCredentials,
RequireConsent = true,
ClientSecrets =
{ new Secret("secret".Sha256())
},
RedirectUris = { "http://localhost:5002/signin-oidc" }, //注意端口5002 是我们修改的Client的端口
PostLogoutRedirectUris = { "http://localhost:5002/signout-callback-oidc" },
AllowedScopes =
{
IdentityServerConstants.StandardScopes.OpenId,
IdentityServerConstants.StandardScopes.Profile, "api1"
},
AllowOfflineAccess = true
}, //Client2
new Client
{
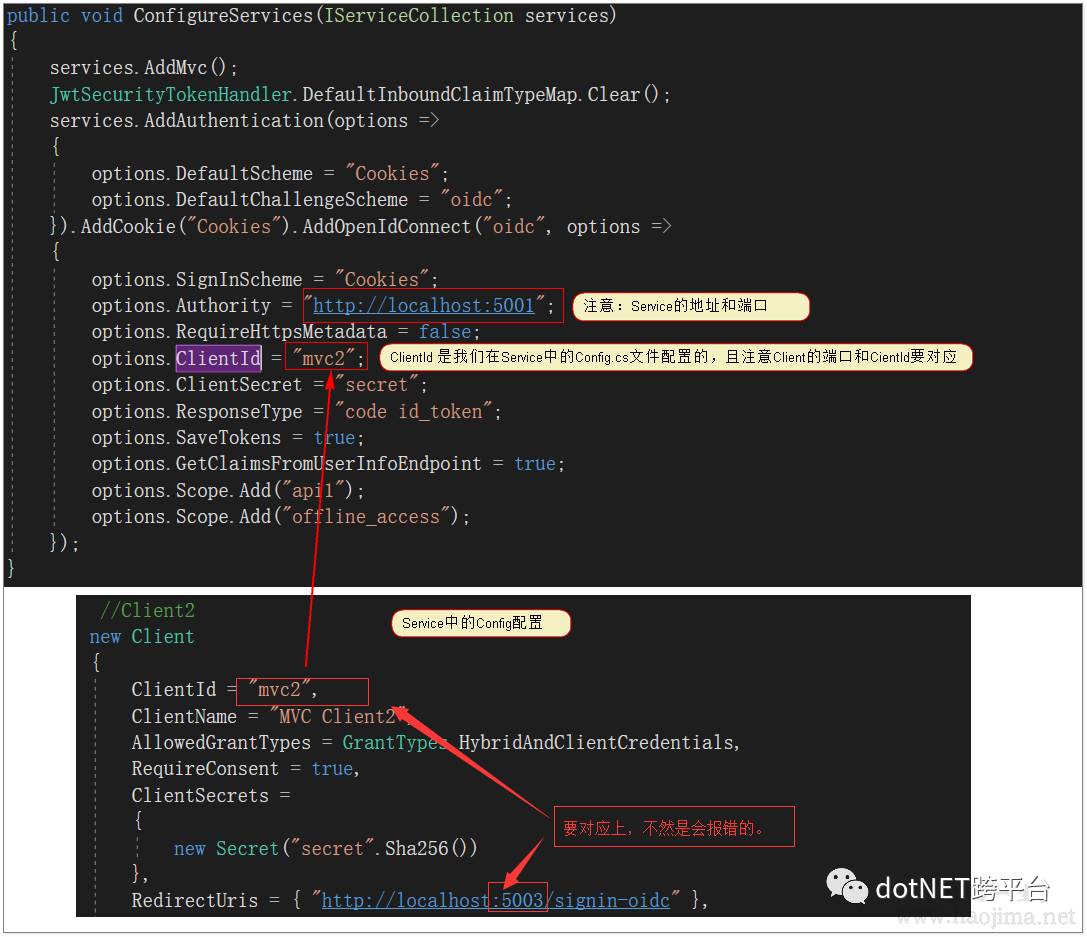
ClientId = "mvc2",
ClientName = "MVC Client2",
AllowedGrantTypes = GrantTypes.HybridAndClientCredentials,
RequireConsent = true,
ClientSecrets =
{ new Secret("secret".Sha256())
},
RedirectUris = { "http://localhost:5003/signin-oidc" },
PostLogoutRedirectUris = { "http://localhost:5003/signout-callback-oidc" },
AllowedScopes =
{
IdentityServerConstants.StandardScopes.OpenId,
IdentityServerConstants.StandardScopes.Profile, "api1"
},
AllowOfflineAccess = true
}
};
}
}新增一个ApplicationDbContext类继承于IdentityDbContext:
public class ApplicationDbContext : IdentityDbContext<IdentityUser>
{    public ApplicationDbContext(DbContextOptions<ApplicationDbContext> options)
        : base(options)
    {
    }
    protected override void OnModelCreating(ModelBuilder builder)
    {        base.OnModelCreating(builder);
    }
}
在文件appsettings.json中配置数据库连接字符串:
"ConnectionStrings": {    "DefaultConnection": "Server=(local);Database=IdentityServer4_Demo;Trusted_Connection=True;MultipleActiveResultSets=true"
  }
在文件Startup.cs的ConfigureServices方法中增加:
public void ConfigureServices(IServiceCollection services)
{
    services.AddDbContext<ApplicationDbContext>(options =>
       options.UseSqlServer(Configuration.GetConnectionString("DefaultConnection"))); //数据库连接字符串
    services.AddIdentity<IdentityUser, IdentityRole>()
        .AddEntityFrameworkStores<ApplicationDbContext>()
        .AddDefaultTokenProviders();

    services.AddMvc();

    string connectionString = Configuration.GetConnectionString("DefaultConnection");
 var migrationsAssembly = typeof(Startup).GetTypeInfo().Assembly.GetName().Name;
    services.AddIdentityServer()
        .AddDeveloperSigningCredential()
        .AddAspNetIdentity<IdentityUser>()
        .AddConfigurationStore(options =>
        {
            options.ConfigureDbContext = builder =>
                builder.UseSqlServer(connectionString,
                    sql => sql.MigrationsAssembly(migrationsAssembly));
        })
        .AddOperationalStore(options =>
        {
            options.ConfigureDbContext = builder =>
                builder.UseSqlServer(connectionString,
                    sql => sql.MigrationsAssembly(migrationsAssembly));
            options.EnableTokenCleanup = true;
            options.TokenCleanupInterval = 30;
        });
}
并在Startup.cs文件里新增一个方法InitializeDatabase(初始化数据库):
/// <summary>/// 初始数据库/// </summary>/// <param name="app"></param>private void InitializeDatabase(IApplicationBuilder app){    using (var serviceScope = app.ApplicationServices.GetService<IServiceScopeFactory>().CreateScope())
    {
        serviceScope.ServiceProvider.GetRequiredService<ApplicationDbContext>().Database.Migrate();//执行数据库迁移
        serviceScope.ServiceProvider.GetRequiredService<PersistedGrantDbContext>().Database.Migrate();
    var context = serviceScope.ServiceProvider.GetRequiredService<ConfigurationDbContext>();
        context.Database.Migrate();
       if (!context.Clients.Any())
        {            foreach (var client in Config.GetClients())//循环添加 我们直接添加的 5002、5003 客户端
            {
                context.Clients.Add(client.ToEntity());
            }
            context.SaveChanges();
        }
        if (!context.IdentityResources.Any())
         {
   foreach (var resource in Config.GetIdentityResources())
                    {
                        context.IdentityResources.Add(resource.ToEntity());
                    }
                    context.SaveChanges();
                }
        if (!context.ApiResources.Any())
                {                    foreach (var resource in Config.GetApiResources())
                    {
                        context.ApiResources.Add(resource.ToEntity());
                    }
                    context.SaveChanges();
                }
    }
}
修改Configure方法:
 public void Configure(IApplicationBuilder app, IHostingEnvironment env)
 {     //初始化数据
     InitializeDatabase(app);
     if (env.IsDevelopment())
     {
         app.UseDeveloperExceptionPage();
         app.UseBrowserLink();
         app.UseDatabaseErrorPage();
     }
     else
     {
         app.UseExceptionHandler("/Home/Error");
     }
     app.UseStaticFiles();
     app.UseIdentityServer();
     app.UseMvc(routes =>
     {
         routes.MapRoute(
             name: "default",
       template: "{controller=Home}/{action=Index}/{id?}");
     });
 }
然后新建一个AccountController控制器,分别实现注册、登录、登出等。
新建一个ConsentController控制器用于Client回调。
然后在Client的Startup.cs类里修改ConfigureServices方法:
public void ConfigureServices(IServiceCollection services){
    services.AddMvc();
    JwtSecurityTokenHandler.DefaultInboundClaimTypeMap.Clear();
    services.AddAuthentication(options =>
    {
        options.DefaultScheme = "Cookies";
        options.DefaultChallengeScheme = "oidc";
    }).AddCookie("Cookies").AddOpenIdConnect("oidc", options =>
    {
        options.SignInScheme = "Cookies";
        options.Authority = "http://localhost:5001";
        options.RequireHttpsMetadata = false;
        options.ClientId = "mvc2";
        options.ClientSecret = "secret";
        options.ResponseType = "code id_token";
        options.SaveTokens = true;
        options.GetClaimsFromUserInfoEndpoint = true;
        options.Scope.Add("api1");
        options.Scope.Add("offline_access");
    });
} 
对于Client的身份认证就简单了:
[Authorize]//身份认证public IActionResult Index(){    return View();
}/// <summary>/// 登出/// </summary>/// <returns></returns>public async Task<IActionResult> Logout(){    await HttpContext.SignOutAsync("Cookies");    await HttpContext.SignOutAsync("oidc");    return View("Index");
}
效果图:
源码地址(demo可配置数据库连接后直接运行)
-
https://github.com/zhaopeiym/BlogDemoCode/tree/master/sso(%E5%8D%95%E7%82%B9%E7%99%BB%E5%BD%95)
推荐阅读
-
http://www.cnblogs.com/ywlaker/p/6113927.html
-
https://identityserver4.readthedocs.io/en/release
相关文章:
原文地址:http://www.cnblogs.com/zhaopei/p/SSO.html
.NET社区新闻,深度好文,微信中搜索dotNET跨平台或扫描二维码关注


 58
58


 被折叠的 条评论
为什么被折叠?
被折叠的 条评论
为什么被折叠?
 到【灌水乐园】发言


