


1 Android widget
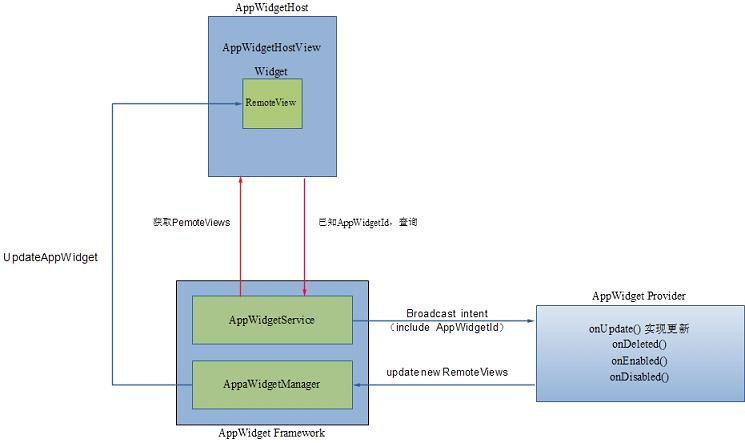
2 AppWidget Framework
实际是写一个事件监听类即一个BroadcastReceiver子类,当然框架已经提供了一个辅助类AppWidgetProvider,实现的类只要实现其方法即可,其中必须实现的方法是onUpdate ,其实就是一个定时事件,widget监听此事件
另外就是规划好视图(layout),将此widget打包安装。
2. 当android系统启动时,AppWidgetService 就将负责检查所有的安装包,将检查
AndroidManifest.xml(不要告诉我不知道,如果不知道可要看看基本开发知识了)
文件中有<metadata android:name="android.appwidget.provider" android:resource="@xml/appwidget_info" />
信息的程序包记录下来
4. AppWidgetService将根据widget配置中的updatePeriodMillis属性来定时发送ACTION_APPWIDGET_UPDATE事件,此事件将激活widget的事件监听方法onUpdate,此方法将通过AppWidgetManager完成widget内容的更新和其他操作。
3 AppWidgetHost
Host的实现者
4 AppWidgetHostView
AppWidgetHostView是真正的View,但它只是一个容器,用来容纳实际的AppWidget的View。这个AppWidget的View是根据RemoteViews的描述来创建。
5 AppWidgetProvider
AppWidgetProvider是AppWidget提供者需要实现的接口,它实际上是一个BroadcastReceiver。只不过子类要实现的不再是onReceive,而是转换成了几个新的函数:
2 public void onDeleted(Context context, int[] appWidgetIds)
3 public void onEnabled(Context context)
4 public void onDisabled(Context context)
这几个函数用来响应AppWidgetService发出的相应的广播消息。
AppWidgetProvider的实现者
o 调用AppWidgetManager的updateAppWidget去更新widget.
6 RemoteViews
1 AppWidgetProviderInfo
2 AppWidgetProvider
    AppWidgetProvider是BroadcastReceiver的子类,这个类处理App Widget广播。AppWidgetProvider只接收于App Widget有关系的广播,比如App Widget在updated, deleted, enabled, and disabled。当这些广播发生的时候,AppWidgetProvider会调用一下回调方法:


 onUpdate(Context, AppWidgetManager, int[])

     间隔调用此方法去更新App Widget,间隔时间的设置是在AppWidgetProviderInfo下的updatePeriodMillis属性,同样当用户添加App Widget的时候也被调用。如果你已经声明了一个configuration Activity,用户添加App Widget的时候就不会调用onUpdate,但是在随后的更新中依然会被调用。

 onDeleted(Context, int[])

     当App Widget 从App Widget host 中删除的时候调用。

 onEnabled(Context)

     当App Widget第一次创建的时候调用。比如,当用户增加两个同样的App Widget时候,这个方法只在第一次去调用。如果你需要打开一个新的数据库或者其他的设置,而这在所有的App Widgets只需要设置一次的情况下,这个是最好的地方去实现它们。

 onDisabled(Context)

     当App Widget的最后一个实例从App Widget host中被删除的时候调用。这里可以做一些在onEnabled(Context)中相反的操作,比如删除临时数据库。

 onReceive(Context, Intent)

     每一个广播的产生都会调用此方法,而且是在上面方法之前被调用。通常不需要实现此方法。

     在AppWidgetProvider中最重要的callback就是onUpdated(),如果你的App Widget接收用户交互事件,就需要在这个callback里面进行处理。
ApiDemo中的例子,ExampleAppWidgetProvider.java文件
* Copyright (C) 2008 The Android Open Source Project
*
* Licensed under the Apache License, Version 2.0 (the "License");
* you may not use this file except in compliance with the License.
* You may obtain a copy of the License at
*
* http://www.apache.org/licenses/LICENSE-2.0
*
* Unless required by applicable law or agreed to in writing, software
* distributed under the License is distributed on an "AS IS" BASIS,
* WITHOUT WARRANTIES OR CONDITIONS OF ANY KIND, either express or implied.
* See the License for the specific language governing permissions and
* limitations under the License.
*/
package com.example.android.apis.appwidget;
import android.appwidget.AppWidgetManager;
import android.appwidget.AppWidgetProvider;
import android.content.ComponentName;
import android.content.Context;
import android.content.pm.PackageManager;
import android.os.SystemClock;
import android.util.Log;
import android.widget.RemoteViews;
// Need the following import to get access to the app resources, since this
// class is in a sub-package.
import com.example.android.apis.R;
/**
* A widget provider. We have a string that we pull from a preference in order to show
* the configuration settings and the current time when the widget was updated. We also
* register a BroadcastReceiver for time-changed and timezone-changed broadcasts, and
* update then too.
*
* <p>See also the following files:
* <ul>
* <li>ExampleAppWidgetConfigure.java</li>
* <li>ExampleBroadcastReceiver.java</li>
* <li>res/layout/appwidget_configure.xml</li>
* <li>res/layout/appwidget_provider.xml</li>
* <li>res/xml/appwidget_provider.xml</li>
* </ul>
*/
public class ExampleAppWidgetProvider extends AppWidgetProvider {
// log tag
private static final String TAG = "ExampleAppWidgetProvider";
@Override
public void onUpdate(Context context, AppWidgetManager appWidgetManager, int[] appWidgetIds) {
Log.d(TAG, "onUpdate");
// For each widget that needs an update, get the text that we should display:
// - Create a RemoteViews object for it
// - Set the text in the RemoteViews object
// - Tell the AppWidgetManager to show that views object for the widget.
final int N = appWidgetIds.length;
for ( int i = 0; i <N; i ++) {
int appWidgetId = appWidgetIds[i];
String titlePrefix = ExampleAppWidgetConfigure.loadTitlePref(context, appWidgetId);
updateAppWidget(context, appWidgetManager, appWidgetId, titlePrefix);
}
}
@Override
public void onDeleted(Context context, int[] appWidgetIds) {
Log.d(TAG, "onDeleted");
// When the user deletes the widget, delete the preference associated with it.
final int N = appWidgetIds.length;
for ( int i = 0; i <N; i ++) {
ExampleAppWidgetConfigure.deleteTitlePref(context, appWidgetIds[i]);
}
}
@Override
public void onEnabled(Context context) {
Log.d(TAG, "onEnabled");
// When the first widget is created, register for the TIMEZONE_CHANGED and TIME_CHANGED
// broadcasts. We don't want to be listening for these if nobody has our widget active.
// This setting is sticky across reboots, but that doesn't matter, because this will
// be called after boot if there is a widget instance for this provider.
PackageManager pm = context.getPackageManager();
pm.setComponentEnabledSetting(
new ComponentName( "com.example.android.apis", ".appwidget.ExampleBroadcastReceiver"),
PackageManager.COMPONENT_ENABLED_STATE_ENABLED,
PackageManager.DONT_KILL_APP);
}
@Override
public void onDisabled(Context context) {
// When the first widget is created, stop listening for the TIMEZONE_CHANGED and
// TIME_CHANGED broadcasts.
Log.d(TAG, "onDisabled");
PackageManager pm = context.getPackageManager();
pm.setComponentEnabledSetting(
new ComponentName( "com.example.android.apis", ".appwidget.ExampleBroadcastReceiver"),
PackageManager.COMPONENT_ENABLED_STATE_ENABLED,
PackageManager.DONT_KILL_APP);
}
static void updateAppWidget(Context context, AppWidgetManager appWidgetManager,
int appWidgetId, String titlePrefix) {
Log.d(TAG, "updateAppWidget appWidgetId=" + appWidgetId + " titlePrefix=" + titlePrefix);
// Getting the string this way allows the string to be localized. The format
// string is filled in using java.util.Formatter-style format strings.
CharSequence text = context.getString(R.string.appwidget_text_format,
ExampleAppWidgetConfigure.loadTitlePref(context, appWidgetId),
"0x" + Long.toHexString(SystemClock.elapsedRealtime()));
// Construct the RemoteViews object. It takes the package name (in our case, it's our
// package, but it needs this because on the other side it's the widget host inflating
// the layout from our package).
RemoteViews views = new RemoteViews(context.getPackageName(), R.layout.appwidget_provider);
views.setTextViewText(R.id.appwidget_text, text);
// Tell the widget manager
appWidgetManager.updateAppWidget(appWidgetId, views);
}
}
public class ExampleAppWidgetProvider extends AppWidgetProvider {
public void onUpdate(Context context, AppWidgetManager appWidgetManager, int[] appWidgetIds) {
final int N = appWidgetIds.length;
// Perform this loop procedure for each App Widget that belongs to this provider
for (int i=0; i<N; i++) {
int appWidgetId = appWidgetIds[i];
// Create an Intent to launch ExampleActivity
Intent intent = new Intent(context, ExampleActivity.class);
PendingIntent pendingIntent = PendingIntent.getActivity(context, 0, intent, 0);
// Get the layout for the App Widget and attach an on-click listener to the button
RemoteViews views = new RemoteViews(context.getPackageName(), R.layout.appwidget_provider_layout);
views.setOnClickPendingIntent(R.id.button, pendingIntent);
// Tell the AppWidgetManager to perform an update on the current App Widget
appWidgetManager.updateAppWidget(appWidgetId, views);
}
}
}
3 View layout
只要你熟悉用xml怎么去定义layout的话,为App Widget定义一个layout还是很简单的。但是由于App Widget的布局是基于RemoteViews,所以只能使用RemoteViews所支持的layout或者view。
RemoteViews支持的layout和view如下:
Layout – FrameLayout 、LinearLayout、 RelativeLayou
View -- Analog、Clock、 Button、 Chronometer 、ImageButton、 ImageView、 ProgressBar 、TextView
注意:继承这些类的子类同样不支持。
ApiDemo例子,appwidget_provider.xml文件。
这个Activity将通过App Widget自动启动,用户可以给App Widget设置有用的参数,比如App Widget的颜色、大小、更新时间或者其他的属性。
在AndroidManifes.xml中定义这个Activity和一般定义Activity基本没有区别,App Widget host启动这个Activity需要一个Action,所以:
<activity android:name=".ExampleAppWidgetConfigure">
<intent-filter>
<action android:name="android.appwidget.action.APPWIDGET_CONFIGURE" />
</intent-filter>
</activity>
同样这个Activity必须在AppWidgetProviderInfo XML文件中定义android:configure。
值得注意的是App Widget host调用configuration Activity,configuration Activity必须要返回一个结果(必须包含App Widget ID)saved in the Intent extras as EXTRA_APPWIDGET_ID。
ApiDemo例子,ExampleAppWidgetConfigure.java文件:
* Copyright (C) 2008 The Android Open Source Project
*
* Licensed under the Apache License, Version 2.0 (the "License");
* you may not use this file except in compliance with the License.
* You may obtain a copy of the License at
*
* http://www.apache.org/licenses/LICENSE-2.0
*
* Unless required by applicable law or agreed to in writing, software
* distributed under the License is distributed on an "AS IS" BASIS,
* WITHOUT WARRANTIES OR CONDITIONS OF ANY KIND, either express or implied.
* See the License for the specific language governing permissions and
* limitations under the License.
*/
package com.example.android.apis.appwidget;
import android.app.Activity;
import android.appwidget.AppWidgetManager;
import android.content.Context;
import android.content.Intent;
import android.content.SharedPreferences;
import android.os.Bundle;
import android.util.Log;
import android.view.View;
import android.widget.EditText;
import java.util.ArrayList;
// Need the following import to get access to the app resources, since this
// class is in a sub-package.
import com.example.android.apis.R;
/**
* The configuration screen for the ExampleAppWidgetProvider widget sample.
*/
public class ExampleAppWidgetConfigure extends Activity {
static final String TAG = "ExampleAppWidgetConfigure";
private static final String PREFS_NAME
= "com.example.android.apis.appwidget.ExampleAppWidgetProvider";
private static final String PREF_PREFIX_KEY = "prefix_";
int mAppWidgetId = AppWidgetManager.INVALID_APPWIDGET_ID;
EditText mAppWidgetPrefix;
public ExampleAppWidgetConfigure() {
super();
}
@Override
public void onCreate(Bundle icicle) {
super.onCreate(icicle);
// Set the result to CANCELED. This will cause the widget host to cancel
// out of the widget placement if they press the back button.
setResult(RESULT_CANCELED);
// Set the view layout resource to use.
setContentView(R.layout.appwidget_configure);
// Find the EditText
mAppWidgetPrefix = (EditText)findViewById(R.id.appwidget_prefix);
// Bind the action for the save button.
findViewById(R.id.save_button).setOnClickListener(mOnClickListener);
// Find the widget id from the intent.
Intent intent = getIntent();
Bundle extras = intent.getExtras();
if (extras != null) {
mAppWidgetId = extras.getInt(
AppWidgetManager.EXTRA_APPWIDGET_ID, AppWidgetManager.INVALID_APPWIDGET_ID);
}
// If they gave us an intent without the widget id, just bail.
if (mAppWidgetId == AppWidgetManager.INVALID_APPWIDGET_ID) {
finish();
}
mAppWidgetPrefix.setText(loadTitlePref(ExampleAppWidgetConfigure. this, mAppWidgetId));
}
View.OnClickListener mOnClickListener = new View.OnClickListener() {
public void onClick(View v) {
final Context context = ExampleAppWidgetConfigure. this;
// When the button is clicked, save the string in our prefs and return that they
// clicked OK.
String titlePrefix = mAppWidgetPrefix.getText().toString();
saveTitlePref(context, mAppWidgetId, titlePrefix);
// Push widget update to surface with newly set prefix
AppWidgetManager appWidgetManager = AppWidgetManager.getInstance(context);
ExampleAppWidgetProvider.updateAppWidget(context, appWidgetManager,
mAppWidgetId, titlePrefix);
// Make sure we pass back the original appWidgetId
Intent resultValue = new Intent();
resultValue.putExtra(AppWidgetManager.EXTRA_APPWIDGET_ID, mAppWidgetId);
setResult(RESULT_OK, resultValue);
finish();
}
};
// Write the prefix to the SharedPreferences object for this widget
static void saveTitlePref(Context context, int appWidgetId, String text) {
SharedPreferences.Editor prefs = context.getSharedPreferences(PREFS_NAME, 0).edit();
prefs.putString(PREF_PREFIX_KEY + appWidgetId, text);
prefs.commit();
}
// Read the prefix from the SharedPreferences object for this widget.
// If there is no preference saved, get the default from a resource
static String loadTitlePref(Context context, int appWidgetId) {
SharedPreferences prefs = context.getSharedPreferences(PREFS_NAME, 0);
String prefix = prefs.getString(PREF_PREFIX_KEY + appWidgetId, null);
if (prefix != null) {
return prefix;
} else {
return context.getString(R.string.appwidget_prefix_default);
}
}
static void deleteTitlePref(Context context, int appWidgetId) {
}
static void loadAllTitlePrefs(Context context, ArrayList <Integer > appWidgetIds,
ArrayList <String > texts) {
}
} Context theirContext = mContext.createPackageContext(
mInfo.provider.getPackageName(), Context.CONTEXT_RESTRICTED);
mRemoteContext = theirContext;
LayoutInflater inflater = (LayoutInflater)
theirContext.getSystemService(Context.LAYOUT_INFLATER_SERVICE);
inflater = inflater.cloneInContext(theirContext);
inflater.setFilter(sInflaterFilter);
defaultView = inflater.inflate(mInfo.initialLayout, this, false);


 347
347


 被折叠的 条评论
为什么被折叠?
被折叠的 条评论
为什么被折叠?
 到【灌水乐园】发言


