


1、安装Hadoop开发插件
hadoop安装包contrib/目录下有个插件hadoop-0.20.2-eclipse-plugin.jar,拷贝到myeclipse根目录下/dropins目录下。
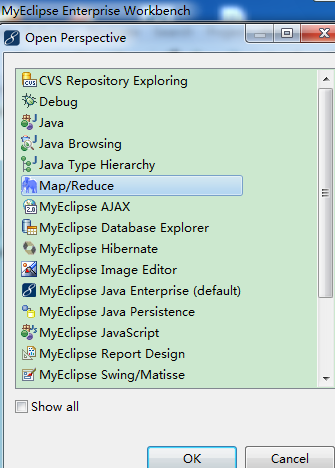
2、 启动myeclipse,打开Perspective:
【Window】->【Open Perspective】->【Other...】->【Map/Reduce】->【OK】
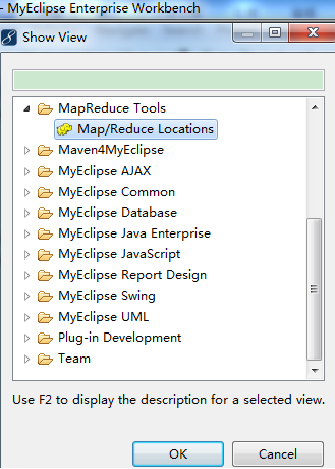
3、 打开一个View:
【Window】->【Show View】->【Other...】->【MapReduce Tools】->【Map/Reduce Locations】->【OK】
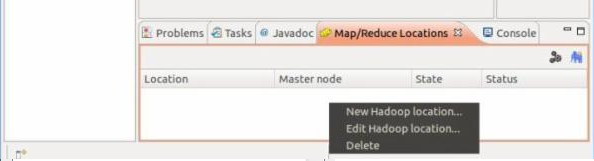
4、 添加Hadoop location:
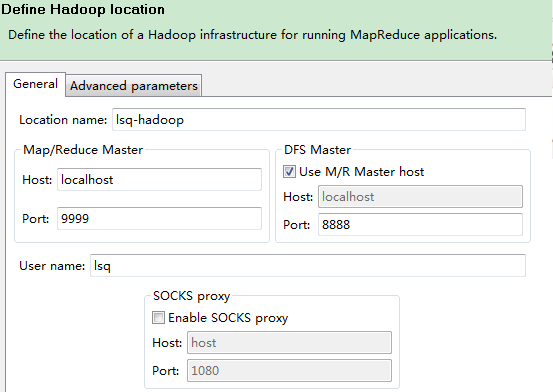
location name: 我填写的是:localhost.
Map/Reduce Master 这个框里
Host:就是jobtracker 所在的集群机器,这里写localhost
Hort:就是jobtracker 的port,这里写的是9999
这两个参数就是mapred-site.xml里面mapred.job.tracker里面的ip和port
DFS Master 这个框里
Host:就是namenode所在的集群机器,这里写localhost
Port:就是namenode的port,这里写8888
这两个参数就是core-site.xml里面fs.default.name里面的ip和port
(Use M/R master host,这个复选框如果选上,就默认和Map/Reduce Master这个框里的host一样,如果不选择,就可以自己定义输入,这里jobtracker 和namenode在一个机器上,所以是一样的,就勾选上)
user name:这个是连接hadoop的用户名,因为我是用lsq用户安装的hadoop,而且没建立其他的用户,所以就用lsq。下面的不用填写。
然后点击finish按钮,此时,这个视图中就有多了一条记录。
重启myeclipse并重新编辑刚才建立的那个连接记录,现在我们编辑advance parameters tab页

(重启编辑advance parameters tab页原因:在新建连接的时候,这个advance paramters tab页面的一些属性会显示不出来,显示不出来也就没法设置,所以必须重启一下eclipse再进来编辑才能看到)
这里大部分的属性都已经自动填写上了,其实就是把core-defaulte.xml、hdfs-defaulte.xml、mapred-defaulte.xml里面的一些配置属性展示出来。因为在安装hadoop的时候,其site系列配置文件里有改动,所以这里也要弄成一样的设置。主要关注的有以下属性:
fs.defualt.name:这个在General tab页已经设置了
mapred.job.tracker:这个在General tab页也设置了
dfs.replication:这个这里默认是3,因为我在hdfs-site.xml里面设置成了1,所以这里也要设置成1
hadoop.job.ugi:这里要填写:lsq,Tardis,逗号前面的是连接的hadoop的用户,逗号后面就写死Tardis(这个属性不知道我怎么没有...)
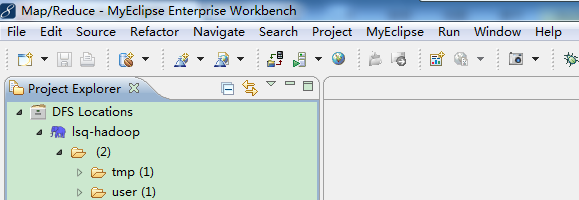
然后点击finish,然后就连接上了(先要启动sshd服务,启动hadoop进程),连接上的标志如图:
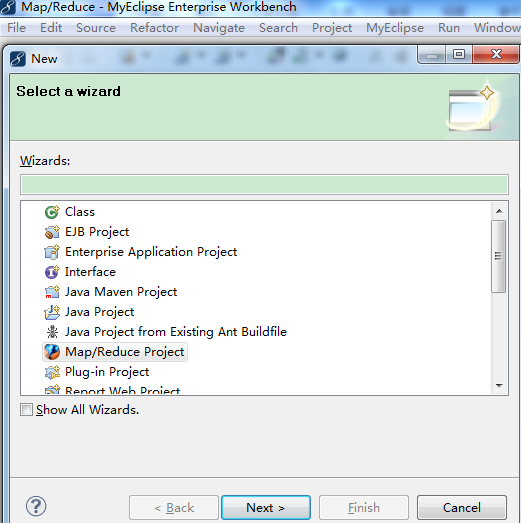
5、新建Map/Reduce Project:
【File】->【New】->【Project...】->【Map/Reduce】->【Map/Reduce Project】->【Project name: WordCount】->【Configure Hadoop install directory...】->【Hadoop installation directory: D:\cygwin\home\lsq\hadoop-0.20.2】->【Apply】->【OK】->【Next】->【Allow output folders for source folders】->【Finish】
6、新建WordCount类:

添加/编写源代码:
package org.apache.hadoop.examples;
import java.io.IOException;
import java.util.StringTokenizer;
import org.apache.hadoop.conf.Configuration;
import org.apache.hadoop.fs.Path;
import org.apache.hadoop.io.IntWritable;
import org.apache.hadoop.io.Text;
import org.apache.hadoop.mapreduce.Job;
import org.apache.hadoop.mapreduce.Mapper;
import org.apache.hadoop.mapreduce.Reducer;
import org.apache.hadoop.mapreduce.lib.input.FileInputFormat;
import org.apache.hadoop.mapreduce.lib.output.FileOutputFormat;
import org.apache.hadoop.util.GenericOptionsParser;
public class WordCount {
public static class TokenizerMapper
extends Mapper<Object, Text, Text, IntWritable>{
private final static IntWritable one = new IntWritable(1);
private Text word = new Text();
public void map(Object key, Text value, Context context
) throws IOException, InterruptedException {
StringTokenizer itr = new StringTokenizer(value.toString());
while (itr.hasMoreTokens()) {
word.set(itr.nextToken());
context.write(word, one);
}
}
}
public static class IntSumReducer
extends Reducer<Text,IntWritable,Text,IntWritable> {
private IntWritable result = new IntWritable();
public void reduce(Text key, Iterable<IntWritable> values,
Context context
) throws IOException, InterruptedException {
int sum = 0;
for (IntWritable val : values) {
sum += val.get();
}
result.set(sum);
context.write(key, result);
}
}
public static void main(String[] args) throws Exception {
Configuration conf = new Configuration();
String[] otherArgs = new GenericOptionsParser(conf, args).getRemainingArgs();
if (otherArgs.length != 2) {
System.err.println("Usage: wordcount <in> <out>");
System.exit(2);
}
Job job = new Job(conf, "word count");
job.setJarByClass(WordCount.class);
job.setMapperClass(TokenizerMapper.class);
job.setCombinerClass(IntSumReducer.class);
job.setReducerClass(IntSumReducer.class);
job.setOutputKeyClass(Text.class);
job.setOutputValueClass(IntWritable.class);
FileInputFormat.addInputPath(job, new Path(otherArgs[0]));
FileOutputFormat.setOutputPath(job, new Path(otherArgs[1]));
System.exit(job.waitForCompletion(true) ? 0 : 1);
}
}
7、上传模拟数据文件夹。
为了运行程序,需要一个输入的文件夹和输出的文件夹。输出文件夹,在程序运行完成后会自动生成。我们需要给程序一个输入文件夹。
(1)、在当前目录(如hadoop安装目录)下新建文件夹input,并在文件夹下新建两个文件file1、file2,这两个文件内容分别如下:
file1
- Hello World Bye World
- Hello Hadoop Goodbye Hadoop
(2)、.将文件夹input上传到分布式文件系统中。
在已经启动Hadoop守护进程终端中cd 到hadoop安装目录,运行下面命令:
- bin/hadoop fs -put input in
①在新建的项目WordCount,点击WordCount.java,右键-->Run As-->Run Configurations
②在弹出的Run Configurations对话框中,点Java Application,右键-->New,这时会新建一个application名为WordCount
③配置运行参数,点Arguments,在Program arguments中输入“你要传给程序的输入文件夹和你要求程序将计算结果保存的文件夹”,如:

(如果运行时报java.lang.OutOfMemoryError: Java heap space 配置VM arguments(在Program arguments下)
-Xms512m -Xmx1024m -XX:MaxPermSize=256m
8、点击Run,运行程序
点击Run,运行程序,过段时间将运行完成,等运行结束后,可以在终端中用命令如下,查看是否生成文件夹output:
bin/hadoop fs -ls
用下面命令查看生成的文件内容:
bin/hadoop fs -cat output/*
如果显示如下,说明已经成功在myeclipse下运行第一个MapReduce程序了。
- Bye 1
- Goodbye 1
- Hadoop 2
- Hello 2
- World 2


 6390
6390


 被折叠的 条评论
为什么被折叠?
被折叠的 条评论
为什么被折叠?
 到【灌水乐园】发言


