iOS10发布以来,相信各位开发者能踩的坑也应该踩得差不多了;但也许正是因为每次苹果都会更新比较多的东西,才会觉得搞iOS很有意思吧。(不知道大家会不会觉得楼主这种想法有点坑?)
推送是iOS10系统变动比较大的一个地方,对于这种大变动不瞅瞅一下着实不符合楼主的性格,那么楼主就在求知欲的推动下(毕竟还得给自己的项目进行适配不是..)就花了点时间对UserNotifications这个框架进行了一个整体的了解,希望在这里记录一下,希望能够帮助对这个框架有兴趣的小伙伴。
如果大家的项目中推送是使用了极光、友盟等第三方推送,那么请根据他们的官方文档以及最新的SDK对iOS10进行适配即可,跟着文档一步一步走也比较简单。但是如果想要真实的了解原框架的流程,建议还是使用原生推送吧,楼主本文博客下使用的就是原生推送。
如何配置原生推送,推荐有梦想的蜗牛 一步一步教你做ios推送,这位博主写的很详细,虽然开发者界面已经不是那样子了,但实质的东西还是没有变化的。如果按照推荐博文的配置(!一定要确认所有的配置都没有问题!),但依旧收不到远程推送,那么估计就和楼主一样“中奖”了,可能是PHP端交互出问题了,这个时候推荐大家使用PushMeBody来完成远程推送。(使用PushMesBody中的device token直接复制打印的device token即可,不需要去掉空格)
为了能够区分它与之前用法的异同,楼主还是尽可能的想通过比较的方法实现推送的相关功能。
所有coding都在 RITL/RITLPushNoticationDemo(如果有帮助,请Star表示支持一下,感谢)。
如果有什么问题,也请及时指出,共同进步,感谢。
推送的注册
注册的位置没有任何的变化,是在Appdelegate中的-application: didFinishLaunchingWithOptions:方法里面进行注册,楼主为了简化它的代码,将注册功能封装成了一个RITLNotificationManager类,所以该方法下只需一句话即可:
- (BOOL)application:(UIApplication *)application didFinishLaunchingWithOptions:(NSDictionary *)launchOptions {
[UIApplication sharedApplication].applicationIconBadgeNumber = 0;
[[RITLNotificationManager sharedInstance]registerRemoteNotificationsApplication:self];
return YES;
}
注册具体代码实现
RITLNotificationManager的声明(楼主在声明文件中使用了预编译进行方法的声明,实际的开发中建议不要这么写,将方法分开便是,不同的版本使用不同的方法即可)以及实现方法如下:
#ifdef __IPHONE_10_0
- (void)registerRemoteNotificationsApplication:(id<UNUserNotificationCenterDelegate>)application;
#else
- (void)registerRemoteNotificationsApplication:(id)application;
#endif
#ifdef __IPHONE_10_0
-(void)registerRemoteNotificationsApplication:(id<UNUserNotificationCenterDelegate>)application
#else
- (void)registerRemoteNotificationsApplication:(id)application
#endif
{
#ifdef __IPHONE_10_0
[UNUserNotificationCenter currentNotificationCenter].delegate = application;
[[UNUserNotificationCenter currentNotificationCenter] requestAuthorizationWithOptions:UNAuthorizationOptionBadge|UNAuthorizationOptionSound|UNAuthorizationOptionAlert completionHandler:^(BOOL granted, NSError * _Nullable error) {
if (granted == true)
{
[[UIApplication sharedApplication]registerForRemoteNotifications];
}
}];
#else
#ifdef __IPHONE_8_0 //适配iOS 8
[[UIApplication sharedApplication] registerUserNotificationSettings:[UIUserNotificationSettings settingsForTypes:UIUserNotificationTypeBadge|UIUserNotificationTypeSound|UIUserNotificationTypeAlert categories:nil]];
[[UIApplication sharedApplication]registerForRemoteNotifications];
#else //适配iOS7
[[UIApplication sharedApplication] registerForRemoteNotificationTypes:UIRemoteNotificationTypeBadge | UIRemoteNotificationTypeSound | UIRemoteNotificationTypeAlert];
#endif
#endif
}
- 1
- 2
- 3
- 4
- 5
- 6
- 7
- 8
- 9
- 10
- 11
- 12
- 13
- 14
- 15
- 16
- 17
- 18
- 19
- 20
- 21
- 22
- 23
- 24
- 25
- 26
- 27
- 28
- 29
- 30
- 31
- 32
- 33
- 34
- 35
- 36
- 1
- 2
- 3
- 4
- 5
- 6
- 7
- 8
- 9
- 10
- 11
- 12
- 13
- 14
- 15
- 16
- 17
- 18
- 19
- 20
- 21
- 22
- 23
- 24
- 25
- 26
- 27
- 28
- 29
- 30
- 31
- 32
- 33
- 34
- 35
- 36
注册完毕进行的回调
这一部分iOS10没有发生变化,还是和之前一样,分为注册成功以及注册失败两个协议方法,方法就在类别RITLOriginPushAppDelegate+RITLNotificationManager:
-(void)application:(UIApplication *)application didRegisterForRemoteNotificationsWithDeviceToken:(NSData *)deviceToken
{
}
-(void)application:(UIApplication *)application didFailToRegisterForRemoteNotificationsWithError:(NSError *)error
{
NSLog(@"remoteNotice failture = %@",error.localizedDescription);
}
UserNotifications以前接收推送消息
在Demo中对AppDelegate新建了一个类别"RITLOriginPushAppDelegate+RITLOldNotification"来完成对之前推送消息的接收以及处理:
-(void)application:(UIApplication *)application didReceiveRemoteNotification:(NSDictionary *)userInfo
{
NSLog(@"%@",[[userInfo valueForKey:@"aps"] valueForKey:@"alert"]);
[self performSelector:NSSelectorFromString(@"__showAlert:") withObject:@"通过点击推送进入App" afterDelay:0];
}
- (void)application:(UIApplication *)application didReceiveRemoteNotification:(NSDictionary *)userInfo fetchCompletionHandler:(void (^)(UIBackgroundFetchResult result))completionHandler
{
completionHandler(UIBackgroundFetchResultNewData);
}
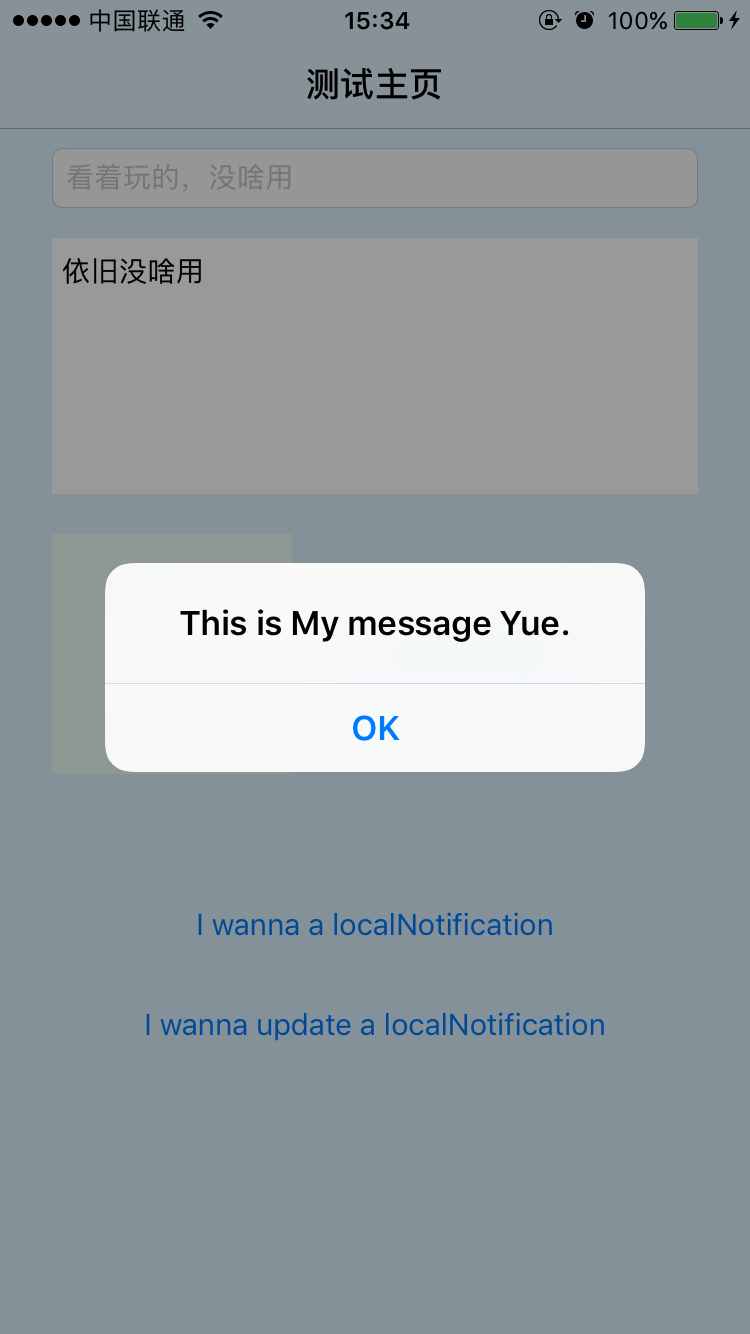
- (void)application:(UIApplication *)application didReceiveLocalNotification:(UILocalNotification *)notification
{
NSLog(@"本地推送啦!");
NSString * content = [NSString stringWithFormat:@"本地通知:title = %@, subTitle = %@",notification.alertBody,notification.alertTitle];
[self performSelector:NSSelectorFromString(@"__showAlert:") withObject:content afterDelay:1];
}
UserNotifications下的接收推送消息
由于UserNotifications不再对远程推送以及本地推送进行区分,所以只需实现UNUserNotificationCenterDelegate协议下的两个协议方法即可,楼主是将该方法写在了AppDelegate的另一类别中RITLOriginPushAppDelegate+RITLUserNotifications:
#pragma mark - <UNUserNotificationCenterDelegate>
- (void)userNotificationCenter:(UNUserNotificationCenter *)center willPresentNotification:(UNNotification *)notification withCompletionHandler:(void (^)(UNNotificationPresentationOptions options))completionHandler
{
if([UIApplication sharedApplication].applicationState == UIApplicationStateActive)
{
completionHandler(UNNotificationPresentationOptionSound | UNNotificationPresentationOptionAlert);
}
else
{
completionHandler(UNNotificationPresentationOptionBadge | UNNotificationPresentationOptionSound | UNNotificationPresentationOptionAlert);
}
}
- 1
- 2
- 3
- 4
- 5
- 6
- 7
- 8
- 9
- 10
- 11
- 12
- 13
- 14
- 15
- 16
- 17
- 1
- 2
- 3
- 4
- 5
- 6
- 7
- 8
- 9
- 10
- 11
- 12
- 13
- 14
- 15
- 16
- 17
- (void)userNotificationCenter:(UNUserNotificationCenter *)center didReceiveNotificationResponse:(UNNotificationResponse *)response withCompletionHandler:(void(^)())completionHandler
{
UNNotification * notification = response.notification;
UNNotificationRequest * request = notification.request;
UNNotificationContent * content = request.content;
NSString * alertString = content.body;
[self performSelector:NSSelectorFromString(@"__showAlert:") withObject:alertString afterDelay:1];
completionHandler();
}
- 1
- 2
- 3
- 4
- 5
- 6
- 7
- 8
- 9
- 10
- 11
- 12
- 13
- 14
- 15
- 16
- 17
- 18
- 19
- 20
- 21
- 22
- 23
- 24
- 25
- 26
- 27
- 28
- 29
- 30
- 31
- 32
- 1
- 2
- 3
- 4
- 5
- 6
- 7
- 8
- 9
- 10
- 11
- 12
- 13
- 14
- 15
- 16
- 17
- 18
- 19
- 20
- 21
- 22
- 23
- 24
- 25
- 26
- 27
- 28
- 29
- 30
- 31
- 32
远程推送阶段预览
以上配置完毕后,使用PushMeBaby进行推送预览一下,以下是推送的内容。
具体内容的格式如下:具体格式摘自简书博主linatan博文-iOS10-UserNotifications
{
"aps":
{
"alert":
{
"title":"hello",
"subtitle" : "Session 01",
"body":"it is a beautiful day"
},
"category":"helloIdentifier",
"badge":1,
"mutable-content":1,
"sound":"default",
"image":"https://picjumbo.imgix.net/HNCK8461.jpg?q=40&w=200&sharp=30"
}
}
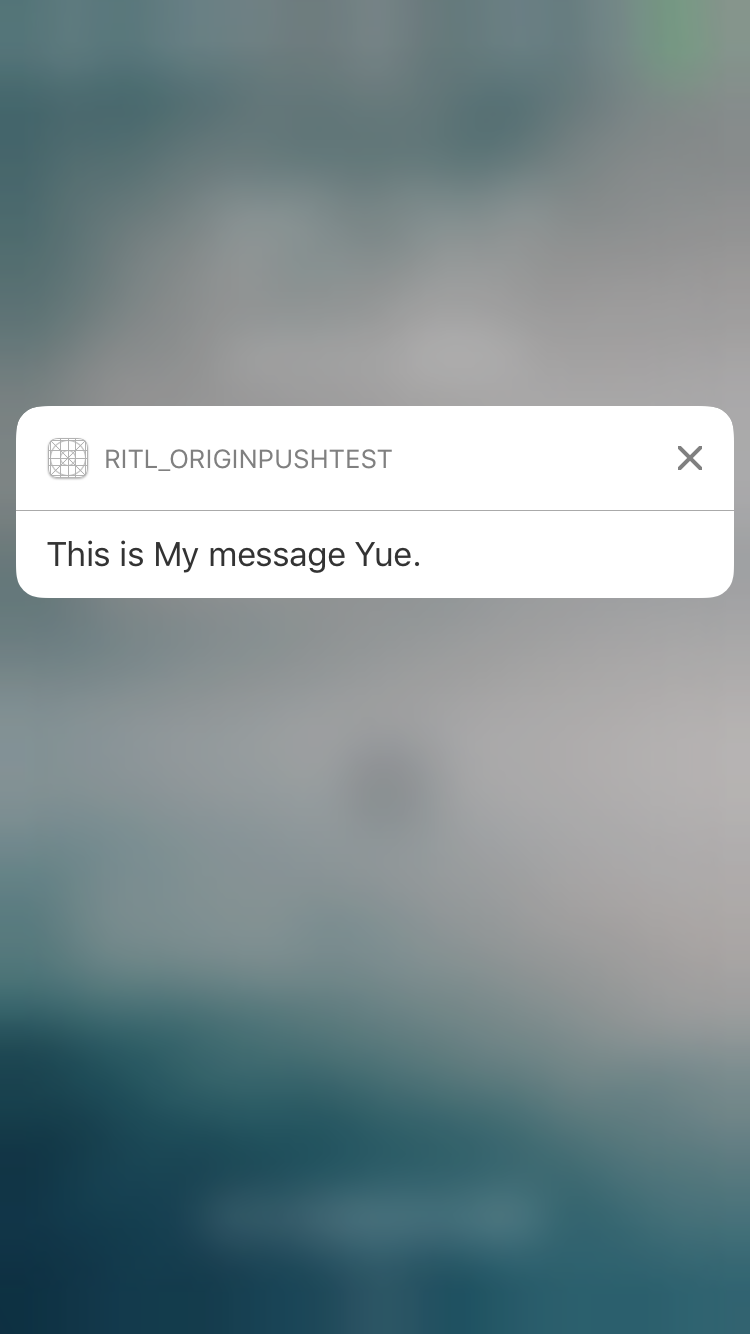
在进行测试的过程中,楼主使用的远程推送如下:
{
"aps":
{
"alert" : "This is My message Yue.",
"badge" : "1",
"mutable-content" : 1
}
}
self.payload = @"{\"aps\":{\"alert\":\"This is My message Yue.\",\"badge\":\"1\",\"mutable-content\":1}}";
后台接收的推送、响应3D Touch的推送以及点击推送进入App后的效果如下:
本地进行推送
项目中推送的声明类
对于Demo中大部分的测试,楼主都是使用了本地推送,所以楼主将推送功能封装成了RITLPushMessageManager类,声明方法如下:
- (void)pushLocationNotificationbeforeiOS10;
typedef NS_ENUM(NSUInteger, RITLPushMessageType)
{
RITLPushMessageTypeNew = 0, /**<默认为推送新的推送通知*/
RITLPushMessageTypeUpdate = 1, /**<更新当前的推送通知*/
};
- (void)pushLicationNotification:(nullable NSArray <UNNotificationAttachment *> *)attachments
pushType:(RITLPushMessageType)type NS_AVAILABLE_IOS(10_0);
UserNotifications以前本地推送
这个推送相信大家都是比较熟的了,使用iOS10建议废弃的UILocalNotification类,实现方法如下:
-(void)pushLocationNotificationbeforeiOS10
{
UILocalNotification * localNotification = [[UILocalNotification alloc]init];
localNotification.alertBody = @"RITL send a location notications (iOS9)";
#ifdef __IPHONE_8_2
localNotification.alertTitle = @"I am SubTitle";
#endif
localNotification.alertLaunchImage = @"Stitch.png";
#ifdef __IPHONE_8_0
localNotification.category = RITLRequestIdentifier;
#endif
localNotification.soundName = UILocalNotificationDefaultSoundName;
localNotification.applicationIconBadgeNumber = 1;
localNotification.fireDate = [NSDate dateWithTimeIntervalSinceNow:1];
[[UIApplication sharedApplication] scheduleLocalNotification:localNotification];
}
- 1
- 2
- 3
- 4
- 5
- 6
- 7
- 8
- 9
- 10
- 11
- 12
- 13
- 14
- 15
- 16
- 17
- 18
- 19
- 20
- 21
- 22
- 23
- 24
- 25
- 26
- 27
- 28
- 29
- 30
- 31
- 32
- 1
- 2
- 3
- 4
- 5
- 6
- 7
- 8
- 9
- 10
- 11
- 12
- 13
- 14
- 15
- 16
- 17
- 18
- 19
- 20
- 21
- 22
- 23
- 24
- 25
- 26
- 27
- 28
- 29
- 30
- 31
- 32
UserNotifications下的本地推送
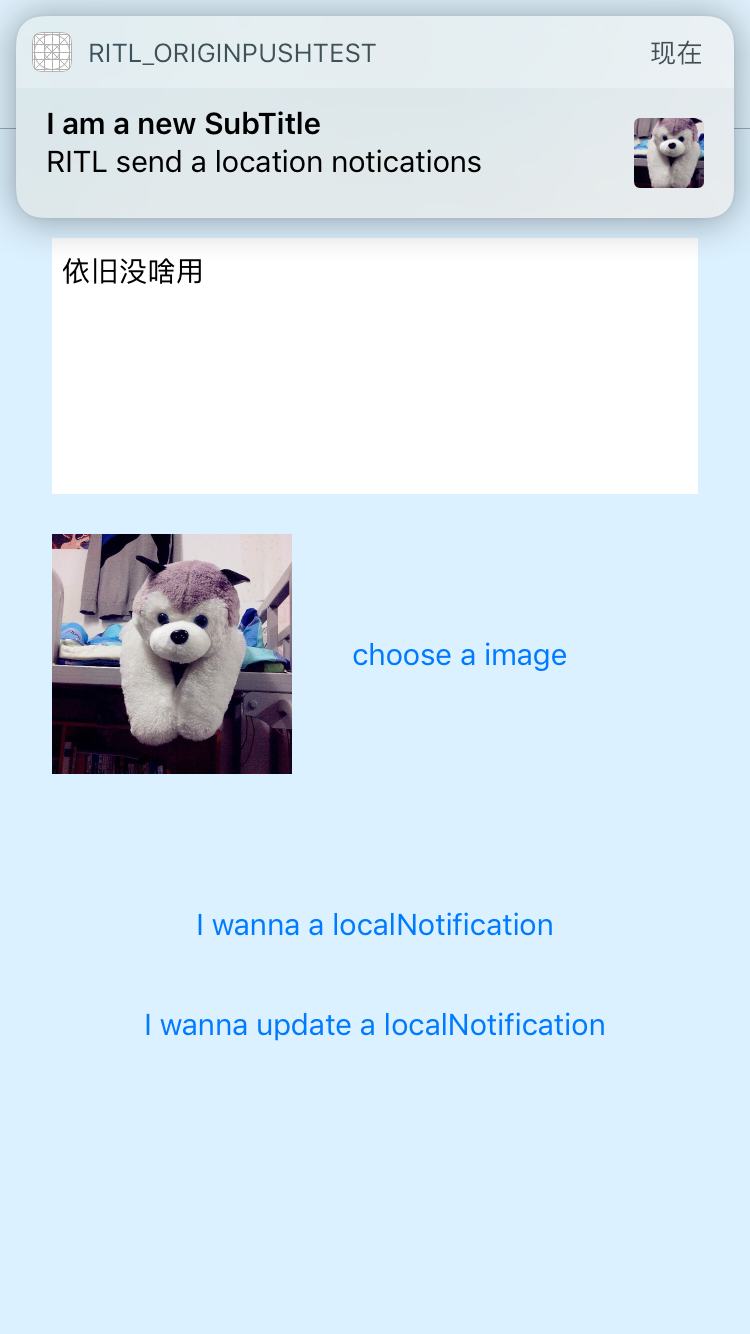
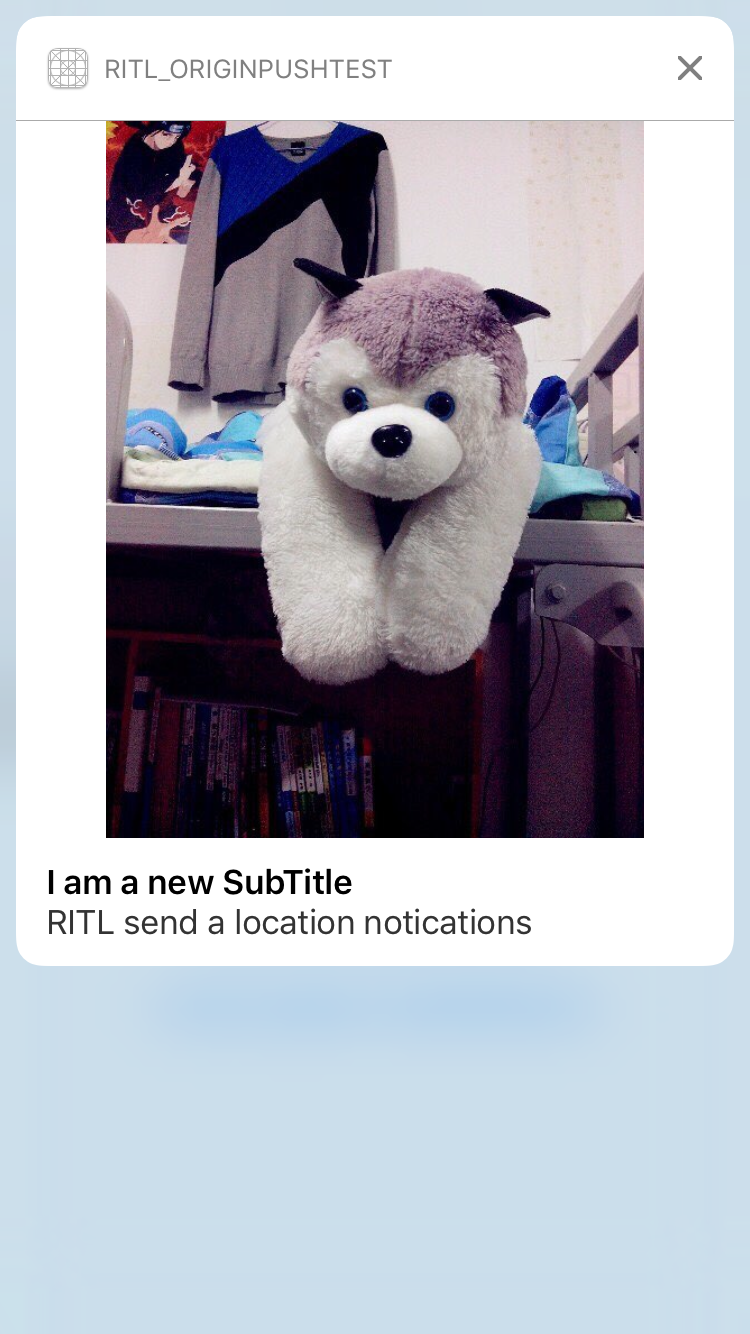
在新的框架下,所有的推送都是使用了UNNotificationRequest类,这里有一点需要注意: 媒体的url可以存储在UNNotificationAttachment类之中,但是必须是本地路径,如果是网络图,需要先从网络下载下来,存到本地,然后将本地的路径存储进行处理;如果UNNotificationAttachment对象初始化失败,会抛出异常,导致程序崩溃。比如Demo中就是通过选择相册的照片进行本地化,再赋值路径来进行的本地推送实现方法如下:
-(void)pushLicationNotification:(NSArray <UNNotificationAttachment *> *)attachments pushType:(RITLPushMessageType)type
{
NSString * subTitle = (type == RITLPushMessageTypeNew ? @"I am a new SubTitle" : @"I am a update SubTitle");
UNMutableNotificationContent * content = [[UNMutableNotificationContent alloc]init];
content.body = @"RITL send a location notications";
content.subtitle = subTitle;
content.launchImageName = @"Stitch.png";
content.categoryIdentifier = RITLRequestIdentifier;
content.sound = [UNNotificationSound defaultSound];
content.badge = @1;
content.userInfo = @{@"RITL":@"I am RITL.",@"network":@"https://www.baidu.com"};
content.attachments = attachments;
#pragma mark - 延时发送
UNTimeIntervalNotificationTrigger * trigger = [UNNotificationTrigger defaultTimeIntervalNotificationTrigger];
UNNotificationRequest * request = [UNNotificationRequest requestWithIdentifier:RITLRequestIdentifier content:content trigger:trigger];
if (type == RITLPushMessageTypeUpdate)
[[UNUserNotificationCenter currentNotificationCenter]removeDeliveredNotificationsWithIdentifiers:@[RITLRequestIdentifier]];
[[UNUserNotificationCenter currentNotificationCenter]addNotificationRequest:request withCompletionHandler:^(NSError * _Nullable error) {
if(error != nil)
{
NSLog(@"error = %@",error.localizedDescription);
}
}];
}
- 1
- 2
- 3
- 4
- 5
- 6
- 7
- 8
- 9
- 10
- 11
- 12
- 13
- 14
- 15
- 16
- 17
- 18
- 19
- 20
- 21
- 22
- 23
- 24
- 25
- 26
- 27
- 28
- 29
- 30
- 31
- 32
- 33
- 34
- 35
- 36
- 37
- 38
- 39
- 40
- 41
- 42
- 43
- 44
- 45
- 46
- 47
- 48
- 49
- 50
- 51
- 1
- 2
- 3
- 4
- 5
- 6
- 7
- 8
- 9
- 10
- 11
- 12
- 13
- 14
- 15
- 16
- 17
- 18
- 19
- 20
- 21
- 22
- 23
- 24
- 25
- 26
- 27
- 28
- 29
- 30
- 31
- 32
- 33
- 34
- 35
- 36
- 37
- 38
- 39
- 40
- 41
- 42
- 43
- 44
- 45
- 46
- 47
- 48
- 49
- 50
- 51
UNNotificationTrigger 消息触发类
可能名字翻译的不是那么正确,但个人的理解,它就是负责触发条件的,比如Demo中的类别UNNotificationTrigger+RITLConveniceInitialize中,为Demo提供了三种默认的触发条件,如下:
+(UNTimeIntervalNotificationTrigger *)defaultTimeIntervalNotificationTrigger
{
return [UNTimeIntervalNotificationTrigger triggerWithTimeInterval:1 repeats:false];
}
+(UNCalendarNotificationTrigger *)defaultCalendarNotificationTrigger
{
NSDateComponents * dateCompents = [NSDateComponents new];
dateCompents.hour = 7;
return [UNCalendarNotificationTrigger triggerWithDateMatchingComponents:dateCompents repeats:true];
}
+(UNLocationNotificationTrigger *)defaultLocationNotificationTrigger
{
CLLocationCoordinate2D coordinate2D = cooddinate2D(100,100);
CLCircularRegion * region = [[CLCircularRegion alloc]initWithCenter:coordinate2D radius:200 identifier:locationTriggerIdentifier];
return [UNLocationNotificationTrigger triggerWithRegion:region repeats:false];
}
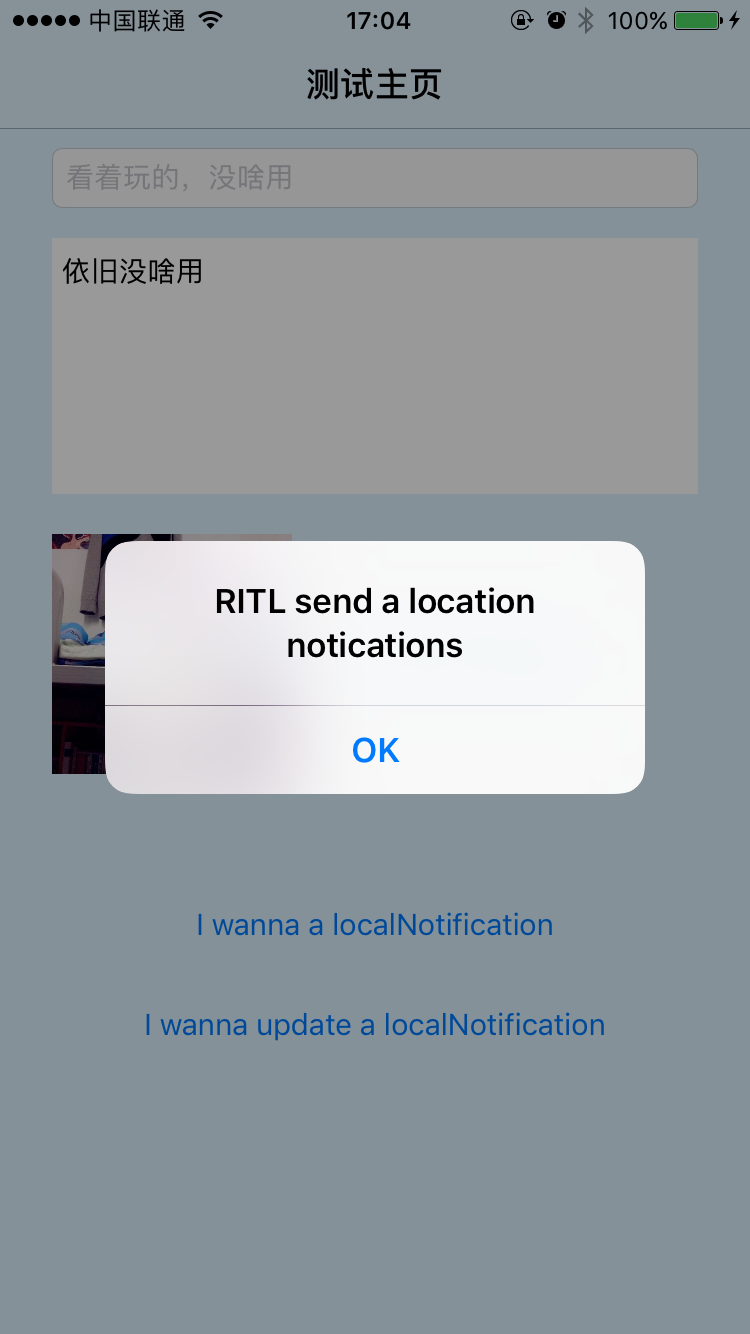
本地推送阶段预览
楼主选择使用在本地相册中选择一个图片来完成本地推送,大体思路如下:
+(NSArray<UNNotificationAttachment *> *)defaultNotificationAttachmentsWithImage:(UIImage *)image
{
if (image == nil) return nil;
NSMutableArray <UNNotificationAttachment *> * attachments = [NSMutableArray arrayWithCapacity:1];
[RITLPushFilesManager saveImage:image key:imageTransformPathKey];
NSError * error;
UNNotificationAttachment * attachment = [UNNotificationAttachment attachmentWithIdentifier:attachmentIdentifier URL:[RITLPushFilesManager imageUrlPathWithKey:imageTransformPathKey] options:nil error:&error];
NSAssert(error == nil, error.localizedDescription);
[attachments addObject:attachment];
return [attachments mutableCopy];
}
- 1
- 2
- 3
- 4
- 5
- 6
- 7
- 8
- 9
- 10
- 11
- 12
- 13
- 14
- 15
- 16
- 17
- 18
- 19
- 20
- 1
- 2
- 3
- 4
- 5
- 6
- 7
- 8
- 9
- 10
- 11
- 12
- 13
- 14
- 15
- 16
- 17
- 18
- 19
- 20
预览图如下:
推送消息的策略
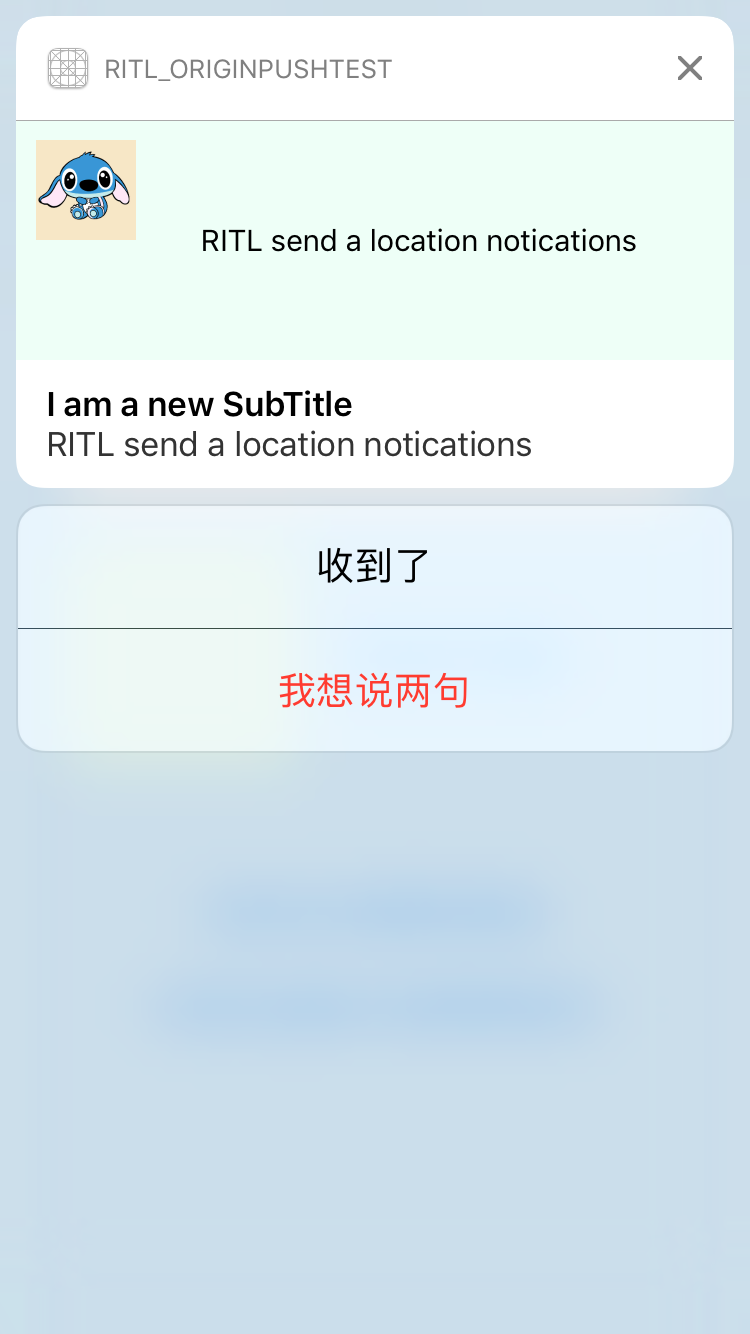
推送策略是什么呢,可以理解为推送的一个”类别”,当我们使用3D Touch得以响应推送信息之后,会出现类似的一排按钮,不过目前最大的限制为4个,并且最早出于iOS 8.0(那个时候没有3D Touch感应,怎么能唤出拓展呢? 如果能告知的小伙伴,也请告知一下楼主,十分感谢)
同样为了方便管理添加拓展,将添加拓展的方法封装成RITLPushCategoryManager类
UserNotifications之前推送策略
+(UIUserNotificationCategory *)addDefaultCategorysBeforeiOS10
{
UIMutableUserNotificationAction * foregroundAction = [UIMutableUserNotificationAction new];
foregroundAction.identifier = foregroundActionIdentifier;
foregroundAction.title = @"收到了";
foregroundAction.activationMode = UIUserNotificationActivationModeForeground;
UIMutableUserNotificationAction * destructiveTextAction = [UIMutableUserNotificationAction new];
destructiveTextAction.identifier = destructiveTextActionIdentifier;
destructiveTextAction.title = @"我想说两句";
destructiveTextAction.activationMode = UIUserNotificationActivationModeForeground;
destructiveTextAction.behavior = UIUserNotificationActionBehaviorTextInput;
destructiveTextAction.authenticationRequired = false;
destructiveTextAction.destructive = true;
UIMutableUserNotificationCategory * category = [UIMutableUserNotificationCategory new];
category.identifier = RITLRequestIdentifier;
[category setActions:@[foregroundAction,destructiveTextAction] forContext:UIUserNotificationActionContextDefault];
return [category copy];
}
- 1
- 2
- 3
- 4
- 5
- 6
- 7
- 8
- 9
- 10
- 11
- 12
- 13
- 14
- 15
- 16
- 17
- 18
- 19
- 20
- 21
- 22
- 23
- 24
- 25
- 26
- 27
- 28
- 29
- 30
- 31
- 32
- 33
- 34
- 35
- 1
- 2
- 3
- 4
- 5
- 6
- 7
- 8
- 9
- 10
- 11
- 12
- 13
- 14
- 15
- 16
- 17
- 18
- 19
- 20
- 21
- 22
- 23
- 24
- 25
- 26
- 27
- 28
- 29
- 30
- 31
- 32
- 33
- 34
- 35
UserNotifications下的推送策略
UserNotifications框架为我们提供了很多的便利初始化方法,从代码也可以看出它的简洁性,由于是单行,所以会显得比较长 (相信我,在这里换行格式也是很难看的,所以索性用了一行 0.0)
+(void)addDefaultCategorys
{
// 设置响应
UNNotificationAction * foregroundAction = [UNNotificationAction actionWithIdentifier:foregroundActionIdentifier title:@"收到了" options:UNNotificationActionOptionForeground];
// 设置文本响应
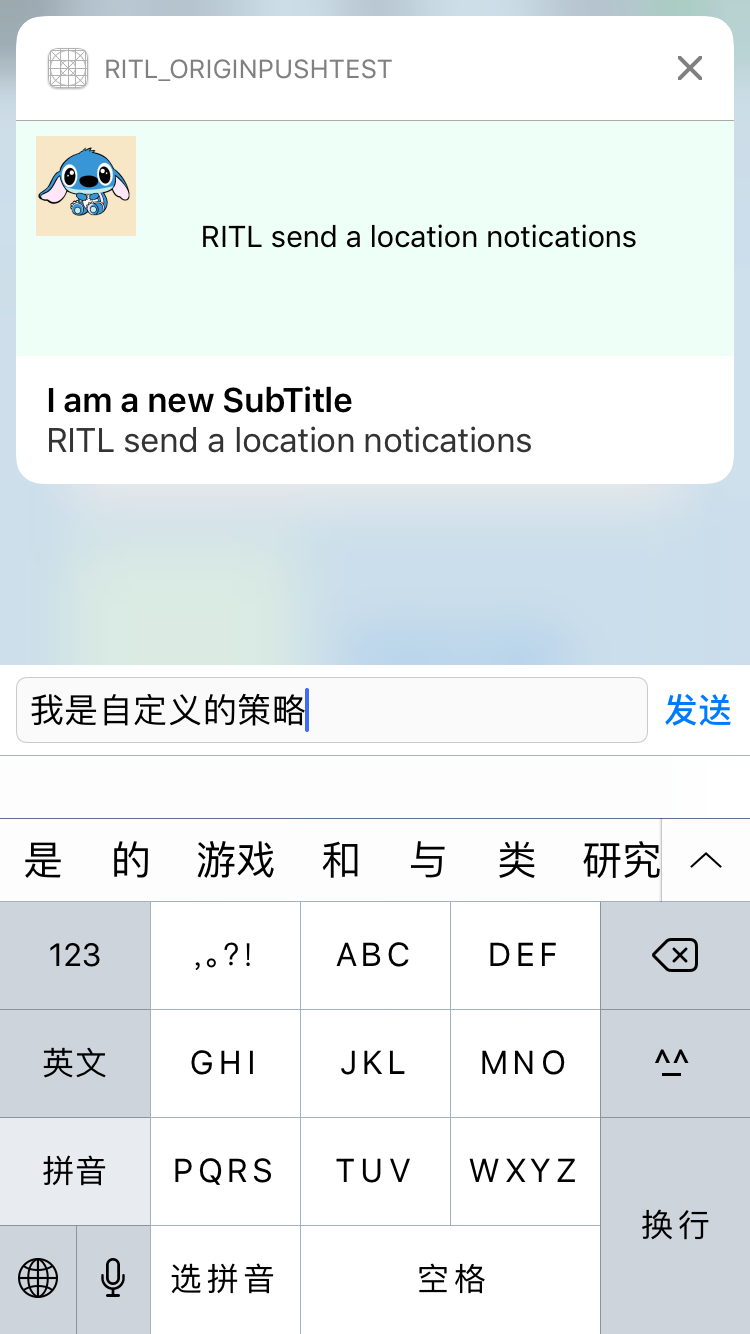
UNTextInputNotificationAction * destructiveTextAction = [UNTextInputNotificationAction actionWithIdentifier:destructiveTextActionIdentifier title:@"我想说两句" options:UNNotificationActionOptionDestructive|UNNotificationActionOptionForeground textInputButtonTitle:@"发送" textInputPlaceholder:@"想说什么?"];
// 初始化策略对象,这里的categoryWithIdentifier一定要与需要使用Category的UNNotificationRequest的identifier匹配(相同)才可触发
UNNotificationCategory * category = [UNNotificationCategory categoryWithIdentifier:RITLRequestIdentifier actions:@[foregroundAction,destructiveTextAction] intentIdentifiers:@[foregroundActionIdentifier,destructiveTextActionIdentifier] options:UNNotificationCategoryOptionCustomDismissAction];
//直接通过UNUserNotificationCenter设置策略即可
[[UNUserNotificationCenter currentNotificationCenter]setNotificationCategories:[NSSet setWithObjects:category, nil]];
}
响应策略的方式
如何响应我们添加的策略呢,这里就只介绍UserNotifications下的响应方法,找到负责响应最新推送协议方法的类别RITLOriginPushAppDelegate+RITLUserNotifications:
在- (void)userNotificationCenter:didReceiveNotificationResponse:withCompletionHandler:方法体最前面进行一下策略判定即可,如下:
if ([response.actionIdentifier isEqualToString:foregroundActionIdentifier])
{
[self performSelector:NSSelectorFromString(@"__showAlert:") withObject:@"我是第一个策略动作,收到了" afterDelay:0];
completionHandler();return;
}
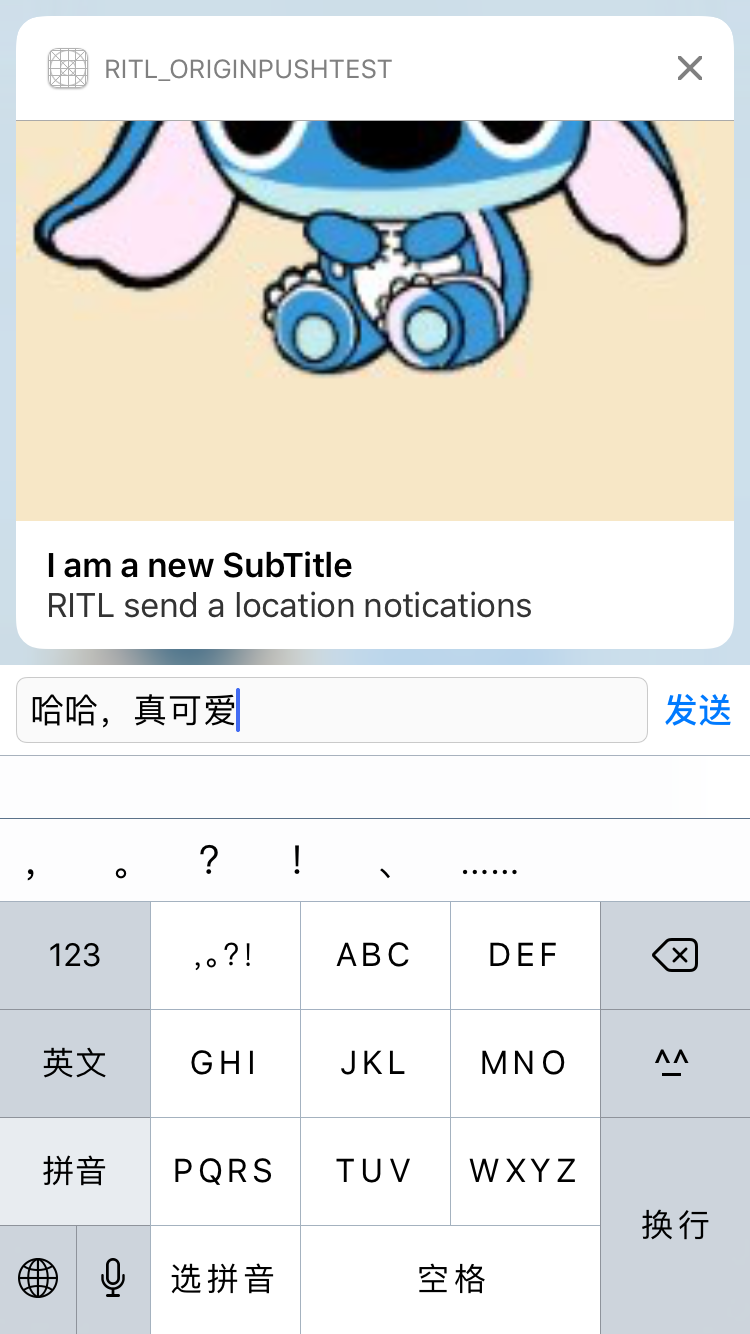
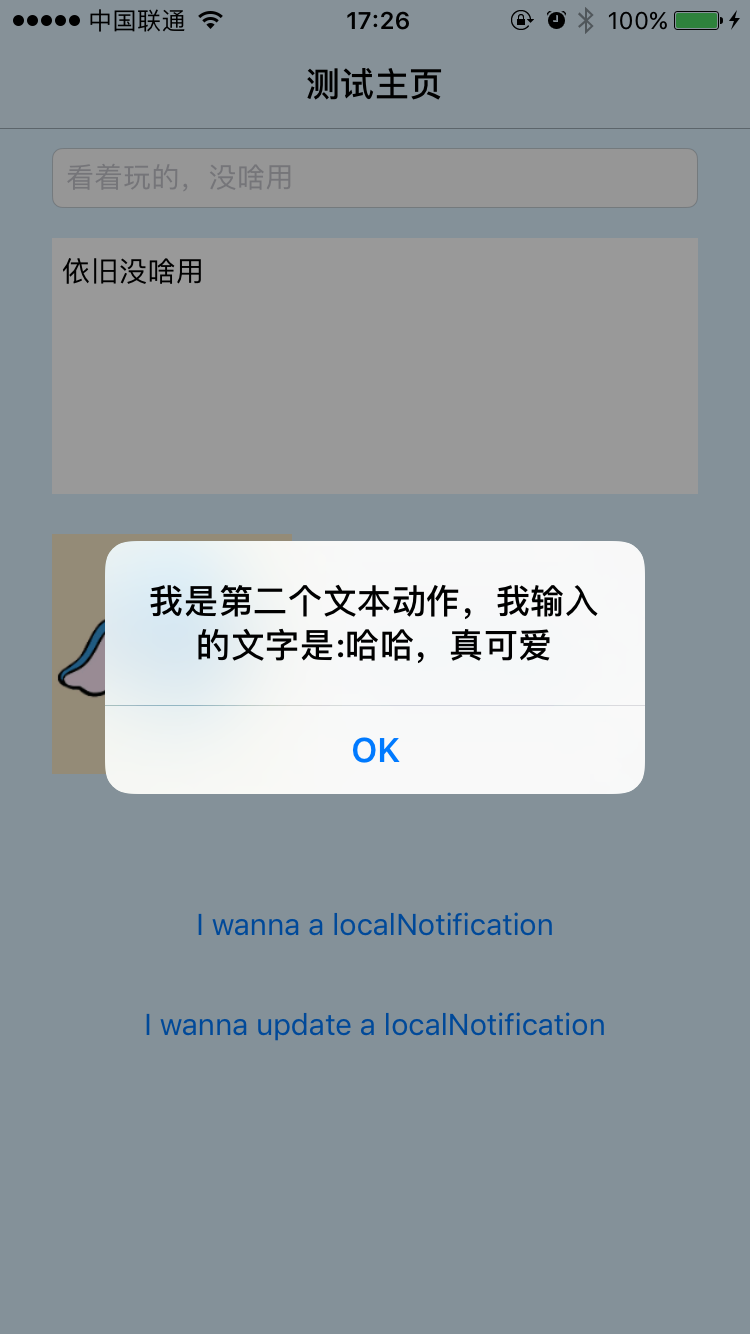
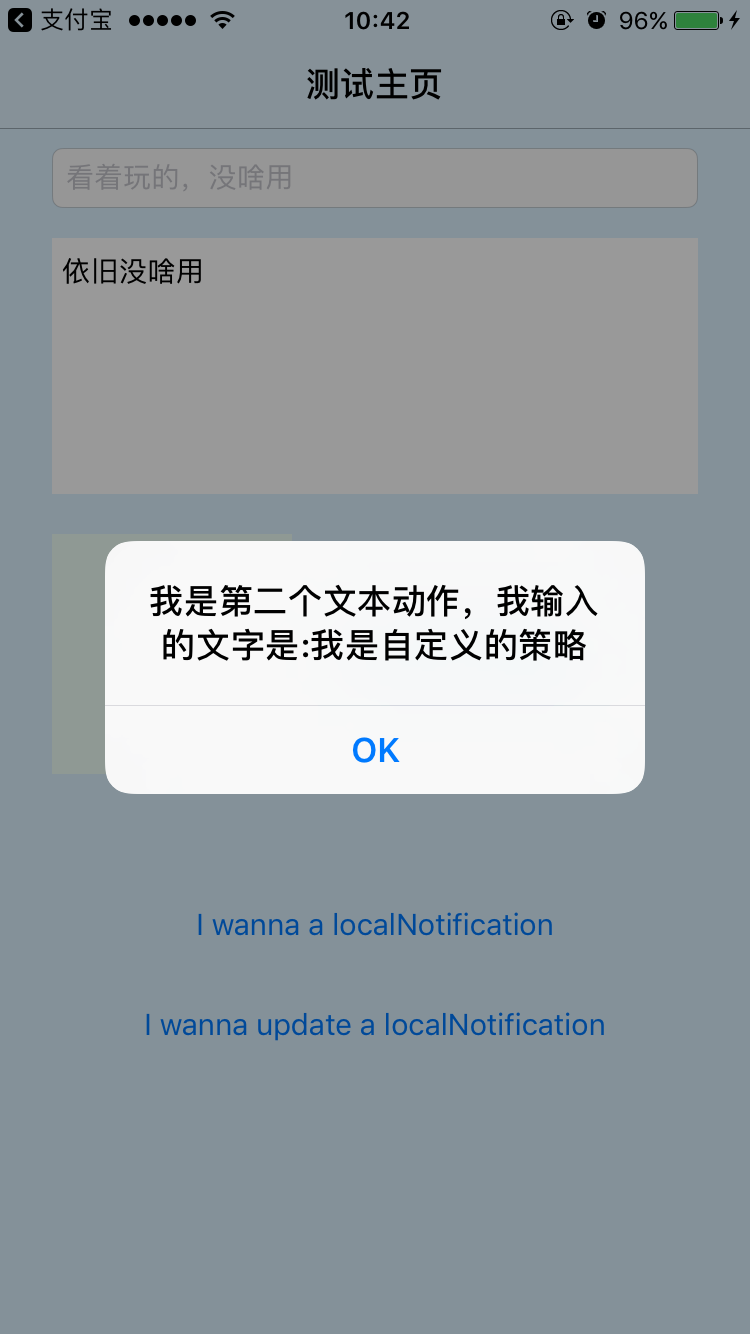
else if([response.actionIdentifier isEqualToString:destructiveTextActionIdentifier])
{
[self performSelector:NSSelectorFromString(@"__showAlert:") withObject:[NSString stringWithFormat:@"我是第二个文本动作,我输入的文字是:%@",((UNTextInputNotificationResponse *)response).userText] afterDelay:0];
completionHandler();return;
}
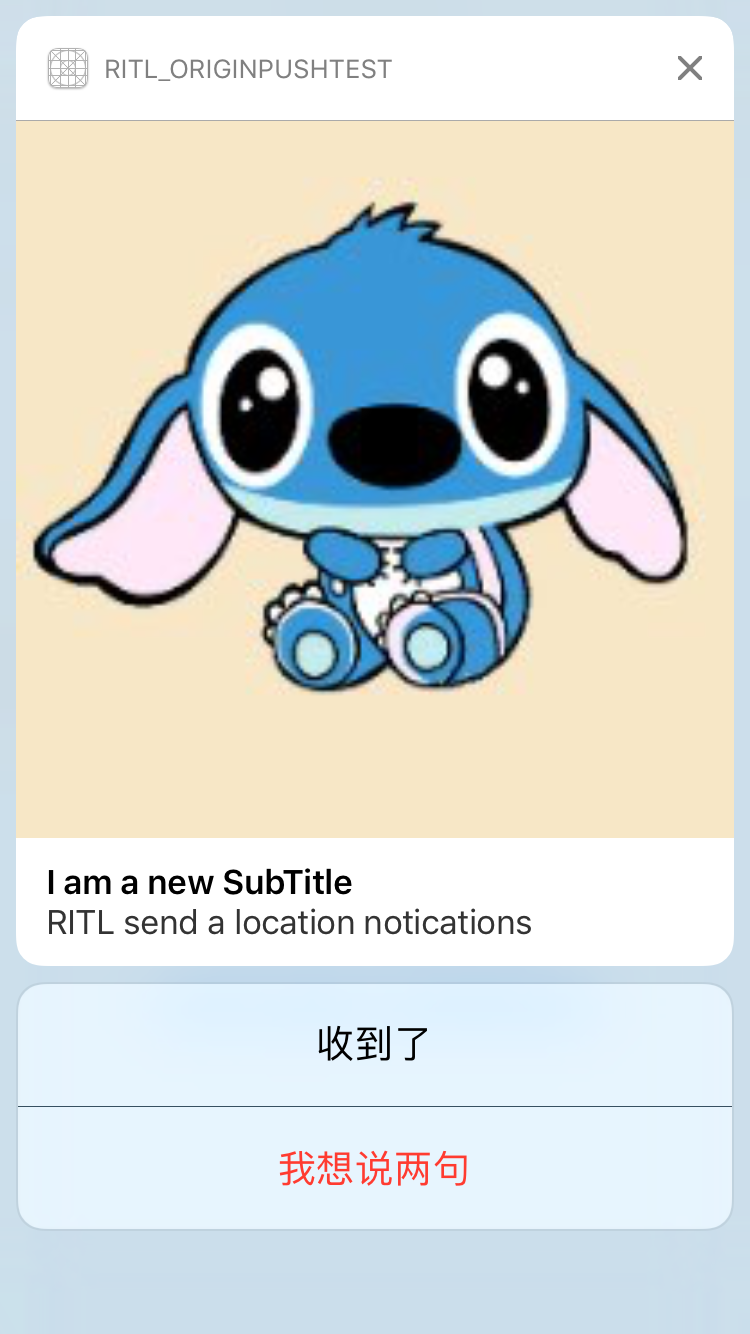
推送策略阶段预览
下面是通过Touch唤起推送策略、响应text策略以及响应策略的预览图
推送拓展插件-NotificationContentExtension
创建方式
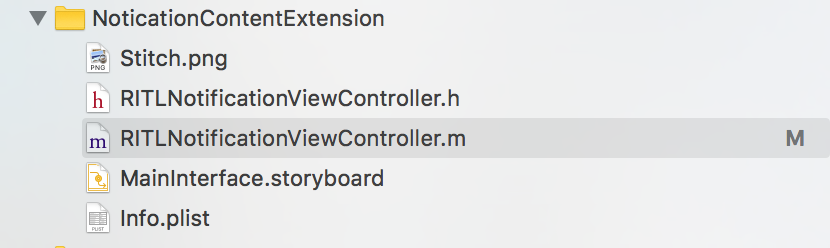
与Widget插件化开发的创建步骤是一样的呢,File->New->Target->NotificationContentExtension
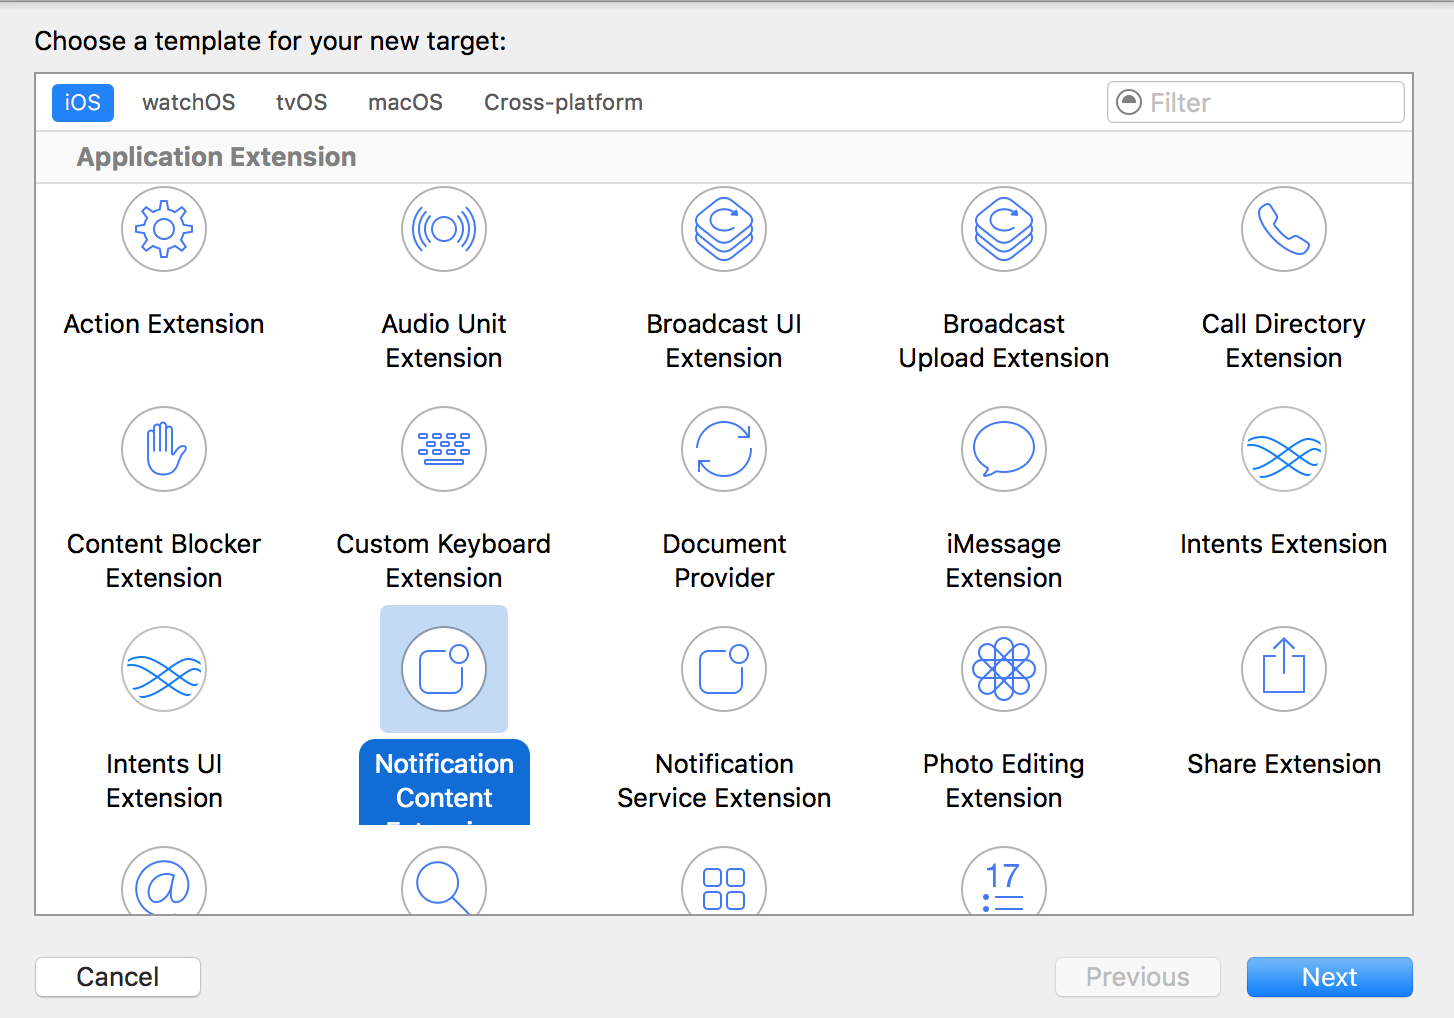
创建成功之后,默认的控制器名称为NotificationViewController,Demo中仅仅改了一下名字,文件夹分布如下:
如果牵扯到UI的绘制的方法,数据与代码的共享的方法,作为插件化开发其实是一致的,可回顾一下博主之前的博文iOS开发——Widget(Today Extension)插件化开发感谢。
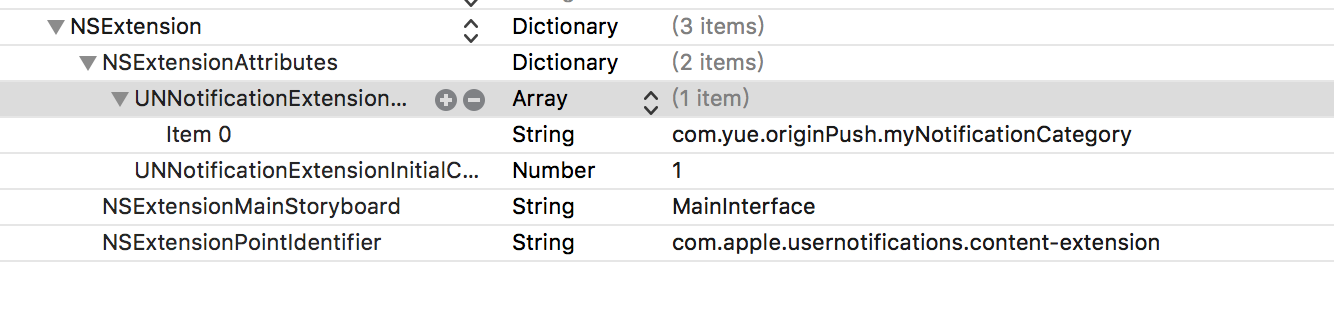
这里需要注意一下,如果我们创建了拓展,但是本地推送的UI如果还是默认的UI形式,这个时候就需要看一下Info.plist文件下 NSExtension->NSExtensionAttributes->UNNotificationExtensionCategory (默认是一个String类型),里面需要与UNNotificationRequest对象的identifier相匹配才可触发;如果支持多个通知,可以将UNNotificationExtensionCategory更改为数组类型。下面是一个栗子0.0
下面是Demo中进行本地推送中初始化UNNotificationRequest对象的具体代码形式:
NSString * const RITLRequestIdentifier = @"com.yue.originPush.myNotificationCategory";
UNNotificationRequest * request = [UNNotificationRequest requestWithIdentifier:RITLRequestIdentifier content:content trigger:trigger];
同时为了保证能够触发自定义的推送UI,Demo中的plist文件设置如下:
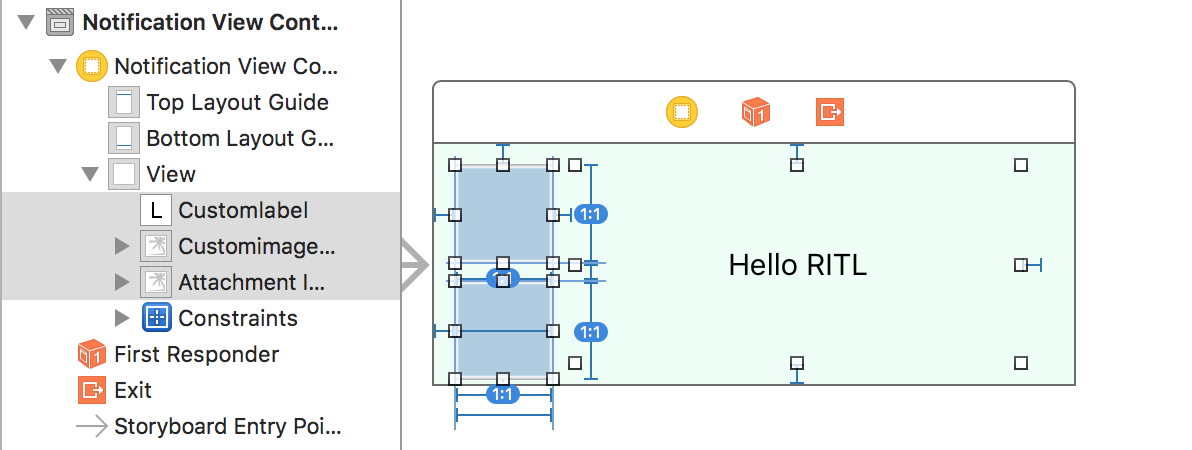
在Demo中,楼主依旧使用了storyboard进行UI布局,也只因为是研究框架,所以布局是非常的简单,如下:
UNNotificationContentExtension协议
这个协议也是比较简单的,只有两个协议方法,有一个必须实现的方法,也有一个可选的。
- (void)didReceiveNotification:(UNNotification *)notification
{
UNNotificationContent * content = notification.request.content;
NSString * customTitle = content.body;
UIImage * image = [UIImage imageNamed:content.launchImageName];
self.customlabel.text = customTitle;
self.customimageView.image = image;
self.attachmentImageView.image = nil;
}
- 1
- 2
- 3
- 4
- 5
- 6
- 7
- 8
- 9
- 10
- 11
- 12
- 13
- 14
- 15
- 16
- 17
- 18
- 19
- 20
- 21
- 22
- 23
- 24
- 1
- 2
- 3
- 4
- 5
- 6
- 7
- 8
- 9
- 10
- 11
- 12
- 13
- 14
- 15
- 16
- 17
- 18
- 19
- 20
- 21
- 22
- 23
- 24
下面这个协议方法是可选的。
它的作用就是,当我们使用自定义的UI进行通知显示的时候,通过点击或者响应策略Action的时候,会优先执行该协议方法,并通过它的回调来决定下一步的操作。
typedef NS_ENUM(NSUInteger, UNNotificationContentExtensionResponseOption)
{
UNNotificationContentExtensionResponseOptionDoNotDismiss,
UNNotificationContentExtensionResponseOptionDismiss,
UNNotificationContentExtensionResponseOptionDismissAndForwardAction,
};
// 展开后的推送消息得到点击响应
- (void)didReceiveNotificationResponse:(UNNotificationResponse *)response completionHandler:(void (^)(UNNotificationContentExtensionResponseOption option))completion
{
    //进行回调,这里是使其消失并回到主App进行处理,处理完毕之后会走UNUserNotificationCenter的协议方法
    completion(UNNotificationContentExtensionResponseOptionDismissAndForwardAction);
}
NotificationContentExtension阶段预览
下面是使用自定义的通知UI、使用策略输入文本以及最后响应文本的操作
推送拓展插件-NotificationServiceExtension
如果眼睛比较厉害的小伙伴估计上面的截图也看到了,在NotificationContentExtension旁边,如下图:

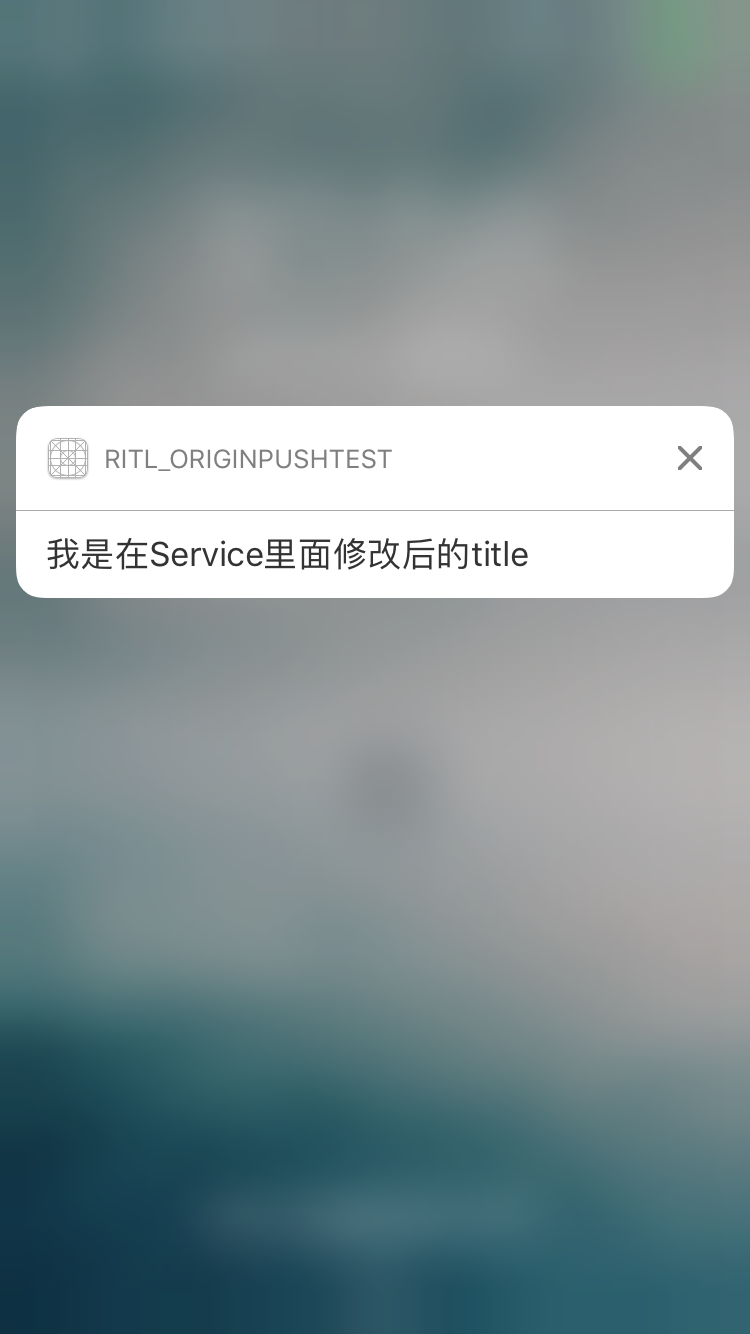
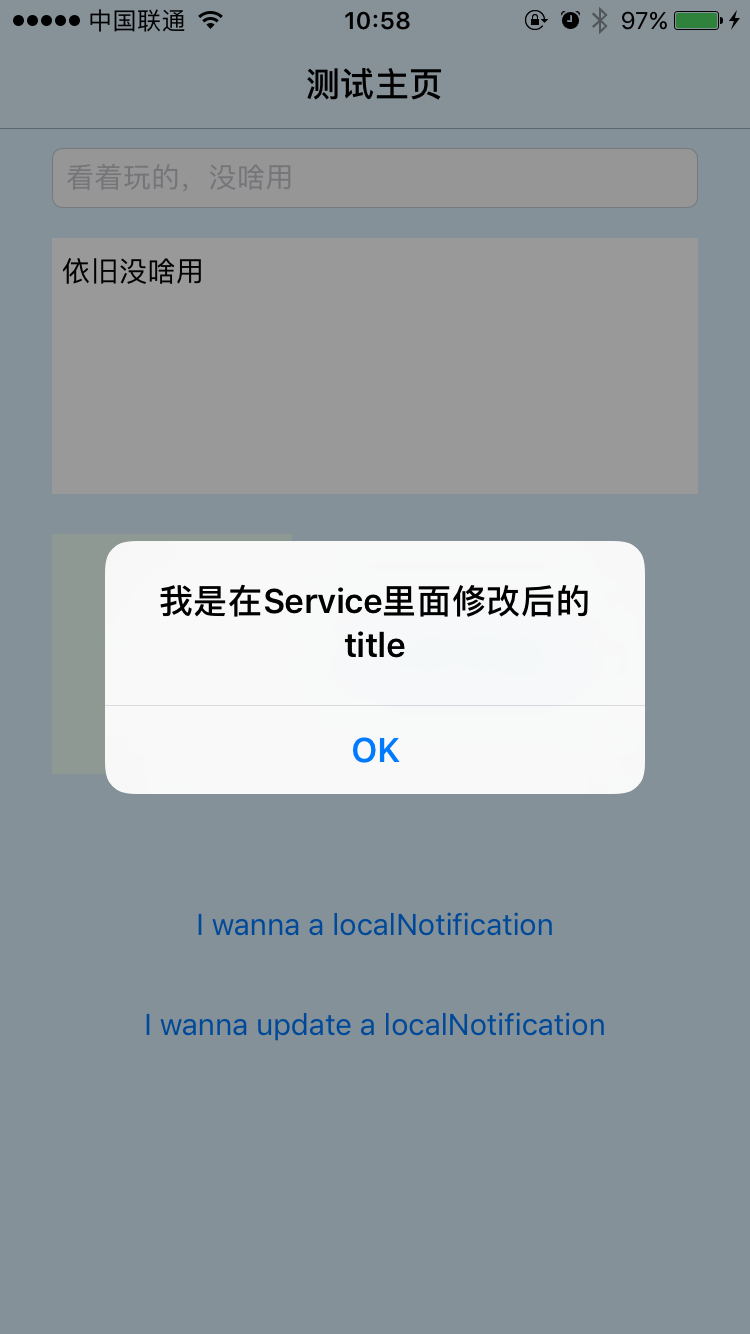
这个插件的作用是什么呢,当然这个插件主要是用于远程推送的数据处理,它能够给我们最长30秒的时间让我们对远程推送的内容进行修改,或者对推送内容中的图片、视频、音频链接进行下载的过程。
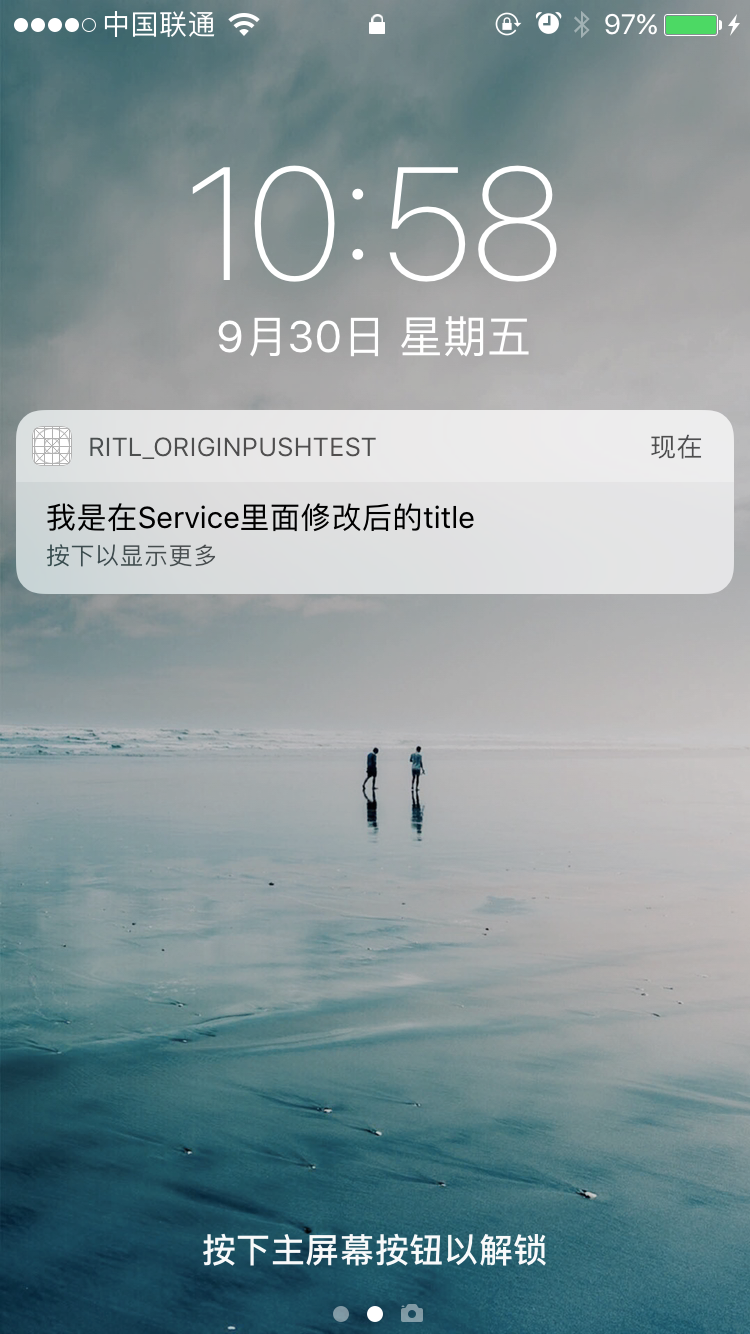
当然大部分的代码系统已经帮我们写好了,这里之贴上Demo中的一个小实现,作用就是在收到远程推送的时候,修改推送的内容,如下:
- (void)didReceiveNotificationRequest:(UNNotificationRequest *)request withContentHandler:(void (^)(UNNotificationContent * _Nonnull))contentHandler {
self.contentHandler = contentHandler;
self.bestAttemptContent = [request.content mutableCopy];
self.bestAttemptContent.body = @"我是在Service里面修改后的title";
self.contentHandler(self.bestAttemptContent);
}
- 1
- 2
- 3
- 4
- 5
- 6
- 7
- 8
- 9
- 10
- 11
- 12
- 13
- 14
- 15
- 16
- 17
- 18
- 1
- 2
- 3
- 4
- 5
- 6
- 7
- 8
- 9
- 10
- 11
- 12
- 13
- 14
- 15
- 16
- 17
- 18
下面的协议方法虽然能大体翻译出来,但却不知道到底有什么用,如果有知道的小伙伴,也请告知一下,十分感谢
- (void)serviceExtensionTimeWillExpire {
self.contentHandler(self.bestAttemptContent);
}
NotificationServiceExtension阶段预览
使用pushMeBody进行一次远程推送,Touch响应以及点击推送该内容结果如下:
更多的请在GitHub
出了文中提到的博文,最后还要感谢下面博文对该博文的帮助:
iOS 10 新特性之通知推送–干货一篇
活久见的重构 - iOS 10 UserNotifications 框架解析


 756
756


 被折叠的 条评论
为什么被折叠?
被折叠的 条评论
为什么被折叠?
 到【灌水乐园】发言


