


在前面已经跟大家分享了,自定义view概述,自定义view需要知道的方法,自定义类继承view,自定义组合控件。今天跟大家分享一下自定义类继承viewgroup,当初挖的坑也就快填完了(四种自定义view,今天是第三种),希望大家能有所收获。
1.自定义viewgroup和组合控件的区别
从目的来看:大部分情况下组合控件是用创建一个囊括逻辑和布局的视图的方式,达到重复使用而不用在不同的场合中写重复的代码目的,而自定义viewgroup是更倾向于自定义属性来定制 ViewGroup 中子视图的位置。
从实现方式来看:组合控件的一般需要加载一个已经写好的布局,声明方法来控制布局中写好的控件,不需要自己处理viewgroup的测量和布局的过程,比如自定义的App顶栏等。而自定义viewgroup一般是通过measure和layout来控制子view的位置,比如流式布局等。
2.ViewGroup概述
A ViewGroup is a special view that can contain other views (called children.) The view group is the base class for layouts and views containers. This class also defines the ViewGroup.LayoutParams class which serves as the base class for layouts parameters.
一个ViewGroup是一个可以包含其他view的特殊View,ViewGroup是各个Layout和View容器组件的基类。这个类还定义了ViewGroup.LayoutParams类来作为布局参数的基类。
LayoutParams are used by views to tell their parents how they want to be laid out.
The base LayoutParams class just describes how big the view wants to be for both width and height.
LayoutParams 通常是子view用来告诉父容器他们的位置。基类LayoutParams 仅仅描述了子view的宽和高。
3.ViewGroup和LayoutParams之间的关系
不知道大家有没有注意到,当我们在LinearLayout中写子View的时候,可以用layout_gravity,layout_weight属性;而zaiRelativeLayout中的子View有layout_centerInParent属性,却没有layout_gravity,layout_weight,这是为什么呢?这是因为每个ViewGroup需要指定一个LayoutParams,用于确定支持子View哪些属性。
4.Android绘制视图的方式
Layout is a two pass process: a measure pass and a layout pass. The measuring pass is implemented in measure(int, int) and is a top-down traversal of the view tree. Each view pushes dimension specifications down the tree during the recursion. At the end of the measure pass, every view has stored its measurements. The second pass happens in layout(int, int, int, int) and is also top-down. During this pass each parent is responsible for positioning all of its children using the sizes computed in the measure pass.
绘制布局由两个遍历过程组成: 测量过程和布局过程。 测量过程由 measure(int, int) 方法完成, 该方法从上到下遍历视图树。 在递归遍历过程中, 每个视图都会向下层传递尺寸和规格。 当measure 方法遍历结束, 每个视图都保存了各自的尺寸信息。 第二个过程由 layout(int, int, int,int) 方法完成, 该方法也是由上而下遍历视图树, 在遍历过程中, 每个父视图通过测量过程的结果定位所有子视图的位置信息。
5.自定义viewgroup的步骤
我们以官方文档中的demo为例。这是一个相对综合的例子,处理的几乎所有的布局情况。通过这个demo我们可以举一反三,把特殊情况简单。先看下效果图:
实现效果:自定义类继承viewgroup实现linearlayout横向摆放的效果,并且自定义属性“layout_position”来控制子view在水平方向的位置。
自定义类继承ViewGroup,并初始化
@RemoteViews.RemoteView
public class CustomLayout extends ViewGroup {
    /** The amount of space used by children in the left gutter. */
    private int mLeftWidth;

    /** The amount of space used by children in the right gutter.
     * 计算右侧的子view需要的空间。
     */
    private int mRightWidth;

    /** These are used for computing child frames based on their gravity.
     * 计算子view基于他们gravity的画面
     */
    private final Rect mTmpContainerRect = new Rect();
    private final Rect mTmpChildRect = new Rect();

    public CustomLayout(Context context) {
        super(context);
    }

    public CustomLayout(Context context, AttributeSet attrs) {
        this(context, attrs, 0);
    }

    public CustomLayout(Context context, AttributeSet attrs, int defStyle) {
        super(context, attrs, defStyle);
    }
}
这里需要注意的一点是,如果我们自定义的viewgroup不需要滚动的话,尽量重写shouldDelayChildPressedState方法,并返回false。
Return true if the pressed state should be delayed for children or descendants of this ViewGroup. Generally, this should be done for containers that can scroll, such as a List. This prevents the pressed state from appearing when the user is actually trying to scroll the content. The default implementation returns true for compatibility reasons. Subclasses that do not scroll should generally override this method and return false.
官方文档中的说明是,当返回false的时候,如果用户试图滚动内容,会阻止这个viewgroup出现按压状态。出于兼容的目的,这个方法默认是返回true的。
/**
 * Any layout manager that doesn't scroll will want this.
 */
@Override
public boolean shouldDelayChildPressedState() {
    return false;
}
为子视图添加自定义属性
<?xml version="1.0" encoding="utf-8"?>
<resources>

    <declare-styleable name="CustomLayoutLP">
        <attr name="android:layout_gravity"/>
        <attr name="layout_position">
            <enum name="middle" value="0"/>
            <enum name="left" value="1"/>
            <enum name="right" value="2"/>
        </attr>
    </declare-styleable>

</resources>
因为属性名的前缀是layout_,没有包含一个视图属性,因此该属性会被添加到LayoutParams的属性表中。
同时,在onMeasure方法之前,要先创建一个自定义的LayoutParams,该类用于存储每个子视图的gravity和position。
 /**
     * Custom per-child layout information.
     * 创建自定义 LayoutParams类, 该类用于保存每个子视图的信息(gravity,position)
     */
    public static class LayoutParams extends MarginLayoutParams {
        /**
         * The gravity to apply with the View to which these layout parameters
         * are associated.
         */
        public int gravity = Gravity.TOP | Gravity.START;

        public static int POSITION_MIDDLE = 0;
        public static int POSITION_LEFT = 1;
        public static int POSITION_RIGHT = 2;

        public int position = POSITION_MIDDLE;

        public LayoutParams(Context c, AttributeSet attrs) {
            super(c, attrs);

            // Pull the layout param values from the layout XML during
            // inflation.  This is not needed if you don't care about
            // changing the layout behavior in XML.
            TypedArray a = c.obtainStyledAttributes(attrs, R.styleable.CustomLayoutLP);
            gravity = a.getInt(R.styleable.CustomLayoutLP_android_layout_gravity, gravity);
            position = a.getInt(R.styleable.CustomLayoutLP_layout_position, position);
            a.recycle();
        }

        public LayoutParams(int width, int height) {
            super(width, height);
        }

        public LayoutParams(ViewGroup.LayoutParams source) {
            super(source);
        }
    }
要使用新定义的layoutparams,我们可能需要重写的方法为:
// The rest of the implementation is for custom per-child layout parameters.
    // If you do not need these (for example you are writing a layout manager
    // that does fixed positioning of its children), you can drop all of this.
 @Override
    public LayoutParams generateLayoutParams(AttributeSet attrs) {
        return new CustomLayout.LayoutParams(getContext(), attrs);
    }

    @Override
    protected LayoutParams generateDefaultLayoutParams() {
        return new LayoutParams(LayoutParams.MATCH_PARENT, LayoutParams.MATCH_PARENT);
    }

    @Override
    protected ViewGroup.LayoutParams generateLayoutParams(ViewGroup.LayoutParams p) {
        return new LayoutParams(p);
    }

    @Override
    protected boolean checkLayoutParams(ViewGroup.LayoutParams p) {
        return p instanceof LayoutParams;
}但是从注释中我们了解到:如果我们用不到这些方法,比如我们的viewgroup中的子view是固定的,那么我们可以丢掉他们。
重写onMeasure()方法
/**
     * Ask all children to measure themselves and compute the measurement of this
     * layout based on the children.
     * 令每个子视图测量自身,计算该viewgroup基于子view的尺寸
     */
    @Override
    protected void onMeasure(int widthMeasureSpec, int heightMeasureSpec) {
        int count = getChildCount();

        // These keep track of the space we are using on the left and right for
        // views positioned there; we need member variables so we can also use
        // these for layout later.
        mLeftWidth = 0;
        mRightWidth = 0;

        // Measurement will ultimately be computing these values.
        //使用宽和高计算布局的最终大小
        int maxHeight = 0;
        int maxWidth = 0;
        int childState = 0;

        // Iterate through all children, measuring them and computing our dimensions
        // from their size.
        //遍历所有的孩子,从他们的大小测量和计算我们的大小
        for (int i = 0; i < count; i++) {
            final View child = getChildAt(i);
            if (child.getVisibility() != GONE) {
                // Measure the child.
                //令每个子视图测量自身
                measureChildWithMargins(child, widthMeasureSpec, 0, heightMeasureSpec, 0);

                // Update our size information based on the layout params.  Children
                // that asked to be positioned on the left or right go in those gutters.
                final LayoutParams lp = (LayoutParams) child.getLayoutParams();
                if (lp.position == LayoutParams.POSITION_LEFT) {
                    mLeftWidth += Math.max(maxWidth,
                            child.getMeasuredWidth() + lp.leftMargin + lp.rightMargin);
                } else if (lp.position == LayoutParams.POSITION_RIGHT) {
                    mRightWidth += Math.max(maxWidth,
                            child.getMeasuredWidth() + lp.leftMargin + lp.rightMargin);
                } else {
                    maxWidth = Math.max(maxWidth,
                            child.getMeasuredWidth() + lp.leftMargin + lp.rightMargin);
                }
                maxHeight = Math.max(maxHeight,
                        child.getMeasuredHeight() + lp.topMargin + lp.bottomMargin);
                childState = combineMeasuredStates(childState, child.getMeasuredState());
            }
        }

        // Total width is the maximum width of all inner children plus the gutters.
        maxWidth += mLeftWidth + mRightWidth;

        // Check against our minimum height and width
        maxHeight = Math.max(maxHeight, getSuggestedMinimumHeight());
        maxWidth = Math.max(maxWidth, getSuggestedMinimumWidth());

        // Report our final dimensions.
        //使用计算的到的宽和高设置整个布局的测量尺寸
        setMeasuredDimension(resolveSizeAndState(maxWidth, widthMeasureSpec, childState),
                resolveSizeAndState(maxHeight, heightMeasureSpec,
                        childState << MEASURED_HEIGHT_STATE_SHIFT));
    }
最后一步为onLayout()方法
/**
     * Position all children within this layout.
     */
    @Override
    protected void onLayout(boolean changed, int left, int top, int right, int bottom) {
        final int count = getChildCount();

        // These are the far left and right edges in which we are performing layout.
        int leftPos = getPaddingLeft();
        int rightPos = right - left - getPaddingRight();

        // This is the middle region inside of the gutter.
        final int middleLeft = leftPos + mLeftWidth;
        final int middleRight = rightPos - mRightWidth;

        // These are the top and bottom edges in which we are performing layout.
        final int parentTop = getPaddingTop();
        final int parentBottom = bottom - top - getPaddingBottom();

        for (int i = 0; i < count; i++) {
            final View child = getChildAt(i);
            if (child.getVisibility() != GONE) {
                final LayoutParams lp = (LayoutParams) child.getLayoutParams();

                final int width = child.getMeasuredWidth();
                final int height = child.getMeasuredHeight();

                // Compute the frame in which we are placing this child.
                if (lp.position == LayoutParams.POSITION_LEFT) {
                    mTmpContainerRect.left = leftPos + lp.leftMargin;
                    mTmpContainerRect.right = leftPos + width + lp.rightMargin;
                    leftPos = mTmpContainerRect.right;
                } else if (lp.position == LayoutParams.POSITION_RIGHT) {
                    mTmpContainerRect.right = rightPos - lp.rightMargin;
                    mTmpContainerRect.left = rightPos - width - lp.leftMargin;
                    rightPos = mTmpContainerRect.left;
                } else {
                    mTmpContainerRect.left = middleLeft + lp.leftMargin;
                    mTmpContainerRect.right = middleRight - lp.rightMargin;
                }
                mTmpContainerRect.top = parentTop + lp.topMargin;
                mTmpContainerRect.bottom = parentBottom - lp.bottomMargin;

                // Use the child's gravity and size to determine its final
                // frame within its container.
                Gravity.apply(lp.gravity, width, height, mTmpContainerRect, mTmpChildRect);

                // Place the child.
                //放置子view
                child.layout(mTmpChildRect.left, mTmpChildRect.top,
                        mTmpChildRect.right, mTmpChildRect.bottom);
            }
        }
    }
上述逻辑并不复杂,循环调用子view的onlayout方法,根据onMeasure的到的参数对子view进行布局。
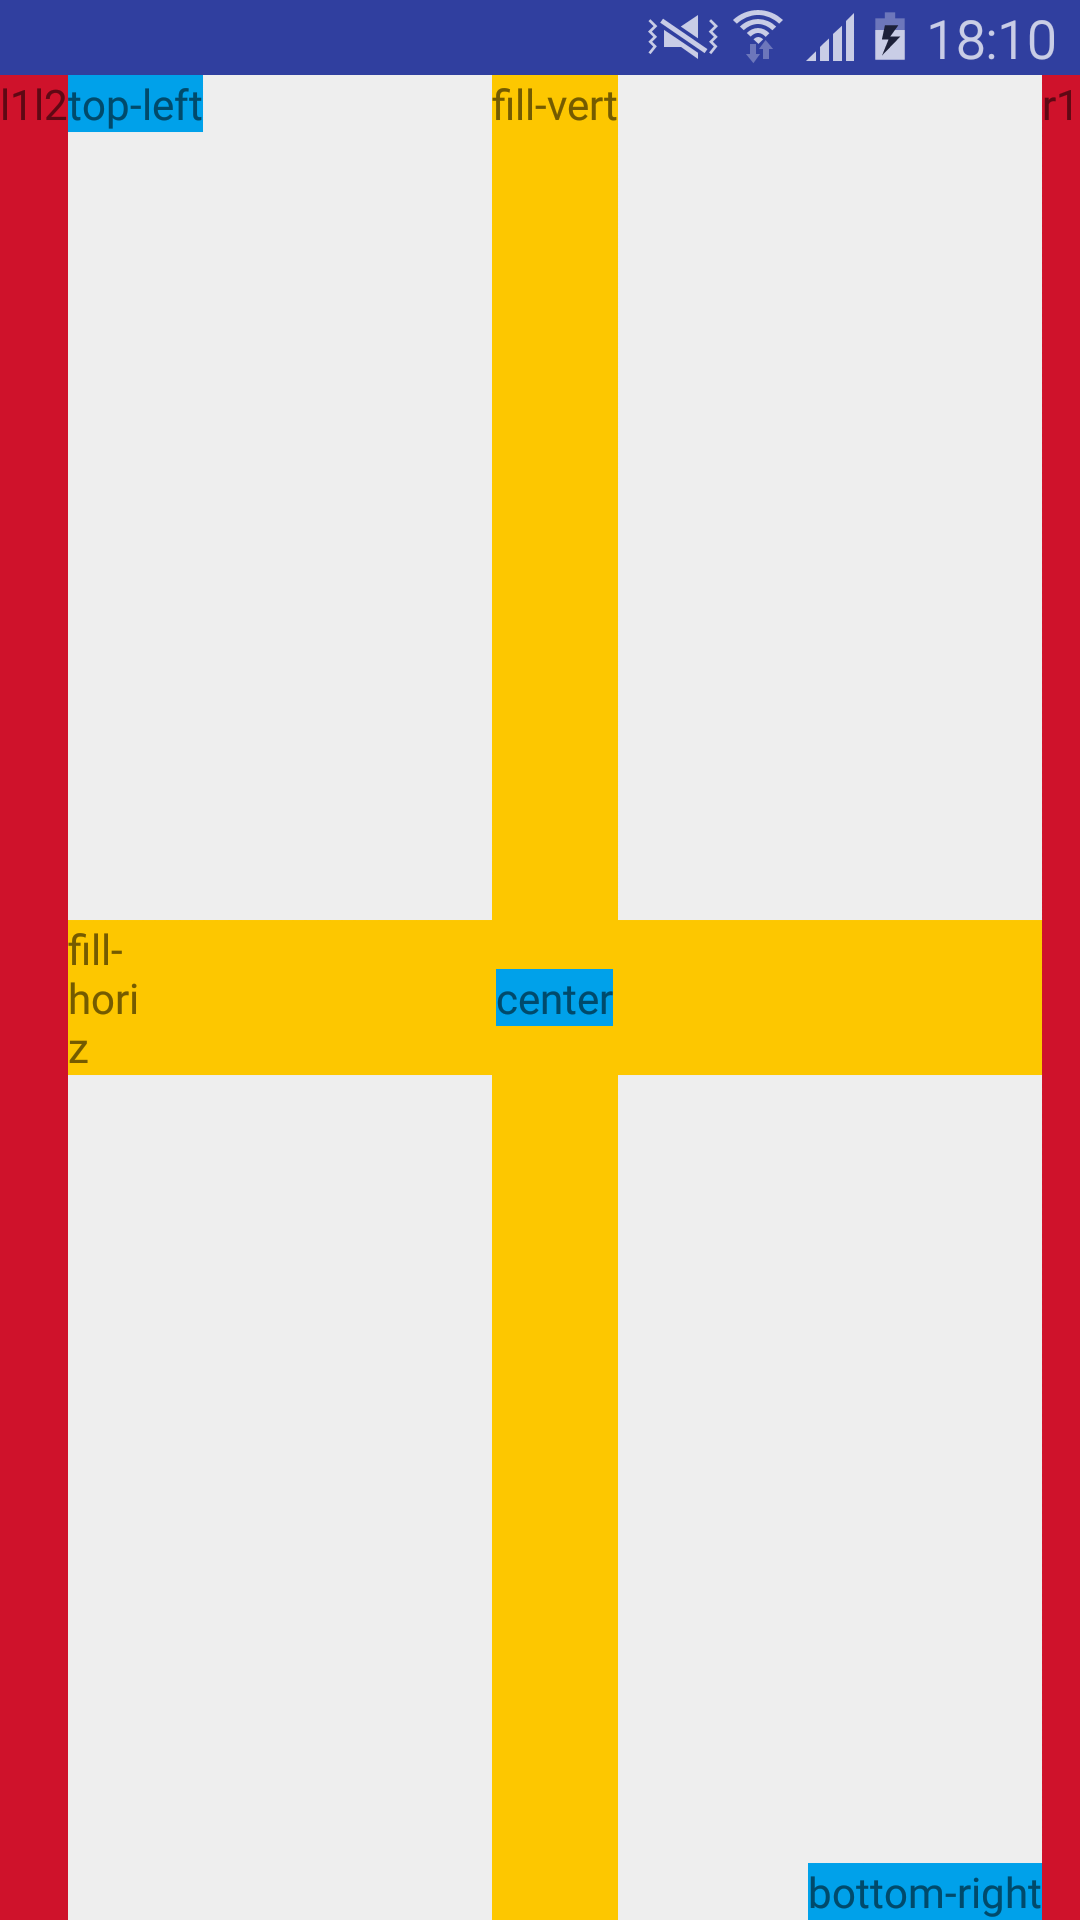
在布局文件中使用
<?xml version="1.0" encoding="utf-8"?>
<oracleen.customlayout.CustomLayout
    xmlns:android="http://schemas.android.com/apk/res/android"
    xmlns:app="http://schemas.android.com/apk/res-auto"
    android:layout_width="match_parent"
    android:layout_height="match_parent">

    <!-- put first view to left. -->
    <TextView
        android:layout_width="wrap_content"
        android:layout_height="wrap_content"
        android:layout_gravity="fill_vertical|center_horizontal"
        android:background="@color/test1"
        android:text="l1"
        app:layout_position="left"/>

    <!-- stack second view to left. -->
    <TextView
        android:layout_width="wrap_content"
        android:layout_height="wrap_content"
        android:layout_gravity="fill_vertical|center_horizontal"
        android:background="@color/test1"
        android:text="l2"
        app:layout_position="left"/>

    <!-- also put a view on the right. -->
    <TextView
        android:layout_width="wrap_content"
        android:layout_height="wrap_content"
        android:layout_gravity="fill_vertical|center_horizontal"
        android:background="@color/test1"
        android:text="r1"
        app:layout_position="right"/>

    <!-- by default views go in the middle; use fill vertical gravity -->
    <TextView
        android:layout_width="wrap_content"
        android:layout_height="wrap_content"
        android:layout_gravity="fill_vertical|center_horizontal"
        android:background="@color/test2"
        android:text="fill-vert"/>

    <!-- by default views go in the middle; use fill horizontal gravity -->
    <TextView
        android:layout_width="30dp"
        android:layout_height="wrap_content"
        android:layout_gravity="center_vertical|fill_horizontal"
        android:background="@color/test2"
        android:text="fill-horiz"/>

    <!-- by default views go in the middle; use top-left gravity -->
    <TextView
        android:layout_width="wrap_content"
        android:layout_height="wrap_content"
        android:layout_gravity="top|left"
        android:background="@color/test3"
        android:text="top-left"/>

    <!-- by default views go in the middle; use center gravity -->
    <TextView
        android:layout_width="wrap_content"
        android:layout_height="wrap_content"
        android:layout_gravity="center"
        android:background="@color/test3"
        android:text="center"/>

    <!-- by default views go in the middle; use bottom-right -->
    <TextView
        android:layout_width="wrap_content"
        android:layout_height="wrap_content"
        android:layout_gravity="bottom|right"
        android:background="@color/test3"
        android:text="bottom-right"/>

</oracleen.customlayout.CustomLayout>
好,到这里基本就结束了。源码我也上传了,大部分方法都加了注释,点击这里下载。


 2857
2857

 被折叠的 条评论
为什么被折叠?
被折叠的 条评论
为什么被折叠?
 到【灌水乐园】发言


