一、XFire
XFire是一个免费的开源SOAP框架,它不仅可以极大方便地实现这样一个环境,并且可以提供许多Web Services规范中高级特征,这些特征在多数的商业或者开源工具都没有提供。http://xfire.codehaus.org/Download是它的官方网站下载区,同时你也可以了解关于它的更多内容。
创建过程示例
下面我们就来使用Java构建一个WebService并且构建一个客户端来测试访问它。
首先请确保你的JDK和Tomcat在Eclipse环境中是可用的,配置方法不做赘述。并且你了解一些java编程技术和tomcat的发布常识。
版本信息:MyEclipse6.0.0M1;Tomcat6.0;JDK1.5;Xfire1.2,注意这里的tomcat为6.0,在5.0下有冲突。
1、打开MyEclipse新建一个WebService Project,为你的项目命名,我选择了Java EE5.0,项目在你的WorkSpace目录下。下一步:看到了这个界面

在这里Eclipse为你创建了webService的配置文件services.xml(主意文件名是有“s”的),并进行了Xfire的Servlet基本配置告诉项目你使用了Xfire改信息将体现在项目的web.xml文件中。继续下一步,加载Xfire相关的jar包,你看到了
在这个项目里我勾选了Xfire1.2 Core Libraries;HTTP Client Libraries;XML Beans Libraries。主要是确保引入了这些包包:
• • activation-1.0.2.jar
• • commons-codec-1.3.jar
• • commons-httpclient-3.0.jar
• • commons-logging-1.0.4.jar
• • jaxen-1.1-beta-8.jar
• • jdom-1.0.jar
• • log4j-1.2.x.jar
• • mail-1.3.3_01.jar
• • spring-1.2.x.jar
• • stax-api-1.0.jar
• • wsdl4j-1.5.2.jar
• • wstx-asl-2.9.jar
• • xbean-2.1.0.jar
• • xbean-spring-2.2.jar
• • xfire-all-1.0.jar
• • XmlSchema-1.0.jar
如果你好奇其他的包包是做什么用的就有待于我们在今后的学习中继续探究了~点击“Finish”完成了项目创建。
打开web.xml我们可以看到如下片断:
xml 代码
1.<servlet>
2. <servlet-name>XFireServlet</servlet-name>
3. <servlet-class>org.codehaus.xfire.transport.http.XFireConfigurableServlet</servlet-class>
4. <load-on-startup>0</load-on-startup>
5. </servlet>
6. <servlet-mapping>
7. <servlet-name>XFireServlet</servlet-name>
8. <url-pattern>/services/*</url-pattern>
9. </servlet-mapping>
10. <welcome-file-list>
11. <welcome-file>index.jsp</welcome-file>
12. </welcome-file-list>
13.
接下来的工作是开始编写java类
•模拟应用是一个银行转账应用,从账户A转账到账户B并需要给出金额和货币种类。我们先来实现一个接口IBankingService.java代码全文如下:
java 代码
1.package com.mybank.xfire.example;
2.
3.public interface IBankingService {
4.
5. public String transferFunds(
6. String fromAccount, String toAccount, double amount, String currency);
7.
8.}
9.
然后编写一个普通的Java类BankingService包含了一个叫做transferFunds()的方法来为我们完成这项工作。它需要四个输入参数:
1、 String fromAccount
2、 String toAccount
3、 double amount
4、 String currency
代码如下:
java 代码
1.package com.mybank.xfire.example;
2.
3.import java.text.NumberFormat;
4.import java.text.DecimalFormat;
5.
6.public class BankingService implements IBankingService {
7.
8. //Default constructor.
9. public BankingService(){
10. }
11.
12. /** Transfers fund from one account to another.
13. */
14. public String transferFunds(
15. String fromAccount, String toAccount, double amount, String currency){
16.
17. String statusMessage = "";
18.
19. //调用业务逻辑执行操作.
20. //建立并返回状态信息.
21. try {
22. NumberFormat formatter = new DecimalFormat("###,###,###,###.00");
23. statusMessage = "COMPLETED: " + currency + " " + formatter.format(amount)+
24. " was successfully transferred from A/C# " + fromAccount + " to A/C# " + toAccount;
25. } catch (Exception e){
26. statusMessage = "BankingService.transferFunds(): EXCEPTION: " + e.toString();
27. }
28. return statusMessage;
29. }
30.
31.}
32.
你可以看到BankingService是一个普通的Java类,没有任何代码告诉我们它将会在Web Services中使用。只是要有默认的构造函数,类型是public。这是必须的。否则,XFire不能够初始化这个类。好的,这里我们不需要增加任何东西。我们所有的工作都在部署描述符里完成。
Web应用的部署描述符
在Java中,Web应用程序通常需要至少一个部署描述符(叫做web.xml)对其进行配置。XFire本身是一个基于servlet的应用程序。因此,我们需要增加必要的引用到描述符文件中。然后我们还必须配置将要创建的Web Services。我们使用一个称为services.xml的新文件来完成这件事。在使用Eclipse工具构建工程的时候我们已经完成了这项配置(参见(上)文)。
services.xml
现在我们不得不说一下我们的Web Services的由什么组成的了。这由一个叫做services.xml的文件完成,当这个项目在tomcat发布后,它存放在WEB-INF/classes/META-INF/xfire目录下,它在Web应用程序的标准类路径中。而在Eclipse环境中我们可以清除的看到Eclipse已经为我们把它清楚的列在项目路径中。这里是services.xml中的基本配置条目:
xml 代码
1.<beans xmlns="http://xfire.codehaus.org/config/1.0">
2.
3. <service>
4. <name>Banking</name>
5. <namespace>mybank</namespace>
6. <serviceClass>com.mybank.xfire.example.IBankingService</serviceClass>
7. <implementationClass>com.mybank.xfire.example.BankingService</implementationClass>
8. </service>
9.
10.</beans>
Web Services的定义包含在元素中,它还含有一些子元素。
第一个子元素是<name></name>Banking,它可以是你提供任何的合法名字。这将会被客户端程序和其它需要定位你的服务的组件用到。例如,在服务准备好以后,你将在浏览器上使用这个名字来查看WSDL。
下一个子元素是<namespace></namespace>。任何合法的XML名字都是可以的。<namespace></namespace>用来唯一标识你的服务的各个参数。(注释@)
注释@:Namespace派什么用?namespace的作用是要避免命名冲突。如果我建立一项Web
Service,其中的WSDL文件包含一个名为"foo"的元素,而你想要使用我的服务与另一项服务连接作为补充,这样的话另一项服务的WSDL文件就不能包含名为"foo"的元素。两个服务器程序只有在它们在两个事例中表示完全相同的东西时,才可以取相同的名字。如果有了表示区别的namespace,我的网络服务里的"foo"就可以表示完全不同于另一个网络服务里"foo"的含义。在你的客户端里,你只要加以限制就可以引用我的"foo"。
<serviceclass></serviceclass>元素包含了Java类的名字,它指定了方法签名。在我们的例子中,它是接口IBankingService。如果Java类没有实现任何接口,你就需要把类的名字放在这里。在你的Java类或者接口中可能有几个方法。只需要一个入口把它们全部发布为Web Services。
<implementationclass></implementationclass>保存了实现方法的Java类名。这是一个可选元素。如果上一个元素<serviceclass></serviceclass>包含了一个接口,那么相应的实现类必须在这里指定。
就是这样。我们的Web Services配置完成了。
我们如何知道Web Service正在工作呢?
为了了解Web Service是否正在工作,我们需要测试。首先,我们测试来看WSDL是否可用。我们在浏览器中输入URL。哪个URL?因为我们的应用程序的war文件是aa.war,并且在services.xml中给出的服务名是Banking,WSDL的URL应该是:http://localhost:8080/aa/services/Banking?wsdl。
请注意:URL的第一部分,例如,http://localhost:8080,可能会根据你的应用服务器不同而不同。无论怎样,当你输入URL后,将会看到一个XML文档,这个文档叫做服务的WSDL。如果你看到了,这就是你的应用作为Web Service已经可用的第一个证明。
正确的执行情况:
在这个WSDL中我们可以看到<xsd:element name="transferFunds">的服务方法明以及他的四个参数描述等信息。但是这个测试是不够的。可能会发生这种情况,可以看到WSDL,但是从客户端程序可能会访问不到服务。因此为了核实服务是否可以访问了,我们必须使用一个客户端进行服务的实际调用来进行一个真正的测试。
开发一个客户端
编写BankClient.java
• public static void main(String[] args) {
// 方法一
Service serviceModel=new ObjectServiceFactory().create(IBankingService.class);
try {
IBankingService client=(IBankingService)new XFireProxyFactory()
.create(serviceModel, "http://localhost:8080/aa/services/Banking");
String serviceResponse=client.transferFunds("Minsheng", "Nongye", 10000, "RMB");
System.out.println(serviceResponse);
} catch (MalformedURLException e) {
// TODO Auto-generated catch block
e.printStackTrace();
}
//方法二
try {
Client client=new Client(new URL("http://localhost:8080/aa/services/Banking?WSDL"));
Object[] result=client.invoke("transferFunds", new Object[]{"minsheng","nongye",10000,"rmb"});
System.out.println(result[0]);
} catch (MalformedURLException e) {
// TODO Auto-generated catch block
e.printStackTrace();
} catch (Exception e) {
// TODO Auto-generated catch block
e.printStackTrace();
}
}
•总结:
基本的Web Services开发步骤清单
•
这个清单总结了将一个Java方法发布为Web Service所必须的步骤: 2、 增加XFire servlet相关条目到web.xml中
•1、 检查Java类的方法和默认构造函数确保为public
•2、 创建services.xml,把它放到WEB-INF/classes/META-INF/xfire目录下
•3、 增加XFire和第三方包到你的Web应用的WEB-INF/lib文件夹中
二、MyEclipse6.5上基于JAX-WS开发Webservice(中文示例)
转自: http://horizonhyg.javaeye.com/blog/378046
1. Introduction
This document will outline the process of developing a JAX-WS web service and deploying it using MyEclipse 6.5 to the internal MyEclipse Tomcat server. The web service used in this tutorial will be a very simple calculator service that provides add, subtract, multiply and divide operations to the caller.
MyEclipse also supports developing web services using the existing XFire framework from previous MyEclipse releases. For folks needing to develop and deploy WebSphere JAX-RPC or WebSphere JAX-WS web services, please take a look at our MyEclipse Blue Edition of the MyEclipse IDE.
Additional resources covering web service creation using JAX-RPC, JAX-WS or XFire are included in the Resources section of this document.
2. System Requirements
This tutorial was created with MyEclipse 6.5. If you are using another version of MyEclipse (possibly newer), most of these screens and instructions should still be very similar.
If you are using a newer version of MyEclipse and notice portions of this tutorial looking different than the screens you are seeing, please let us know and we will make sure to resolve any inconsistencies.
3.新建一个工程
开始我们新建一个Web Service Project工程File->New->Web Service Project(Optional Maven Support) 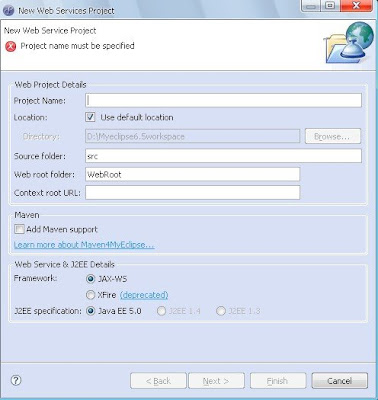
Note:A JAX-WS web service can also be generated in any existing Java EE 5 web project.
我们给这个工程取名为WebServiceProject.注意JAX-WS支持只在javaEE5或更高版本的工程中是可行的。如果你需要使用低版本的工程类型(java1.4或者1.3),那么只能使用XFire Web Service代替JAX-WS。
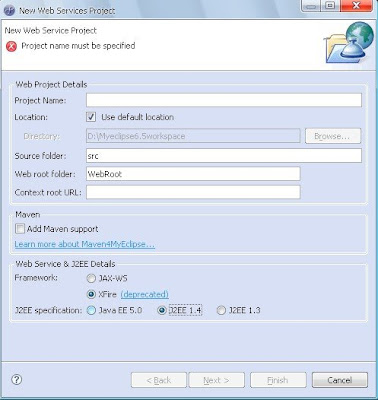
这里我们使用上面的JAX—WS。
4.创建服务类
服务类就是一个普通的java类,负责提供我们想要发布的执行方法。这里我们写一个简单的计算器类,实现几个典型的计算器应用方法,如加减乘除。
首先我们先建一个包,WebServiceProject->src->new->package,取名com.myeclipseide.ws
让后我们在这个包下建一个类,Calculator.java.
根据上面提到的,这个计算器类实现计算器的加减乘除算法,简单实现:
- package com.myeclipseide.ws;
- public class Calculator {
- public int add(int a, int b) {
- return (a + b);
- }
- public int subtract(int a, int b) {
- return (a - b);
- }
- public int multiply(int a, int b) {
- return (a * b);
- }
- public int divide(int a, int b) {
- return (a / b);
- }
- }
package com.myeclipseide.ws;

public class Calculator {
    public int add(int a, int b) {
        return (a + b);
    }

    public int subtract(int a, int b) {
        return (a - b);
    }

    public int multiply(int a, int b) {
        return (a * b);
    }

    public int divide(int a, int b) {
        return (a / b);
    }
}
可以看出,这个类中的方法是非常简单的,没有用到特殊的注释还有接口,父类之类的东西。
5.创建一个Web Service
在上面的工具条中点击新建Web Service
Note:如果没有的话可以File->New->others->Myeclipse->WebService->webService
点击之后出现的屏幕,在Strategy中选择Bottom-up scenario,因为我们已经建立好了Calculator类而且想根据它建立JAX-WS服务。
下面是创建的最后一个屏幕,你需要选择提供webService方法的javaBean,在我们这个例子中就是我们已经建立好的Calculator类。 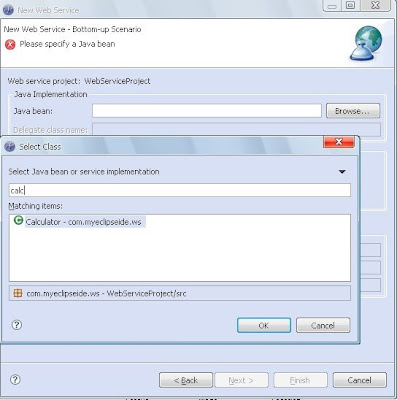
填好之后,Myeclipse会自动帮我们填满其他的项,
Select Generate WSDL in project and hit Finish.
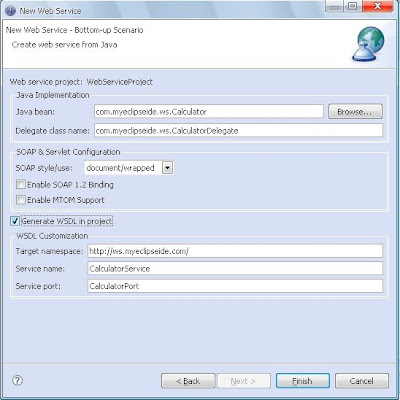
点击完成之后,Myeclipse会自动生成CalculatorDelegate代理类,还有一些必须的JAX-WS描述符,而且会自动在服务器目录下的web.xml中配置WebService的一些mappings,方便将webService部署到服务器中。
到此web service已经建立好了,我们开始部署它然后进行测试。
========================================================================
6.部署和测试webService。
这里我们不使用用Myeclipse自带的tomcat服务器,使用自己应经在电脑中部署好的tomcat5.5。
在server面板中右击,选择configure 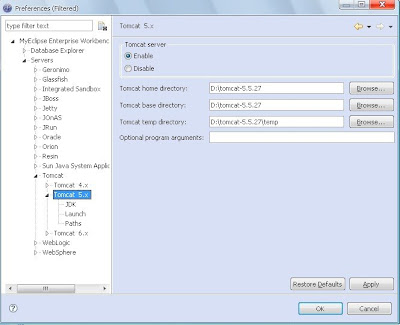
部署自己的tomcat注意选择jdk要跟项目中的相同。
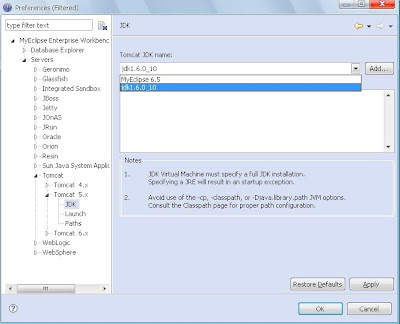
现在要向工程中导入JAX-WS的jar包
在项目名称上右击->properties->Add Library->Myeclipse Libraries->最后面的两个。 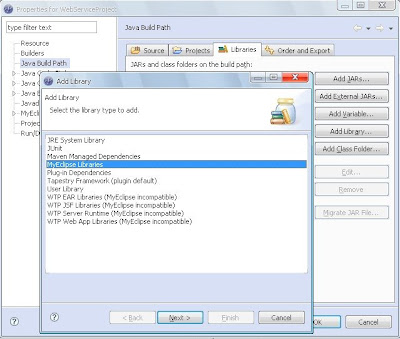
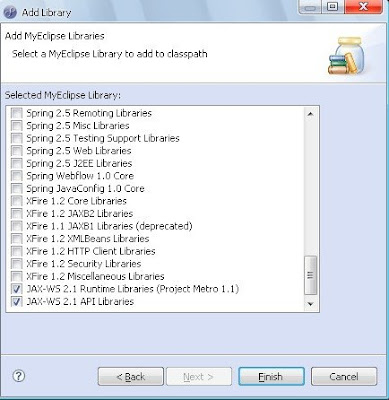
点击完成,导入成功。
Note:Myeclipse自带的tomcat中有自带的这两个jar包,可以不用导入。
6.1部署
在部署好的tomcat服务器上右击选择Add Deployment
点击完成。
6.2测试
运行tomcat服务器,在工具栏中点击launch WebService Explorer
打开后,点击右上角的WSDL视图,可以看到下面的屏幕 
在WSDL URL中填写路径:http://localhost:8888/WebServiceProject/CalculatorPort?WSDL
解释下路径组成:
http://localhost:8888/是服务器的路径,我的端口号是8888,可以根据自己的更改,一般都是8080。
/WebServiceProject = We know by default the Web Context-root that is used to deploy(部署) web projects matches the name of the projects. (因为我们没有为这个工程自定义我们的Web Context-root,所以他就是这个工程的名字)
/CalculatorPort = As we saw from the last screenshot in Section #5, when our JAX-WS web service was generated, it was bound using a servlet-mapping in the web.xml file to the /CalculatorPort path.
- <servlet>
- <description>JAX-WS endpoint - CalculatorService</description>
- <display-name>CalculatorService</display-name>
- <servlet-name>CalculatorService</servlet-name>
- <servlet-class>
- com.sun.xml.ws.transport.http.servlet.WSServlet
- </servlet-class>
- <load-on-startup>1</load-on-startup>
- </servlet>
- <servlet-mapping>
- <servlet-name>CalculatorService</servlet-name>
- <url-pattern>/CalculatorPort</url-pattern>
- </servlet-mapping>
?WSDL = This is a universal query string argument that can be added to the end of any web service which will tell the web service to return it's full WSDL to the caller. In this case, the WSDL is returned to our Web Services Explorer tool which loads it up, and displays the web services exposed operations to us.
弄清楚之后,我们开始测试,比如我们选择add方法:
填写args,点击go,在status中就会显示结果。 
结果是正确的。
7.创建Webservice Client
现在我们已经部署好Webservice,而且应经测试过了,那我们新建一个Webservice client,来调用Webservice提供的方法。
7.1新建一个java project,给他取个名字。比如我们叫它ClientofWebService
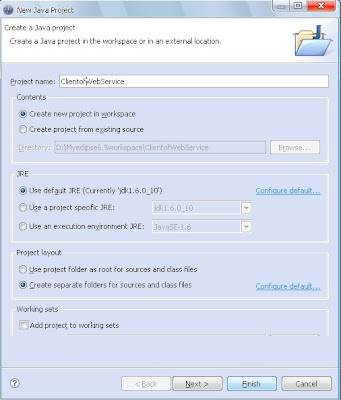
在工具条中点击new Web Service Client
然后按照以下步骤操作:
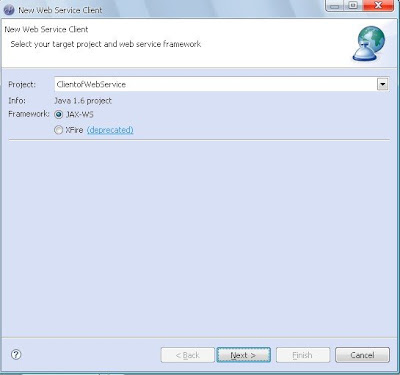
The last step of the web service client creation is to specify either a WSDL File or a WSDL URL for the wizard to retrieve the web service WSDL from. In our case we are using the URL and generate the client into the new package com.myeclipseide.ws.client:
http://localhost:8888/WebServiceProject/CalculatorPort?WSDL
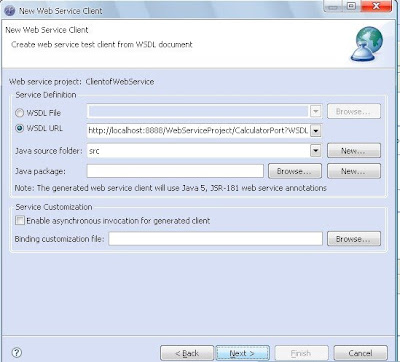
点击Next知道完成。
可以看到在新建的java project ClientofWebService中,src文件夹下产生了许多的文件,根据名称我们大体可以了解其意思,可以打开看一下源代码,其实不难理解。比如add文件,就是Calculator类中add方法的两个参数的get和set方法。其他类似。
我们在文件夹下见一个类test.java写一个main函数测试
- public static void main(String[] args) {
- /* Create the service instance */
- CalculatorService service = new CalculatorService();
- CalculatorDelegate delegate = service.getCalculatorPort();
- /* Using the web service, perform the 4 calculations */
- System.out.println("1. 3+7=" + delegate.add(3, 7));
- System.out.println("2. 12-2=" + delegate.subtract(12, 2));
- System.out.println("3. 9*9=" + delegate.multiply(9, 9));
- System.out.println("4. 40/2=" + delegate.divide(40, 2));
- }
public static void main(String[] args) {
    /* Create the service instance */
    CalculatorService service = new CalculatorService();
    CalculatorDelegate delegate = service.getCalculatorPort();

    /* Using the web service, perform the 4 calculations */
    System.out.println("1. 3+7=" + delegate.add(3, 7));
    System.out.println("2. 12-2=" + delegate.subtract(12, 2));
    System.out.println("3. 9*9=" + delegate.multiply(9, 9));
    System.out.println("4. 40/2=" + delegate.divide(40, 2));
}
运行得到如下结果:
1. 3+7=10
2. 12-2=10
3. 9*9=81
4. 40/2=20
测试完成。
8. Resources
In this section we want to provide you with additional links to resources that supplement the topics covered in this tutorial. While this is not an exhaustive list, we do make an effort to point to the more popular links that should provide you with diverse, high-quality information.
Example Web Service Project & Web Service Client Project
NOTE: The example projects provided are configured to run against WebSphere 6.1. You may need to adjust the Target Server and/or the runtime JRE libraries used to build the projects to more closely match your particular build and deployment environment.
三、Axis
说明及约定:
本文主要描述如何使用Apache开源项目Axis提供的API来实现Web Services。本文中的提到的例子只为了方便本文的描述而提出,有不妥之处请见谅。
本文的读者应有JAVA web 应用开发基础。应该具有看过WSDL,SOAP,XML等的基本规范。熟悉Eclipse+MyEclipse开发环境。
本文可以随意转载使用,但是要保留作者的署名。
一、环境准备
使用Axis来开发Web services 需要准备 web 服务器,Axis API。本文使用的Web container 是Tomcat5.5, Axis API 采用版本2。
1.1软件下载准备
Tomcat下载地址:http://tomcat.apache.org/download-55.cgi#5.5.20
Axis标准包:
http://ftp.wayne.edu/apache/ws/axis2/1_0/axis2-std-1.0-bin.zip
Axis War包:
http://ftp.wayne.edu/apache/ws/axis2/1_0/axis2.war
Axis Eclipse plug-in(代码生成工具和打包工具):
http://archive.apache.org/dist/ws/axis2/tools/1_4/
Eclipse+MyEclipse:可以到官方网站下载(本文为3.2+5.0GA)
1.2安装
A.首先搭建开发环境,需要将下载到的Eclipse解压缩到一个目录。
B.将下载到的Axis 的两个plug-in解压缩到Eclipse安装目录下的plug-in子目录。
C.安装MyEclipse5.0GA。然后启动MyEclipse,并选择“File->New->Other”可以找到下面的这些Wizards,这些将是本文中用到的很重要的工具。

D.下面开始搭建Web Services的部署环境。将下载的 tomcat报解压缩到一个目录。完成web container 的安装。
E.将axis2.war包拷贝到tomcat安装目录下的webapps 目录中。
F.启动Tomcat(windows 下为TOMCA_HOME/bin中的startup.bat;Linux,unix环境为startup.sh文件),打开浏览器输入并访问:http://ip:port/axis2来查看。(如果没有进行陪孩子文件的修改此地址应该为http://localhost:8080/axis),如果能看到下面的页面则说明已经安装完成。

二、Quick Start
环境准备好后,先从一个简单的例子开始。以便对使用Axis来开发Web services的大致流程有个了解。这个例子就是SayHello,请求端输入一个名字字符串,返回的将是一个问候语。
例如:输入了Tom,那么返回的事Hi,Tom.How are you?
2.1编写WSDL
A.启动MyEclipse,新建立一个WebApps(File->New->Project->Web Project),给Project Name 为SayHello,其他保持不改变。
B.选择File->New-Other菜单,进入后找到MyEclipse->Web Services并选择WSDL.
C. 选择“src”目录作为“Enter or select the parent folder”的值,“File name”值给定为SayHello.wsdl。点击“Next”进入下一步。

D.将目标命名空间设置为“http://ws.tonyzhangcn.org/SayHello/”.在生成代码的时候一般以这个命名空间为package的名字,例如:org.tonyzhangcn.ws.sayhello。这些值可以按需要设置。

E.点击“Finish”按钮就可以看到MyEclipse提供的WSDL 设计器的界面了。可以看到设计器为WSDL默认的添加了一个现操作。

即图中的“NewOperation”。现在将其改名为SayHello,如下图:

之后点击设计界面中的“Source”Tab来查看其代码。如下:可以看到我们定义了一个SayHello的Web Services,她提供了一个SayHello的方法,她能够接受一个String(事实上是tns:SayHelloRequest对象,她对String进行了封装)类型的输入参数SayHelloRequest并返回一个String(事实上是tns:SayHelloResponse对象,她对String进行了封装)类型的SayHelloResponse结果。更多关于WSDL的信息,请参考W3C的规范文档。
<?xml version="1.0" encoding="UTF-8"?>
<wsdl:definitions xmlns:soap="http://schemas.xmlsoap.org/wsdl/soap/" xmlns:tns="http://ws.tonyzhangcn.org/SayHello/" xmlns:wsdl="http://schemas.xmlsoap.org/wsdl/" xmlns:xsd="http://www.w3.org/2001/XMLSchema" name="SayHello" targetNamespace="http://ws.tonyzhangcn.org/SayHello/">
<wsdl:types>
<xsd:schema targetNamespace="http://ws.tonyzhangcn.org/SayHello/">
<xsd:element name="SayHelloResponse" type="xsd:string" />
<xsd:element name="SayHelloRequest" type="xsd:string" />
</xsd:schema>
</wsdl:types>
<wsdl:message name="SayHelloResponse">
<wsdl:part element="tns:SayHelloResponse" name="SayHelloResponse" />
</wsdl:message>
<wsdl:message name="SayHelloRequest">
<wsdl:part element="tns:SayHelloRequest" name="SayHelloRequest" />
</wsdl:message>
<wsdl:portType name="SayHello">
<wsdl:operation name="SayHello">
<wsdl:input message="tns:SayHelloRequest" />
<wsdl:output message="tns:SayHelloResponse" />
</wsdl:operation>
</wsdl:portType>
<wsdl:binding name="SayHelloSOAP" type="tns:SayHello">
<soap:binding style="document" transport="http://schemas.xmlsoap.org/soap/http" />
<wsdl:operation name="SayHello">
<soap:operation soapAction="http://ws.tonyzhangcn.org/SayHello/NewOperation" />
<wsdl:input>
<soap:body use="literal" />
</wsdl:input>
<wsdl:output>
<soap:body use="literal" />
</wsdl:output>
</wsdl:operation>
</wsdl:binding>
<wsdl:service name="SayHello">
<wsdl:port binding="tns:SayHelloSOAP" name="SayHelloSOAP">
<soap:address location="http://www.example.org/" />
</wsdl:port>
</wsdl:service>
</wsdl:definitions>
至此WSDL的编写已经完成。
2.2从WSDL生成Java代码
A.选择菜单“File->New->Other”,从对话框中选取“Axis2 Wizards”下面的“Axis2 Code Generator”.点击“Next”进入下一个页面,保持“Generate java source code from WSDL file”被选中,点击“Next”进入下一步。
B.点击“Browse”来选取存放在src目录下的SayHello.wsdl文件,“Next”进入下一步。设置如下:

C.点击“next”进入下一个页面,设置“Output path”为本Project的src目录。点击“finish”后代在SayHello项目上按F5刷新就可以看到有代码生成好了。但是能看到一堆红“x”,这是由于没有将Axis2的jar包放入class path 中以及源代码的package不为org.tonyzhangcn.ws.sayhello引起的。

下面解决这个问题,首先选择“SayHello”项目,并右击选择“Build path->Add External Archives..”,选择上面部署在tomcat中的axis2 web应用WEB-INF/lib目录中的所有jar包。之后右击“src.org.tonyzhangcn.ws.sayhello”项目,选择“Refactor->rename”,做如下修改,并选择OK完成。

这个时候发现test.org.tonyzhangcn.ws.sayhello下面的SayHelloTest.java仍然存在问题。点击此文件中package 关键子前面的红“x”,会提示有两个选项,我们选择下面的那个。

选择public class SayHelloTest前的红“x”,选择第一项。

进行完这几个改动之后,生成的代码就没有问题了。其中
SayHelloRequest,SayHelloResponse是输入输出参数对象。
SayHelloSkeleton是服务端对象,用来编写业务逻辑调用。
SayHelloStub是客户端用来定位endpoint(就是发布的Web Services的地址)的类,客户端根据其提供的方法定位Web服务并发起调用
SayHelloMessageReceiverInOut是一个实现同步调用的web服务信息转换处理类。
Resources目录下的services.xml文件是webservices的描述文件。
SayHelloTest是一个客户端的TestCase示例,用户可以根据这个示例来编写自己的客户端调用类。
2.3编写业务代码
打开SayHelloSKeleton.java文件将其中的实现方法
public org.tonyzhangcn.ws.sayhello.SayHelloResponse SayHello(org.tonyzhangcn.ws.sayhello.SayHelloRequest param0)
{
// Todo fill this with the necessary business logic
throw new java.lang.UnsupportedOperationException();
}
改为
public org.tonyzhangcn.ws.sayhello.SayHelloResponse SayHello(org.tonyzhangcn.ws.sayhello.SayHelloRequest request)
{
// Todo fill this with the necessary business logic
try
{
SayHelloResponse response = new SayHelloResponse();
response.setSayHelloResponse("Hi,"+request.getSayHelloRequest()+".How are you?");
return response;
}catch(UnsupportedOperationException e)
{
throw e;
}
}
2.4打包
A.选择菜单“File->New->Other”,从对话框中选取“Axis2 Wizards”下面的“Axis2 Services Archive”.点击“Next”进入下一个页面。
B.选择编译好的class文件所在目录(本项目应该是WebRoot下面WEB-INF/classes),“Next”进入下一步。
C.选择WSDL文件所在目录,此处为src目录下的SayHello.wsdl文件。“Next”,再“Next”。选择services.xm文件,本文应该是生成再src/resources下面的services.xml文件。之后选取“Generate the services.xml automatically”,然后再点击一下使其变为非选中状态,之后点击“Back”按钮,再点击一次“Next”。(注意:这里本应该不是这么来回折腾的,但是我的机器上只有这样操作finish按钮才能生效。怀疑这是一个bug,如果读到此文的用户没有这种情况,忽略此提示)
D.点击“Next”,将记入最后一个页面,此处有两个选项,一个是输出目录一个是处处文件名称。我这里的输出文件名称给的是SayHello。点击“Finish”完成。
2.5部署
A.将打包好的文件SayHello.jar(或者可以改名为SayHello.aar),拷贝到Tomcat中已经部署的Axis2应用的WEB-INF/services目录下面。
B.启动Tomcat(即点击Tomcat安装目录下的startup.bat,linux或unix下执行startup.sh)。
C.打开浏览器,输入http://ipaddress:port/axis2(一般为http://localhost:8080/axis2),并点击其中的“services”链接

可以看到SayHello已经被部署。点击SayHello提供的连接可以看到与之对应的WSDL。
2.6调用测试
A.修改SayHelloTest.java文件中的方法testSayHello的内容为:
public void testSayHello() throws java.lang.Exception
{
String url="http://localhost:8080/axis2/services/SayHello";
org.tonyzhangcn.ws.sayhello.SayHelloStub stub = new org.tonyzhangcn.ws.sayhello.SayHelloStub(url); // the
org.tonyzhangcn.ws.sayhello.SayHelloRequest request = (org.tonyzhangcn.ws.sayhello.SayHelloRequest) getTestObject(org.tonyzhangcn.ws.sayhello.SayHelloRequest.class);
request.setSayHelloRequest("tonyzhangcn");
System.out.println(stub.SayHello(request).getSayHelloResponse());
// todo Fill in the param14 here
assertNotNull(stub.SayHello(request));
}
B.从菜单中选择“Run->Run as->JUnit Test”。

可以看到web 服务已经正确的返回了结果。那么,不用TestCase类可以调用WebServices吗?答案是肯定的,我们可以随便些一个带有main方法的类,并仿照SayHelloTest.java中的testSayHello()方法就可以达到调用Web Services的目的了。
在我实际操作工程中,还遇到了两个问题:
一个是缺少xalan包中的jar文件,
解决办法:从官网下载,添加进lib中就好了
一个是在自动产生的JUnit Test类中有两个方法,都要实现,
解决办法:可以去掉一个方法。
本文来自CSDN博客,转载请标明出处:http://blog.csdn.net/bonbonstella/archive/2007/05/17/1613401.aspx
转自:http://blog.csdn.net/flm_0722/archive/2009/05/14/4182594.aspx


 4万+
4万+

 被折叠的 条评论
为什么被折叠?


