


S60 Python 编程指南—— 如何创建一个应用程序
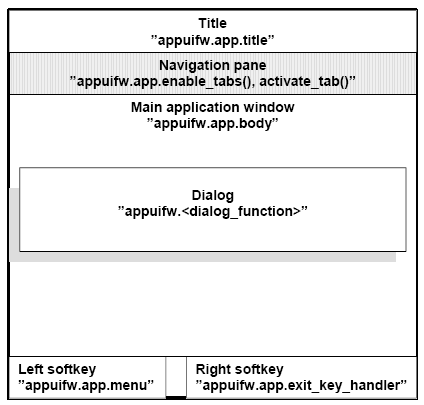
1,插入所有需要的模块
2,设定屏幕大小 (normal, large, full)
3,编写你程序的逻辑代码
4,创建一个程序菜单(如果有必要)
5,设定一个离开的按键
6,设定程序标题
7,如果有必要,分配活动的对象
8,设定程序主题(文字,背景,列表或什么都没有)
9,创建一个恰当的主循环体
1,如何装如所需要的所有模块?
- import appuifw
- import e32
- import appuifw
- import e32
import appuifw
import e32
2,如何设定屏幕大小?
- # screen has 3 different values:
- appuifw.app.screen='normal' #(a normal screen with title pane and softkeys)
- appuifw.app.screen='large' #(only softkeys visible)
- appuifw.app.screen='full' #(a full screen)
- # screen has 3 different values:
- appuifw.app.screen='normal' #(a normal screen with title pane and softkeys)
- appuifw.app.screen='large' #(only softkeys visible)
- appuifw.app.screen='full' #(a full screen)
# screen has 3 different values:
appuifw.app.screen='normal' #(a normal screen with title pane and softkeys)
appuifw.app.screen='large' #(only softkeys visible)
appuifw.app.screen='full' #(a full screen)
示例代码:
---------------------------------
- import e32
- def exit_key_handler():
- app_lock.signal()
- round = appuifw.Text()
- round.set(u'hello')
- # put the application screen size to full screen
- appuifw.app.screen='full' #(a full screen)
- # other options:
- #appuifw.app.screen='normal' #(a normal screen with title pane and softkeys)
- #appuifw.app.screen='large' #(only softkeys visible)
- app_lock = e32.Ao_lock()
- appuifw.app.body = round
- appuifw.app.exit_key_handler = exit_key_handler
- app_lock.wait()
- import appuifw
- import e32
- def exit_key_handler():
- app_lock.signal()
- round = appuifw.Text()
- round.set(u'hello')
- # put the application screen size to full screen
- appuifw.app.screen='full' #(a full screen)
- # other options:
- #appuifw.app.screen='normal' #(a normal screen with title pane and softkeys)
- #appuifw.app.screen='large' #(only softkeys visible)
- app_lock = e32.Ao_lock()
- appuifw.app.body = round
- appuifw.app.exit_key_handler = exit_key_handler
- app_lock.wait()
import appuifw
import e32
def exit_key_handler():
    app_lock.signal()
round = appuifw.Text()
round.set(u'hello')
# put the application screen size to full screen
appuifw.app.screen='full' #(a full screen)
# other options:
#appuifw.app.screen='normal' #(a normal screen with title pane and softkeys)
#appuifw.app.screen='large' #(only softkeys visible)
app_lock = e32.Ao_lock()
appuifw.app.body = round
appuifw.app.exit_key_handler = exit_key_handler
app_lock.wait()
3,如何创建你程序的逻辑结构?
这个完整的指南就是关于这个问题的…… 你必须确定一些逻辑结构使你的程序运行起来,任何逻辑结构都有可能!
4,如何创建一个应用程序菜单?
一个应用程序菜单使用左边的软按键并使得在你的应用程序运行时总是更够被使用。一个应用程序菜单也能包含子菜单。
- # create the callback functions that shall be executed when when selecting an item in
- # the menu:
- def item1():
- print "item one"
- def subitem1():
- print "subitem one"
- def subitem2():
- print "subitem two"
- # create the menu using appuifw.app.menu[(title, callback1), (title, (subtitle, callback2))]
- appuifw.app.menu = [(u"item 1", item1), (u"Submenu 1", ((u"sub item 1"
- , subitem1),(u"sub item 2", subitem2)))]
Python代码


- # create the callback functions that shall be executed when when selecting an item in
- # the menu:
- def item1():
- print "item one"
- def subitem1():
- print "subitem one"
- def subitem2():
- print "subitem two"
- # create the menu using appuifw.app.menu[(title, callback1), (title, (subtitle, callback2))]
- appuifw.app.menu = [(u"item 1", item1), (u"Submenu 1", ((u"sub item 1"
- , subitem1),(u"sub item 2", subitem2)))]
# create the callback functions that shall be executed when when selecting an item in
# the menu:
def item1():
   print "item one"
def subitem1():
   print "subitem one"
def subitem2():
   print "subitem two"
# create the menu using appuifw.app.menu[(title, callback1), (title, (subtitle, callback2))]
appuifw.app.menu = [(u"item 1", item1), (u"Submenu 1", ((u"sub item 1"
, subitem1),(u"sub item 2", subitem2)))]
示例代码:
---------------------------------
- import appuifw
- import e32
- def exit_key_handler():
- app_lock.signal()
- # create the callback functions for the application menu and its submenus
- def item1():
- print ""
- round.set(u'item one was selected')
- def subitem1():
- print ""
- round.set(u'subitem one was selected')
- def subitem2():
- round.set(u'subitem two was selected')
- app_lock = e32.Ao_lock()
- round = appuifw.Text()
- round.set(u'press options')
- appuifw.app.screen='large'
- appuifw.app.body = round
- # create the application menu including submenus
- appuifw.app.menu = [(u"item 1", item1),
- (u"Submenu 1", ((u"sub item 1", subitem1),
- (u"sub item 2", subitem2)))]
- appuifw.app.exit_key_handler = exit_key_handler
- app_lock.wait()
import appuifw
import e32
def exit_key_handler():
    app_lock.signal()
# create the callback functions for the application menu and its submenus
def item1():
    print ""
    round.set(u'item one was selected')
def subitem1():
    print ""
    round.set(u'subitem one was selected')
def subitem2():
    round.set(u'subitem two was selected')
app_lock = e32.Ao_lock()
round = appuifw.Text()
round.set(u'press options')
appuifw.app.screen='large'
appuifw.app.body = round
# create the application menu including submenus
appuifw.app.menu = [(u"item 1", item1),
                    (u"Submenu 1", ((u"sub item 1", subitem1),
                                    (u"sub item 2", subitem2)))]
appuifw.app.exit_key_handler = exit_key_handler
app_lock.wait()
5,如何设定一个离开程序的键盘操作?
当你按下右键(即离开)时,离开的操作就会被执行。使用特别定义的一个函数,你就能定义在按下键时要做什么。
- def quit():
- appuifw.app.set_exit()
- app.exit_key_handler=quit
- def quit():
- appuifw.app.set_exit()
- app.exit_key_handler=quit
def quit():
        appuifw.app.set_exit()
app.exit_key_handler=quit
6,如何设定程序名称(标题)?
- appuifw.app.title = u"SMS sending"
- appuifw.app.title = u"SMS sending"
appuifw.app.title = u"SMS sending"7,如果有必要,如何来分配有效的对象?
A facility called active object is used extensively on the Symbian OS to implement co-operative, non-preemptive scheduling within operating system threads. Preserving the responsiveness of the UI can be done with the help of active objects. This needs to be considered when designing the application logic. As a Python programmer, you typically need to take care of active objects as they relate to UI programming, and sockets. Can be tricky!
- # You need to import the e32 module
- import e32
- # create an instance of the active object
- app_lock = e32.Ao_lock()
- # starts a scheduler -> the script processes events (e.g. from the UI) until lock.signal() is
- # callled.
- app_lock.wait()
- # stops the scheduler
- app_lock.signal()
- # You need to import the e32 module
- import e32
- # create an instance of the active object
- app_lock = e32.Ao_lock()
- # starts a scheduler -> the script processes events (e.g. from the UI) until lock.signal() is
- # callled.
- app_lock.wait()
- # stops the scheduler
- app_lock.signal()
# You need to import the e32 module
import e32
# create an instance of the active object
app_lock = e32.Ao_lock()
# starts a scheduler -> the script processes events (e.g. from the UI) until lock.signal() is
# callled.
app_lock.wait()
# stops the scheduler
app_lock.signal()
8,如何设置程序主体?
- # body as Listbox:
- appuifw.app.body = appuifw.Listbox(entries,shout)
- # body as Listbox:
- appuifw.app.body = appuifw.Listbox(entries,shout)
# body as Listbox:
appuifw.app.body = appuifw.Listbox(entries,shout)
示例代码:
------------------------------------------------
- import appuifw
- import e32
- def exit_key_handler():
- app_lock.signal()
- # define a callback function
- def shout():
- index = lb.current()
- print index
- print entries[index]
- # create your content list of your listbox including the icons to be used for each entry
- entries = [u"Signal",u"Battery"]
- lb = appuifw.Listbox(entries,shout)
- # create an Active Object
- app_lock = e32.Ao_lock()
- # create an instance of appuifw.Listbox(), include the content list "entries" and the callback function "shout"
- # and set the instance of Listbox now as the application body
- appuifw.app.body = lb
- appuifw.app.exit_key_handler = exit_key_handler
- app_lock.wait()
import appuifw
import e32
def exit_key_handler():
    app_lock.signal()
# define a callback function
def shout():
    index = lb.current()
    print index
    print entries[index]
# create your content list of your listbox including the icons to be used for each entry
entries = [u"Signal",u"Battery"]
lb = appuifw.Listbox(entries,shout)
# create an Active Object
app_lock = e32.Ao_lock()
# create an instance of appuifw.Listbox(), include the content list "entries" and the callback function "shout"
# and set the instance of Listbox now as the application body
appuifw.app.body = lb
appuifw.app.exit_key_handler = exit_key_handler
app_lock.wait()
- # body as Text:
- appuifw.app.body = appuifw.Text(u'hello')
- # body as Text:
- appuifw.app.body = appuifw.Text(u'hello')
# body as Text:
appuifw.app.body = appuifw.Text(u'hello')
示例代码:
------------------------------------------------
- import appuifw
- import e32
- def exit_key_handler():
- app_lock.signal()
- # create an instance of appuifw.Text()
- round = appuifw.Text()
- # change the style of the text
- round.style = appuifw.STYLE_UNDERLINE
- # set the text to 'hello'
- round.set(u'hello')
- # put the screen size to full screen
- appuifw.app.screen='full'
- # create an Active Object
- app_lock = e32.Ao_lock()
- # set the application body to Text
- # by handing over "round" which is an instance of appuifw.Text() as definded above
- appuifw.app.body = round
- appuifw.app.exit_key_handler = exit_key_handler
- app_lock.wait()
import appuifw
import e32
def exit_key_handler():
    app_lock.signal()
# create an instance of appuifw.Text()
round = appuifw.Text()
# change the style of the text
round.style = appuifw.STYLE_UNDERLINE
# set the text to 'hello'
round.set(u'hello')
# put the screen size to full screen
appuifw.app.screen='full'
# create an Active Object
app_lock = e32.Ao_lock()
# set the application body to Text
# by handing over "round" which is an instance of appuifw.Text() as definded above
appuifw.app.body = round
appuifw.app.exit_key_handler = exit_key_handler
app_lock.wait()
- # body as Canvas:
- appuifw.app.body=appuifw.Canvas(event_callback=None, redraw_callback=handle_redraw)
- appuifw.app.body=appuifw.Canvas(event_callback=None, redraw_callback=handle_redraw)
# body as Canvas:
appuifw.app.body=appuifw.Canvas(event_callback=None, redraw_callback=handle_redraw)
示例代码:
---------------------------------------------
- # Copyright (c) 2005 Jurgen Scheible
- # This script draws different shapes and text to the canvas
- import appuifw
- from appuifw import *
- import e32
- # import graphics
- from graphics import *
- # create an exit handler
- def quit():
- global running
- running=0
- appuifw.app.set_exit()
- # set the screen size to large
- appuifw.app.screen='large'
- # define an initial image (white)
- img=Image.new((176,208))
- # add different shapes and text to the image
- # coord. sequence x1,x2,y1,y2
- img.line((20,20,20,120),0xff00ee)
- img.rectangle((40,60,50,80),0xff0000)
- img.point((50.,150.),0xff0000,width=40)
- img.ellipse((100,150,150,180),0x0000ff)
- img.text((100,80), u'hello')
- # define your redraw function (that redraws the picture on and on)
- # in this case we redraw the image named img using the blit function
- def handle_redraw(rect):
- canvas.blit(img)
- running=1
- # define the canvas, include the redraw callback function
- canvas=appuifw.Canvas(event_callback=None, redraw_callback=handle_redraw)
- # set the app.body to canvas
- appuifw.app.body=canvas
- app.exit_key_handler=quit
- # create a loop to redraw the the screen again and again until the exit button is pressed
- while running:
- # redraw the screen
- handle_redraw(())
- # yield needs to be here in order that key pressings can be noticed
- e32.ao_yield()
# Copyright (c) 2005 Jurgen Scheible
# This script draws different shapes and text to the canvas
import appuifw
from appuifw import *
import e32
# import graphics
from graphics import *
# create an exit handler
def quit():
    global running
    running=0
    appuifw.app.set_exit()
# set the screen size to large
appuifw.app.screen='large'
# define an initial image (white)
img=Image.new((176,208))
# add different shapes and text to the image
# coord. sequence x1,x2,y1,y2
img.line((20,20,20,120),0xff00ee)
img.rectangle((40,60,50,80),0xff0000)
img.point((50.,150.),0xff0000,width=40)
img.ellipse((100,150,150,180),0x0000ff)
img.text((100,80), u'hello')
# define your redraw function (that redraws the picture on and on)
# in this case we redraw the image named img using the blit function
def handle_redraw(rect):
    canvas.blit(img)
running=1
# define the canvas, include the redraw callback function
canvas=appuifw.Canvas(event_callback=None, redraw_callback=handle_redraw)
# set the app.body to canvas
appuifw.app.body=canvas
app.exit_key_handler=quit
# create a loop to redraw the the screen again and again until the exit button is pressed
while running:
    # redraw the screen
    handle_redraw(())
    # yield needs to be here in order that key pressings can be noticed
    e32.ao_yield()
9,如何创建一个主循环?
把主循环放置在需要反复运行的代码位置
- 1. running = 1
- 2. while running:
- 3. # #e.g. redraw the screen:
- 4. handle_redraw(())
- 1. running = 1
- 2. while running:
- 3. # #e.g. redraw the screen:
- 4. handle_redraw(())
1.   running = 1
2.   while running:
3.        # #e.g. redraw the screen:
4.        handle_redraw(())
示例代码:
---------------------------------
- # Application skeleton (no main loop)
- import appuifw
- import e32
- appuifw.app.screen='large'
- # create your application logic ...
- def item1():
- print "hello"
- def subitem1():
- print "aha"
- def subitem2():
- print "good"
- appuifw.app.menu = [(u"item 1", item1),
- (u"Submenu 1", ((u"sub item 1", subitem1),
- (u"sub item 2", subitem2)))]
- def exit_key_handler():
- app_lock.signal()
- appuifw.app.title = u"drawing"
- app_lock = e32.Ao_lock()
- appuifw.app.body = ...
- appuifw.app.exit_key_handler = exit_key_handler
- app_lock.wait()
- """ description:
- # 1. import all modules needed
- import appuifw
- import e32
- # 2. set the screen size to large
- appuifw.app.screen='large'
- # 3. create your application logic ...
- # e.g. create all your definitions (functions) or classes and build instances of them or call them etc.
- # ...... application logic ....
- # 4. create the application menu including submenus
- # create the callback functions for the application menu and its submenus
- def item1():
- print ""
- round.set(u'item one was selected')
- def item1():
- print "hello"
- def subitem1():
- print "aha"
- def subitem2():
- print "good"
- appuifw.app.menu = [(u"item 1", item1),
- (u"Submenu 1", ((u"sub item 1", subitem1),
- (u"sub item 2", subitem2)))]
- # 5. create and set an exit key handler
- def exit_key_handler():
- app_lock.signal()
- # 6. set the application title
- appuifw.app.title = u"drawing"
- # 7. crate an active objects
- app_lock = e32.Ao_lock()
- # 8. set the application body
- appuifw.app.body = ...
- # no main loop
- appuifw.app.exit_key_handler = exit_key_handler
- app_lock.wait()
- """
- # Copyright (c) 2006 Jurgen Scheible
- # Application skeleton (no main loop)
- import appuifw
- import e32
- appuifw.app.screen='large'
- # create your application logic ...
- def item1():
- print "hello"
- def subitem1():
- print "aha"
- def subitem2():
- print "good"
- appuifw.app.menu = [(u"item 1", item1),
- (u"Submenu 1", ((u"sub item 1", subitem1),
- (u"sub item 2", subitem2)))]
- def exit_key_handler():
- app_lock.signal()
- appuifw.app.title = u"drawing"
- app_lock = e32.Ao_lock()
- appuifw.app.body = ...
- appuifw.app.exit_key_handler = exit_key_handler
- app_lock.wait()
- """ description:
- # 1. import all modules needed
- import appuifw
- import e32
- # 2. set the screen size to large
- appuifw.app.screen='large'
- # 3. create your application logic ...
- # e.g. create all your definitions (functions) or classes and build instances of them or call them etc.
- # ...... application logic ....
- # 4. create the application menu including submenus
- # create the callback functions for the application menu and its submenus
- def item1():
- print ""
- round.set(u'item one was selected')
- def item1():
- print "hello"
- def subitem1():
- print "aha"
- def subitem2():
- print "good"
- appuifw.app.menu = [(u"item 1", item1),
- (u"Submenu 1", ((u"sub item 1", subitem1),
- (u"sub item 2", subitem2)))]
- # 5. create and set an exit key handler
- def exit_key_handler():
- app_lock.signal()
- # 6. set the application title
- appuifw.app.title = u"drawing"
- # 7. crate an active objects
- app_lock = e32.Ao_lock()
- # 8. set the application body
- appuifw.app.body = ...
- # no main loop
- appuifw.app.exit_key_handler = exit_key_handler
- app_lock.wait()
- """
# Copyright (c) 2006 Jurgen Scheible
# Application skeleton (no main loop)
import appuifw
import e32
appuifw.app.screen='large'
# create your application logic ...
def item1():
    print "hello"
def subitem1():
    print "aha"
def subitem2():
    print "good"
appuifw.app.menu = [(u"item 1", item1),
                    (u"Submenu 1", ((u"sub item 1", subitem1),
                                    (u"sub item 2", subitem2)))]
def exit_key_handler():
    app_lock.signal()
appuifw.app.title = u"drawing"
app_lock = e32.Ao_lock()
appuifw.app.body = ...
appuifw.app.exit_key_handler = exit_key_handler
app_lock.wait()
""" description:
# 1. import all modules needed
import appuifw
import e32
# 2. set the screen size to large
appuifw.app.screen='large'
# 3. create your application logic ...
# e.g. create all your definitions (functions) or classes and build instances of them or call them etc.
# ...... application logic ....
# 4. create the application menu including submenus
# create the callback functions for the application menu and its submenus
def item1():
    print ""
    round.set(u'item one was selected')
def item1():
    print "hello"
def subitem1():
    print "aha"
def subitem2():
    print "good"
appuifw.app.menu = [(u"item 1", item1),
                    (u"Submenu 1", ((u"sub item 1", subitem1),
                                    (u"sub item 2", subitem2)))]
    # 5. create and set an exit key handler
def exit_key_handler():
    app_lock.signal()
# 6. set the application title
appuifw.app.title = u"drawing"
# 7. crate an active objects
app_lock = e32.Ao_lock()
# 8. set the application body
appuifw.app.body = ...
# no main loop
appuifw.app.exit_key_handler = exit_key_handler
app_lock.wait()
"""
2. with mainloop (if suitable)
- # Copyright (c) 2006 Jurgen Scheible
- # Application skeleton with main loop (while loop)
- import appuifw
- import e32
- appuifw.app.screen='large'
- # create your application logic ...
- running=1
- def quit():
- global running
- running=0
- app.exit_key_handler=quit
- appuifw.app.title = u"drawing"
- appuifw.app.body= ...
- while running:
- # handle_redraw(())
- e32.ao_sleep(0.5)
- """ description:
- # 1. import all modules needed
- import appuifw
- import e32
- # 2. set the screen size to large
- appuifw.app.screen='large'
- # 3. create your application logic ...
- # e.g. create all your definitions (functions) or classes and build instances of them or call them etc.
- # ...... application logic ....
- running=1
- # 4. no application menu here neccessary
- # 5. create and set an exit key handler: when exit ley is pressed, the main loop stops going (because the variable running will be put to 0=
- def quit():
- global running
- running=0
- app.exit_key_handler=quit
- # 6. set the application title
- appuifw.app.title = u"drawing"
- # 7. no active objects needed
- # 8. set the application body
- appuifw.app.body= ...
- # 9. create a main loop (e.g. redraw the the screen again and again)
- while running:
- # #put here things that need to be run through again and again
- # #e.g. redraw the screen:
- # handle_redraw(())
- # yield needs to be here e.g. in order that key pressings can be noticed
- e32.ao_yield()
- """


 105
105


 被折叠的 条评论
为什么被折叠?
被折叠的 条评论
为什么被折叠?
 到【灌水乐园】发言


