


SpringBoot之mybatis-generator自动生成
上文说道勤快的人已经可以开始使用spring boot+mybatis了,这次就来说说懒得人怎么用:
mybatis-generator用过的人都知道,俩字方便,一次配置,到处使用下面就说下spring boot里边怎么配置,pom.xml里加入如下插件
<plugin>
    <groupId>org.mybatis.generator</groupId>
    <artifactId>mybatis-generator-maven-plugin</artifactId>
    <version>1.3.2</version>
    <configuration>
        <verbose>true</verbose>
        <overwrite>true</overwrite>
    </configuration>
</plugin>
resource目录下创建generatorConfig.xml文件
<?xml version="1.0" encoding="UTF-8"?>
<!DOCTYPE generatorConfiguration
PUBLIC "-//mybatis.org//DTD MyBatis Generator Configuration 1.0//EN"
"http://mybatis.org/dtd/mybatis-generator-config_1_0.dtd">
<generatorConfiguration>
<properties resource="application.yml" />
<!-- mysql驱动的位置 -->
<classPathEntry location="C:\Users\admin\.m2\repository\mysql\mysql-connector-java\5.1.38\mysql-connector-java-5.1.38.jar" />
<context id="Tables" targetRuntime="MyBatis3">
<!-- 注释 -->
<commentGenerator>
<!-- 是否生成注释代时间戳 -->
<property name="suppressDate" value="true"/>
<!-- 是否去除自动生成的注释 true:是 : false:否 -->
<property name="suppressAllComments" value="true"/>
</commentGenerator>
<!-- JDBC连接 -->
<jdbcConnection
driverClass="com.mysql.jdbc.Driver"
connectionURL="jdbc:mysql://localhost:3306/dbzb"
userId="root"
password="tiger">
</jdbcConnection>
<!-- 非必需,类型处理器,在数据库类型和java类型之间的转换控制-->
<!-- 默认false,把JDBC DECIMAL 和 NUMERIC 类型解析为 Integer,为 true时把JDBC DECIMAL 和
NUMERIC 类型解析为java.math.BigDecimal -->
<javaTypeResolver>
<!-- 是否使用bigDecimal, false可自动转化以下类型(Long, Integer, Short, etc.) -->
<property name="forceBigDecimals" value="false" />
</javaTypeResolver>
<!-- 生成实体类地址 -->
<javaModelGenerator targetPackage="com.shx.dao.model" targetProject="src/main/java">
<!-- 从数据库返回的值被清理前后的空格 -->
<property name="trimStrings" value="true" />
<!-- enableSubPackages:是否让schema作为包的后缀 -->
<property name="enableSubPackages" value="false" />
</javaModelGenerator>
<!-- 生成mapper xml文件 -->
<sqlMapGenerator targetPackage="com.shx.dao.mapper" targetProject="src/main/java">
<!-- enableSubPackages:是否让schema作为包的后缀 -->
<property name="enableSubPackages" value="false" />
</sqlMapGenerator>
<!-- 生成mapper xml对应Client-->
<javaClientGenerator targetPackage="com.shx.dao.mapper" targetProject="src/main/java" type="XMLMAPPER">
<!-- enableSubPackages:是否让schema作为包的后缀 -->
<property name="enableSubPackages" value="false" />
</javaClientGenerator>
<!-- 配置表信息 -->
<!-- schema即为数据库名 tableName为对应的数据库表 domainObjectName是要生成的实体类 enable*ByExample
是否生成 example类 -->
<table schema="t_livetype" tableName="t_livetype"
domainObjectName="LiveType" enableCountByExample="false"
enableDeleteByExample="false" enableSelectByExample="false"
enableUpdateByExample="false">
</table>
</context>
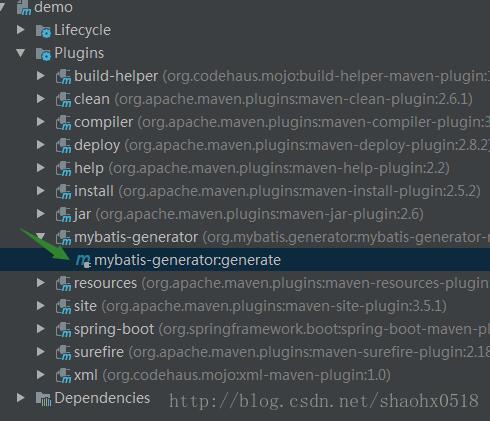
</generatorConfiguration>OK,到此为止大功告成,ide右侧maven窗口右键run一下就可以了,success之后你需要的model,mapper就都有了,然后把上文提到的application处@MapperScan(basePackages = “com.shx.dao”)和application.yml的
type-aliases-package: classpath*:com.shx.dao.model
mapper-locations: classpath*:com.shx.dao.mapper/*.xml
改成你自己的包路径就可以了


 399
399


 被折叠的 条评论
为什么被折叠?
被折叠的 条评论
为什么被折叠?
 到【灌水乐园】发言


