


添加Swagger2依赖
在pom.xml中加入Swagger2的依赖
<dependency>
            <groupId>io.springfox</groupId>
            <artifactId>springfox-swagger2</artifactId>
            <version>2.5.0</version>
        </dependency>
        <dependency>
            <groupId>io.springfox</groupId>
            <artifactId>springfox-swagger-ui</artifactId>
            <version>2.5.0</version>
        </dependency>
        <!--jackson用于将springfox返回的文档对象转换成JSON字符串-->
        <dependency>
            <groupId>com.fasterxml.jackson.core</groupId>
            <artifactId>jackson-annotations</artifactId>
            <version>2.5.0</version>
        </dependency>
        <dependency>
            <groupId>com.fasterxml.jackson.core</groupId>
            <artifactId>jackson-databind</artifactId>
            <version>2.5.0</version>
        </dependency>
        <dependency>
            <groupId>com.fasterxml.jackson.core</groupId>
            <artifactId>jackson-core</artifactId>
            <version>2.5.0</version>
        </dependency>
创建Swagger2配置类
package com.leo.ows.util;

import org.springframework.context.annotation.Bean;
import org.springframework.context.annotation.ComponentScan;
import org.springframework.context.annotation.Configuration;
import org.springframework.web.servlet.config.annotation.EnableWebMvc;

import springfox.documentation.builders.ApiInfoBuilder;
import springfox.documentation.builders.RequestHandlerSelectors;
import springfox.documentation.service.ApiInfo;
import springfox.documentation.spi.DocumentationType;
import springfox.documentation.spring.web.plugins.Docket;
import springfox.documentation.swagger2.annotations.EnableSwagger2;


@EnableWebMvc
@EnableSwagger2
@ComponentScan(basePackages = {"com.leo.ows.action"})
@Configuration
public class MySwaggerConfig {

    @Bean
    public Docket petApi() {
        return new Docket(DocumentationType.SWAGGER_2).apiInfo(apiInfo()).select()
               .apis(RequestHandlerSelectors.basePackage("com.leo.ows.action")).build();

    }

    private ApiInfo apiInfo() {
        return new ApiInfoBuilder().title("服务平台 API").description("").termsOfServiceUrl("http://localhost:8080").version("1.0").build();
    }
}
配置静态文件访问
<mvc:resources location="classpath:/META-INF/resources/" mapping="swagger-ui.html"/>
<mvc:resources location="classpath:/META-INF/resources/webjars/" mapping="/webjars/**"/>
package com.leo.ows.action;
import javax.annotation.Resource;
import org.springframework.stereotype.Controller;
import org.springframework.ui.Model;
import org.springframework.web.bind.annotation.RequestMapping;
import org.springframework.web.bind.annotation.RequestMethod;
import com.leo.ows.entity.Article;
import com.leo.ows.servise.ArticleServise;
import io.swagger.annotations.Api;
import io.swagger.annotations.ApiOperation;
@Api(description = "文章控制器")
@Controller
public class ArticleAction {
@Resource
private ArticleServise articleServise;
@ApiOperation(value = "增加文章", httpMethod = "POST")
@RequestMapping(value = "/articleAdd", method = RequestMethod.POST)
public String ArticleAdd(Model model, Article article) {
System.out.println(article.getTitle());
articleServise.AddArticle(article);
return "index";
}
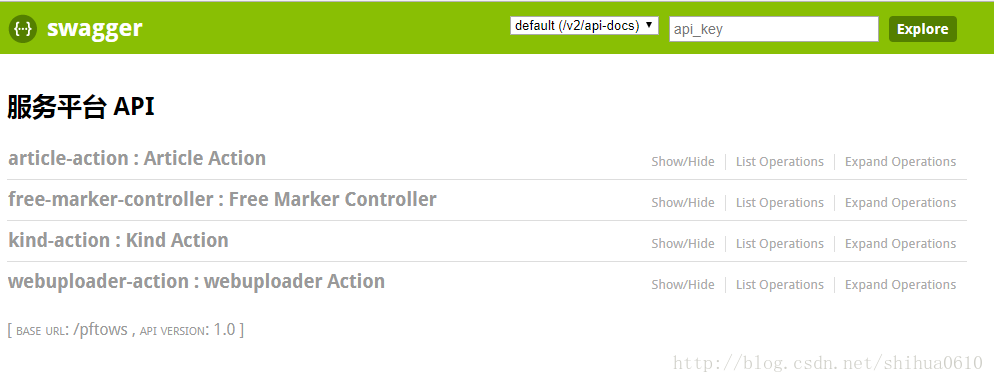
}启动项目访问即可看到
http://localhost:8080/pftows/swagger-ui.html
常用到的注解有:
Api
ApiModel
ApiModelProperty
ApiOperation
ApiParam
ApiResponse
ApiResponses
ResponseHeader
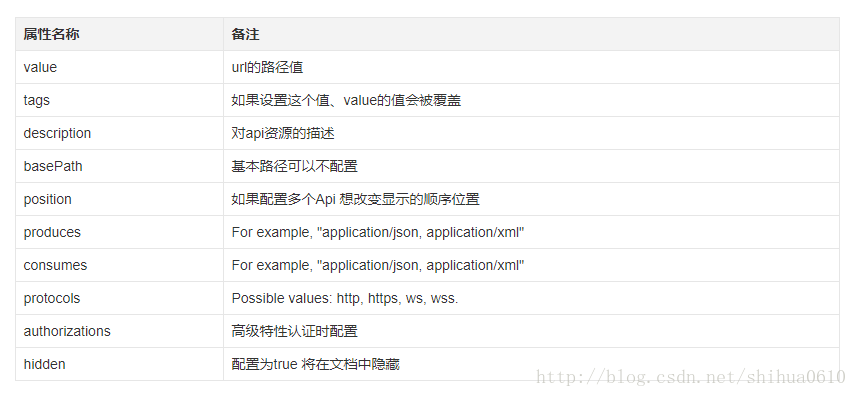
api标记
Api 标记可以标记一个Controller类做为swagger 文档资源,使用方式:
@Api(value = “/user”, description = “Operations about user”)
与Controller注解并列使用。 属性配置:
属性名称 备注
在SpringMvc中的配置如下:
@Controller
@RequestMapping(value = "/api/pet", produces = {APPLICATION_JSON_VALUE, APPLICATION_XML_VALUE})
@Api(value = "/pet", description = "Operations about pets")
public class PetController {

}
ApiOperation标记
ApiOperation每一个url资源的定义,使用方式:
@ApiOperation(
          value = "Find purchase order by ID",
          notes = "For valid response try integer IDs with value <= 5 or > 10\. Other values will generated exceptions",
          response = Order,
          tags = {"Pet Store"})
与Controller中的方法并列使用。
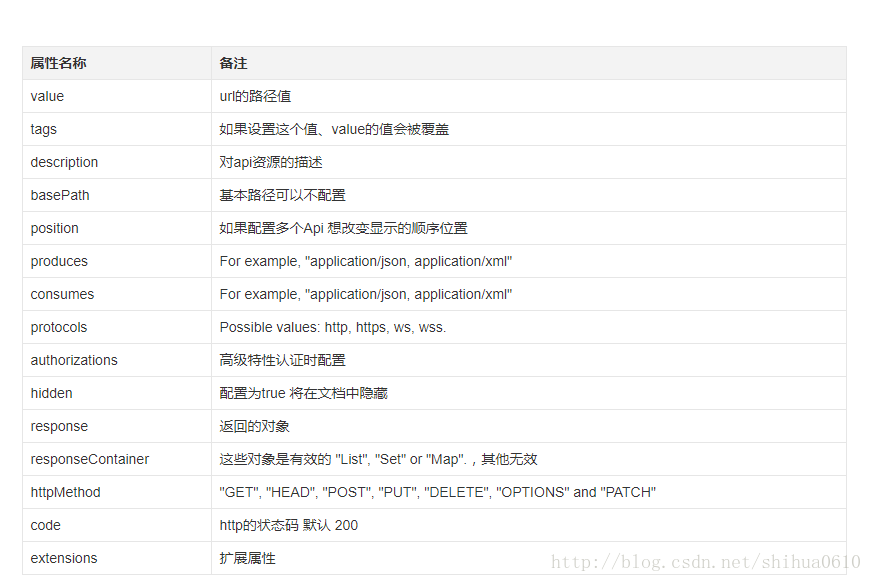
属性配置:
属性名称 备注
在SpringMvc中的配置如下:
@RequestMapping(value = "/order/{orderId}", method = GET)
  @ApiOperation(
      value = "Find purchase order by ID",
      notes = "For valid response try integer IDs with value <= 5 or > 10\. Other values will generated exceptions",
      response = Order.class,
      tags = { "Pet Store" })
   public ResponseEntity<Order> getOrderById(@PathVariable("orderId") String orderId)
      throws NotFoundException {
    Order order = storeData.get(Long.valueOf(orderId));
    if (null != order) {
      return ok(order);
    } else {
      throw new NotFoundException(404, "Order not found");
    }
  }
ApiParam标记
ApiParam请求属性,使用方式:
public ResponseEntity<User> createUser(@RequestBody @ApiParam(value = "Created user object", required = true) User user)与Controller中的方法并列使用。
属性配置:
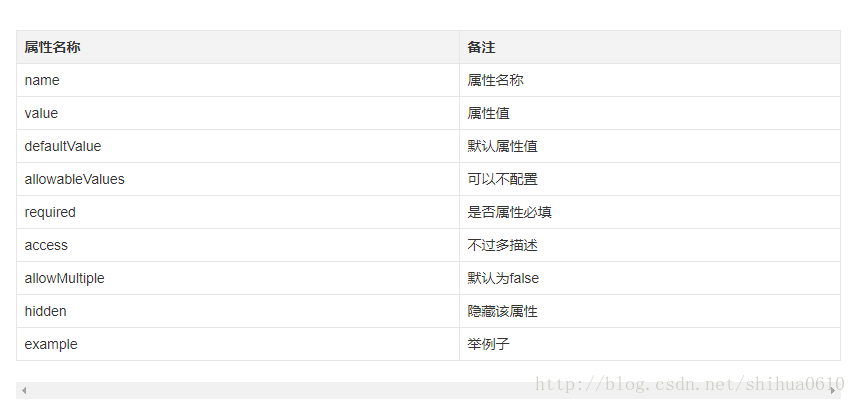
在SpringMvc中的配置如下:
 public ResponseEntity<Order> getOrderById(
      @ApiParam(value = "ID of pet that needs to be fetched", allowableValues = "range[1,5]", required = true)
      @PathVariable("orderId") String orderId)
ApiResponse
ApiResponse:响应配置,使用方式:
@ApiResponse(code = 400, message = “Invalid user supplied”)
与Controller中的方法并列使用。 属性配置:
属性名称 备注
code http的状态码
message 描述
response 默认响应类 Void
reference 参考ApiOperation中配置
responseHeaders 参考 ResponseHeader 属性配置说明
responseContainer 参考ApiOperation中配置
在SpringMvc中的配置如下:
 @RequestMapping(value = "/order", method = POST)
  @ApiOperation(value = "Place an order for a pet", response = Order.class)
  @ApiResponses({ @ApiResponse(code = 400, message = "Invalid Order") })
  public ResponseEntity<String> placeOrder(
      @ApiParam(value = "order placed for purchasing the pet", required = true) Order order) {
    storeData.add(order);
    return ok("");
  }
ApiResponses
ApiResponses:响应集配置,使用方式:
@ApiResponses({ @ApiResponse(code = 400, message = “Invalid Order”) })
与Controller中的方法并列使用。 属性配置:
属性名称 备注
value 多个ApiResponse配置
在SpringMvc中的配置如下:
 @RequestMapping(value = "/order", method = POST)
  @ApiOperation(value = "Place an order for a pet", response = Order.class)
  @ApiResponses({ @ApiResponse(code = 400, message = "Invalid Order") })
  public ResponseEntity<String> placeOrder(
      @ApiParam(value = "order placed for purchasing the pet", required = true) Order order) {
    storeData.add(order);
    return ok("");
  }
ResponseHeader
响应头设置,使用方法
@ResponseHeader(name="head1",description="response head conf")与Controller中的方法并列使用。 属性配置:
属性名称 备注
name 响应头名称
description 头描述
response 默认响应类 Void
responseContainer 参考ApiOperation中配置
在SpringMvc中的配置如下:
@ApiModel(description = “群组”)


 564
564


 被折叠的 条评论
为什么被折叠?
被折叠的 条评论
为什么被折叠?
 到【灌水乐园】发言


