


在现今的Web应用中经常使用Spring框架来装载JavaBean。如果要想将某些在Spring中装配的JavaBean发布成WebService,使用Axis2的Spring感知功能是非常容易做到的。
1、首先建立一个web工程,名字叫WebService,
2、把相应的axis2的jar文件考到WEB-INF的lib下
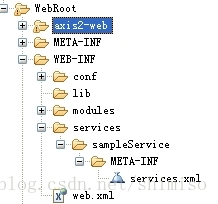
3、 在项目的WebRoot下的目录结构要和以前用war包是的目录结构一样(否则可能就要报错了)
目录结构如图所示:
4、在src下建立package sample.service
5、建立提供服务的接口
  package sample.service;

/**
 * 定义服务接口
 * @author 11111
 *
 */
public interface ServiceServer {
//定义服务方法
	public String sayHello(String name);

}
实现类:
package sample.service;

public class ServiceServerImpl implements ServiceServer {

	public String sayHello(String name) {

		return "hello"+name;
	}

}
6、在src下建立applicationContext.xml文件
配置如下
<?xml version="1.0" encoding="UTF-8"?>
<beans xmlns="http://www.springframework.org/schema/beans"
	xmlns:xsi="http://www.w3.org/2001/XMLSchema-instance"
	xmlns:aop="http://www.springframework.org/schema/aop"
	xmlns:tx="http://www.springframework.org/schema/tx"
	xsi:schemaLocation="http://www.springframework.org/schema/beans http://www.springframework.org/schema/beans/spring-beans-2.0.xsd
           http://www.springframework.org/schema/aop http://www.springframework.org/schema/aop/spring-aop-2.0.xsd
           http://www.springframework.org/schema/tx http://www.springframework.org/schema/tx/spring-tx-2.0.xsd">


<bean id="SayHelloService" class="sample.service.ServiceServerImpl">
</bean>


</beans>
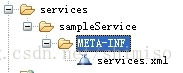
7、在WebRoor/WEB-INF/services/目录下建立目录sampleService(这个名字可以随便取)
然后建立在其下META-INF目录,然后再在其目录下建立services.xml
目录结构如下
services.xml的内容如下:
<?xml version="1.0" encoding="UTF-8"?>


<service name="HelloWorld">
		<description>web service</description>
		<parameter name="ServiceObjectSupplier">
			org.apache.axis2.extensions.spring.receivers.SpringServletContextObjectSupplier
		</parameter>
		<parameter name="SpringBeanName">SayHelloService</parameter>
//SpringBeanName名字是固定的不能改
//SayHelloService是spring中注册的实现类的id(这个大家肯定很清楚了)

 <operation name="sayHello">
			<messageReceiver
				class="org.apache.axis2.rpc.receivers.RPCMessageReceiver" />
		</operation>

</service>
8、现在要配置一下web.xml了
内容如下:
<?xml version="1.0" encoding="UTF-8"?>
<web-app version="2.5"
	xmlns="http://java.sun.com/xml/ns/javaee"
	xmlns:xsi="http://www.w3.org/2001/XMLSchema-instance"
	xsi:schemaLocation="http://java.sun.com/xml/ns/javaee
	http://java.sun.com/xml/ns/javaee/web-app_2_5.xsd">

	<servlet>
        <servlet-name>AxisServlet</servlet-name>
//注册axis2的servlet
        <servlet-class>org.apache.axis2.transport.http.AxisServlet</servlet-class>
        <load-on-startup>1</load-on-startup>
    </servlet>

    <servlet-mapping>
        <servlet-name>AxisServlet</servlet-name>
        <url-pattern>/services/*</url-pattern>
    </servlet-mapping>
//加载spring的配置文件
	<context-param>
      <param-name>contextConfigLocation</param-name>

      <param-value>classpath*:applicationContext.xml</param-value>
	</context-param>
//增加spring监听器
	<listener>
        <listener-class>org.springframework.web.context.ContextLoaderListener</listener-class>
	</listener>
</web-app>
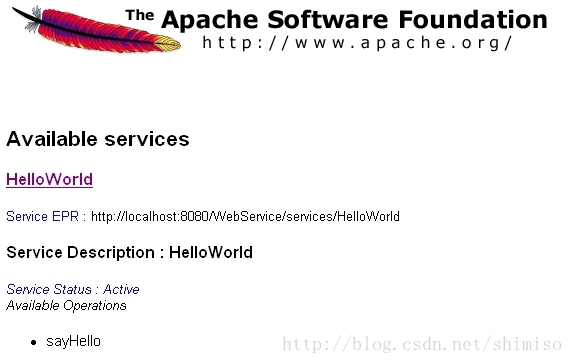
9、启动tomcat 在浏览器中输入http://localhost:8080/WebService/services/listServices
可以看到一下内容说明我们的服务已经发布成功了
访问
http://localhost:8080/WebService/services/HelloWorld?wsdl
可以查看wsdl
现在我们开始访问我们的服务,我们采用用axis2 的eclipse 插件自动生成客户端
一、根据wsdl自动生成客户端的方式
1、新建一个java project ,取名为ServiceClient
2、建立一个User Library 取名AXIS2 将axis2 所需要的jar文件加到AXIS2中,然后在
ServiceClient 中引入这个library
3、在eclipse中安装axis2插件
Service Archive Wizard - Eclipse Plug-in 和 Code Generator Wizard - Eclipse Plug-in
注:安装方式可见我的博客中的axis webservice 笔记 安装eclipse axis2 插件 (links 方式)文章
4、(1)选择new->other->Axis2 Wizards-> Axis2 code generator
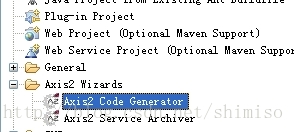
(2)下一步

(3)下一步
把浏览其中的wsdl地址考到里面

(4) 下一步 直接点next
(5)选择生成到我们刚建好的ServiceClient的src 目录中

然后点击finish,这样就可一生成客户端了,刷新项目就可以看到了
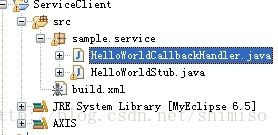
5、生成的目录结构如图所示:
二、新建ServiceClient.java 内容如下
   package sample.service;

public class ServiceClient {

	/**
	 * @param args
	 */
	public static void main(String[] args) throws java.lang.Exception{
//创建存根类
		HelloWorldStub stub = new HelloWorldStub();
//设置相应的方法的值
	        HelloWorldStub.SayHello sayHello = new HelloWorldStub.SayHello();

		sayHello.setName("张三");
//调用服务的相应方法并获得返回值
		HelloWorldStub.SayHelloResponse response = stub.sayHello(sayHello);

		System.out.println(response.get_return());

	}

}
运行这个java类,可以看到console中
打印出:hello张三 ,说明我们已经调用成功了。
教程源码下载:
转载请标明出处http://blog.csdn.net/shimiso
欢迎有识之士加入我们的技术交流群:361579846


 441
441


 被折叠的 条评论
为什么被折叠?
被折叠的 条评论
为什么被折叠?
 到【灌水乐园】发言


