


本人录制技术视频地址:https://edu.csdn.net/lecturer/1899 欢迎观看。
UICollectionView 和 UICollectionViewController 类是iOS6 新引进的API,用于展示集合视图,布局更加灵活,可实现多列布局,用法类似于UITableView 和 UITableViewController 类。
我们来按顺序看下面四幅图。可以看出,UICollectionViewCell与UITableViewCell的结构很相似。


下图是UICollectionView相关的类图,从图中我们可以看到
1. UICollectionView继承自UIScrollView,
2. 尊循UICollectionViewDelegate和UICollectionViewDataSource两个协议
3. 管理UICollectionViewCell

图中貌似还缺点东西,什么呢?对了,就是缺少Layout。我们需要Layout对cell和其它的view进行布局。再看下图,图中多了UICollectionViewLayout和UICollectionViewFlowLayout (关于这两个layout,我会在下面两节中介绍到)。

如下面的两个图是collection view的layout。


CollectionView主要是以Item为基本单元,可以看出,每个Item不一定占满一行,而tableView的Cell必须占满一行。
典型的例子:九宫格。
UITableView的实现思路:
1. 自定义一个UITableViewCell。
2. 在自定义的Cell的contentView上面放置所需要的元素。
3. 为每一个放置的元素添加点击事件,而且还要计算好每个元素所在的位置。
UICollectionView的实现思路
每一个Item就是一个Cell,而点击事件直接交给UICollectionView的代理方法就可以了。
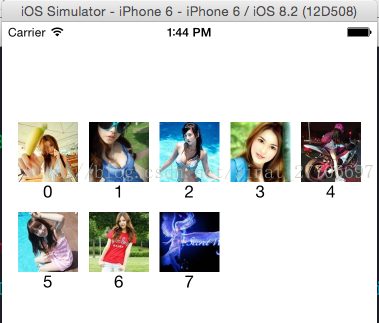
先看实现效果图:
代码大致实现步骤如下:
1. 自定义UICollectionViewCell,就是上图中对应的每一个Item。
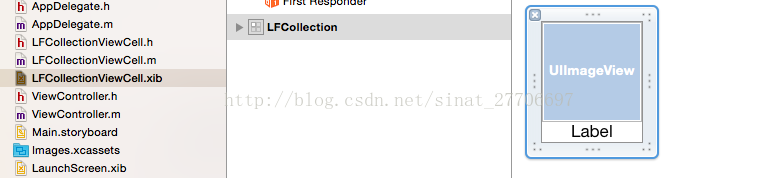
LFCollectionViewCell.h
@interface LFCollectionViewCell : UICollectionViewCell

@property (weak, nonatomic) IBOutlet UIImageView *myImage;
@property (weak, nonatomic) IBOutlet UILabel *myLabel;

@end
LFCollectionViewCell.m
@implementation LFCollectionViewCell

- (void)awakeFromNib {
    // Initialization code
}

- (instancetype)initWithFrame:(CGRect)frame {
    if(self = [super initWithFrame:frame]){
        self = [[[NSBundle mainBundle] loadNibNamed:@"LFCollectionViewCell" owner:nil options:nil] lastObject];
    }
    return self;
}

@end
2. 主界面代码:
@interface ViewController ()<UICollectionViewDataSource,UICollectionViewDelegate>

@end

@implementation ViewController

- (void)viewDidLoad {
    [super viewDidLoad];
    // 注册LFCollectionViewCell
    [self.collectionView registerClass:[LFCollectionViewCell class] forCellWithReuseIdentifier:@"LFCollection"];
}

#pragma mark - UICollectionView DataSource
// 每个section的item个数
- (NSInteger)collectionView:(UICollectionView *)collectionView numberOfItemsInSection:(NSInteger)section {
    return 8;
}

- (UICollectionViewCell *)collectionView:(UICollectionView *)collectionView cellForItemAtIndexPath:(NSIndexPath *)indexPath {
    // UICollectionViewCell内部已经实现了循环使用,所以不用判断为空,自己创建
    LFCollectionViewCell *cell = (LFCollectionViewCell *)[collectionView dequeueReusableCellWithReuseIdentifier:@"LFCollection" forIndexPath:indexPath];

    //图片名称
    NSString *image = [NSString stringWithFormat:@"%ld.jpg", (long)indexPath.row];

    //加载图片
    cell.myImage.image = [UIImage imageNamed:image];

    //设置label文字
    cell.myLabel.text = [NSString stringWithFormat:@"%ld",(long)indexPath.row];

    return cell;
}
@end
需要说明的两点:
1. 在viewDidload中完成LFCollectionViewCell的注册。
2. 在dequeueReusableCellWithReuseIdentifer方法从缓存池中获取的cell不需要判断取出来的cell是否为nil,如果为nil,系统会自动创建一个。
3. 如果改变图片的尺寸,只要当屏幕的一行不够显示图片的时候,图片会自动换行。
4. 想要实现每个Item的点击实现,只要在代理中实现就可以了。
- (void)collectionView:(UICollectionView *)collectionView didSelectItemAtIndexPath:(NSIndexPath *)indexPath {

}


 5383
5383


 被折叠的 条评论
为什么被折叠?
被折叠的 条评论
为什么被折叠?
 到【灌水乐园】发言


