


Android-Universal-Image-Loader 解读
过年回来,工作不是很忙,想着花些时间把之前用到的/看过的 一些知识整理下,就从一个比较早期的图片加载框架 Android-Universal-Image-Loader 开始好啦
- imageLoader简单使用
- imageLoader结构设计
- imageLoader源码解读
imageLoader的简单使用
public class BaseActivity extends Activity {//也可以放在 Application oncreate 中
    ImageLoader imageLoader;
    @Override
    protected void onCreate(Bundle savedInstanceState) {
        //创建默认的ImageLoader配置参数
        ImageLoaderConfiguration config =ImageLoaderConfiguration.createDefault(this);
        ImageLoader.getInstance().init(config);
        super.onCreate(savedInstanceState);
    }
}ImageLoaderConfiguration是图片加载器ImageLoader的配置参数,这儿使用了建造者模式,这里是直接使用了createDefault()方法创建一个默认的ImageLoaderConfiguration,当然也可以自己设置具体。(ps:更度详细可以参考这位的)
接下来在页面中加载
ImageView mImageView = (ImageView) findViewById(R.id.image);
String imageUrl = "http://ww1.sinaimg.cn/bmiddle/a20a9b80jw1f1ywucphddj20jw3gldqp.jpg";

//显示图片的配置
DisplayImageOptions options = new DisplayImageOptions.Builder()
        .showImageOnLoading(R.drawable.ic_stub)
        .showImageOnFail(R.drawable.ic_error)
        .cacheInMemory(true)
        .cacheOnDisk(true)
        .bitmapConfig(Bitmap.Config.RGB_565)
        .build();

ImageLoader.getInstance().displayImage(imageUrl, mImageView, options);
项目中 最主要的就是这 - ImageLoaderConfiguration、DisplayImageOptions、ImageLoader三个类。
其中:
- ImageLoaderConfiguration: 是针对图片缓存的全局配置,主要有线程类、缓存大小、磁盘大小、图片下载与解析、日志方面的配置。
- DisplayImageOptions: 用于指导每一个Imageloader根据网络图片的状态(空白、下载错误、正在下载)显示对应的图片,是否将缓存加载到磁盘上,下载完后对图片进行怎么样的处理。
- ImageLoader: 是具体下载图片,缓存图片,显示图片的具体操作类。它有两个具体的方法displayImage(…),loadImage(…);他们具体的实现都是在displayImage(…)
他们之间的关系类似与,公司制度、部门工作简章、员工之间的关系;ImageLoaderConfiguration就好比公司制度,规定一天几小时的班,必须打卡等,这是针对公司所有员工的规定;DisplayImageOptions则类似不同部门有不同的工作内容,工作规则等;ImageLoader则是具体员工,负责自己部门的工作内容。
具体使用细节点我
imageLoader的结构设计
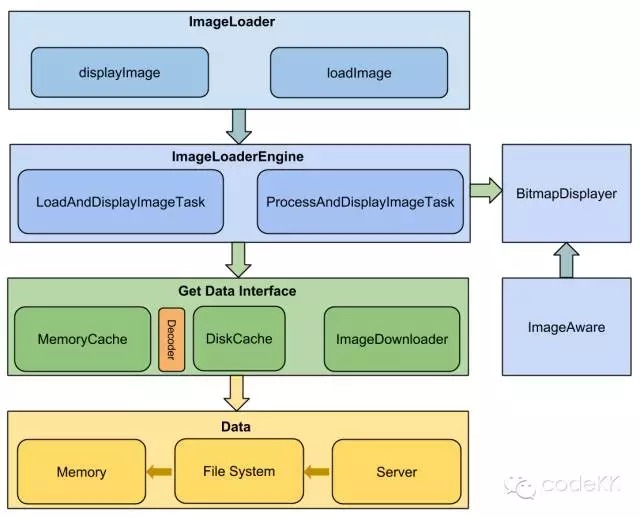
Android-Universal-Image-Loader,整个库主要分为ImageLoaderEngine、Cache && ImageDownloader、ImageDecoder、BitmapDisplayer、BitmapProcessor 5层。
简单来说就是:ImageLoader 收到加载以及显示图片的任务、并将它交给ImageLoaderEngine,ImageLoaderEngine分发任务到具体线程池去执行,任务通过 Cache 及 ImageDownloader 获取图片,中间可能经过BitmapProcess、ImageDecoder处理,最终转化为Bitmap,交给BitmapDisplayer在 imageAware中显示。
imageLoader源码解读
经过之前的预备,现在开始来看源码;这儿先大体上给介绍下流程,后面慢慢验证。
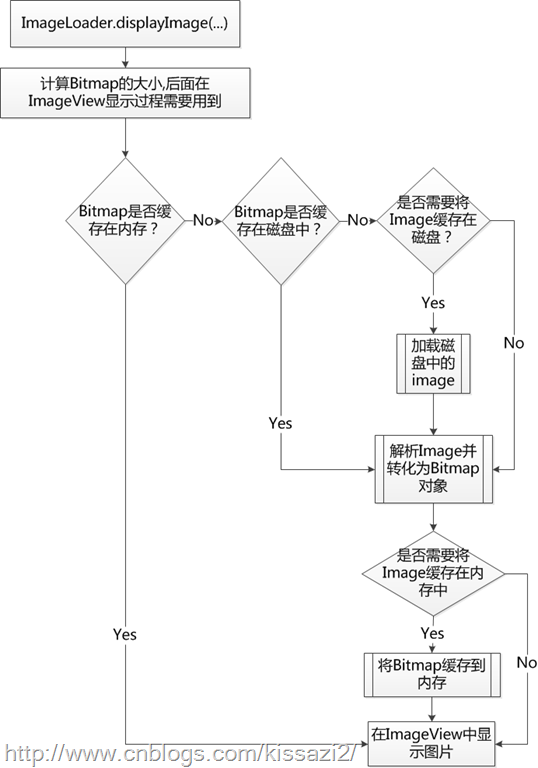
从开头知道加载图片最终都是调用的displayImage(…),那么先看下
//
public void displayImage(String uri, ImageView imageView, DisplayImageOptions options,
        ImageLoadingListener listener, ImageLoadingProgressListener progressListener) {
    displayImage(uri, new ImageViewAware(imageView), options, listener, progressListener);
}
将 imageView 转成 ImageViewAware;ImageViewAware主要是对imageView做一个包装
    //将 imageView 变成弱引用           方便回收imageView对象
    this.viewRef = new WeakReference<View>(view);
还有就是获取imageView的 宽高 这样可以根据宽高进行裁剪 减少内存使用
接着我们看displayImage(….)的具体实现,代码太长 我们分段来看
checkConfiguration();                   //检查ImageLoaderConfiguration 是否初始化 ,初始化应该在 application/baseActivity 里进行
if (imageAware == null) {
    throw new IllegalArgumentException(ERROR_WRONG_ARGUMENTS);
}
if (listener == null) {
    listener = emptyListener;
}
if (options == null) {
    options = configuration.defaultDisplayImageOptions;
}

if (TextUtils.isEmpty(uri)) {                       //至此以及以上 各种非空 判断
    engine.cancelDisplayTaskFor(imageAware);        //  ImageLoaderEngine engine 存在一个 HashMap 用来记录正在加载的任务,加载图片的时候会将imageView的id和图片的URL 宽高放进去 加载完成之后会将其移除
                                                    //  然后将DisplayImageOptions的imageResForEmptyUri的图片设置给ImageView,最后回调给ImageLoadingListener接口告诉它这次任务完成了。
    listener.onLoadingStarted(uri, imageAware.getWrappedView());
    if (options.shouldShowImageForEmptyUri()) {
        imageAware.setImageDrawable(options.getImageForEmptyUri(configuration.resources));
    } else {
        imageAware.setImageDrawable(null);
    }
    listener.onLoadingComplete(uri, imageAware.getWrappedView(), null);
    return;
}
~~第1行代码是检查ImageLoaderConfiguration是否初始化,这个初始化是在Application中进行的
~~12-21行主要是针对url为空的时候做的处理,
~~第13行代码中,ImageLoaderEngine中存在一个HashMap,用来记录正在加载的任务,加载图片的时候会将ImageView的id和图片的url加上尺寸加入到HashMap中,加载完成之后会将其移除,然后将DisplayImageOptions的imageResForEmptyUri的图片设置给ImageView,最后回调给ImageLoadingListener接口告诉它这次任务完成了。
ImageSize targetSize = ImageSizeUtils.defineTargetSizeForView(imageAware, configuration.getMaxImageSize());     // 将imageView的宽高封装成 ImageSize对象,如果获取imageView的宽高<=0 就会取屏幕宽高做为imageView的宽高,我们在使用listview Gridview去加载图片的时候,第一页获取的是屏幕的宽高,之后就是控件本身的大小了。
String memoryCacheKey = MemoryCacheUtils.generateKey(uri, targetSize);
engine.prepareDisplayTaskFor(imageAware, memoryCacheKey);
listener.onLoadingStarted(uri, imageAware.getWrappedView());
ImageSize targetSize = ImageSizeUtils.defineTargetSizeForView(imageAware, configuration.getMaxImageSize()); // 将imageView的宽高封装成 ImageSize对象,如果获取imageView的宽高<=0 就会取屏幕宽高做为imageView的宽高,我们在使用listview Gridview去加载图片的时候,第一页获取的是屏幕的宽高,之后就是控件本身的大小了。
String memoryCacheKey = MemoryCacheUtils.generateKey(uri, targetSize);
engine.prepareDisplayTaskFor(imageAware, memoryCacheKey);
listener.onLoadingStarted(uri, imageAware.getWrappedView());
Bitmap bmp = configuration.memoryCache.get(memoryCacheKey); // 从内存缓存中获取Bitmap对象,我们可以再ImageLoaderConfiguration中配置内存缓存逻辑,默认使用的是LruMemoryCacheif (bmp != null && !bmp.isRecycled()) {
L.d(LOG_LOAD_IMAGE_FROM_MEMORY_CACHE, memoryCacheKey);
if (options.shouldPostProcess()) { //图片处理器 是否开启 默认postProcessor是为null的,BitmapProcessor接口主要是对Bitmap进行处理,这个框架并没有给出相对应的实现,如果我们有自己的需求的时候可以自己实现BitmapProcessor接口
ImageLoadingInfo imageLoadingInfo = new ImageLoadingInfo(uri, imageAware, targetSize, memoryCacheKey,
options, listener, progressListener, engine.getLockForUri(uri));
ProcessAndDisplayImageTask displayTask = new ProcessAndDisplayImageTask(engine, bmp, imageLoadingInfo,
defineHandler(options));
if (options.isSyncLoading()) {
displayTask.run();
} else {
engine.submit(displayTask);
}
} else { // 将Bitmap设置到ImageView上面,这里我们可以在DisplayImageOptions中配置显示需求displayer,默认使用的是SimpleBitmapDisplayer,直接将Bitmap设置到ImageView上面,我们可以配置其他的显示逻辑他这里提供了FadeInBitmapDisplayer(透明度从0-1)RoundedBitmapDisplayer(4个角是圆弧)等, 然后回调到ImageLoadingListener接口
options.getDisplayer().display(bmp, imageAware, LoadedFrom.MEMORY_CACHE);
listener.onLoadingComplete(uri, imageAware.getWrappedView(), bmp);
}
} else {
if (options.shouldShowImageOnLoading()) {
imageAware.setImageDrawable(options.getImageOnLoading(configuration.resources));
} else if (options.isResetViewBeforeLoading()) {
imageAware.setImageDrawable(null);
}
ImageLoadingInfo imageLoadingInfo = new ImageLoadingInfo(uri, imageAware, targetSize, memoryCacheKey,
options, listener, progressListener, engine.getLockForUri(uri));
LoadAndDisplayImageTask displayTask = new LoadAndDisplayImageTask(engine, imageLoadingInfo,
defineHandler(options));
if (options.isSyncLoading()) {
displayTask.run();
} else {
engine.submit(displayTask);
}
}
这段代码主要是Bitmap不在内存缓存,从文件中或者网络里面获取bitmap对象,实例化一个LoadAndDisplayImageTask对象,
LoadAndDisplayImageTask实现了Runnable,如果配置了isSyncLoading为true, 直接执行LoadAndDisplayImageTask的run方法,表示同步,默认是false,将LoadAndDisplayImageTask提交给线程池对象代码有点多,但是有很多代码是进行异常判断处理和函 数的回调,为了先把握整体的流程,我们先放弃细节方面的追踪。基本上重要的处理流程我都有用注释标出。
接下来,我们来看 LoadAndDisplayImageTask displayTask.run();方法
还是分段看吧
if (waitIfPaused()) return;
if (delayIfNeed()) return;
其中waitIfPaused()
AtomicBoolean pause = engine.getPause();            // 带有原子性的Boolean
    if (pause.get()) {
        synchronized (engine.getPauseLock()) {
            if (pause.get()) {
                L.d(LOG_WAITING_FOR_RESUME, memoryCacheKey);
                try {
                    engine.getPauseLock().wait();
                } catch (InterruptedException e) {
                    L.e(LOG_TASK_INTERRUPTED, memoryCacheKey);
                    return true;
                }
                L.d(LOG_RESUME_AFTER_PAUSE, memoryCacheKey);
            }
        }
    }
    return isTaskNotActual();
}
根据方法名儿 可以知道 如果是paused 则线程等待 (Atomic类 具体相关)
这个方法主要是在使用ListView,GridView去加载图片的时候,有时候为了滑动更加的流畅,选择手指在滑动或者猛地一滑动的时候不去加载图片,所以才有这么个方法,使用的话: 这里用到了PauseOnScrollListener这个类,使用很简单ListView.setOnScrollListener(new PauseOnScrollListener(pauseOnScroll, pauseOnFling )),
pauseOnScroll控制我们缓慢滑动ListView,GridView是否停止加载图片,pauseOnFling 控制猛的滑动ListView,GridView是否停止加载图片
除此之外,这个方法的返回值 还由isTaskNotActual()决定,我们接着看看isTaskNotActual()的源码
private boolean isTaskNotActual() {
    return isViewCollected() || isViewReused();
}
isViewCollected()是判断我们ImageView是否被垃圾回收器回收了,如果回收了,LoadAndDisplayImageTask方法的run()就直接返回了,isViewReused()判断该ImageView是否被重用,被重用run()方法也直接返回。
使用场景:主要是使用 ListView,GridView时会复用item对象,假如先去加载ListView,GridView第一页的图片的时候,、
第一页图片还没有全部加载完我们就快速的滚动,isViewReused()方法就会避免这些不可见的item去加载图片,而直接加载当前界面的图片
接着回到主线 我们来看 delayIfNeed();
private boolean delayIfNeed() {
        if (options.shouldDelayBeforeLoading()) {
            L.d(LOG_DELAY_BEFORE_LOADING, options.getDelayBeforeLoading(), memoryCacheKey);
            try {
                Thread.sleep(options.getDelayBeforeLoading());
            } catch (InterruptedException e) {
                L.e(LOG_TASK_INTERRUPTED, memoryCacheKey);
                return true;
            }
            return isTaskNotActual();
        }
        return false;
    }
    同理 这是 如果DisplayImageOptions 需求延迟加载则延迟加载。
接着主线走主线任务:
ReentrantLock loadFromUriLock = imageLoadingInfo.loadFromUriLock;
L.d(LOG_START_DISPLAY_IMAGE_TASK, memoryCacheKey);
if (loadFromUriLock.isLocked()) {
    L.d(LOG_WAITING_FOR_IMAGE_LOADED, memoryCacheKey);
}

loadFromUriLock.lock();
Bitmap bmp;
try {
    checkTaskNotActual();

    bmp = configuration.memoryCache.get(memoryCacheKey);
    if (bmp == null || bmp.isRecycled()) {
        bmp = tryLoadBitmap();
        if (bmp == null) return; // listener callback already was fired

        checkTaskNotActual();
        checkTaskInterrupted();

        if (options.shouldPreProcess()) {
            L.d(LOG_PREPROCESS_IMAGE, memoryCacheKey);
            bmp = options.getPreProcessor().process(bmp);
            if (bmp == null) {
                L.e(ERROR_PRE_PROCESSOR_NULL, memoryCacheKey);
            }
        }

        if (bmp != null && options.isCacheInMemory()) {
            L.d(LOG_CACHE_IMAGE_IN_MEMORY, memoryCacheKey);
            configuration.memoryCache.put(memoryCacheKey, bmp);
        }
    } else {
        loadedFrom = LoadedFrom.MEMORY_CACHE;
        L.d(LOG_GET_IMAGE_FROM_MEMORY_CACHE_AFTER_WAITING, memoryCacheKey);
    }

    if (bmp != null && options.shouldPostProcess()) {
        L.d(LOG_POSTPROCESS_IMAGE, memoryCacheKey);
        bmp = options.getPostProcessor().process(bmp);
        if (bmp == null) {
            L.e(ERROR_POST_PROCESSOR_NULL, memoryCacheKey);
        }
    }
    checkTaskNotActual();
    checkTaskInterrupted();
} catch (TaskCancelledException e) {
    fireCancelEvent();
    return;
} finally {
    loadFromUriLock.unlock();
}
第1行代码有一个loadFromUriLock,这个是一个锁,根据ImageLoad.displayImage()方法中可以知道 获取锁的方法在ImageLoaderEngine类的getLockForUri()方法中。
ReentrantLock getLockForUri(String uri) {
    ReentrantLock lock = uriLocks.get(uri);
    if (lock == null) {
        lock = new ReentrantLock();
        uriLocks.put(uri, lock);
    }
    return lock;
}
这样设计的原因:假如在一个ListView中,某个item正在获取图片的过程中,而此时我们将这个item滚出界面之后又将其滚进来,滚进来之后如果没有加锁,
该item又会去加载一次图片,假设在很短的时间内滚动很频繁,那么就会出现多次去网络上面请求图片,所以这里根据图片的Url去对应一个ReentrantLock对象,
让具有相同Url的请求就会在第7行等待,等到这次图片加载完成之后,ReentrantLock就被释放,刚刚那些相同Url的请求就会继续执行第7行下面的代码
来到第12行,它们会先从内存缓存中获取一遍,如果内存缓存中没有在去执行下面的逻辑,所以ReentrantLock的作用就是避免这种情况下重复的去从网络上面请求图片。
第14行的方法tryLoadBitmap(),这个方法确实也有点长,我先告诉大家,这里面的逻辑是先从文件缓存中获取有没有Bitmap对象,如果没有在去从网络中获取,然后将bitmap保存在文件系统中
先判断文件缓存中有没有该文件,如果有的话,直接去调用decodeImage()方法去解码图片,该方法里面调用BaseImageDecoder类的decode()方法,
根据ImageView的宽高,ScaleType去裁剪图片,具体的代码就不介绍了,自己去看看,接着往下看tryLoadBitmap()方法
File imageFile = configuration.diskCache.get(uri);
if (imageFile != null && imageFile.exists()) {
    L.d(LOG_LOAD_IMAGE_FROM_DISK_CACHE, memoryCacheKey);
    loadedFrom = LoadedFrom.DISC_CACHE;

    checkTaskNotActual();
    bitmap = decodeImage(Scheme.FILE.wrap(imageFile.getAbsolutePath()));
}
if (bitmap == null || bitmap.getWidth() <= 0 || bitmap.getHeight() <= 0) {
L.d(LOG_LOAD_IMAGE_FROM_NETWORK, memoryCacheKey);
loadedFrom = LoadedFrom.NETWORK;
String imageUriForDecoding = uri;
if (options.isCacheOnDisk() && tryCacheImageOnDisk()) {
imageFile = configuration.diskCache.get(uri);
if (imageFile != null) {
imageUriForDecoding = Scheme.FILE.wrap(imageFile.getAbsolutePath());
}
}
checkTaskNotActual();
bitmap = decodeImage(imageUriForDecoding);
if (bitmap == null || bitmap.getWidth() <= 0 || bitmap.getHeight() <= 0) {
fireFailEvent(FailType.DECODING_ERROR, null);
}
}第1行表示从文件缓存中获取的Bitmap为null,或者宽高为0,就去网络上面获取Bitmap,来到第6行代码是否配置了DisplayImageOptions的isCacheOnDisk,表示是否需要将Bitmap对象保存在文件系统中,
一般我们需要配置为true, 默认是false这个要注意下,然后就是执行tryCacheImageOnDisk()方法,去服务器上面拉取图片并保存在本地文件中
回到主线方法 接下来比较简单
if (bmp == null) return; // listener callback already was fired
checkTaskNotActual();
checkTaskInterrupted();

if (options.shouldPreProcess()) {
    L.d(LOG_PREPROCESS_IMAGE, memoryCacheKey);
    bmp = options.getPreProcessor().process(bmp);
    if (bmp == null) {
        L.e(ERROR_PRE_PROCESSOR_NULL, memoryCacheKey);
    }
}

if (bmp != null && options.isCacheInMemory()) {
    L.d(LOG_CACHE_IMAGE_IN_MEMORY, memoryCacheKey);
    configuration.memoryCache.put(memoryCacheKey, bmp);
}
6-12行是否要对Bitmap进行处理,这个需要自行实现,14-17就是将图片保存到内存缓存中去
DisplayBitmapTask displayBitmapTask = new DisplayBitmapTask(bmp, imageLoadingInfo, engine, loadedFrom);
runTask(displayBitmapTask, syncLoading, handler, engine);
最后这两行代码就是一个显示任务,直接看DisplayBitmapTask类的run()方法
到这 ImageLoader的主线就已经跑完了,当然 一些别的处理还有很多在此就不记录了…


 178
178


 被折叠的 条评论
为什么被折叠?
被折叠的 条评论
为什么被折叠?
 到【灌水乐园】发言


