


课程回顾:Spring框架第三天
1. AOP注解方式
    * 编写切面类(包含通知和切入点)
    * 开启自动代理

2. JDBC模板技术
    * Spring提供模板技术,数据库的操作
    * 以后编写DAO层,都可以继承JdbcDaoSupport类(JDBC模板)
    * Spring框架可以整合开源连接池

3. Spring事务管理
    * Spring框架事务管理需要接口和概述
        * PlatformTransactionManager接口(平台事务管理器接口),不管使用哪种方式管理事务,这个类必须配置的!!
    * 手动编码(了解)
    * 声明式事务管理方式(重点掌握),默认使用AOP的技术来增强
        * XML的方式
        * 注解的方式
案例一:SSH框架整合保存客户
需求分析
1. 案例一:SSH框架整合保存客户
技术分析之SSH框架的整合
技术分析之SSH框架开发的基本回顾
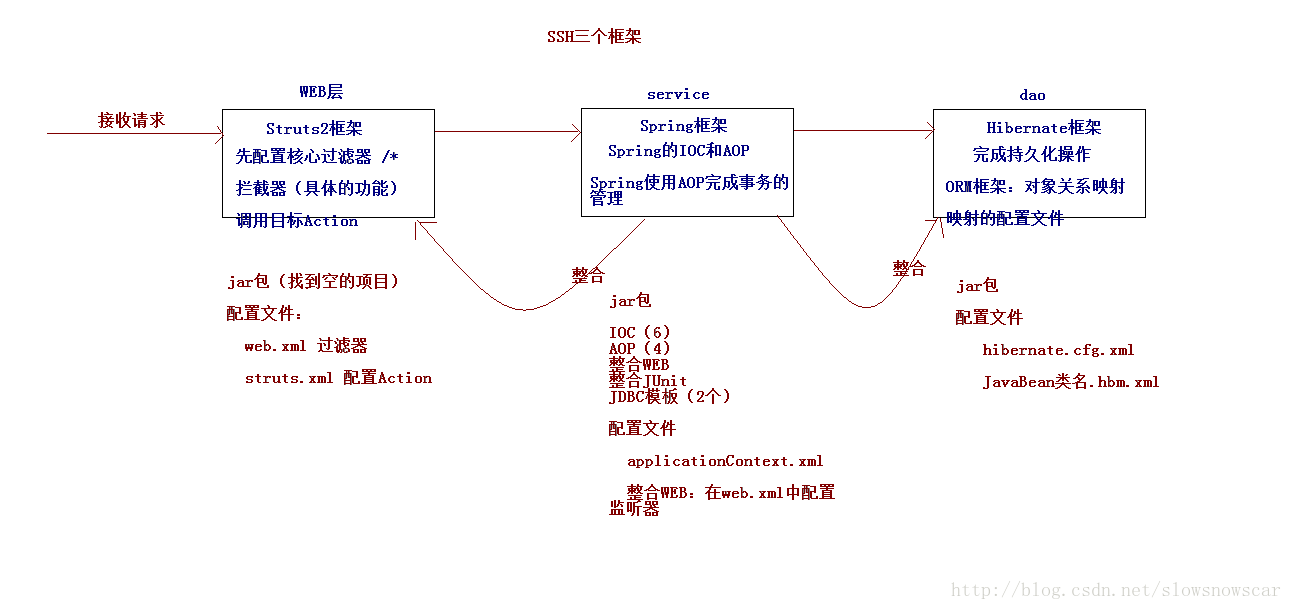
技术分析之SSH三大框架需要的jar包
1. Struts2框架
    * struts-2.3.24\apps\struts2-blank\WEB-INF\lib\*.jar        -- Struts2需要的所有jar包
    * struts2-spring-plugin-2.3.24.jar                          ---Struts2整合Spring的插件包

2. Hibernate框架
    * hibernate-release-5.0.7.Final\lib\required\*.jar          -- Hibernate框架需要的jar包
    * slf4j-api-1.6.1.jar                                       -- 日志接口
    * slf4j-log4j12-1.7.2.jar                                   -- 日志实现
    * mysql-connector-java-5.1.7-bin.jar                        -- MySQL的驱动包

3. Spring框架
    * IOC核心包
    * AOP核心包
    * JDBC模板和事务核心包
    * Spring整合JUnit测试包
    * Spring整合Hibernate核心包
    * Spring整合Struts2核心包
技术分析之SSH三大框架需要的配置文件
1. Struts2框架
    * 在web.xml中配置核心的过滤器
        <filter>
            <filter-name>struts2</filter-name>
            <filter-class>org.apache.struts2.dispatcher.ng.filter.StrutsPrepareAndExecuteFilter</filter-class>
        </filter>

        <filter-mapping>
            <filter-name>struts2</filter-name>
            <url-pattern>/*</url-pattern>
        </filter-mapping>

    * 在src目录下创建struts.xml,用来配置Action

2. Hibernate框架
    * 在src目录创建hibernate.cfg.xml配置文件
    * 在JavaBean所在的包下映射的配置文件

3. Spring框架
    * 在web.xml配置整合WEB的监听器
        <listener>
            <listener-class>org.springframework.web.context.ContextLoaderListener</listener-class>
        </listener>
        <context-param>
            <param-name>contextConfigLocation</param-name>
            <param-value>classpath:applicationContext.xml</param-value>
        </context-param>

    * 在src目录下创建applicationContext.xml
    * 在src目录下log4j.proerties
web.xml编写
<?xml version="1.0" encoding="UTF-8"?>
<web-app xmlns:xsi="http://www.w3.org/2001/XMLSchema-instance"
    xmlns="http://java.sun.com/xml/ns/javaee"
    xsi:schemaLocation="http://java.sun.com/xml/ns/javaee http://java.sun.com/xml/ns/javaee/web-app_2_5.xsd"
    id="WebApp_ID" version="2.5">


    <!-- 配置Spring框架整合WEB的监听器 -->
    <listener>
        <listener-class>org.springframework.web.context.ContextLoaderListener</listener-class>
    </listener>
    <context-param>
        <param-name>contextConfigLocation</param-name>
        <param-value>classpath:applicationContext.xml</param-value>
    </context-param>

    <!-- 解决延迟加载的问题 -->
    <filter>
        <filter-name>OpenSessionInViewFilter</filter-name>
        <filter-class>org.springframework.orm.hibernate5.support.OpenSessionInViewFilter</filter-class>
    </filter>
    <filter-mapping>
        <filter-name>OpenSessionInViewFilter</filter-name>
        <url-pattern>/*</url-pattern>
    </filter-mapping>

    <!-- 配置Struts2框架的核心的过滤器 -->
    <filter>
        <filter-name>struts2</filter-name>
        <filter-class>org.apache.struts2.dispatcher.ng.filter.StrutsPrepareAndExecuteFilter</filter-class>
    </filter>
    <filter-mapping>
        <filter-name>struts2</filter-name>
        <url-pattern>/*</url-pattern>
    </filter-mapping>

    <welcome-file-list>
        <welcome-file>index.jsp</welcome-file>
    </welcome-file-list>
</web-app>
技术分析之Spring框架整合Struts2框架
- 导入CRM项目的UI页面,找到添加客户的页面,修改form表单,访问Action
- 编写CustomerAction接收请求,在struts.xml中完成Action的配置
<package name="crm" extends="struts-default" namespace="/">
            <action name="customer_*" class="com.itheima.web.action.CustomerAction" method="{1}">

            </action>
        </package>
在Action中获取到service(开发不会使用,因为麻烦)
* 可以通过 WebApplicationContextUtils.getWebApplicationContext(ServletActionContext.getServletContext()); 来获取,但是这种方式编写代码太麻烦了!!Spring整合Struts2框架的第一种方式(Action由Struts2框架来创建)
* 因为导入的struts2-spring-plugin-2.3.24.jar 包自带一个配置文件 struts-plugin.xml ,该配置文件中有如下代码
* 开启一个常量,如果该常量开启,那么下面的常量就可以使用
* struts.objectFactory.spring.autoWire = name,该常量是可以让Action的类来自动装配Bean对象!!Spring整合Struts2框架的第二种方式(Action由Spring框架来创建)(推荐大家来使用的)
- 把具体的Action类配置文件applicatonContext.xml的配置文件中,但是注意:struts.xml需要做修改
- applicationContext.xml
<bean id="customerAction" class="com.itheima.web.action.CustomerAction" scope="prototype">- struts.xml中的修改,把全路径修改成ID值
<action name="customer_*" class="customerAction" method="{1}">- 第二种方式需要有两个注意的地方
- Spring框架默认生成CustomerAction是单例的,而Struts2框架是多例的。所以需要配置 scope=”prototype”
- CustomerService现在必须自己手动注入了
技术分析之Spring框架整合Hibernate框架(带有hibernate.cfg.xml的配置文件。强调:不能加绑定当前线程的配置)
1. 编写CustomerDaoImpl的代码,加入配置并且在CustomerServiceImpl中完成注入
2. 编写映射的配置文件,并且在hibernate.cfg.xml的配置文件中引入映射的配置文件

3. 在applicationContext.xml的配置文件,配置加载hibernate.cfg.xml的配置
    <bean id="sessionFactory" class="org.springframework.orm.hibernate5.LocalSessionFactoryBean">
        <property name="configLocation" value="classpath:hibernate.cfg.xml"/>
    </bean>

4. 在CustomerDaoImpl中想完成数据的添加,Spring框架提供了一个HibernateDaoSupport的工具类,以后DAO都可以继承该类!!
    public class CustomerDaoImpl extends HibernateDaoSupport implements CustomerDao {
        public void save(Customer c) {
            System.out.println("持久层...");
            this.getHibernateTemplate().save(c);
        }
    }

    <bean id="customerDao" class="com.itheima.dao.CustomerDaoImpl">
        <property name="sessionFactory" ref="sessionFactory"/>
    </bean>

5. 开启事务的配置
    * 先配置事务管理器,注意现在使用的是Hibernate框架,所以需要使用Hibernate框架的事务管理器
        <bean id="transactionManager" class="org.springframework.orm.hibernate5.HibernateTransactionManager">
            <property name="sessionFactory" ref="sessionFactory"/>
        </bean>

    * 开启注解事务
        <tx:annotation-driven transaction-manager="transactionManager"/>

    * 在Service类中添加事务注解
        @Transactional
技术分析之Spring框架整合Hibernate框架(不带有hibernate.cfg.xml的配置文件)
1. Hibernate配置文件中
    * 数据库连接基本参数(4大参数)
    * Hibernate相关的属性
    * 连接池
    * 映射文件

2. 开始进行配置
    * 先配置连接池相关的信息
        <bean id="dataSource" class="com.mchange.v2.c3p0.ComboPooledDataSource">
            <property name="driverClass" value="com.mysql.jdbc.Driver"/>
            <property name="jdbcUrl" value="jdbc:mysql:///xxx"/>
            <property name="user" value="root"/>
            <property name="password" value="root"/>
        </bean>

    * 修改 LocalSessionFactoryBean 的属性配置,因为已经没有了hibernate.cfg.xml的配置文件,所以需要修改该配置,注入连接池
        <bean id="transactionManager" class="org.springframework.orm.hibernate5.HibernateTransactionManager">
            <property name="dataSource" ref="dataSource"/>
        </bean>

    * 继续在 LocalSessionFactoryBean 中配置,使用hibernateProperties属性继续来配置其他的属性,注意值是properties属性文件
        <!-- 配置其他的属性 -->
        <property name="hibernateProperties">
            <props>
                <prop key="hibernate.dialect">org.hibernate.dialect.MySQLDialect</prop>
                <prop key="hibernate.show_sql">true</prop>
                <prop key="hibernate.format_sql">true</prop>
                <prop key="hibernate.hbm2ddl.auto">update</prop>
            </props>
        </property>
        <!-- 配置映射 -->
        <property name="mappingResources">
            <list>
                <value>com/itheima/domain/Customer.hbm.xml</value>
            </list>
        </property>
applicationContext.xml模板
<?xml version="1.0" encoding="UTF-8"?>
<beans xmlns="http://www.springframework.org/schema/beans"
    xmlns:xsi="http://www.w3.org/2001/XMLSchema-instance"
    xmlns:context="http://www.springframework.org/schema/context"
    xmlns:aop="http://www.springframework.org/schema/aop"
    xmlns:tx="http://www.springframework.org/schema/tx"
    xsi:schemaLocation="http://www.springframework.org/schema/beans
    http://www.springframework.org/schema/beans/spring-beans.xsd
    http://www.springframework.org/schema/context
    http://www.springframework.org/schema/context/spring-context.xsd
    http://www.springframework.org/schema/aop
    http://www.springframework.org/schema/aop/spring-aop.xsd
    http://www.springframework.org/schema/tx
    http://www.springframework.org/schema/tx/spring-tx.xsd">

    <!-- 先配置C3P0的连接池 -->
    <bean id="dataSource" class="com.mchange.v2.c3p0.ComboPooledDataSource">
        <property name="driverClass" value="com.mysql.jdbc.Driver"/>
        <property name="jdbcUrl" value="jdbc:mysql:///day38_ssh"/>
        <property name="user" value="root"/>
        <property name="password" value="root"/>
    </bean>

    <!-- LocalSessionFactoryBean加载配置文件 -->
    <bean id="sessionFactory" class="org.springframework.orm.hibernate5.LocalSessionFactoryBean">
        <!-- 先加载连接池 -->
        <property name="dataSource" ref="dataSource"/>
        <!-- 加载方言,加载可选 -->
        <property name="hibernateProperties">
            <props>
                <prop key="hibernate.dialect">org.hibernate.dialect.MySQLDialect</prop>
                <prop key="hibernate.show_sql">true</prop>
                <prop key="hibernate.format_sql">true</prop>
                <prop key="hibernate.hbm2ddl.auto">update</prop>
            </props>
        </property>

        <!-- 引入映射的配置文件 -->
        <property name="mappingResources">
            <list>
                <value>com/itheima/domain/Customer.hbm.xml</value>
            </list>
        </property>
    </bean>

    <!-- 先配置平台事务管理器 -->
    <bean id="transactionManager" class="org.springframework.orm.hibernate5.HibernateTransactionManager">
        <property name="sessionFactory" ref="sessionFactory"/>
    </bean>

    <!-- 开启事务的注解 -->
    <tx:annotation-driven transaction-manager="transactionManager"/>

    <!-- 配置客户模块 -->
    <!-- 强调:以后配置Action,必须是多例的 -->
    <bean id="customerAction" class="com.itheima.web.action.CustomerAction" scope="prototype">
        <property name="customerService" ref="customerService"/>
    </bean>

    <bean id="customerService" class="com.itheima.service.CustomerServiceImpl">
        <property name="customerDao" ref="customerDao"/>
    </bean>

    <!-- 以后:Dao都需要继承HibernateDaoSupport,注入sessionFactory -->
    <bean id="customerDao" class="com.itheima.dao.CustomerDaoImpl">
        <property name="sessionFactory" ref="sessionFactory"/>
    </bean>

    <!-- <bean id="hibernateTemplate" class="org.springframework.orm.hibernate5.HibernateTemplate">
        <property name="sessionFactory"></property>
    </bean> -->

</beans>
技术分析之Hibernate的模板的常用的方法
/**
 * 持久层
 * @author Administrator
 */
public class CustomerDaoImpl extends HibernateDaoSupport implements CustomerDao {

    /**
     * 保存客户
     */
    public void save(Customer customer) {
        System.out.println("持久层:保存客户...");
        // 把数据,保存到数据库中
        this.getHibernateTemplate().save(customer);
    }

    /**
     * 修改客户
     */
    public void update(Customer customer) {
        this.getHibernateTemplate().update(customer);
    }

    /**
     * 通过主键,查询
     */
    public Customer getById(Long id) {
        return this.getHibernateTemplate().get(Customer.class, id);
    }

    /**
     * 查询所有
     */
    public List<Customer> findAll() {
        List<Customer> list = (List<Customer>) this.getHibernateTemplate().find("from Customer");
        return list;
    }

    /**
     * 查询所有的数据,使用QBC的查询
     */
    public List<Customer> findAllByQBC() {
        DetachedCriteria criteria = DetachedCriteria.forClass(Customer.class);
        // 设置查询条件
        List<Customer> list = (List<Customer>) this.getHibernateTemplate().findByCriteria(criteria);
        return list;
    }

    /**
     * 演示延迟加载
     */
    public Customer loadById(long id) {
        return this.getHibernateTemplate().load(Customer.class, id);
    }

}
技术分析之延迟加载问题
1. 使用延迟加载的时候,再WEB层查询对象的时候程序会抛出异常!
    * 原因是延迟加载还没有发生SQL语句,在业务层session对象就已经销毁了,所以查询到的JavaBean对象已经变成了托管态对象!

    * 注意:一定要先删除javassist-3.11.0.GA.jar包(jar包冲突了)

2. 解决办法非常简单,Spring框架提供了一个过滤器,让session对象在WEB层就创建,在WEB层销毁。只需要配置该过滤器即可
    * 但是:要注意需要在struts2的核心过滤器之前进行配置
        <filter>
            <filter-name>OpenSessionInViewFilter</filter-name>
            <filter-class>org.springframework.orm.hibernate5.support.OpenSessionInViewFilter</filter-class>
        </filter>
        <filter-mapping>
            <filter-name>OpenSessionInViewFilter</filter-name>
            <url-pattern>/*</url-pattern>
        </filter-mapping>


 415
415


 被折叠的 条评论
为什么被折叠?
被折叠的 条评论
为什么被折叠?
 到【灌水乐园】发言


