


如无书面授权,请勿转载
第四章 大型项目中Ansible的使用
New features in 1.3
There are two features in Ansible 1.3 that were alluded to previously in the chapter.
The first feature is the metadata roles. They allow you to specify that your role
depends on other roles. For example, if the application that you are deploying needs
to send mail, your role could depend on a Postfix role. This would mean that
before the application is set up and installed, Postfix will be installed and set up.
The meta/main.yml file would look similar to the following code:
---
allow_duplicates: no
dependencies:
- apache
The allow_duplicates line is set to no , which is the default. If you set this to no ,
Ansible will not run a role the second time, if it is included twice with the same
arguments. If you set it to yes , it will repeat the role even if it has run before. You can
leave it off instead of setting it to no .
Dependencies are specified in the same format as roles. This means, you can pass
variables here; either static values or variables that are passed to the current role.

The second feature included with Ansible 1.3 is variable default values. If you place
a main.yml file in the defaults directory for the role, these variables will be read into
the role; however they can be overridden by variables in the vars/main.yml file, or
the variables that are passed to the role when it is included. This allows you to make
passing variables to the role optional. These files look exactly like other variable
files. For example, if you used a variable named port in your role, and you wanted
to default it to port 80 , your defaults/main.yml file would look similar to the
following code:
---
port: 80
1.3版本中的新特性
第一个特性是Metadata角色,它可以让我们指定一个角色依赖另外一个角色。比如,如果你现在部署的应用程序需要使用sendmail服务,那么你的角色可能要以来postfix角色。你需要在部署应用程序之前先安装和配置postfix。下面是代码:
---
allow_duplicates: no
dependencies:
- apache
allow_duplicates的默认值是no,如果设置成no,表示他不会在角色中运行的次数不会超过1次,如果是yes则会在运行过一次之后重复运行,你可以不设置这个关键字,那么它的默认值是no。
在角色中指定依赖关系也一样,你可以传递变量、静态值、动态的值给现在的角色。
第二个特性是变量可以有默认值,如果你把main.yml文件放到defult目录下面,那么变量会传递给角色,但是它们会被/vars/main.yml文件覆盖,还可以传递到包含他们的角色,这意味着你可以传递可选的变量到角色里面。这些文件和其他变量文件类似,比如你使用一个包含port变量的角色,你希望它的默认值是80,那么你的/defaults/main.yml文件应该像下面的代码这样:
---
port: 80
Speeding things up
As you add more and more machines and services to your Ansible configuration,
you will find things getting slower and slower. Fortunately, there are several tricks
you can use to make Ansible work on a bigger scale.
Tags
Ansible tags are features that allow you to select which parts of a playbook you need
to run, and which should be skipped. While Ansible modules are idempotent and
will automatically skip if there are no changes, this often requires a connection to the
remote hosts. The yum module is often quite slow in determining if a module is the
latest, as it will need to refresh all the repositories.
If you know you don't need certain actions to be run, you can select only run
modules that have been tagged with a particular tag. This doesn't even try to run the
module, it simply skips over it. This will save time on almost all the modules even if
there is nothing to be done.
Let's say you have a machine which has a large number of shell accounts, but also
several services set up to run on it. Now, imagine that a single user's SSH key has
been compromised and needs to be removed immediately. Instead of running the
entire playbook, or rewriting the playbooks to only include the steps necessary to
remove that key, you could simply run the existing playbooks with the SSH keys
tag, and it would only run the steps necessary to copy out the new keys, instantly
skipping anything else.
This is particularly useful if you have a playbook with playbook includes in it that
covers your whole infrastructure. With this setup, you can quickly deploy security
patches, change passwords, and revoke keys across your entire infrastructure as
quickly as possible.
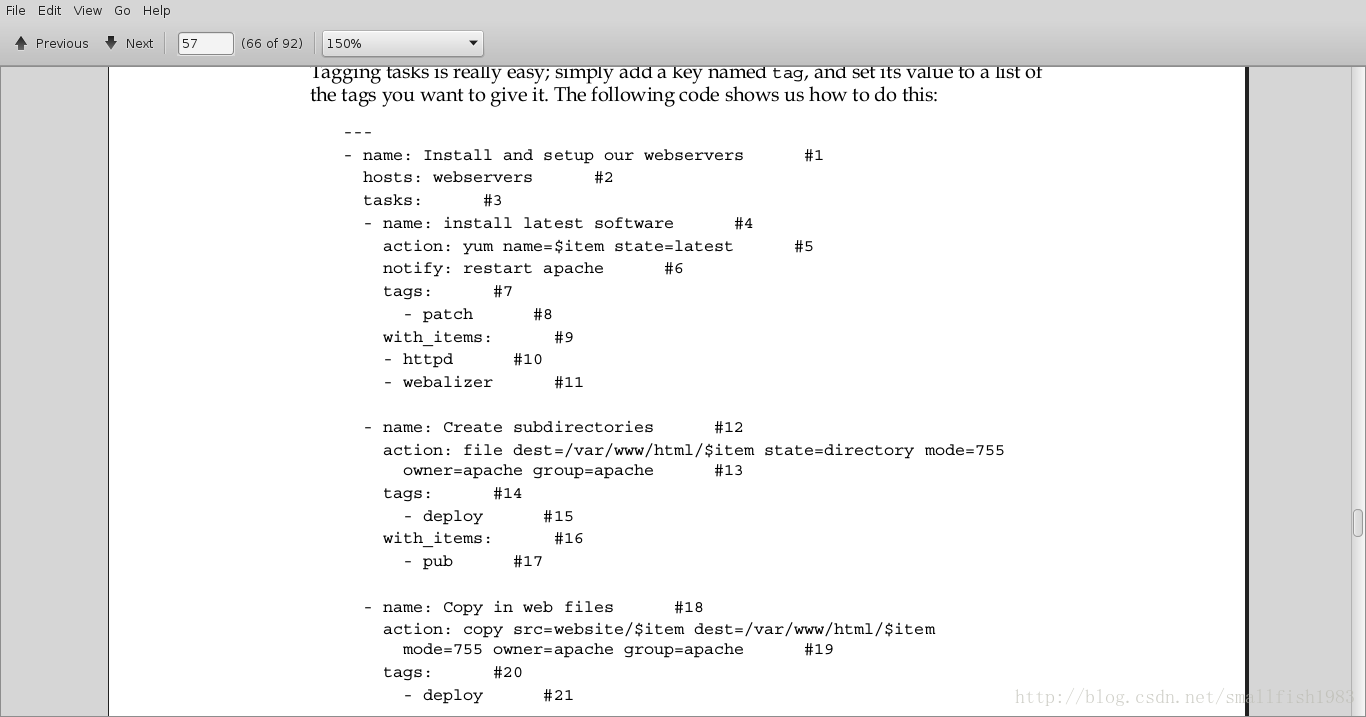
Tagging tasks is really easy; simply add a key named tag , and set its value to a list of
the tags you want to give it. The following code shows us how to do this:
给paly加速
当你的Ansible配置中的机器和服务越来越多,你会发现运行速度会变得越来越慢。幸运的是,这有几个技巧可以让我们改善性能。
Tags
tags标记可以让你选择运行playbook中哪些部分,跳过哪些。While Ansible modules are idempotent and will automatically skip if there are no changes, this often requires a connection to the remote hosts.如果yum模块制定lastest的话通常运行很慢,因为他要刷新所有资料库repositories.
如果你可以确定那些操作不是必须的,你可以标记那些你希望运行的模块。没有被标记的会被跳过,而这可以节约大量时间。
假设你有一台机器上面有很多的shell用户,还运行了很多服务。如果有一个用户的 ssh key有点弱,需要马上被移除。比起运行整个play,或者重新写一个编写一个playbook,对现存的playbook对相应的ssh key的操作打个tags标记显然更加有效率,这样你只需要执行必要的步骤来复制新的密钥,跳过其他的步骤。当你的剧本包含所有机器的设施的时候很有用,让你可以快速对所有设备部署安全更新、更改密码、撤销密钥。
使用tag非常简单,只需要添加tag关键字,然后设定你希望的值,下面是示例代码:
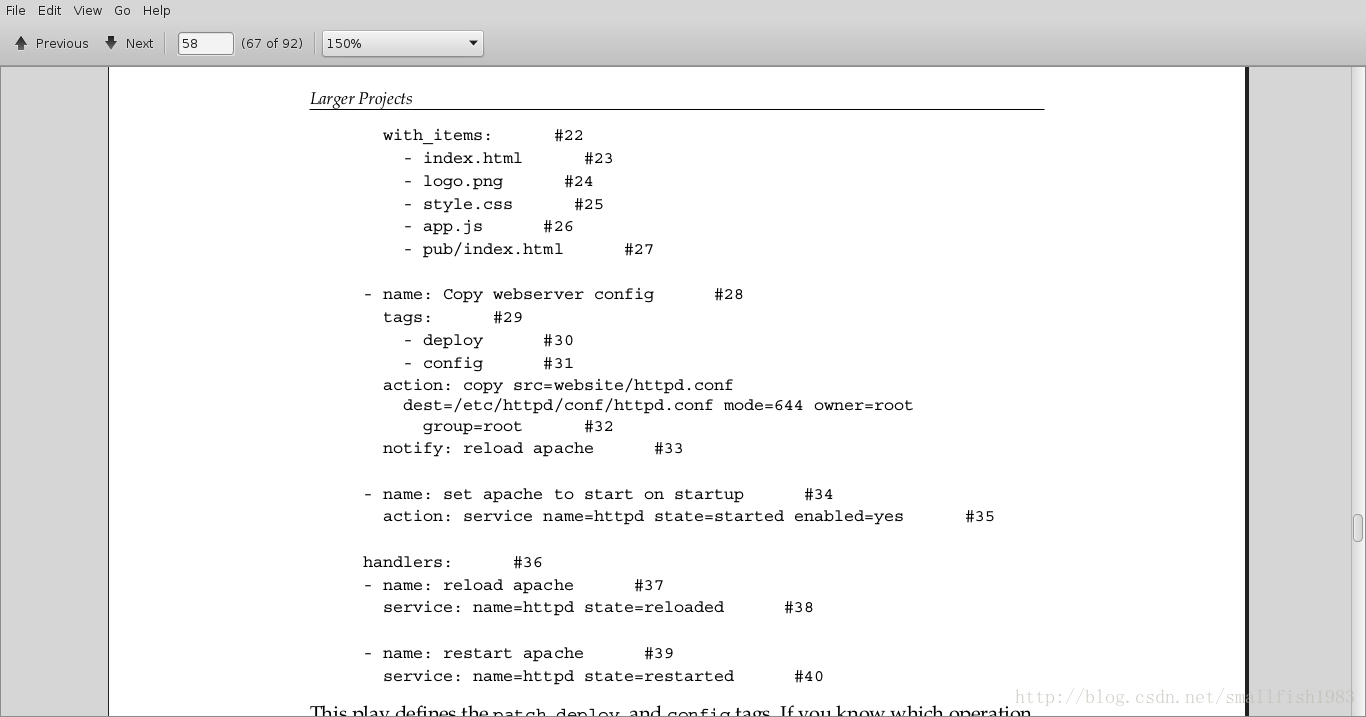
这个play定义了patch , deploy , config这些标记,你自定义执行你希望的标记选项,只需要简单的提供标记参数就可以了。
如果你不在命令行里运行,默认是执行所有的操作。比如你想运行标记deploy,在命令行中输入以下命令:
$ ansible-playbook webservers.yml --tags deploy
除了离散的任务,角色也可以使用tags,在命令行中,Ansible可以选择打了标记的角色来运行,操作方式跟任务差不多,代码如下:
---
- hosts: website1
roles:
- common
- { role: apache, tags: ["patch"] }
- { role: website2, tags: ["deploy", "patch"] }
common角色中没有打任何标记,当其他标记被应用的时候common角色不会被运行;如果path标记被应用,那么apache和website2角色会被执行,common不会;如果deploy标记,则只有website2角色会被执行。
这样在部署或者打补丁的时候,通过使用标记来选择我们制定的角色,我们可以大大缩短play的运行时间。
Ansible's pull mode
Ansible includes a pull mode which can drastically improve the scalability of your
playbooks. So far we have only covered using Ansible to configure another machine
over SSH. This is a contrast to Ansible's pull mode, which runs on the host that you
wish to configure. Since ansible-pull runs on the machine that it is configuring,
it doesn't need to make connections to other machines and runs much faster. In this
mode, you provide your configuration in a git repository which Ansible downloads
and uses to configure your machine.
You should use Ansible's pull mode in the following situations:
•	 Your node might not be available when configuring them, such as members
of auto-scaling server farms
•	 You have a large amount of machines to configure and even with large
values of forks , it would take a long time to configure them all
•	 You want machines to update their configuration automatically when the
repository changes
•	 You want to run Ansible on a machine that may not have network access yet,
such as in a kick start post install
However, pull mode does have the following disadvantages that make it unsuitable
for certain circumstances:
•	 To connect to other machines and gather variables, or copy a file you need to
have credentials on the managed nodes
•	 You need to co-ordinate the running of the playbook across a server farm; for
example, if you could only take three servers offline at a time
•	 The servers are behind strict firewalls that don't allow incoming SSH
connections from the nodes you use to configure them for Ansible
Ansible的pull模式
Ansible有一个pull(push 推送是它的反义词)可以大大提高你playbooks的伸缩性。目前为止,我们都是使用Ansible通过ssh来配置另外一台机器,这跟pull模式刚好相反,pull模式在被配置的机器上运行,速度很快。在这种模式下,你需要提供一个git资料来供Ansible下载来配置你的机器。
在以下场景你可以使用pull模式:
- 你的节点在你配置的时候还不可用,比如自动伸缩的服务池
- 你有数量巨大的机器需要配置,即使使用非常高的线程还是要花费很多时间
- 你要在一个没有网络连接的机器上运行Anisble,比如在启动之后安装
以下的场景不适合pull模式
- 需要连接到其他机器来收集变量,或则在控制主机上复制文件时需要凭证
- 你的playbook需要跨越所有设备,比如在同一时间你只能有3台服务器离线
- 你配置Ansible的机器所在的网络不允许穿透ssh协议
Pull mode doesn't require anything special in your playbooks, but it does require
some setup on the nodes you want configured. In some circumstances, you could do
this using Ansible's normal push mode. Here is a small play to setup play mode on a
machine:
pull模式不需要在playbooks做任何特殊的设置,但是它需要在你配置的机器上做一些设置。有时候,你可以使用普通的推送模式,下面是一个小的play用来在机器上设置play模式:
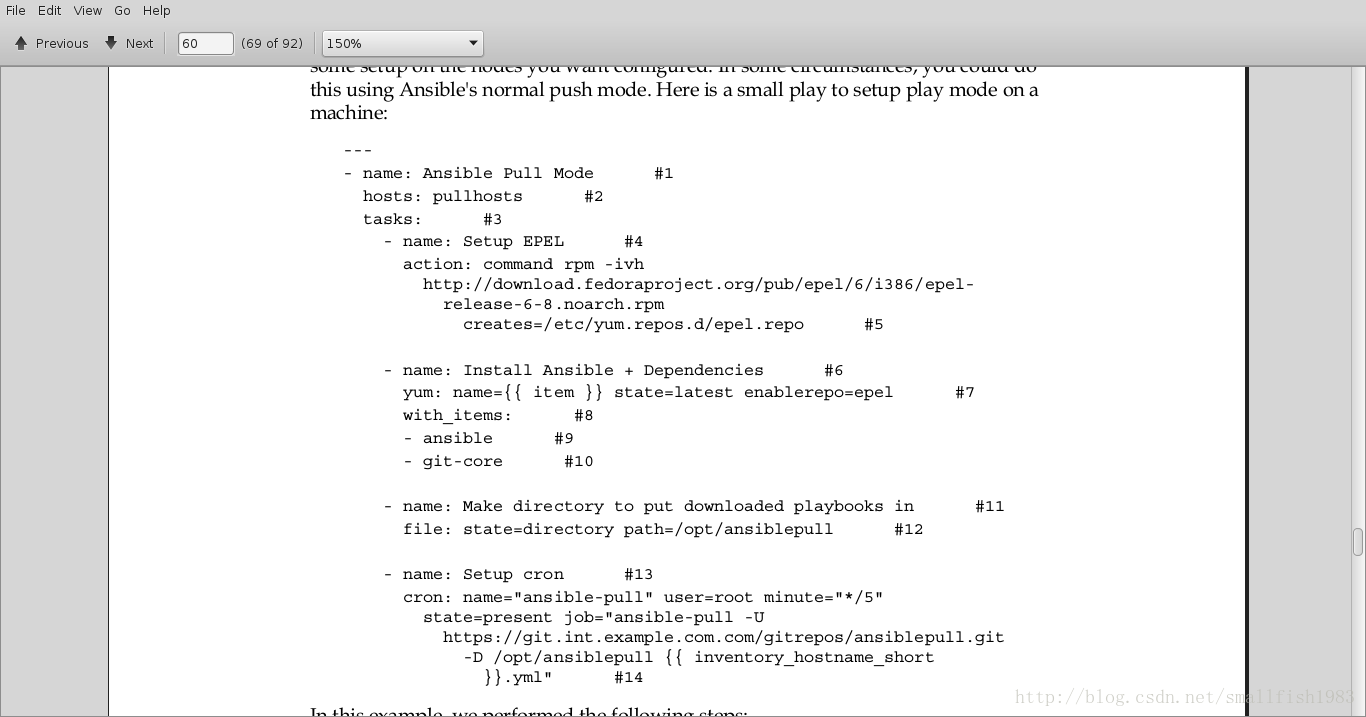
In this example, we performed the following steps:
•	 First, we( )installed and set up EPEL. This is a repository with extra software
for CentOS. Ansible is available in the EPEL repository.
•	 Next, we installed Ansible, making sure to enable the EPEL repository.
•	 Then, we created a directory for Ansible's pull mode to put the playbooks in.
Keeping these files around means you don't need to download the whole git
repository the whole time; only updates are required.
•	 Finally, we set up a cron job that will try to run the ansible-pull mode
config every five minutes.
在这个例子中,执行的步骤如下:
- 设置RPEL,他是centos系列操作系统的软件资料库
- 确认启用了EPEL 资料库,并安装Ansible
- 为Ansible创建一个目录用来存放playbooks,保存这些文件可以让你只在需要的时候更新git资料库,而不是每次都下载所有的资料库
- 最后我们添加了一个新的cron任务来运行ansible-pull模式,每5分钟运行一次
The preceding code downloads the repository off an internal HTTPS
git server. If you want to download the repository instead of SSH, you
will need to add a step to install SSH keys, or generate keys and copy
them to the git machine.
注意:上述代码从一个内部的https git服务器中下载资料库,如果你想使用ssh,你需要设置安装ssh,生成密钥并复制到git的机器。
Summary
In this chapter, we have covered the techniques required when moving from a
simple setup to a larger deployment. We discussed how to separate your playbook
into multiple parts using includes. We then looked at how we can package up related
includes and automatically include them all at once using roles. Finally we discussed
pull mode, which allows you to automate the deployment of playbooks on the
remote node itself.
In the next chapter, we will cover writing your own modules. We start this by
building a simple module using bash scripting. We then look at how Ansible
searches for modules, and how to make it find your own custom ones. Then, we take
a look at how you can use Python to write more advanced modules using features
that Ansible provides. Finally, we will write a script that configures Ansible to pull
its inventory from an external source.
本章小结
在本章中,我们学习了如何从一个简单的设置到一个复杂的部署任务。介绍了如何使用包含来分割playbook,如何使用角色来自动实现包含,最后我们介绍了Anisble的pull模式,它可以让远程受管主机自己运行playbook。
下一章,我们将介绍如何自己来创建自定义的模块。我们将先介绍在bash中建立简单模块,如何介绍Ansible如何搜寻模块,如何自定义自己的模块。然后我们将介绍如何使用python利用Anisble提供的特性来编写高级模块,最后,我们将写一个脚本来配置Ansible从外部的数据源来引用它自己的清单inventory。


 936
936


 被折叠的 条评论
为什么被折叠?
被折叠的 条评论
为什么被折叠?
 到【灌水乐园】发言


