


http://ly4cn.cnblogs.com/archive/2005/11/23/282637.html
程序文档,曾经是程序员的一个头痛问题。写一个程序文档,比较花时间,但不是很难;麻烦的是当程序修改后,程序文档也要跟着同步更新,否则文档和程序就要脱节,文档也就变成没用的东西了。
好在有许多好用的文档生成器来解决这个问题。目前比较流行的C++文档生成器是doxygen。
本文就简单的介绍一下doxygen的文档注释方法,以供初学者参考:
C++ 程序文档生成器介绍(doxygen) 沐枫网志
* @defgroup 模块名 模块的说明文字
* @name 分组说明文字
* 分行的简要说明 /n
* 简要的函数说明文字
* 打开文件 /n
* A list of events:
* - mouse events
* -# mouse move event
* -# mouse click event/n
* More info about the click event.
* -# mouse double click event
* - keyboard events
* -# key down event
* -# key up event
*
* More text here.
*/
结果为:
A list of events:
- mouse events
- mouse move event
- mouse click event
More info about the click event. - mouse double click event
- keyboard events
- key down event
- key up event
More text here.
 /*
/*
 * @defgroup EXAMPLES 自动注释文档范例
* @author 沐枫
* @version 1.0
* @date 2004-2005
* @{
* @defgroup EXAMPLES 自动注释文档范例
* @author 沐枫
* @version 1.0
* @date 2004-2005
* @{
 */
*/
 /*
* @name 文件名常量
* @{
*/
/** 日志文件名 */
#define LOG_FILENAME "d://log//debug.log"
/** 数据文件名 */
#define DATA_FILENAME "d://data//detail.dat"
/** 存档文件名 */
#define BAK_FILENAME "d://data//backup.dat"
/** @}*/ // 文件名常量
/*
* @name 系统状态常量
* @{
*/
/** 正常状态 */
#define SYS_NORMAL 0
/** 故障状态 */
#define SYS_FAULT 1
/** 警告状态 */
#define SYS_WARNNING 2
/** @}*/ // 系统状态常量
/** 枚举常量 */
typedef enum TDayOfWeek
{
/*
* @name 文件名常量
* @{
*/
/** 日志文件名 */
#define LOG_FILENAME "d://log//debug.log"
/** 数据文件名 */
#define DATA_FILENAME "d://data//detail.dat"
/** 存档文件名 */
#define BAK_FILENAME "d://data//backup.dat"
/** @}*/ // 文件名常量
/*
* @name 系统状态常量
* @{
*/
/** 正常状态 */
#define SYS_NORMAL 0
/** 故障状态 */
#define SYS_FAULT 1
/** 警告状态 */
#define SYS_WARNNING 2
/** @}*/ // 系统状态常量
/** 枚举常量 */
typedef enum TDayOfWeek
{
 SUN = 0, /**< 星期天 */
MON = 1, /**< 星期一 */
TUE = 2, /**< 星期二 */
WED = 3, /**< 星期三 */
THU = 4, /**< 星期四 */
FRI = 5, /**< 星期五 */
SAT = 6 /**< 星期六 */
}
/** 定义类型 TEnumDayOfWeek */
TEnumDayOfWeek;
/** 定义类型 PEnumDayOfWeek */
typedef TEnumDayOfWeek* PEnumDayOfWeek;
/** 定义枚举变量 enum1 */
TEnumDayOfWeek enum1;
/** 定义枚举指针变量 enum2 */
PEnumDayOfWeek p_enum2;
/*
* @defgroup FileUtils 文件操作函数
* @{
*/
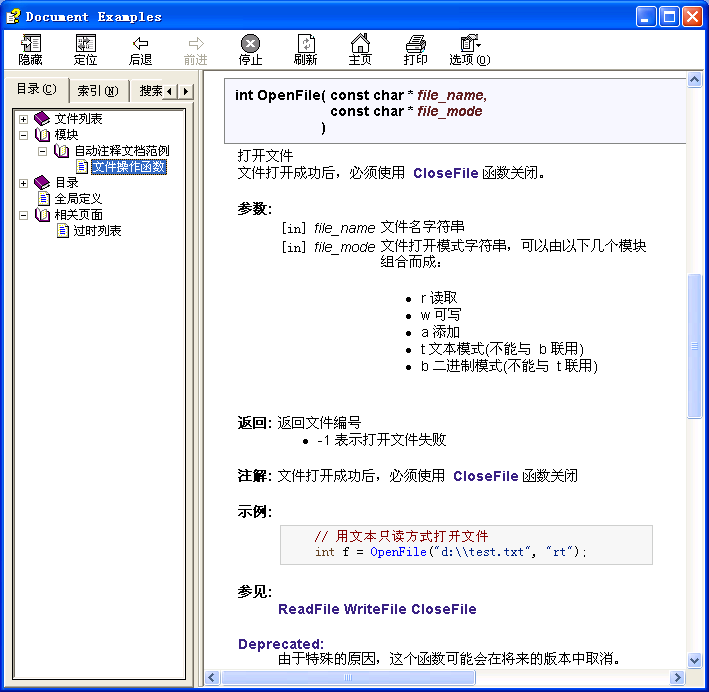
/*
* 打开文件 /n
* 文件打开成功后,必须使用 ::CloseFile 函数关闭。
* @param[in] file_name 文件名字符串
* @param[in] file_mode 文件打开模式字符串,可以由以下几个模块组合而成:
* - r 读取
* - w 可写
* - a 添加
* - t 文本模式(不能与 b 联用)
* - b 二进制模式(不能与 t 联用)
* @return 返回文件编号
* - -1 表示打开文件失败
* @note 文件打开成功后,必须使用 ::CloseFile 函数关闭
* @par 示例:
* @code
// 用文本只读方式打开文件
int f = OpenFile("d://test.txt", "rt");
* @endcode
* @see ::ReadFile ::WriteFile ::CloseFile
* @deprecated 由于特殊的原因,这个函数可能会在将来的版本中取消。
*/
int OpenFile(const char* file_name, const char* file_mode);
/*
* 读取文件
* @param[in] file 文件编号,参见:::OpenFile
* @param[out] buffer 用于存放读取的文件内容
* @param[in] len 需要读取的文件长度
* @return 返回读取文件的长度
* - -1 表示读取文件失败
* @pre /e file 变量必须使用 ::OpenFile 返回值
* @pre /e buffer 不能为 NULL
* @see ::OpenFile ::WriteFile ::CloseFile
*/
int ReadFile(int file, char* buffer, int len);
/*
* 写入文件
* @param[in] file 文件编号,参见:::OpenFile
* @param[in] buffer 用于存放将要写入的文件内容
* @param[in] len 需要写入的文件长度
* @return 返回写入的长度
* - -1 表示写入文件失败
* @pre /e file 变量必须使用 ::OpenFile 返回值
* @see ::OpenFile ::ReadFile ::CloseFile
*/
int WriteFile(int file, const char* buffer, int len);
/*
* 关闭文件
* @param file 文件编号,参见:::OpenFile
* @retval 0 为成功
* @retval -1 表示失败
* @see ::OpenFile ::WriteFile ::ReadFile
* @deprecated 由于特殊的原因,这个函数可能会在将来的版本中取消。
*/
int CloseFile(int file);
/** @}*/ // 文件操作函数
/** @}*/ // 自动注释文档范例
SUN = 0, /**< 星期天 */
MON = 1, /**< 星期一 */
TUE = 2, /**< 星期二 */
WED = 3, /**< 星期三 */
THU = 4, /**< 星期四 */
FRI = 5, /**< 星期五 */
SAT = 6 /**< 星期六 */
}
/** 定义类型 TEnumDayOfWeek */
TEnumDayOfWeek;
/** 定义类型 PEnumDayOfWeek */
typedef TEnumDayOfWeek* PEnumDayOfWeek;
/** 定义枚举变量 enum1 */
TEnumDayOfWeek enum1;
/** 定义枚举指针变量 enum2 */
PEnumDayOfWeek p_enum2;
/*
* @defgroup FileUtils 文件操作函数
* @{
*/
/*
* 打开文件 /n
* 文件打开成功后,必须使用 ::CloseFile 函数关闭。
* @param[in] file_name 文件名字符串
* @param[in] file_mode 文件打开模式字符串,可以由以下几个模块组合而成:
* - r 读取
* - w 可写
* - a 添加
* - t 文本模式(不能与 b 联用)
* - b 二进制模式(不能与 t 联用)
* @return 返回文件编号
* - -1 表示打开文件失败
* @note 文件打开成功后,必须使用 ::CloseFile 函数关闭
* @par 示例:
* @code
// 用文本只读方式打开文件
int f = OpenFile("d://test.txt", "rt");
* @endcode
* @see ::ReadFile ::WriteFile ::CloseFile
* @deprecated 由于特殊的原因,这个函数可能会在将来的版本中取消。
*/
int OpenFile(const char* file_name, const char* file_mode);
/*
* 读取文件
* @param[in] file 文件编号,参见:::OpenFile
* @param[out] buffer 用于存放读取的文件内容
* @param[in] len 需要读取的文件长度
* @return 返回读取文件的长度
* - -1 表示读取文件失败
* @pre /e file 变量必须使用 ::OpenFile 返回值
* @pre /e buffer 不能为 NULL
* @see ::OpenFile ::WriteFile ::CloseFile
*/
int ReadFile(int file, char* buffer, int len);
/*
* 写入文件
* @param[in] file 文件编号,参见:::OpenFile
* @param[in] buffer 用于存放将要写入的文件内容
* @param[in] len 需要写入的文件长度
* @return 返回写入的长度
* - -1 表示写入文件失败
* @pre /e file 变量必须使用 ::OpenFile 返回值
* @see ::OpenFile ::ReadFile ::CloseFile
*/
int WriteFile(int file, const char* buffer, int len);
/*
* 关闭文件
* @param file 文件编号,参见:::OpenFile
* @retval 0 为成功
* @retval -1 表示失败
* @see ::OpenFile ::WriteFile ::ReadFile
* @deprecated 由于特殊的原因,这个函数可能会在将来的版本中取消。
*/
int CloseFile(int file);
/** @}*/ // 文件操作函数
/** @}*/ // 自动注释文档范例
Doxygen 源代码文档自动生成器的使用笔记
在 google 上搜了很久的关于 Doxygen 使用方法的咚咚,只不过都是英文,而且都很多的规则。实际上大家只需要告诉基本的规则就可以。下面是我对 Doxygen 的摸索
首先熟知 Doxygen 产生的文件的基本结构 ( 以 Html 和 1.4.6 为例 )
Header (头部)
MainPage Files Classes
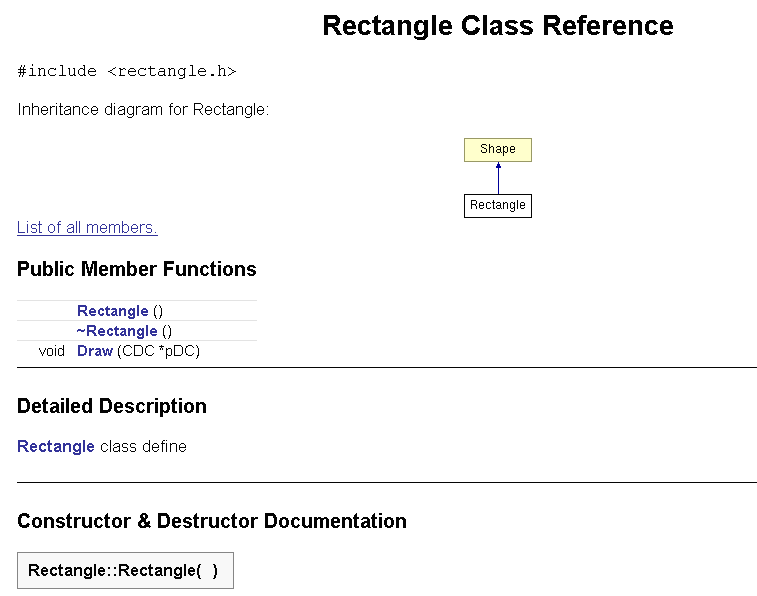
那么我们首先建立两个类吧,以典型的 Shape 和 它的继承类 Rectangle 为例
(为了表示那些是我的解释约定 ~ 为解释符号 其他的头文件和源文件的具体内容)
// shape.h
~ 在这个头文件中首先要有一些关于本文件的一些信息或者公司的 copyright 信息
~ 至于你想写什么,发挥你的创意把。
/** /file
* <pre><b>Richard Zeng Shape Class File Source</b></pre>
~ <pre></pre> 为居中显示
* <pre><b>Copyright and Use</b></pre>
* /author Richard Zeng
* /date 2006-3-23
~ /author 和 /date 是 Doxygen 的两个关键字
/author 为作者标题
/date 为日期标题
* <pre>zengyongjoy@gmail.com</pre>
<b>All rights reserved.</b>
*/
/** class shape define
* this is the base class for all Shape
*/
~ 在 Shape 类定义的前面请加上解释,否则这个类就不会产生很重要的
class Shape{
public :
Shape();
~Shape();
virtual void Draw(CDC* pDC);
};
// shape.cpp
/** /file
* <pre><b>Richard Zeng Shape Class File Source</b></pre>
* <pre><b>Copyright and Use</b></pre>
* /author Richard Zeng
* /date 2006-3-23
* <pre>zengyongjoy@gmail.com</pre>
<b>All rights reserved.</b>
*/
~ 上面的就不用说了吧
#include "shape.h"
~ 解释,随便你写什么都可以的
~ 这里我们可以看出在 CPP 中加注释比较好
~ 每个函数的实现都必须加上注释否则就没有这个函数拉
/** default constructor*/
Shape ::Shape()
{
}
/** destructor */
Shape ::~Shape()
{
}
/** Draw funtion for this shape
* /param CDC* pointer to MFC CDC
*/
~ /param 为 Doxygen 的关键字 用于定义参数
~ /return 为返回关键字
void Shape::Draw(CDC* pDC)
{
}
//Rectangle.h
/** /file __FILE__
* <pre><b>Richard Zeng Shape Class File Source</b></pre>
* <pre><b>Copyright and Use</b></pre>
* /author Richard Zeng
* /date 2006-3-23
* <pre>zengyongjoy@gmail.com</pre>
<b>All rights reserved.</b>
*/
#include "shape.h"
/** Rectangle class define
*/
class Rectangle:publicShape{
public :
Rectangle();
~Rectangle();
void Draw(CDC*pDC);
private :
int width,height;
};
//Rectangle.cpp
/** /file __FILE__
* <pre><b>Richard Zeng Shape Class File Source</b></pre>
* <pre><b>Copyright and Use</b></pre>
* /author Richard Zeng
* /date 2006-3-23
* <pre>zengyongjoy@gmail.com</pre>
<b>All rights reserved.</b>
*/
/** default constructor */
Rectangle ::Rectangle()
{
}
/** destructor */
Rectangle ::~Rectangle()
{
}
/** Draw function
* /param CDC* pointer to MFC CDC Class
*/
void Rectangle::Draw(CDC* pDC)
{
}
下面是 Doxygen 的主要操作步骤
首先我们在 MainPage 中看到 ProjectName 和 ProjectVersion (在 Doxygen Wizhard Step1
中输入就可以啦 )

然后在 Step2
中选择保存文件的位置
Step3 选择工作目录
Step4 点击 Start 按钮, ok 完成。
打开输出文件的位置。 Html 文件就生成拉。
http://www.codeproject.com/KB/tips/doxysetup.aspx
Welcome!
Doxygen is a free1) tool that extracts specific source code comments and analyzes the declarations of your code, to create a comprehensive online documentation, similar to the Tools/Build Comment web pagescommand in Visual Studio.NET. If you want the same for VC++6, or maybe some more flexibility and options, this article is for you.
Once setup, Doxygen can generate create a HTML documentation of your code at one click. It's still you who has to write the documentation, and if you want quality, it's still your job. However, an automated system can do a lot of vanilla tasks, and setting up the one-click documentation process is the first step to take: if you see the results of your effort immediately, it will soon feel natural to add the right type of comments.
1) Doxygen is written by Dimitri van Heesch, and released under the GNU public license (GPL). The documentation created by doxygen is not affected by the GPL. See the Doxygen Homepage for more information.
What do I have for you today?
- Setting it up - a quick step-by-step guide to setting up and integrating doxygen with VC++ 6
- Documenting Basics - hot to make doxygen understand your comments.
- Rationale - why to use doxygen? (skip if you are already convinced)
- Working with Doxygen - discusses the sample setup from 1), and provides an introduction to the most important doxygen features.
- Additional Resources (not much right now)
So let's jump right in!
Setting it up
This will show you how to integrate doxygen in VC++ 6, and set it up for one of your projects. I assume you already have a project you want to try doxygen on (if not, any C++ file will do). The whole process will take about 5 minutes (depends on your download speed).
Note: this setup does not work very well if you have a workspace with multiple projects in sub folders. See below for more.
| doxygen binaries [^] | 1. Download the Win32 binaries and install them I'll assume in the following you installed doxygen in c:/program files/doxygen. |
| doxygen tools | 2. Download and extract my doxygen tools and keep them safe and warm in a folder of your choice. They contain all the individual files mentioned in this article |
| Add VC++ Tool: "doxygen" | Add a new custom tool, called "DoxyGen", with the following parameters:
|
| Add VC++ Tool: "view results" | add another tool, to view the results new "View DoxyDoc" tool, to view the results:
|
| Add to project |
|
| You're done! Try! | choose Tools/doxygen from the menu, and watch the magic happen (doxygen will log it's progress and complaints to the output window). Choose Tools/View results to explore the documentation. The "Main Page" is probably rather boring. Click on "Data Structures" in the top line to browse your classes etc. |
Documenting Basics
Unless you already use some comment style that doxygen understands, the documentation is pretty much meaningless. So what can you do?
1. Add a comment block before classes and structures, using ///
Just use /// for the comment block:
/// SNAPINFO holds the data for calculating a modified window rect. Since it /// only works on coordinate rects, it can be used without any actual Windows. struct SNAPINFO {// ... }
2. Add a brief comment to to class member declarations
Use /// if you put a single line before the member. Use ///< if you put the comment behind the member
struct SNAPINFO { /// Init, using a pre-change and a post-change rectangle void Init(RECT const & oldRect, RECT const & newRect, DWORD snapwidth); void SnapHLine(int y); ///< Snap to ahorizontal line }
3. Add a detailed description to the method implementation
as with classes, use a /// - comment block
/// Initializes the structure with an old an a new rectangle. /// use this method if the window is about to be moved or resized (e.g. in /// WM_SIZING or WM_MOVING handler) void Init(RECT const & oldRect, RECT const & newRect, DWORD snapwidth) { // ... }
I prepared an example for a small class of another article, which had virtually no documentable comments.
| original code [^] | documentation [^] | |
| brief comments added [^] | documentation [^] | 13 new lines 2 with comment style modified |
| method desciptions added [^] | documentation [^] | 14 additional lines (with ehavy copy&paste) |
| without EXTRACT_ALL option | documentation [^] |
Note: as soon as you have added a basic doxy-comment to the important classes, you should turn off the EXTRACT_ALL option (as done in default2.doxygen). Undocumented classes are excluded, This will very much reduce the clutter in the detailed documentaiton section.
Rationale
When working with VS.NET I noticed that the Tools/Build comment web pages is a great motivaiton for me to add useful function and class comments to my sources. Having a large VC6 code base to maintain, which, for a huge part, already has the comments, but no tool to extract, I was pointed to doxygen, and got it running in relatively short time. So, maybe you're not convinced, so here are three questions for you, with some (suggestive) answers.
First Question: Do You need a software documentation?
Reasons are many:
- your company requires some documentation
- you're not convinced you understand all of your code after not looking at it for half a year
- your co-workers pester you with ""how do I do this" questions about your tool library.
- you plan to retire or move on, and don't want your precious code to end up in the garbage, pillaged and rewritten by someone you don't even know, just because he doesn't take the time for it.
- you feel better
Of course you can live without for an amazinghly long time, especially when you work on your own, or in a very small team. However, once a project grows beyond a certain size, you'll start to want some formal documentation. And the earlier you start, the better it is. Having set up a tool ready to be used, waiting for you tears down the biggest obstacle - getting started.
Second Question: Why use an automated system?
- Documentation is up-to-date
You are much more likely to change a comment atop of the function you fiddle with, than fire up MS Word, look for the function documentation, and change it there. - Reuse of your own comments
Assuming you already discovered the virtue of commenting your own code, the market value of your comments just doubled. - automatic formatting, and crosslinking
with a few simple markups, you get documentation that looks professional and consistent, and creates links to the description of all important entities. Forget about struggling with MS Word. - In-code comments carry important meta information
Not all important information is available from the actual "raw" source code. Interface contracts, pre- and post-conditions, side effects, meaning of special parameters, etc. need to be known to anyone who is to maintain the code - be it yourself or someone else. A formal style for these comments, in conjucntion with a parser (like doxygen's XML export) can make this informaiton available in customized format for various recipients: be it project management, testers, and the like.
Third Question: Why doxygen?
- It's free - so it's perfect for
- cheapskates
- sneaking it into the development process, in case noone cares about at your place
- evaluating if and how an automated documentation system can help you
- find out what features you expect when you shop for something better
- OpenSource with installer
It's fairly comfortable to use (see also "Using Doxygen" below), so having the source code available comes as an added bonus. - Configurable
With a basic style sheet, and twiddling the options in the doxygen configuration file (easy by using the doxywizard), you can customize many aspects ofthe documentation to your needs.
Documenting an existing code base
Maybe you have a large project, where you wished someone would have had the patience to add extractable comments. Yet, the idea of walking through documenting 10.000 lines of code, and documenting them makes you shudder. Here are some suggestions:
- Set up doxygen for the project. It's five minutes, and without nothing will happen
- Document everything you write anew.
- Touch up the code you work on. If you fiddle around with some function anyway, it's easiest to add some extra comments. Often it is just copying around / adjusting some existing comments to look a bit nicer.
- Spend 5 minutes before lunch break on adding comments. Or: comment one function for each visit to the CodeProject lounge
Soon you will feel more "fluid" in documenting your code, and adding brief comments to an existing class is a matter of minutes. If the benefits of having the documentation kick in, you are encouraged to carry on.
Working with Doxygen
The setup used above is quite generic. You can generate a default configuration file using doxygen -g, or by using the doxywizard. the latter makes playing around with various options fairly easy.
For each docmentable entity, doxygen looks for a brief comment, and a detailed description. The brief comment is addedto various overviews (liek the class member listing).
Comment Style
Doxygen recognizes other comment formats as well - I chose the above for both personal taste and compliance with those understood in .NET. For a comprehensive list, see Commenting the code in the doxygen documentation.
Other doxygen Options:
For the default.doxygen, I changed some of default options, notably:
- EXTRACT_ALL enabled: so some generation is created even for "undocumented" code
I'd strongly recommend for existing projects to first add some documentation to the most important class declarations and methods, and then turn off the EXTRACT_ALL option. This makes the documentation less cluttered, and gives you even more more inducement to document what isn't - JAVADOC_AUTOBRIEF: this allows to have both the brief comment anddetailed description in one block (despite it's name, it works for C++ sources, too)
The first line of a comment block (up to the first period) is used as brief description. - WARN_FORMAT set to $file($line): $text - so you can double-click doxygen warning messages in the output window to jump to the relevant source line
- INPUT : I added a single "." as INPUT directory, and checked the RECURSIVE option. this will scan the working directory (set to the workspace folder in the VC++ custom tool), and added a reasonable list of files to scan (.IDL files work very well, too!). You could specify exclude patterns, too (e.g. *_i.c and *_p.c for ATL projects to exclude some of the internal guts from documentation)
- Source browser: I enabled the SOURCE_BROWSER option, so the sources are included and crosslinked (doxygen removes all doxygen-style comments, but leaves all other comments in).
- I disabled the REFERENCED_BY_RELATION and REFERENCES_RELATION options. They can be valuable if you want to explore the interdependencies of complex code, but for the things I'm working on it's just clutter.
- for the HTML_OUTPUT I set doxydoc as directory (it will be created under the working directory)
Tip: When specifying dorectory names in doxygen config files -- if it contains spaces, put it into quotes (this is a good idea for other options as well)
- do not end them with a backslash - doxygen uses it to spread argument lists over multiple lines
- doxygen will try to create non-existing output directories, but cannot generate multiple levels.
- GENERATE_TREEVIEW : While I left it disabled for the default, you shoud try it!
Documentation Markup:
Doxygen allows for simple markup tags in the comments (I used some in the sample documentation) they start with either a backslash, or an @. The most important I listed here:
| /param name descripiton | Intended for documenting function parameters. see the full sample source and documentation for how it looks like. |
| /return description | desribe what a function returns |
| /b /c /e | set the next word to bold, italic, or courier, respectively. e.g. /// You can make things /b bold, /e italic, or set them in /c courier results in You can make things bold, italic, or set them in courier. |
| /code /endcode | starts and ends a section of code, respectively. (it will be formatted nicely) |
| /n | force a newline |
| /internal | starts a paragraph with "internal information" (such as implementaiton details). The paragraph will be included only if the INTERNAL_DOCS option is enabled. |
| /mainpage | Indictaes that the following section should appear on the main page. it's a good place to introduce your most important classes, etc. (entities will be crosslinked) |
| /par /par Title | Starts a new paragraph (optionally with a paragraph title), works also inside other paragraphs (such as /param) |
| Lists | Doxygen automatically creates a list if multiple lines start with a dash at the same position. Numbered lists can be created by starting the line with a dach and a hash (-#). See the doxygen documentation for more. |
| More... (doxygen documentation) | Doxygen supports many more tags, many of them allowing for further markup, or are intended for working in conjucntion with the XML export. (e.g. you can makr the specificaiton of pre- and post-conditions, bugs, test cases, todo's, etc.) |
| HTML (doxygen documentation) | Doxygen also supports HTML tags, which get converted to other outputs mroe or less correctly. |
Additional Resources
Macros:
It's convenient to set up some auto-text bound to hotkeys for writing documentation. I just use some macros, and assign shortcuts to it manually: Setup is a bit of a hassle, but it's worth it:
- copy doxygen.dsm into the [DevStudo]/Common/MSDev98/Macros folder
- Start VC++, choose Tools/Customize...
- on the "Add ins and macros" tab, enable the doxygen.dsm macro file
- On the Keyboard tab, choose "Macros" under Category, and assign your preferred shortcuts to the commands
Here's a list of the macros I use:
| Macro Name | Description | my shortcut |
| DoxyComment | three slashes and a space (I use it rarely , but it's there) | Ctrl-# (german keyboard..) |
| DoxyCommentNL | newline + '/// ' - perfect for writing block comments (just press Ctrl-Enter instead of just Enter) | Ctrl-Enter |
| DoxyCommentPrev | '///< ' : for brief comments behind the declaration | Ctrl-Shift-# |
| DoxyDocFunction | a simple header to comment a function | Ctrl-Shift-F |
Style Sheets:
You can generate a default doxygen style sheet, HTML header and footer by calling
doxygen -w html <header_name> <footer_name> <stylesheet_name>
I did this for you already: doxygen_header.html, doxygen_footer.html, and doxygen_default.css.
The default style sheet is a good starting point for your own.
DoxyWizard:
In closing, just a little tip: Together with doxygen comes DoxyWizard, a UI tool to edit the configuration files. It's ok to use, the "quick help" gives a short explanaiton of each option. As I named all my config files .doxygen, I associated this extension with doxywizard, so life got much easier, and playing around with the options is much more fun.
Other Systems:
If you have experience with other documentation systems, feel free to (dis-)recommend them in the comments section - as long as you don't make it an advertisement, and stay within what's considered good taste on CP.
Enjoy! And document well.


 2610
2610


 被折叠的 条评论
为什么被折叠?
被折叠的 条评论
为什么被折叠?
 到【灌水乐园】发言


