


一、什么是OAuth
OAuth是一个关于授权(Authorization)的开放网络标准,目前的版本是2.0版。注意是Authorization(授权),而不是Authentication(认证)。用来做Authentication(认证)的标准叫做openid connect,我们将在以后的文章中进行介绍。
二、名词定义
理解OAuth中的专业术语能够帮助你理解其流程模式,OAuth中常用的名词术语有4个,为了便于理解这些术语,我们先假设一个很常见的授权场景:
你访问了一个日志网站(third party application),你(client)觉得这个网站很不错,准备以后就要在这个网站上写日志了,所以你准备把QQ空间(Resource owner)里面的日志都导入进来。此日志网站想要导入你在QQ空间中的日志需要知道你的QQ用户名和密码才行,为了安全期间你不会把你的QQ用户名和密码直接输入在日志网站中,所以日志网站帮你导航到了QQ认证界面(Authorization Server),当你输入完用户名和密码后,QQ认证服务器返回给日志网站一个token, 该日志网站凭借此token来访问你在QQ空间中的日志。
- third party application 第三方的应用,想要的到Resource owner的授权
- client 代表用户
- Resource owner 资源拥有者,在这里代表QQ
- Authorization server 认证服务,这里代表QQ认证服务,Resource owner和Authorization server可以是不同的服务器,也可以是同一个服务器。
三、OAuth2.0中的四种模式
OAuth定义了四种模式,覆盖了所有的授权应用场景:
- 授权码模式(authorization code)
- 简化模式(implicit)
- 密码模式(resource owner password credentials)
- 客户端模式(client credentials)
前面我们假设的场景可以用前两种模式来实现,不同之处在于:
当日志网站(third party application)有服务端,使用模式1;
当日志网站(third party application)没有服务端,例如纯的js+html页面需要采用模式2;
本文主描述利用OAuth2.0实现自己的WebApi认证服务,前两种模式使用场景不符合我们的需求。
四、选择合适的OAuth模式打造自己的webApi认证服务
场景:你自己实现了一套webApi,想供自己的客户端调用,又想做认证。
这种场景下你应该选择模式3或者4,特别是当你的的客户端是js+html应该选择3,当你的客户端是移动端(ios应用之类)可以选择3,也可以选择4。
密码模式(resource owner password credentials)的流程:

这种模式的流程非常简单:
- 用户向客户端(third party application)提供用户名和密码。
- 客户端将用户名和密码发给认证服务器(Authorization server),向后者请求令牌(token)。
- 认证服务器确认无误后,向客户端提供访问令牌。
- 客户端持令牌(token)访问资源。
此时third party application代表我们自己的客户端,Authorization server和Resource owner代表我们自己的webApi服务。我们在日志网站的场景中提到:用户不能直接为日志网站(third party application)提供QQ(resource owner)的用户名和密码。而此时third party application、authorization server、resource owner都是一家人,Resource owner对third party application足够信任,所以我们才能采取这种模式来实现。
五、使用owin来实现密码模式
owin集成了OAuth2.0的实现,所以在webapi中使用owin来打造authorization无疑是最简单最方便的方案。
- 新建webApi项目
- 安装Nuget package:
Microsoft.AspNet.WebApi.Owin
Microsoft.Owin.Host.SystemWeb
- 增加owin的入口类:Startup.cs
在项目中新建一个类,命名为Startup.cs,这个类将作为owin的启动入口,添加下面的代码
|
1
2
3
4
5
6
7
8
9
10
11
12
13
14
15
|
[assembly: OwinStartup(
typeof
(OAuthPractice.ProtectedApi.Startup))]
namespace
OAuthPractice.ProtectedApi
{
public
class
Startup
{
public
void
Configuration(IAppBuilder app)
{
var
config =
new
HttpConfiguration();
WebApiConfig.Register(config);
app.UseWebApi(config);
}
}
}
|
另外修改WebApiConfig.Register(HttpConfiguration config)方法:
|
1
2
3
4
5
6
7
8
9
10
11
12
13
14
15
16
|
public
static
class
WebApiConfig
{
public
static
void
Register(HttpConfiguration config)
{
config.MapHttpAttributeRoutes();
config.Routes.MapHttpRoute(
name:
"DefaultApi"
,
routeTemplate:
"api/{controller}/{id}"
,
defaults:
new
{ id = RouteParameter.Optional }
);
var
jsonFormatter = config.Formatters.OfType<JsonMediaTypeFormatter>().First();
jsonFormatter.SerializerSettings.ContractResolver =
new
CamelCasePropertyNamesContractResolver();
}
}
|
最后两句话将会使用CamelCase命名法序列化webApi的返回结果。
3.使用ASP.NET Identity 实现一个简单的用户认证功能,以便我们生成用户名和密码
安装nuget package:
Microsoft.AspNet.Identity.Owin
Microsoft.AspNet.Identity.EntityFramework
4.新建一个Auth的文件夹,并添加AuthContext类:
|
1
2
3
4
5
6
7
|
public
class
AuthContext : IdentityDbContext<IdentityUser>
{
public
AuthContext():
base
(
"AuthContext"
)
{
}
}
|
同时在web.config中添加connectionString:
|
1
2
3
|
<
connectionStrings
>
<
add
name="AuthContext" connectionString="Data Source=.;Initial Catalog=OAuthPractice;Integrated Security=SSPI;" providerName="System.Data.SqlClient" />
</
connectionStrings
>
|
5.增加一个Entities文件夹并添加UserModel类:
|
1
2
3
4
5
6
7
8
9
10
11
12
13
14
15
16
17
|
public
class
UserModel
{
[Required]
[Display(Name =
"UserModel name"
)]
public
string
UserName {
get
;
set
; }
[Required]
[StringLength(100, ErrorMessage =
"The {0} must be at least {2} characters long."
, MinimumLength = 6)]
[DataType(DataType.Password)]
[Display(Name =
"Password"
)]
public
string
Password {
get
;
set
; }
[DataType(DataType.Password)]
[Display(Name =
"Confirm password"
)]
[Compare(
"Password"
, ErrorMessage =
"The password and confirmation password do not match."
)]
public
string
ConfirmPassword {
get
;
set
; }
}
|
6.在Auth文件夹下添加AuthRepository类,增加用户注册和查找功能:
|
1
2
3
4
5
6
7
8
9
10
11
12
13
14
15
16
17
18
19
20
21
22
23
24
25
26
27
28
29
30
31
32
33
34
35
36
37
38
|
public
class
AuthRepository : IDisposable
{
private
AuthContext _ctx;
private
UserManager<IdentityUser> _userManager;
public
AuthRepository()
{
_ctx =
new
AuthContext();
_userManager =
new
UserManager<IdentityUser>(
new
UserStore<IdentityUser>(_ctx));
}
public
async Task<IdentityResult> RegisterUser(UserModel userModel)
{
IdentityUser user =
new
IdentityUser
{
UserName = userModel.UserName
};
var
result = await _userManager.CreateAsync(user, userModel.Password);
return
result;
}
public
async Task<IdentityUser> FindUser(
string
userName,
string
password)
{
IdentityUser user = await _userManager.FindAsync(userName, password);
return
user;
}
public
void
Dispose()
{
_ctx.Dispose();
_userManager.Dispose();
}
}
|
7、增加AccountController
|
1
2
3
4
5
6
7
8
9
10
11
12
13
14
15
16
17
18
19
20
21
22
23
24
25
26
27
28
29
30
31
32
33
34
35
36
37
38
39
40
41
42
43
44
45
46
47
48
49
50
51
52
53
54
55
56
57
58
59
60
61
62
63
64
65
66
67
68
69
70
71
|
[RoutePrefix(
"api/Account"
)]
public
class
AccountController : ApiController
{
private
readonly
AuthRepository _authRepository =
null
;
public
AccountController()
{
_authRepository =
new
AuthRepository();
}
// POST api/Account/Register
[AllowAnonymous]
[Route(
"Register"
)]
public
async Task<IHttpActionResult> Register(UserModel userModel)
{
if
(!ModelState.IsValid)
{
return
BadRequest(ModelState);
}
IdentityResult result = await _authRepository.RegisterUser(userModel);
IHttpActionResult errorResult = GetErrorResult(result);
if
(errorResult !=
null
)
{
return
errorResult;
}
return
Ok();
}
protected
override
void
Dispose(
bool
disposing)
{
if
(disposing)
{
_authRepository.Dispose();
}
base
.Dispose(disposing);
}
private
IHttpActionResult GetErrorResult(IdentityResult result)
{
if
(result ==
null
)
{
return
InternalServerError();
}
if
(!result.Succeeded)
{
if
(result.Errors !=
null
)
{
foreach
(
string
error
in
result.Errors)
{
ModelState.AddModelError(
""
, error);
}
}
if
(ModelState.IsValid)
{
// No ModelState errors are available to send, so just return an empty BadRequest.
return
BadRequest();
}
return
BadRequest(ModelState);
}
return
null
;
}
}
|
Register方法打上了AllowAnonymous标签,意味着调用这个api无需任何授权。
8.增加一个OrderControll,添加一个受保护的api用来做实验
在Models文件夹下增加Order类:
|
1
2
3
4
5
6
7
8
9
10
11
12
13
14
15
16
17
18
19
20
21
|
public
class
Order
{
public
int
OrderID {
get
;
set
; }
public
string
CustomerName {
get
;
set
; }
public
string
ShipperCity {
get
;
set
; }
public
Boolean IsShipped {
get
;
set
; }
public
static
List<Order> CreateOrders()
{
List<Order> OrderList =
new
List<Order>
{
new
Order {OrderID = 10248, CustomerName =
"Taiseer Joudeh"
, ShipperCity =
"Amman"
, IsShipped =
true
},
new
Order {OrderID = 10249, CustomerName =
"Ahmad Hasan"
, ShipperCity =
"Dubai"
, IsShipped =
false
},
new
Order {OrderID = 10250,CustomerName =
"Tamer Yaser"
, ShipperCity =
"Jeddah"
, IsShipped =
false
},
new
Order {OrderID = 10251,CustomerName =
"Lina Majed"
, ShipperCity =
"Abu Dhabi"
, IsShipped =
false
},
new
Order {OrderID = 10252,CustomerName =
"Yasmeen Rami"
, ShipperCity =
"Kuwait"
, IsShipped =
true
}
};
return
OrderList;
}
}
|
增加OrderController类:
|
1
2
3
4
5
6
7
8
9
10
11
|
[RoutePrefix(
"api/Orders"
)]
public
class
OrdersController : ApiController
{
[Authorize]
[Route(
""
)]
public
List<Order> Get()
{
return
Order.CreateOrders();
}
}
|
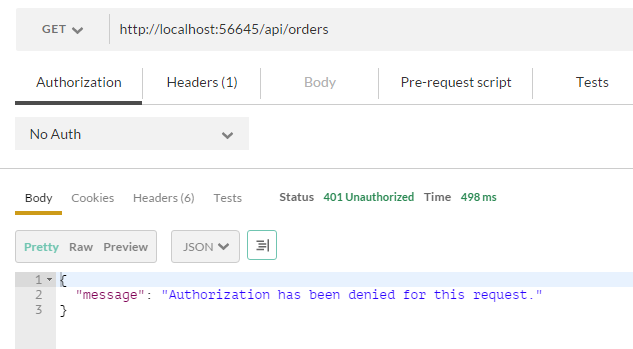
我们在Get()方法上加了Authorize标签,所以此api在没有授权的情况下将返回401 Unauthorize。使用postman发个请求试试:
9. 增加OAuth认证
|
1
2
3
4
5
6
7
8
9
10
11
12
13
14
15
16
17
18
19
20
21
22
23
24
25
26
27
|
public
class
Startup
{
public
void
Configuration(IAppBuilder app)
{
var
config =
new
HttpConfiguration();
WebApiConfig.Register(config);
ConfigureOAuth(app);
//这一行代码必须放在ConfiureOAuth(app)之后
app.UseWebApi(config);
}
public
void
ConfigureOAuth(IAppBuilder app)
{
OAuthAuthorizationServerOptions OAuthServerOptions =
new
OAuthAuthorizationServerOptions()
{
AllowInsecureHttp =
true
,
TokenEndpointPath =
new
PathString(
"/token"
),
AccessTokenExpireTimeSpan = TimeSpan.FromMinutes(30),
Provider =
new
SimpleAuthorizationServerProvider()
};
// Token Generation
app.UseOAuthAuthorizationServer(OAuthServerOptions);
app.UseOAuthBearerAuthentication(
new
OAuthBearerAuthenticationOptions());
}
|
ConfigureOAuth(IAppBuilder app)方法开启了OAuth服务。简单说一下OAuthAuthorizationServerOptions中各参数的含义:
AllowInsecureHttp:允许客户端使用http协议请求;
TokenEndpointPath:token请求的地址,即http://localhost:端口号/token;
AccessTokenExpireTimeSpan :token过期时间;
Provider :提供具体的认证策略;
SimpleAuthorizationServerProvider的代码如下:
|
1
2
3
4
5
6
7
8
9
10
11
12
13
14
15
16
17
18
19
20
21
22
23
24
25
26
27
28
29
30
31
32
33
34
35
36
37
38
39
40
41
42
43
44
45
46
47
48
49
50
|
public
class
SimpleAuthorizationServerProvider : OAuthAuthorizationServerProvider
{
public
override
Task ValidateClientAuthentication(OAuthValidateClientAuthenticationContext context)
{
context.Validated();
return
Task.FromResult<
object
>(
null
);
}
public
override
async Task GrantResourceOwnerCredentials(OAuthGrantResourceOwnerCredentialsContext context)
{
using
(AuthRepository _repo =
new
AuthRepository())
{
IdentityUser user = await _repo.FindUser(context.UserName, context.Password);
if
(user ==
null
)
{
context.SetError(
"invalid_grant"
,
"The user name or password is incorrect."
);
return
;
}
}
var
identity =
new
ClaimsIdentity(context.Options.AuthenticationType);
identity.AddClaim(
new
Claim(ClaimTypes.Name, context.UserName));
identity.AddClaim(
new
Claim(ClaimTypes.Role,
"user"
));
identity.AddClaim(
new
Claim(
"sub"
, context.UserName));
var
props =
new
AuthenticationProperties(
new
Dictionary<
string
,
string
>
{
{
"as:client_id"
, context.ClientId ??
string
.Empty
},
{
"userName"
, context.UserName
}
});
var
ticket =
new
AuthenticationTicket(identity, props);
context.Validated(ticket);
}
public
override
Task TokenEndpoint(OAuthTokenEndpointContext context)
{
foreach
(KeyValuePair<
string
,
string
> property
in
context.Properties.Dictionary)
{
context.AdditionalResponseParameters.Add(property.Key, property.Value);
}
return
Task.FromResult<
object
>(
null
);
}
}
|
ValidateClientAuthentication方法用来对third party application 认证,具体的做法是为third party application颁发appKey和appSecrect,在本例中我们省略了颁发appKey和appSecrect的环节,我们认为所有的third party application都是合法的,context.Validated(); 表示所有允许此third party application请求。
GrantResourceOwnerCredentials方法则是resource owner password credentials模式的重点,由于客户端发送了用户的用户名和密码,所以我们在这里验证用户名和密码是否正确,后面的代码采用了ClaimsIdentity认证方式,其实我们可以把他当作一个NameValueCollection看待。最后context.Validated(ticket); 表明认证通过。
只有这两个方法同时认证通过才会颁发token。
TokenEndpoint方法将会把Context中的属性加入到token中。
10、注册用户
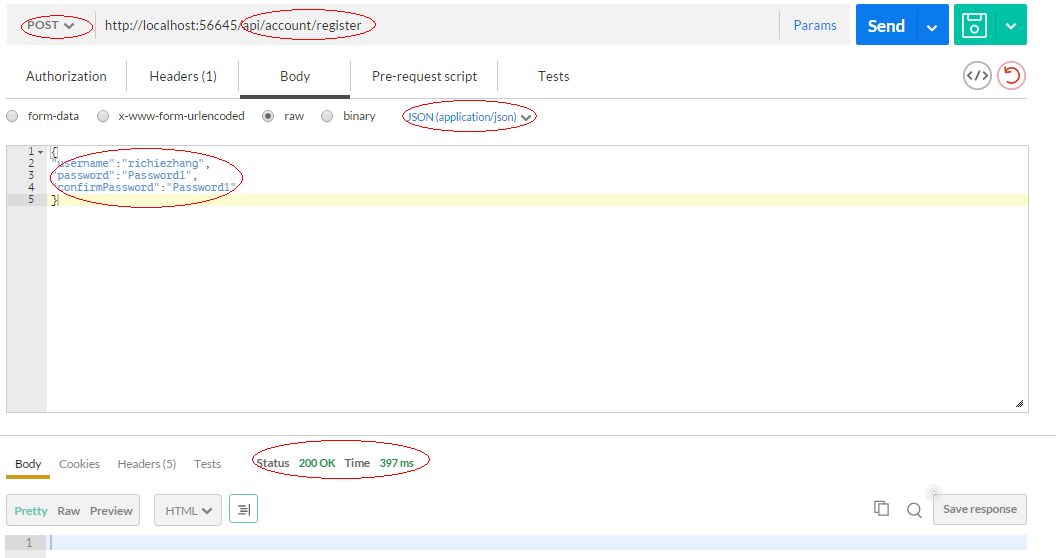
使用postman发送注册用户的请求(http://{url}/api/account/register)服务器返回200,说明注册成功。
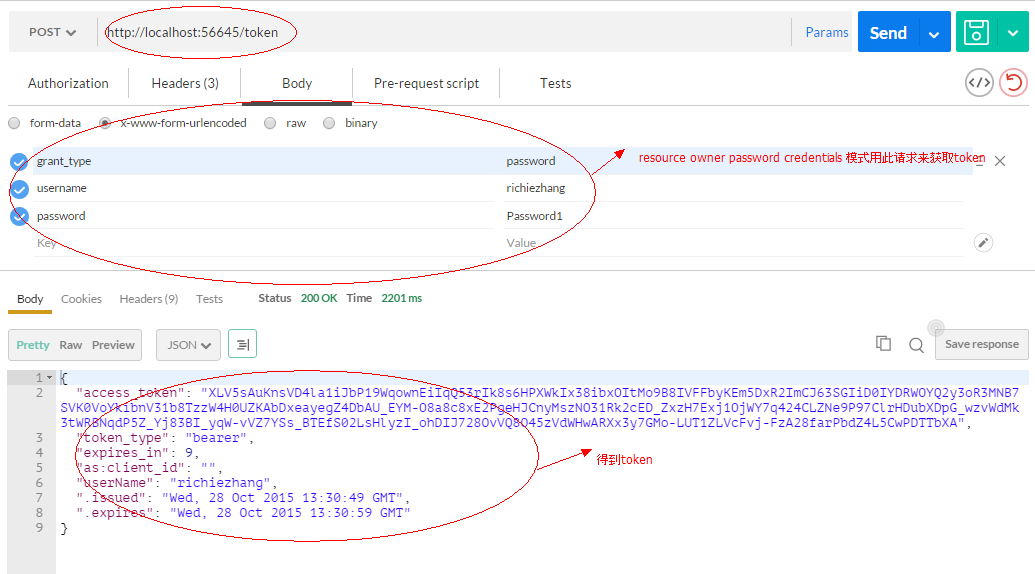
11、向服务器请求token
resource owner password credentials模式需要body包含3个参数:
grant_type-必须为password
username-用户名
password-用户密码
12、使用token访问受保护的api
在Header中加入:Authorization – bearer {{token}},此token就是上一步得到的token。
此时客户端在30分钟内使用该token即可访问受保护的资源。30分钟这个设置来自AccessTokenExpireTimeSpan = TimeSpan.FromMinutes(30),你可以自定义token过期时间。

六、刷新token
当token过期后,OAuth2.0提供了token刷新机制:
|
1
2
3
4
5
6
7
8
9
10
11
12
13
14
15
16
17
|
public
void
ConfigureOAuth(IAppBuilder app)
{
OAuthAuthorizationServerOptions OAuthServerOptions =
new
OAuthAuthorizationServerOptions()
{
AllowInsecureHttp =
true
,
TokenEndpointPath =
new
PathString(
"/token"
),
AccessTokenExpireTimeSpan = TimeSpan.FromSeconds(10),
Provider =
new
SimpleAuthorizationServerProvider(),
//refresh token provider
RefreshTokenProvider =
new
SimpleRefreshTokenProvider()
};
// Token Generation
app.UseOAuthAuthorizationServer(OAuthServerOptions);
app.UseOAuthBearerAuthentication(
new
OAuthBearerAuthenticationOptions());
}
|
1、添加新的RefreshTokenProvider
|
1
2
3
4
5
6
7
8
9
10
11
12
13
14
15
16
17
18
19
20
21
22
23
24
25
26
27
28
29
30
31
32
33
34
35
36
37
38
39
40
41
42
43
44
45
46
47
48
49
50
51
52
53
54
55
56
57
58
59
60
61
|
public
class
SimpleRefreshTokenProvider : IAuthenticationTokenProvider
{
public
async Task CreateAsync(AuthenticationTokenCreateContext context)
{
var
refreshTokenId = Guid.NewGuid().ToString(
"n"
);
using
(AuthRepository _repo =
new
AuthRepository())
{
var
token =
new
RefreshToken()
{
Id = refreshTokenId.GetHash(),
Subject = context.Ticket.Identity.Name,
IssuedUtc = DateTime.UtcNow,
ExpiresUtc = DateTime.UtcNow.AddMinutes(30)
};
context.Ticket.Properties.IssuedUtc = token.IssuedUtc;
context.Ticket.Properties.ExpiresUtc = token.ExpiresUtc;
token.ProtectedTicket = context.SerializeTicket();
var
result = await _repo.AddRefreshToken(token);
if
(result)
{
context.SetToken(refreshTokenId);
}
}
}
public
async Task ReceiveAsync(AuthenticationTokenReceiveContext context)
{
string
hashedTokenId = context.Token.GetHash();
using
(AuthRepository _repo =
new
AuthRepository())
{
var
refreshToken = await _repo.FindRefreshToken(hashedTokenId);
if
(refreshToken !=
null
)
{
//Get protectedTicket from refreshToken class
context.DeserializeTicket(refreshToken.ProtectedTicket);
var
result = await _repo.RemoveRefreshToken(hashedTokenId);
}
}
}
public
void
Create(AuthenticationTokenCreateContext context)
{
throw
new
NotImplementedException();
}
public
void
Receive(AuthenticationTokenReceiveContext context)
{
throw
new
NotImplementedException();
}
}
|
我们实现了其中两个异步方法,对两个同步方法不做实现。其中CreateAsync用来生成RefreshToken值,生成后需要持久化在数据库中,客户端需要拿RefreshToken来请求刷新token,此时ReceiveAsync方法将拿客户的RefreshToken和数据库中RefreshToken做对比,验证成功后删除此refreshToken。
2、重新请求token

可以看到这次请求不但得到了token,还得到了refresh_token
3、当token过期后,凭借上次得到的refresh_token重新获取token

此次请求又得到了新的refresh_token,每次refresh_token只能用一次,因为在方法ReceiveAsync中我们一旦拿到refresh_token就删除了记录。
七、总结
此文重点介绍了OAuth2.0中resource owner password credentials模式的使用,此模式可以实现资源服务为自己的客户端授权。另外文章中也提到模式4-client credentials也可以实现这种场景,但用来给有服务端的客户端使用-区别于纯html+js客户端。原因在于模式4-client credentials使用appKey+appSecrect来验证客户端,如果没有服务端的话appSecrect将暴露在js中。
同样的道理:模式1-授权码模式(authorization code)和模式2-简化模式(implicit)的区别也在于模式2-简化模式(implicit)用在无服务端的场景下,请求头中不用带appSecrect。
在webApi中使用owin来实现OAuth2.0是最简单的解决方案,另外一个方案是使用DotNetOpenOauth,这个方案的实现稍显复杂,可用的文档也较少,源码中带有几个例子我也没有直接跑起来,最后无奈之下几乎读完了整个源码才理解。
八、客户端的实现
我们将采用jquery和angular两种js框架来调用本文实现的服务端。下一篇将实现此功能,另外还要给我们的服务端加上CORS(同源策略)支持。


 2964
2964


 被折叠的 条评论
为什么被折叠?
被折叠的 条评论
为什么被折叠?
 到【灌水乐园】发言


