


深入理解Android View(一) View的位置参数信息
二、View的绘制过程
View的绘制过程一共分为三个部分:
- measure(测量View的大小)
- layout(确定View的位置)
- draw(画出View)
通常我们的View都是以这样的树结构呈现的,如下图
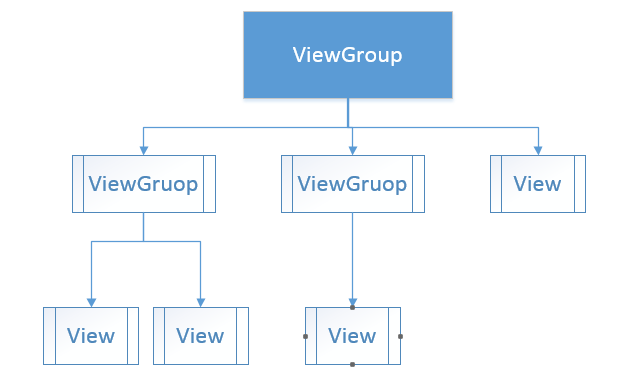
当然我们这里ViewGroup其实上面其实是放在DecorView中的,我们可以通过findViewbById(andorid.id.content)获取到顶级ViewGroup,这里的DecorView开发中一般涉及不到,这里我们不过多分析,我们只需要知道我们的绘制过程是从DecorView分发下来的即可。我们先来看ViewGroup中的一段源码
protected void measureChildren(int widthMeasureSpec, int heightMeasureSpec) {
        final int size = mChildrenCount;
        final View[] children = mChildren;
        for (int i = 0; i < size; ++i) {
            final View child = children[i];
            if ((child.mViewFlags & VISIBILITY_MASK) != GONE) {
                measureChild(child, widthMeasureSpec, heightMeasureSpec);
            }
        }
    }


protected void measureChild(View child, int parentWidthMeasureSpec,
            int parentHeightMeasureSpec) {
        final LayoutParams lp = child.getLayoutParams();

        final int childWidthMeasureSpec = getChildMeasureSpec(parentWidthMeasureSpec,
                mPaddingLeft + mPaddingRight, lp.width);
        final int childHeightMeasureSpec = getChildMeasureSpec(parentHeightMeasureSpec,
                mPaddingTop + mPaddingBottom, lp.height);

        child.measure(childWidthMeasureSpec, childHeightMeasureSpec);
    }
这里我们可以看到在ViewGroup中的measureChildren的方法,首先获取到了所有的子View,然后调用View的measure方法进行子View的测量,这样就完成了一次测量过程,然后子View会重复父View的操作,如此返回就完成了整个View树的测量过程。通过源码我们发现一个View的大小,主要由父View的MeasureSpec和自身的LayoutParams来共同决定,LayoutParams我们应都比较熟悉了,接下来我们就来深入分析MeasureSpec,这是在View类中的一个静态内部类,看名字就能猜到它代表它的作用是一种测量标准或者说测量规格,我们先来看下它的源码
public static class MeasureSpec {
    private static final int MODE_SHIFT = 30;
    private static final int MODE_MASK = 0x3 << MODE_SHIFT;
    public static final int UNSPECIFIED = 0 << MODE_SHIFT;
    public static final int EXACTLY = 1 << MODE_SHIFT;
    public static final int AT_MOST = 2 << MODE_SHIFT;

    public static int makeMeasureSpec(int size, int mode) {
        if (sUseBrokenMakeMeasureSpec) {
            // 老版api
            return size + mode;
        } else {
            return (size & ~MODE_MASK) | (mode & MODE_MASK);
        }
    }

    public static int getMode(int measureSpec) {
        return (measureSpec & MODE_MASK);
    }

    public static int getSize(int measureSpec) {
        return (measureSpec & ~MODE_MASK);
    }
}
MeasureSpec代表一个32位的int值,高两位代表SpecMode,低30位代表SpecSize,Mode指测量模式,Size则指测量的大小,通过看MeasureSpec的源码也能看到,其实这里谷歌工程师非常巧妙的把Mode和Size封装到了一个int值中,非常巧妙的办法(这种设计方式可以借鉴),如果你对Java运算符不太熟的话,你可以这样理解,谷歌工程师把一个32位的int分成了两节,一节用来表示Mode,一节用来表示Size。可以看到Mode分为三种模式如下所示:
- UNSPECIFIED
父容器不对子View做任何限制,要多大给多大,一般用于系统内部,这里不用过多考虑 - EXACTLY
精准模式,一般View指定了具体的大小(dp/px)或者设置为match_parent则就是这个模式 - AT_MOST
父容器制定了一个可用的大小,子View不能大于这个值,对于wrap_content
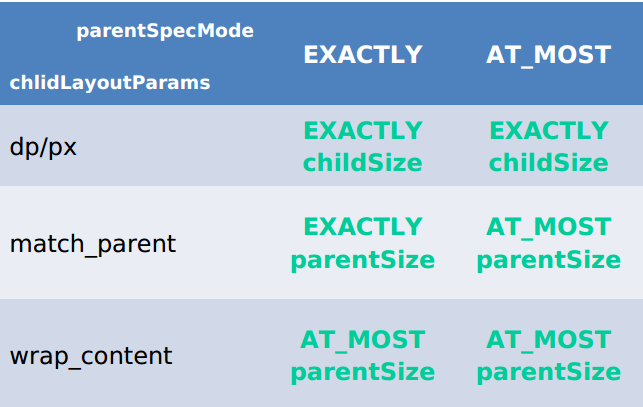
这里借用任主席博客中的一张图,UNSPECIFIED 我们不予考虑。
总结:一个View的绘制主要由父View的MeasureSpec和自身的LayoutParams决定,其关系如上表。说了这么多其实大多数时候当我自定义View时,只需要处理AT_MOST即可,通用代码如下:
protected void onMeasure(int widthMeasureSpec, int heightMeasureSpec) {
    //分别获取宽高的Mode 和size
    super.onMeasure(widthMeasureSpec, heightMeasureSpec);
    int widthSpecMode = MeasureSpec.getMode(widthMeasureSpec);
    int widthSpecSize = MeasureSpec.getSize(widthMeasureSpec);
    int heightSpecMode = MeasureSpec.getMode(heightMeasureSpec);
    int heightSpecSize = MeasureSpec.getSize(heightMeasureSpec);
    // 如果是精准模式则直接使用获取到的宽高,如果是AT_MOST,则使用我 们自己测量的宽高
    if (widthSpecMode == MeasureSpec.AT_MOST && heightSpecMode == MeasureSpec.AT_MOST) {
        setMeasuredDimension(mWidth, mHeight);
    } else if (widthSpecMode == MeasureSpec.AT_MOST) {
        setMeasuredDimension(mWidth, heightSpecSize);
    } else if (heightSpecMode == MeasureSpec.AT_MOST) {
        setMeasuredDimension(widthSpecSize, mHeight);
    }
}
如果当前是View则直接完成测量,如果当前是ViewGruop除了完成自身绘制外,还需要遍历调用子View的measure方法。
View的layout方法和Draw方法就比较简单了,layout用于确定View的位置,原理和Measure过程类似,当一个ViewGroup的位置被确定之后,会遍历其所有子View并调用其layout方法。Draw的过程也类似,通过dispatchDraw(Canvas canvas)方法,遍历子View,通过canvas进行Draw过程,接下来我通过一个小Demo流式布局,来运用一下三个过程
import java.util.ArrayList;
import java.util.List;

import android.content.Context;
import android.util.AttributeSet;
import android.view.View;
import android.view.ViewGroup;

/**
 *
 */
public class FlowLayout extends ViewGroup {

    /**
     * 存储所有的子View
     */
    private List<List<View>> mAllChildViews = new ArrayList<List<View>>();

    /**
     * 存储每一行的高度
     */
    private List<Integer> mLineHeight = new ArrayList<Integer>();

    public FlowLayout(Context context) {
        this(context, null);
    }

    public FlowLayout(Context context, AttributeSet attrs) {
        this(context, attrs, 0);
    }

    public FlowLayout(Context context, AttributeSet attrs, int defStyle) {
        super(context, attrs, defStyle);
    }

    @Override
    protected void onLayout(boolean changed, int l, int t, int r, int b) {
        mAllChildViews.clear();
        mLineHeight.clear();
        // 获取当前ViewGroup的宽度
        int width = getWidth();

        int lineWidth = 0;
        int lineHeight = 0;
        // 记录当前行的view
        List<View> lineViews = new ArrayList<View>();
        int childCount = getChildCount();
        for (int i = 0; i < childCount; i++) {
            View child = getChildAt(i);
            MarginLayoutParams lp = (MarginLayoutParams) child
                    .getLayoutParams();
            int childWidth = child.getMeasuredWidth();
            int childHeight = child.getMeasuredHeight();

            // 如果需要换行
            if (childWidth + lineWidth + lp.leftMargin + lp.rightMargin > width) {
                // 记录LineHeight
                mLineHeight.add(lineHeight);
                // 记录当前行的Views
                mAllChildViews.add(lineViews);
                // 重置行的宽高
                lineWidth = 0;
                lineHeight = childHeight + lp.topMargin + lp.bottomMargin;
                // 重置view的集合
                lineViews = new ArrayList();
            }
            lineWidth += childWidth + lp.leftMargin + lp.rightMargin;
            lineHeight = Math.max(lineHeight, childHeight + lp.topMargin
                    + lp.bottomMargin);
            lineViews.add(child);
        }
        // 处理最后一行
        mLineHeight.add(lineHeight);
        mAllChildViews.add(lineViews);

        MarginLayoutParams params = (MarginLayoutParams) this.getLayoutParams();

        // 设置子View的位置
        int left = 0;
        // 添加marginTop
        int top = 0 + params.topMargin;
        // 获取行数
        int lineCount = mAllChildViews.size();
        for (int i = 0; i < lineCount; i++) {
            // 当前行的views和高度
            lineViews = mAllChildViews.get(i);
            lineHeight = mLineHeight.get(i);
            for (int j = 0; j < lineViews.size(); j++) {
                // 为每一列设置marginLeft
                if (j == 0) {
                    left = 0 + params.leftMargin;
                }
                View child = lineViews.get(j);
                // 判断是否显示
                if (child.getVisibility() == View.GONE) {
                    continue;
                }
                MarginLayoutParams lp = (MarginLayoutParams) child
                        .getLayoutParams();
                int cLeft = left + lp.leftMargin;
                int cTop = top + lp.topMargin;
                int cRight = cLeft + child.getMeasuredWidth();
                int cBottom = cTop + child.getMeasuredHeight();
                // 进行子View进行布局
                child.layout(cLeft, cTop, cRight, cBottom);
                left += child.getMeasuredWidth() + lp.leftMargin
                        + lp.rightMargin;
            }
            left = 0;
            top += lineHeight;
        }
    }

    @Override
    protected void onMeasure(int widthMeasureSpec, int heightMeasureSpec) {

        // 父控件传进来的宽度和高度以及对应的测量模式
        int sizeWidth = MeasureSpec.getSize(widthMeasureSpec);
        int modeWidth = MeasureSpec.getMode(widthMeasureSpec);
        int sizeHeight = MeasureSpec.getSize(heightMeasureSpec);
        int modeHeight = MeasureSpec.getMode(heightMeasureSpec);

        // 如果当前ViewGroup的宽高为wrap_content的情况
        int width = 0;// 自己测量的 宽度
        int height = 0;// 自己测量的高度
        // 记录每一行的宽度和高度
        int lineWidth = 0;
        int lineHeight = 0;

        // 获取子view的个数
        int childCount = getChildCount();

        for (int i = 0; i < childCount; i++) {
            View child = getChildAt(i);
            // 测量子View的宽和高
            measureChild(child, widthMeasureSpec, heightMeasureSpec);
            // 得到LayoutParams

            MarginLayoutParams params = (MarginLayoutParams) child
                    .getLayoutParams();
            // 子View占据的宽度
            int childWidth = child.getMeasuredWidth() + params.leftMargin
                    + params.rightMargin;
            // 子View占据的高度
            int childHeight = child.getMeasuredHeight() + params.bottomMargin
                    + params.topMargin;
            // 换行时候
            if (lineWidth + childWidth > sizeWidth) {
                // 对比得到最大的宽度
                width = Math.max(width, lineWidth);
                // 重置lineWidth
                lineWidth = childWidth;
                // 记录行高
                height += lineHeight;
                lineHeight = childHeight;
            } else {
                // 不换行情况
                // 叠加行宽
                lineWidth += childWidth;
                // 得到最大行高
                lineHeight = Math.max(lineHeight, childHeight);
            }
            // 处理最后一个子View的情况
            if (i == childCount - 1) {
                width = Math.max(width, lineWidth);
                height += lineHeight;
            }
        }
        // 这里就是关键代码
        setMeasuredDimension(modeWidth == MeasureSpec.EXACTLY ? sizeWidth
                : width, modeHeight == MeasureSpec.EXACTLY ? sizeHeight
                : height);

    }

    /**
     * 与当前ViewGroup对应的LayoutParams
     */
    @Override
    public LayoutParams generateLayoutParams(AttributeSet attrs) {
        return new MarginLayoutParams(getContext(), attrs);
    }
}


 176
176


 被折叠的 条评论
为什么被折叠?
被折叠的 条评论
为什么被折叠?
 到【灌水乐园】发言


