


- 1、分片是对数据量比较大的集合进行拆分到不同服务器MongoDB实例中去,如果架构是分片架构,则以后登录不能使用mongo,要改为mongos路由链接形式
- 2、分片架构的核心是分片的片键设置,片键选取的目标是能让后续插入的集合均匀的插入到各个片区中去。如果根据自增、创建时间等自增类型设置片键,则会造成,最后的数据库越来越大,不符合初衷,如果根据性别、学历等设置片键,则会造成数据块较少,起不到分片的效果。
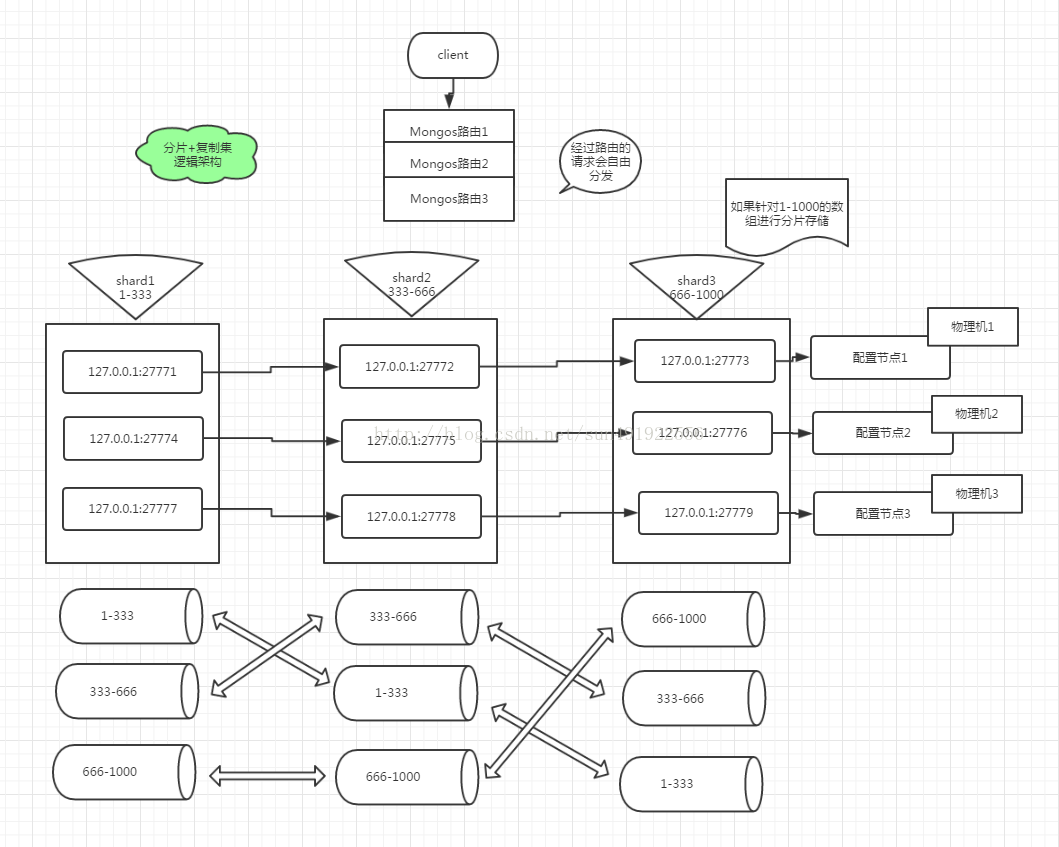
- 3、结合副本集,则架构如下图:
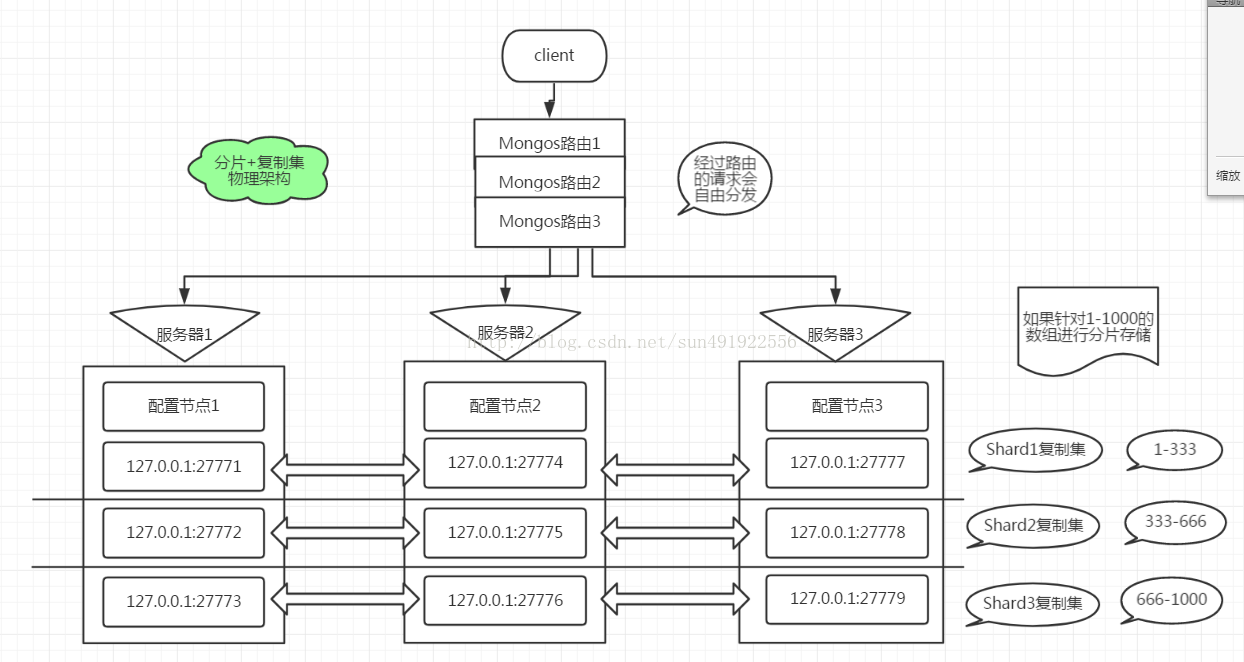
- 4、实例准备,3台服务器:服务器1对应端口1.2.3、服务器2对应端口4.5.6、服务器3对应端口7.8.9 (如果开启权限认证之后,请保持所有的实例关联的keyfile文件一样)
9个分片节点:127.0.0.1:27771、127.0.0.1:27772、127.0.0.1:27773、127.0.0.1:27774.....127.0.0.1:27779
1.4.7为shard1副本集、2.5.8为shard2副本集、3.6.9为shard3副本集
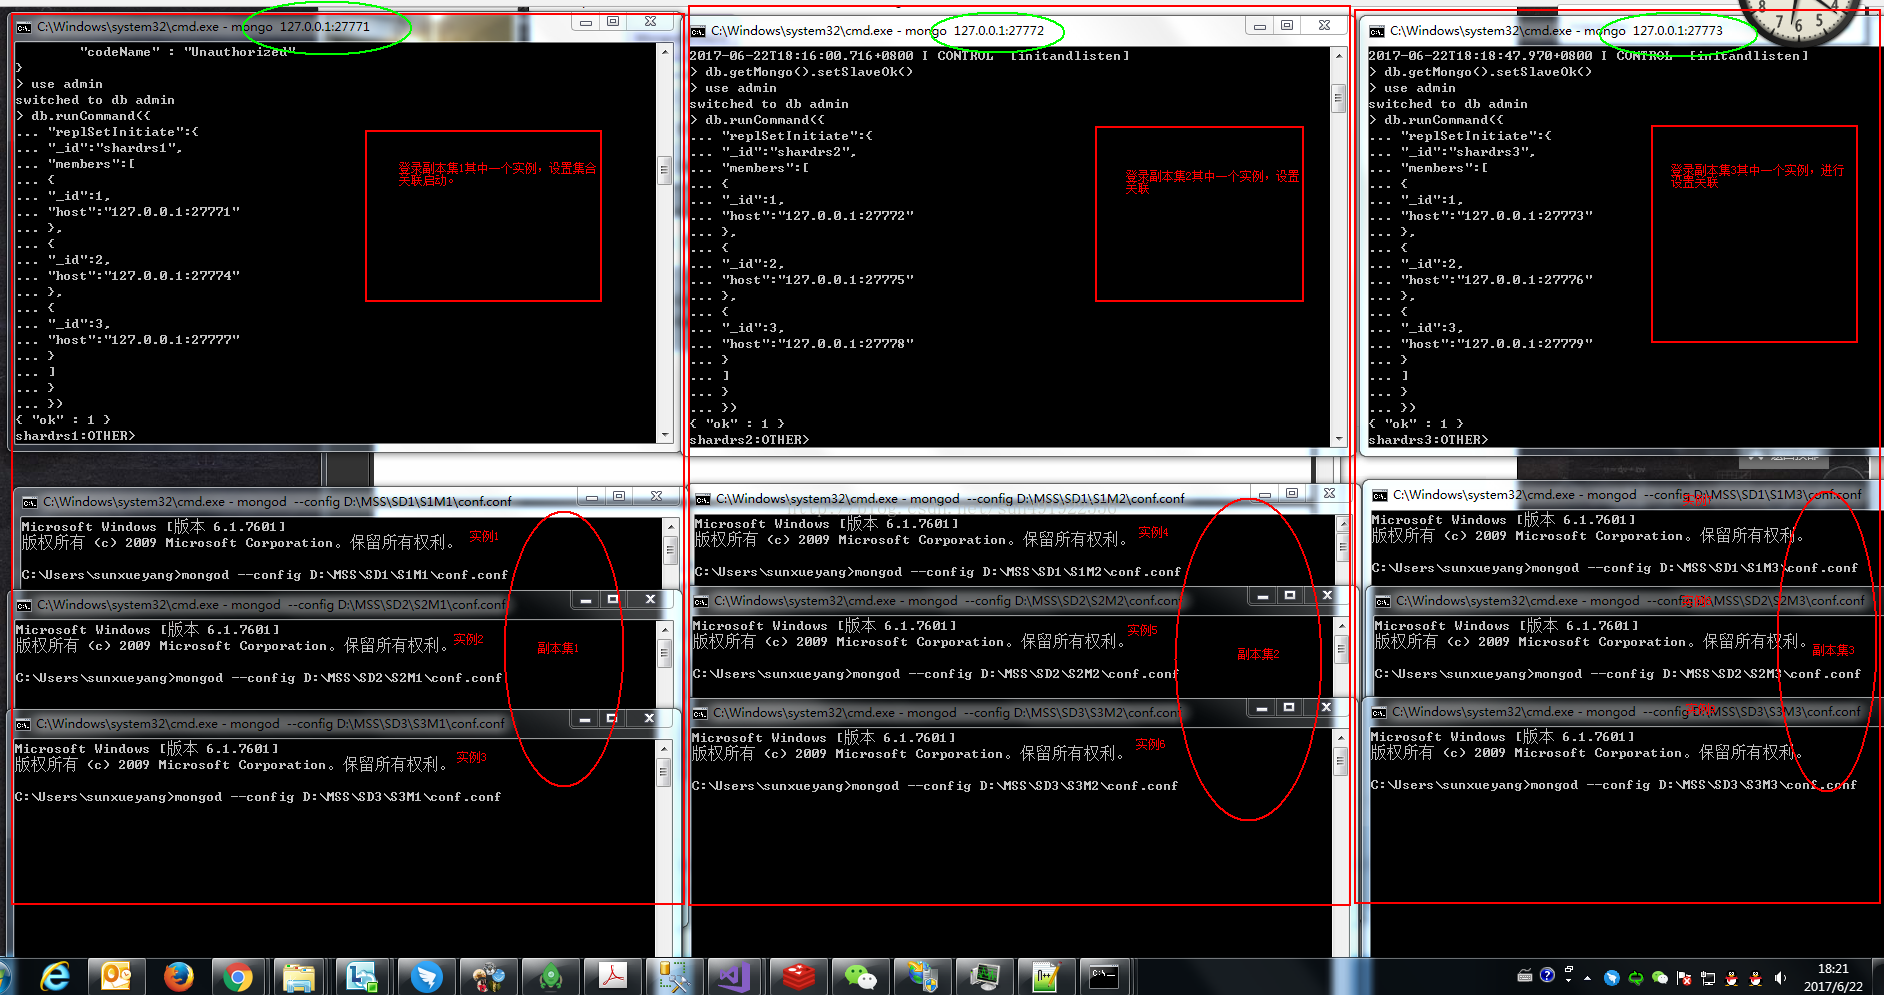
单个节点设置完成之后,登陆其中要设置为副本集的主节点,进行设置副本集
命令:
rs.initiate() --节点初始化
cfg={_id:"Set1", members:[ {_id:0,host:"172.17.7.106:25552"}] } --节点默认值
rs.reconfig(cfg, {force:true}) --加载默认值节点
rs.add("XXXXXXX") --添加其他节点
3个配置节点:127.0.0.1:27761、127.0.0.1:27762、127.0.0.1:27763
注意配置节点需要配置为副本集形式,此举是3.0版本之后得强制设置,这样可以提高容灾机制
配置节点每台服务器一个
命令:与分片节点的副本集命令一样,注意修改副本集的ID
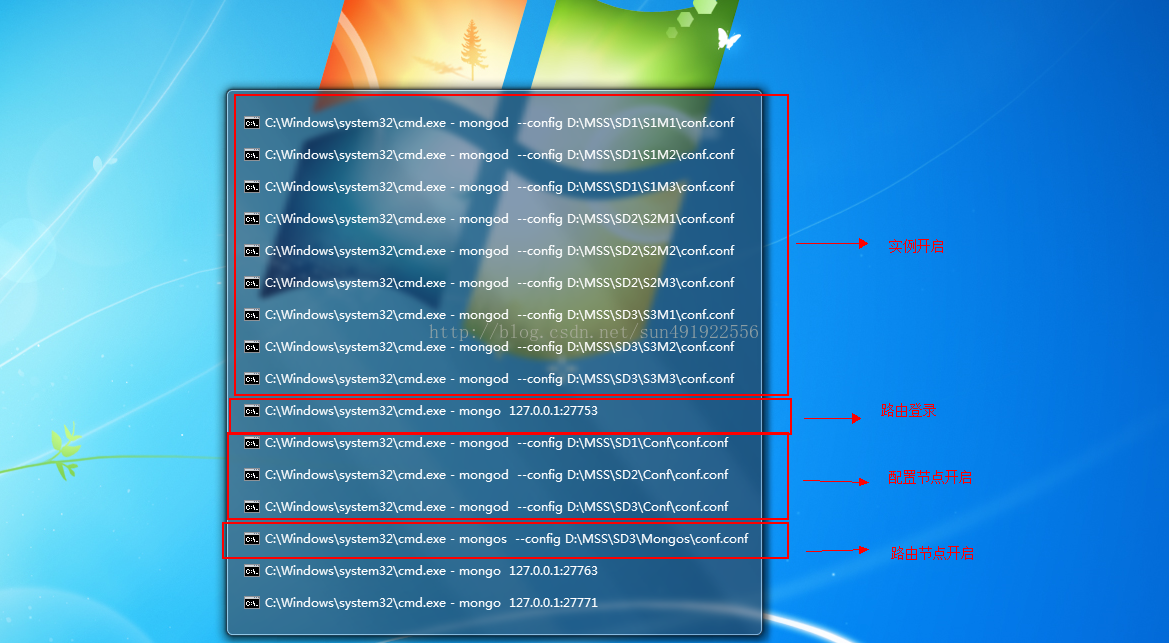
3个路由节点:127.0.0.1:27751、127.0.0.1:27752、127.0.0.1:27753(注意:因为是单机模拟,所以路由起一个就可以了,多了则会报错)
请注意,开启路由节点需要使用mongos 命令
1、分片节点实例配置文件
实例1(注意下面开头的---也是配置文件内容为第一行)
---systemLog:destination: filepath: "D:\\MGDBP\\Set1\\LOG\\Set1_1.log"logAppend: truestorage:dbPath: "D:\\MGDBP\\Set1\\DB"journal:enabled: truedirectoryPerDB: truesyncPeriodSecs: 30engine: wiredTiger # MongoDB 3.0版本开始务必使用WT引擎wiredTiger:engineConfig:cacheSizeGB: 1# statisticsLogDelaySecs: 0journalCompressor: snappy# directoryForIndexes: truecollectionConfig:blockCompressor: snappyindexConfig:prefixCompression: trueoperationProfiling:slowOpThresholdMs: 200mode: "slowOp"#processManagement:# fork: true# pidFilePath: "D:\\MSset\\Set1\\Forklog"net:port: 27771replication:replSetName: "Set1"oplogSizeMB: 10000sharding:clusterRole: shardsvrsecurity:authorization: "enabled"clusterAuthMode: "keyFile"keyFile: "D:\\MGDBP\\Set1\\KEY\\skey.key"
实例2
---systemLog:destination: filepath: "D:\\MGDBP\\Set2\\LOG\\Set2_1.log"logAppend: truestorage:dbPath: "D:\\MGDBP\\Set2\\DB"journal:enabled: truedirectoryPerDB: truesyncPeriodSecs: 30engine: wiredTiger # MongoDB 3.0版本开始务必使用WT引擎wiredTiger:engineConfig:cacheSizeGB: 1# statisticsLogDelaySecs: 0journalCompressor: snappy# directoryForIndexes: truecollectionConfig:blockCompressor: snappyindexConfig:prefixCompression: trueoperationProfiling:slowOpThresholdMs: 200mode: "slowOp"#processManagement:# fork: true# pidFilePath: "D:\\MSset\\Set2\\Forklog"net:port: 27772replication:replSetName: "Set2"oplogSizeMB: 10000sharding:clusterRole: shardsvrsecurity:authorization: "enabled"clusterAuthMode: "keyFile"keyFile: "D:\\MGDBP\\Set2\\KEY\\skey.key"
仿照设置到实例9...
2、配置节点实例配置文件
节点1
---systemLog:destination: filepath: "D:\\MGDBP\\Conf\\LOG\\s1.log"logAppend: truestorage:dbPath: "D:\\MGDBP\\Conf\\DB"journal:enabled: truedirectoryPerDB: truesyncPeriodSecs: 30engine: wiredTiger # MongoDB 3.0版本开始务必使用WT引擎wiredTiger:engineConfig:cacheSizeGB: 1# statisticsLogDelaySecs: 0journalCompressor: snappy# directoryForIndexes: truecollectionConfig:blockCompressor: snappyindexConfig:prefixCompression: trueoperationProfiling:slowOpThresholdMs: 200mode: "slowOp"#processManagement:# fork: true# pidFilePath: "D:\\MSset\\Set1\\Forklog"net:port: 27761replication:replSetName: "confrs"oplogSizeMB: 10000sharding:clusterRole: "configsvr"security:authorization: "enabled"clusterAuthMode: "keyFile"keyFile: "D:\\MGDBP\\Conf\\confkey.key"
节点2
---systemLog:destination: filepath: "D:\\MGDBP\\Conf\\LOG\\s1.log"logAppend: truestorage:dbPath: "D:\\MGDBP\\Conf\\DB"journal:enabled: truedirectoryPerDB: truesyncPeriodSecs: 30engine: wiredTiger # MongoDB 3.0版本开始务必使用WT引擎wiredTiger:engineConfig:cacheSizeGB: 1# statisticsLogDelaySecs: 0journalCompressor: snappy# directoryForIndexes: truecollectionConfig:blockCompressor: snappyindexConfig:prefixCompression: trueoperationProfiling:slowOpThresholdMs: 200mode: "slowOp"#processManagement:# fork: true# pidFilePath: "D:\\MSset\\Set1\\Forklog"net:port: 27762-- (注意此处,如果是同一台机器,请修改端口)replication:replSetName: "confrs"oplogSizeMB: 10000sharding:clusterRole: "configsvr"security:authorization: "enabled"clusterAuthMode: "keyFile"keyFile: "D:\\MGDBP\\Conf\\confkey.key"
节点3
---systemLog:destination: filepath: "D:\\MGDBP\\Conf\\LOG\\s1.log"logAppend: truestorage:dbPath: "D:\\MGDBP\\Conf\\DB"journal:enabled: truedirectoryPerDB: truesyncPeriodSecs: 30engine: wiredTiger # MongoDB 3.0版本开始务必使用WT引擎wiredTiger:engineConfig:cacheSizeGB: 1# statisticsLogDelaySecs: 0journalCompressor: snappy# directoryForIndexes: truecollectionConfig:blockCompressor: snappyindexConfig:prefixCompression: trueoperationProfiling:slowOpThresholdMs: 200mode: "slowOp"#processManagement:# fork: true# pidFilePath: "D:\\MSset\\Set1\\Forklog"net:port: 27763-- (注意此处,如果是同一台机器,请修改端口)replication:replSetName: "confrs"oplogSizeMB: 10000sharding:clusterRole: "configsvr"security:authorization: "enabled"clusterAuthMode: "keyFile"keyFile: "D:\\MGDBP\\Conf\\confkey.key"
3、路由节点实例配置文件
节点1
logpath=D:\\MGDBP\\Mongos\\LOG\\s1.loglogappend=trueport= 27751configdb=confrs/XXXXXX:25541,XXXXXXXX:25541,XXXXXXXX:25541 --(注意,此处为配置文件所设置的IP和端口)keyFile=D:\\MGDBP\\Mongos\\mongoskey.key
节点2
logpath=D:\\MGDBP\\Mongos\\LOG\\s1.loglogappend=trueport= 27752configdb=confrs/XXXXXX:25541,XXXXXXXX:25541,XXXXXXXX:25541 --(注意,此处为配置文件所设置的IP和端口)keyFile=D:\\MGDBP\\Mongos\\mongoskey.key
节点3
logpath=D:\\MGDBP\\Mongos\\LOG\\s1.loglogappend=trueport= 27753configdb=confrs/XXXXXX:25541,XXXXXXXX:25541,XXXXXXXX:25541 --(注意,此处为配置文件所设置的IP和端口)keyFile=D:\\MGDBP\\Mongos\\mongoskey.key
- 4、最后使用mongo 登录到路由节点,mongo 127.0.0.1:27751,进行分片的配置初始化
路由节点进行配置
db.runCommand({
"addshard":"shardrs1/127.0.0.1:27771,127.0.0.1:27774,127.0.0.1:27777"
})
db.runCommand({
"addshard":"shardrs2/127.0.0.1:27772,127.0.0.1:27775,127.0.0.1:27778"
})
db.runCommand({
"addshard":"shardrs3/127.0.0.1:27773,127.0.0.1:27776,127.0.0.1:27779"
})
- 5、物理节点配置好之后,需要配置sharding分片规则。
设置需要分片的数据库
db.runCommand({
enablesharding:"testsd"
})
设置片键
db.runCommand({
shardcollection:"testsd.stu",
key:{"name":1}
})
运行到此步骤 则证明 配置成功
项目目录
http://pan.baidu.com/s/1nvqhPXJ (此项目文件为单机部署,没有权限)
服务器环境搭建实践
遇到问题:
1、以windows服务启动时报错,msvcp140.dll 丢失
1、使用mongoDB安装文件 安装一下
2、以windows服务启动时报错,vc++错误
1、下载vc_redist.x64.exe文件,执行。
3、登录节点,设置集群初始化命令报错
1、查看防火墙,端口是否都开启,可以设置20000-65535端口开启
2、使用命令单独增加节点, rs.initiate() , 等待成为主节点时,rs.add("") 添加剩下节点。
3、如果节点添加出现泵机或其他问题,可以暂停问题节点,删除数据,重新开启,重新初始化节点添加。
cfg={_id:"Set2", members:[ {_id:0,host:"172.17.7.106:25552"}] }
rs.reconfig(cfg, {force:true});
rs.add(""")
4、分片时 设置路由出错,sharding.configdb配置文件报错
1、路由启动时应该是用mongos命令 而不是mongod
5、mongos 路由链接不上配置节点Error initializing sharding state, sleeping for 2 seconds and trying again
1、查看keyfile是否和配置节点的一致,必须一致才能链上配置节点
6、当设置初始化副本集的时候报错
1、请注意配置文件的Ip地址,与rs.status() 里面节点名称是否和配置文件显示的是否一致


 525
525

 被折叠的 条评论
为什么被折叠?
被折叠的 条评论
为什么被折叠?
 到【灌水乐园】发言


