


最近学习spring框架,学习中总是磕磕绊绊的,出现这样或者那样的问题,于是就像写一篇笔记,将spring,springmvc,hibernate框架整合的过程,以及简单的实现记录下来,一来加深印象,二来一遍以后忘记好找资料(...)当然,初学者也可以借鉴一下。废话不多说,直接上干货!
平台:eclipse
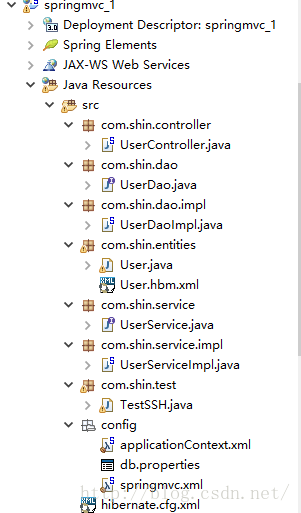
1.首先看看我整个项目的结构
2.项目开始:开始配置配置文件,主要有web.xml, applicationContext.xml, springmvc这三个文件
web.xml文件如下(主要是配置spring IOC容器,springmvc的dispacherServlet, 编码的格式化:防止出现乱码,SessionFilter过滤器:防止session异常。这里主要注意的是路径问题,由于楼主的配置文件是放在src下的config包中的,所以配置的时候用classpath:包名/配置文件名.xml的形式;如果放在WebContext下,直接写文件名就行, WEB-INF下就是/WEB-INF/文件名.xml,以此类推。。)
- <?xml version="1.0" encoding="UTF-8"?>
- <web-app xmlns:xsi="http://www.w3.org/2001/XMLSchema-instance" xmlns="http://java.sun.com/xml/ns/javaee" xsi:schemaLocation="http://java.sun.com/xml/ns/javaee http://java.sun.com/xml/ns/javaee/web-app_3_0.xsd" id="WebApp_ID" version="3.0">
- <display-name>springmvc_1</display-name>
- <welcome-file-list>
- <welcome-file>index.html</welcome-file>
- <welcome-file>index.htm</welcome-file>
- <welcome-file>index.jsp</welcome-file>
- <welcome-file>default.html</welcome-file>
- <welcome-file>default.htm</welcome-file>
- <welcome-file>default.jsp</welcome-file>
- </welcome-file-list>
- <!-- 配置spring ioc容器 -->
- <context-param>
- <param-name>contextConfigLocation</param-name>
- <param-value>classpath:config/applicationContext.xml</param-value>
- </context-param>
- <!-- Bootstraps the root web application context before servlet initialization -->
- <listener>
- <listener-class>org.springframework.web.context.ContextLoaderListener</listener-class>
- </listener>
- <!-- 配置springmvc 的DispatcherServlet -->
- <servlet>
- <servlet-name>dispatcherServlet</servlet-name>
- <servlet-class>org.springframework.web.servlet.DispatcherServlet</servlet-class>
- <init-param>
- <param-name>contextConfigLocation</param-name>
- <param-value>classpath:config/springmvc.xml</param-value>
- </init-param>
- <load-on-startup>1</load-on-startup>
- </servlet>
- <!-- Map all requests to the DispatcherServlet for handling -->
- <servlet-mapping>
- <servlet-name>dispatcherServlet</servlet-name>
- <url-pattern>*.do</url-pattern>
- </servlet-mapping>
- <filter>
- <filter-name>CharacterEncodingFilter</filter-name>
- <filter-class>org.springframework.web.filter.CharacterEncodingFilter</filter-class>
- <init-param>
- <param-name>encoding</param-name>
- <param-value>UTF-8</param-value>
- </init-param>
- </filter>
- <filter-mapping>
- <filter-name>CharacterEncodingFilter</filter-name>
- <url-pattern>/*</url-pattern>
- </filter-mapping>
- <filter>
- <filter-name>SessionFilter</filter-name>
- <filter-class>org.springframework.orm.hibernate4.support.OpenSessionInViewFilter</filter-class>
- </filter>
- <filter-mapping>
- <filter-name>SessionFilter</filter-name>
- <url-pattern>/*</url-pattern>
- </filter-mapping>
- </web-app>
- <?xml version="1.0" encoding="UTF-8"?>
- <beans xmlns="http://www.springframework.org/schema/beans"
- xmlns:xsi="http://www.w3.org/2001/XMLSchema-instance"
- xmlns:context="http://www.springframework.org/schema/context"
- xmlns:mvc="http://www.springframework.org/schema/mvc"
- xmlns:tx="http://www.springframework.org/schema/tx"
- xsi:schemaLocation="http://www.springframework.org/schema/mvc http://www.springframework.org/schema/mvc/spring-mvc-4.2.xsd
- http://www.springframework.org/schema/beans http://www.springframework.org/schema/beans/spring-beans.xsd
- http://www.springframework.org/schema/context http://www.springframework.org/schema/context/spring-context-4.2.xsd
- http://www.springframework.org/schema/tx http://www.springframework.org/schema/tx/spring-tx-4.2.xsd">
- <!-- 配置自动扫描包 -->
- <context:component-scan base-package="com.shin">
- <!-- <context:include-filter type="annotation" expression="org.springframework.stereotype.Controller"/> -->
- <!-- <context:include-filter type="annotation" expression="org.springframework.web.bind.annotation.ControllerAdvice"/> -->
- </context:component-scan>
- <!-- 配置视图解析器 -->
- <bean class="org.springframework.web.servlet.view.InternalResourceViewResolver">
- <property name="prefix" value="/pages/"></property>
- <property name="suffix" value=".jsp"></property>
- </bean>
- <mvc:default-servlet-handler/>
- <mvc:annotation-driven/>
- </beans>
- <?xml version="1.0" encoding="UTF-8"?>
- <beans xmlns="http://www.springframework.org/schema/beans"
- xmlns:xsi="http://www.w3.org/2001/XMLSchema-instance"
- xmlns:context="http://www.springframework.org/schema/context"
- xmlns:tx="http://www.springframework.org/schema/tx"
- xsi:schemaLocation="http://www.springframework.org/schema/beans http://www.springframework.org/schema/beans/spring-beans.xsd
- http://www.springframework.org/schema/context http://www.springframework.org/schema/context/spring-context-4.2.xsd
- http://www.springframework.org/schema/tx http://www.springframework.org/schema/tx/spring-tx-4.2.xsd">
- <!-- 配置自动扫描的包 -->
- <context:component-scan base-package="com.shin">
- <!-- <context:exclude-filter type="annotation" expression="org.springframework.stereotype.Controller"/> -->
- <!-- <context:exclude-filter type="annotation" expression="org.springframework.web.bind.annotation.ControllerAdvice"/> -->
- </context:component-scan>
- <context:property-placeholder location="classpath:config/db.properties"/>
- <bean id="dataSource" class="com.mchange.v2.c3p0.ComboPooledDataSource" >
- <property name="user" value="${jdbc.user}"></property>
- <property name="password" value="${jdbc.password}"></property>
- <property name="driverClass" value="${jdbc.driverClass}"></property>
- <property name="jdbcUrl" value="${jdbc.jdbcUrl}"></property>
- </bean>
- <bean id="sessionFactory" class="org.springframework.orm.hibernate4.LocalSessionFactoryBean" >
- <property name="dataSource" ref="dataSource"></property>
- <property name="namingStrategy">
- <bean class="org.hibernate.cfg.ImprovedNamingStrategy"></bean>
- </property>
- <property name="packagesToScan" value="com.shin.entities"></property>
- <property name="hibernateProperties">
- <props>
- <prop key="hibernate.dialect">org.hibernate.dialect.MySQL5InnoDBDialect </prop>
- <prop key="hibernate.show_sql">true</prop>
- <prop key="hibernate.format_sql">true</prop>
- <prop key="hibernate.hbm2ddl.auto">update</prop>
- <prop key="hibernate.temp.use_jdbc_metadata_defaults">false</prop>
- </props>
- </property>
- <property name="mappingResources" >
- <list>
- <value>com/shin/entities/User.hbm.xml</value>
- </list>
- </property>
- </bean>
- <bean id="transactionManager" class="org.springframework.orm.hibernate4.HibernateTransactionManager">
- <property name="sessionFactory" ref="sessionFactory"></property>
- </bean>
- </beans>
- jdbc.user=root
- jdbc.password=123456
- jdbc.driverClass=com.mysql.jdbc.Driver
- jdbc.jdbcUrl=jdbc:mysql:///test
然后开始java代码的编写:
楼主只是做了一个简单的用户添加应用,所以代码比较简单,主要是实现这个基本框架,还有很多东西需要去学习;
先来实体类 User.Java 然后我用hibernate插件自动生成hbm.xml文件(当然也可以手动配置,挺简单的)
- package com.shin.entities;
- public class User {
- private Integer id;
- private String name;
- private String password;
- public Integer getId() {
- return id;
- }
- public void setId(Integer id) {
- this.id = id;
- }
- public String getName() {
- return name;
- }
- public void setName(String name) {
- this.name = name;
- }
- public String getPassword() {
- return password;
- }
- public void setPassword(String password) {
- this.password = password;
- }
- }
- <?xml version="1.0"?>
- <!DOCTYPE hibernate-mapping PUBLIC "-//Hibernate/Hibernate Mapping DTD 3.0//EN"
- "http://hibernate.sourceforge.net/hibernate-mapping-3.0.dtd">
- <!-- Generated 2016-7-12 10:59:16 by Hibernate Tools 3.5.0.Final -->
- <hibernate-mapping>
- <class name="com.shin.entities.User" table="USER">
- <id name="id" type="java.lang.Integer">
- <column name="ID" />
- <generator class="native" />
- </id>
- <property name="name" type="java.lang.String">
- <column name="NAME" />
- </property>
- <property name="password" type="java.lang.String">
- <column name="PASSWORD" />
- </property>
- </class>
- </hibernate-mapping>
然后是dao层,分别是UserDao.java接口 和 UserDaoImpl.java实现
- package com.shin.dao;
- import com.shin.entities.User;
- public interface UserDao {
- public void addUser(User user);
- }
- package com.shin.dao.impl;
- import org.hibernate.SessionFactory;
- import org.springframework.beans.factory.annotation.Autowired;
- import org.springframework.stereotype.Repository;
- import org.springframework.transaction.annotation.Transactional;
- import com.shin.dao.UserDao;
- import com.shin.entities.User;
- @Repository("userDao")
- public class UserDaoImpl implements UserDao {
- @Autowired
- private SessionFactory sessionFactory;
- public SessionFactory getSessionFactory() {
- return sessionFactory;
- }
- public void addUser(User user) {
- sessionFactory.getCurrentSession().save(user);
- }
- }
再就是service层,分别是UserService.java接口和UserServiceImpl,java实现类
- package com.shin.service;
- import com.shin.entities.User;
- public interface UserService {
- public void addUser(User user);
- }
- package com.shin.service.impl;
- import org.springframework.beans.factory.annotation.Autowired;
- import org.springframework.stereotype.Service;
- import com.shin.dao.UserDao;
- import com.shin.entities.User;
- import com.shin.service.UserService;
- @Service("userService")
- public class UserServiceImpl implements UserService {
- @Autowired
- private UserDao userDao;
- public void setUserDao(UserDao userDao) {
- this.userDao = userDao;
- }
- @Override
- public void addUser(User user) {
- // TODO Auto-generated method stub
- userDao.addUser(user);
- }
- }
- package com.shin.controller;
- import javax.servlet.http.HttpServletRequest;
- import org.springframework.beans.factory.annotation.Autowired;
- import org.springframework.stereotype.Controller;
- import org.springframework.web.bind.annotation.RequestMapping;
- import com.shin.entities.User;
- import com.shin.service.UserService;
- @Controller
- @RequestMapping("/user")
- public class UserController {
- @Autowired
- private UserService userService;
- @RequestMapping(value="sucess.do")
- public String add(HttpServletRequest request){
- String username = request.getParameter("username");
- String password = request.getParameter("password");
- System.out.println(username+" "+password);
- User user = new User();
- user.setName(username);
- user.setPassword(password);
- userService.addUser(user);
- return "sucess";
- }
- }
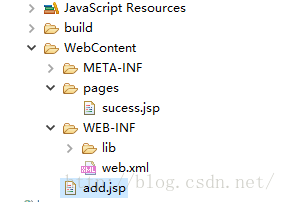
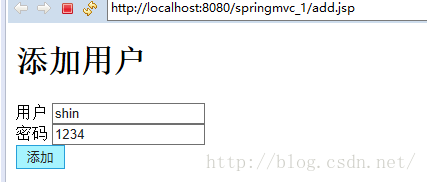
add.jsp
- <%@ page language="java" contentType="text/html; charset=utf-8"
- pageEncoding="utf-8"%>
- <!DOCTYPE html PUBLIC "-//W3C//DTD HTML 4.01 Transitional//EN" "http://www.w3.org/TR/html4/loose.dtd">
- <html>
- <head>
- <meta http-equiv="Content-Type" content="text/html; charset=utf-8">
- <title>Insert title here</title>
- </head>
- <body>
- <h1>添加用户</h1>
- <form action="user/sucess.do" method="post">
- 用户 <input type="text" name="username"/><br/>
- 密码 <input type="text" name="password"/><br/>
- <input type="submit" value="添加">
- </form>
- </body>
- </html>
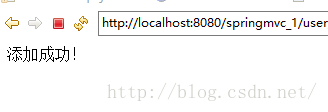
sucess.jsp
- <%@ page language="java" contentType="text/html; charset=utf-8"
- pageEncoding="utf-8"%>
- <!DOCTYPE html PUBLIC "-//W3C//DTD HTML 4.01 Transitional//EN" "http://www.w3.org/TR/html4/loose.dtd">
- <html>
- <head>
- <meta http-equiv="Content-Type" content="text/html; charset=utf-8">
- <title>Insert title here</title>
- </head>
- <body>
- 添加成功!
- </body>
- </html>
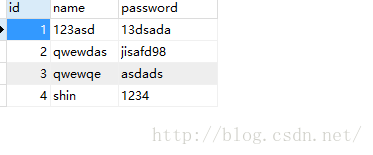
测试:
其他渠道来源, 紧个人学习使用不得用于商业经营;


 5395
5395

 被折叠的 条评论
为什么被折叠?
被折叠的 条评论
为什么被折叠?
 到【灌水乐园】发言


