


项目接近尾声,开发过程中碰到的很多知识和bug都没有及时记录下来。在这里想回顾一下整个项目中用到的技术点和一些问题的解决方法,方便以后查阅,温故而知新,也和大家分享一下自己的一点心得。。
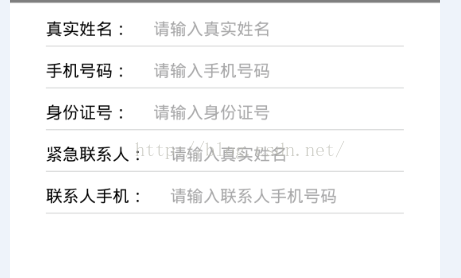
开发过程中,对于设计图中出现两次以上的重复控件,我们基本就需要考虑去进行封装,有的并不仅仅只是简单的一个输入框或者按钮,而是各种控件的组合。这时候,我们就需要对组合控件进行封装。举个简单的例子,如下图所示的常见的资料填写界面。如果每个TextView和EditText我们都去写一遍,会造成大量重复代码,并没有什么意义,也不能统一修改样式。我们可以把左边的TextView和右边的EditText以及底下的横线封装成一个组合型控件,大大减少了代码,也便于统一去修改样式。
从面向对象的思想,这样一个组合型控件就是一个对象,我们给他定义一些属性以及方法,来使其具有我们想要的效果。
首先,我们要思考一下需要给这个组合型控件赋予一些什么属性。文本框的文字,输入框的hint,输入类型,输入长度等等。提供这些自定义的属性很简单,我们只需要在res\values目录下新建attrs.xml的属性文件,通过如下代码定义这些属性。
<resources>
    <declare-styleable name="TextViewAndEditText">
        <attr name="leftText" format="string"></attr>
        <attr name="rightTextHint" format="string"></attr>
        <attr name="maxLength" format="integer"></attr>
        <attr name="isPassword" format="boolean"></attr>
        <attr name="isTelephoneNumber" format="boolean"></attr>
    </declare-styleable>
</resources>
我们在<resources>标签下新建<declare-styable>标签来自定义属性,通过name指定引用该属性的名称。然后在标签内部通过<attr>标签来声明具体的属性,上面定义了leftText,rightTextHint,maxLength等等属性,format则为这些属性指定了数据类型。确定好属性后,我们新建TextAndEditText类来完成这个组合型控件。代码注释比较详细,这里简单说一下思路。我们通过继承LinearLayout,当然RealativeLayout,ViewGroup都是可以的,复写其构造函数,通过TypeArray类获取之前定义的属性值来初始化控件,最后记得调用recycle方法进行资源回收。 public class TextViewAndEditText extends LinearLayout {
public static final int MAX_LENGTH = 11;//默认最大长度
private Context context;
private TextView mTextView = null;
private EditText mEditText = null;
public TextViewAndEditText(Context context) {
this(context, null);
}
public TextViewAndEditText(Context context, AttributeSet attrs) {
super(context, attrs);
this.context=context;
initLayoutInflater(context, attrs);
}
//初始化控件
private void initLayoutInflater(Context context, AttributeSet attrs) {
this.context = context;
//加载控件View
View view = LayoutInflater.from(context).inflate(R.layout.textviewandedittext, this);
mTextView = (TextView) view.findViewById(R.id.textView_item);
mEditText = (EditText) view.findViewById(R.id.editText_item);
if (attrs != null) {
//AttributeSet可以看成是一个自定义属性的集合
//TypeArray可以看出是一个存放属性的容器
TypedArray typedArray = context.obtainStyledAttributes(attrs, R.styleable.TextViewAndEditText);
//获取左侧TextView文字
String leftText = typedArray.getString(R.styleable.TextViewAndEditText_leftText);
if (!TextUtils.isEmpty(leftText)) {
mTextView.setText(leftText);
}
//获取右侧EdiText中hint文字
String rightTextHint = typedArray.getString(R.styleable.TextViewAndEditText_rightTextHint);
if (!TextUtils.isEmpty(rightTextHint)) {
mEditText.setHint(rightTextHint);
}
//获取右侧EditText最大输入长度
Integer maxLength = typedArray.getInteger(R.styleable.TextViewAndEditText_maxLength, MAX_LENGTH);
mEditText.setSingleLine(true);
mEditText.setFilters(new InputFilter[]{new InputFilter.LengthFilter(maxLength)});
//设置输入类型,默认为false
Boolean isPassword = typedArray.getBoolean(R.styleable.TextViewAndEditText_isPassword, false);
if (isPassword) {
mEditText.setInputType(InputType.TYPE_CLASS_TEXT | InputType.TYPE_TEXT_VARIATION_PASSWORD);
}
Boolean isTelephoneNumber = typedArray.getBoolean(R.styleable.TextViewAndEditText_isTelephoneNumber, false);
if (isTelephoneNumber) {
mEditText.setInputType(InputType.TYPE_CLASS_PHONE);
}
typedArray.recycle();//回收TypeArray,重复使用
}
}
//提供一些方法,方便实际业务中进行操作
public void setTextViewText(String text) {
mTextView.setText(text);
}
public void setEditTextText(String text) {
mEditText.setText(text);
}
public void setEditTextHint(String text) {
mEditText.setHint(text);
}
public EditText getEditText() {
return mEditText;
}
}<span style="white-space:pre"> </span>PS:这里需要注意的是,在加载控件的布局View时, View view = LayoutInflater.from(context).inflate(R.layout.textviewandedittext, this); 这里的this一定不可以用null,因为这个null耗费了我两个多小时。平时写加载Dialog对话框的View的时候一直写的null,这里也就顺手写了null,结果是这个控件无法显示。关于inflate的问题,这篇文章解释的不错,请移步http://blog.csdn.net/xyz_fly/article/details/21301303这样一个组合型控件就定义好了,直接在布局文件中使用就可以了。下面是布局文件,<LinearLayout xmlns:android="http://schemas.android.com/apk/res/android"
xmlns:app="http://schemas.android.com/apk/res-auto"
android:orientation="vertical"
android:layout_width="match_parent"
android:layout_height="match_parent"
android:focusable="true"
android:focusableInTouchMode="true"
android:background="@color/white">
<LinearLayout
android:orientation="vertical"
android:layout_width="match_parent"
android:layout_height="wrap_content">
<com.sun.FixedView.TextViewAndEditText
android:layout_marginTop="20dp"
android:id="@+id/name"
android:layout_width="match_parent"
android:layout_height="wrap_content"
app:leftText="@string/name"
app:rightTextHint="@string/input_name"></com.sun.FixedView.TextViewAndEditText>
<com.sun.FixedView.TextViewAndEditText
android:id="@+id/phone"
android:layout_marginTop="10dp"
android:layout_width="match_parent"
android:layout_height="wrap_content"
app:leftText="@string/telephone"
app:rightTextHint="@string/input_phone"></com.sun.FixedView.TextViewAndEditText>
<com.sun.FixedView.TextViewAndEditText
android:layout_marginTop="10dp"
android:layout_width="match_parent"
android:layout_height="wrap_content"
app:leftText="@string/card_number"
app:rightTextHint="@string/input_idcard"></com.sun.FixedView.TextViewAndEditText>
<com.sun.FixedView.TextViewAndEditText
android:layout_marginTop="10dp"
android:layout_width="match_parent"
android:layout_height="wrap_content"
app:leftText="@string/emergency_contact"
app:rightTextHint="@string/input_name"></com.sun.FixedView.TextViewAndEditText>
<com.sun.FixedView.TextViewAndEditText
android:layout_marginTop="10dp"
android:layout_width="match_parent"
android:layout_height="wrap_content"
app:leftText="@string/emergency_phone"
app:rightTextHint="@string/input_contact_phone"></com.sun.FixedView.TextViewAndEditText>
</LinearLayout>
</LinearLayout>这里要注意在布局文件的根节点要加上xmlns:app="http://schemas.android.com/apk/res-auto",或者xmlns:app="http://schemas.android.com/apk/res/包名",否则你自定义的属性是无法使用的,加上后在你的app:leftText等属性就可以起作用了。


 239
239


 被折叠的 条评论
为什么被折叠?
被折叠的 条评论
为什么被折叠?
 到【灌水乐园】发言


