


一、准备工作
首先设置域名的A记录和MX记录
1.web登录到域名解析的后台界面,选择新建,类型选择A记录,主机名为mail.您的域名,ip/主机值填写您的服务器的公网地址。

2.添加Mx记录,类型选择mx,主机名为您的域名(不用加前缀)值为mail.您的域名。
一定要注意在添加MX记录时,RR值要留空,没有任何前缀,如图。

配置完毕后必须有两条记录:
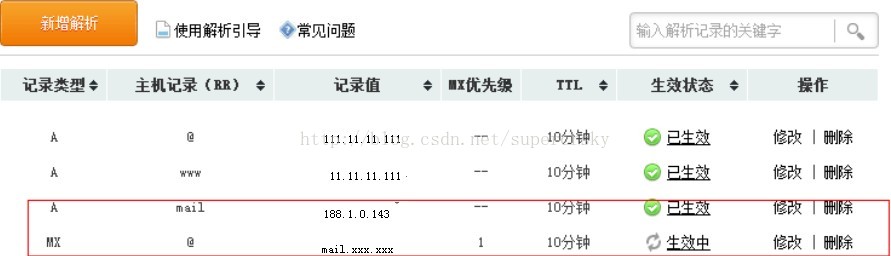
如上图中红色框圈中的部分
3.检查域名配置
Windows环境下:
做好后检查是否生效可以在ms-dos下去检查,开始-运行-cmd,输入nslookup回车
检查mx记录后输入set type=mx 回车,输入您的域名(yourdomain.com,注意不要加mail) 如果出现类似这样的提示那就是mx是成功的。
> set type=mx
>yourdomain.com
Server:cache-b.guangzhou.gd.cn
Address:202.96.128.166
Non-authoritativeanswer:
yourdomain.com MXpreference = 10, mail exchanger = mail. yourdomain.com
mail.yourdomain.com internet address = 1.1.1.1
同样检查a记录也一样set type=a 输入您的主机名(这里要加mail),如果最后得到的反馈地址是您的服务器的公网地址,那说明解析是正确生效的。
Linux环境下:
host -t mx example.org
注意没有mail前缀

返回类似上面的信息说明配置成功了。
二.配置邮件服务
本文中的所有操作都是在root环境下操作的,请切换到root后再进行操作sudo su -
要安装的软件如下:Apache、PHP、Postfix、Postfix Admin、Dovecot、Postgrey、amavisd-new、Clam AntiVirus、SpamAssassin
本节参考文章:https://www.exratione.com/2012/05/a-mailserver-on-ubuntu-1204-postfix-dovecot-mysql/
1.配置web环境
apt-get install apache2
apt-get install libapache2-mod-php5 php5 php5-imap php-apc php5-curl php5-gd php-xml-parser
在浏览器里输入http://localhost或者mail.xxxx.org(刚才配置的域名),如果看到了It works!,就说明Apache安装成功了。
Apache的默认安装,会在/var下建立一个名为www的目录,这个就是Web目录了,所有要能过浏览器访问的Web文件都要放到这个目录里。
我们在Web目录下面新建一个test.php文件来测试PHP是否能正常的运行,命令:
vi /var/www/test.php
<?php echo "hello,world"?>重启apache
service apache2 restart安装数据库,配置过程我就不说了,很简单。
apt-get install mysql-server安装完成后,用root登录
mysql -uroot -pcreate database mail;
grant all on mail.* to 'mail'@'localhost' identified by 'mailpassword';2.设置主机域名
hostname mail.example.com
mail.example.com再编辑 /etc/hosts文件在第一行加入
127.0.0.1 mail.example.com localhost

# Usually some IPv6 configuration below the first line, but leave that alone.
3.配置postfix
安装邮件服务软件
apt-get install mail-server^
apt-get install postfix-mysql dovecot-mysql postgrey
apt-get install amavis clamav clamav-daemon spamassassin
apt-get install libnet-dns-perl pyzor razor
apt-get install arj bzip2 cabextract cpio file gzip nomarch pax unzip zip
安装postfixadmin
wget http://downloads.sourceforge.net/project/postfixadmin/postfixadmin/postfixadmin-2.3.6/postfixadmin-2.3.6.tar.gz
gunzip postfixadmin-2.3.6.tar.gz
tar -xf postfixadmin-2.3.6.tar
mv postfixadmin-2.3.6 /var/www/postfixadmin
chown -R www-data:www-data /var/www/postfixadmin
编辑postfixadmin的安装配置文件
vi /var/www/postfixadmin/config.inc.php激活安装
/*****************************************************************
 *  !!!!!!!!!!!!!!!!!!!!!!!!!!!!!!!!!!!!!!!!!!!!!!!!!!!!!!!!!!!!
 * You have to set $CONF['configured'] = true; before the
 * application will run!
 * Doing this implies you have changed this file as required.
 * i.e. configuring database etc; specifying setup.php password etc.
 */
$CONF['configured'] = true;
postfixadmin的管理地址
// Postfix Admin Path
// Set the location of your Postfix Admin installation here.
// YOU MUST ENTER THE COMPLETE URL e.g. http://domain.tld/postfixadmin
$CONF['postfix_admin_url'] = 'https://mail.example.com/postfixadmin';
数据库配置
// Database Config
// mysql = MySQL 3.23 and 4.0, 4.1 or 5
// mysqli = MySQL 4.1+
// pgsql = PostgreSQL
$CONF['database_type'] = 'mysql';
$CONF['database_host'] = 'localhost';
$CONF['database_user'] = 'mail';
$CONF['database_password'] = 'mailpassword';
$CONF['database_name'] = 'mail';// Site Admin
// Define the Site Admins email address below.
// This will be used to send emails from to create mailboxes.
$CONF['admin_email'] = 'me@example.com';
// Mail Server
// Hostname (FQDN) of your mail server.
// This is used to send email to Postfix in order to create mailboxes.
//
// Set this to localhost for now, but change it later.
$CONF['smtp_server'] = 'localhost';
$CONF['smtp_port'] = '25';// Encrypt
// In what way do you want the passwords to be crypted?
// md5crypt = internal postfix admin md5
// md5 = md5 sum of the password
// system = whatever you have set as your PHP system default
// cleartext = clear text passwords (ouch!)
// mysql_encrypt = useful for PAM integration
// authlib = support for courier-authlib style passwords
// dovecot:CRYPT-METHOD = use dovecotpw -s 'CRYPT-METHOD'. Example: dovecot:CRAM-MD5
$CONF['encrypt'] = 'md5crypt';这个时候在安装密码处输入你的密码(随便输),然后点生成,把生成的加密密码复制到刚才的配置文件中
// In order to setup Postfixadmin, you MUST specify a hashed password here.
// To create the hash, visit setup.php in a browser and type a password into the field,
// on submission it will be echoed out to you as a hashed value.
$CONF['setup_password'] = '...a long hash string...';
替换掉...a long hash string...
再回到页面进行安装即可,同时还可以添加管理员账号。
安装完成后我们要把/var/www/postfixadmin/setup.php 设置成禁止访问,以防出现安全问题。
创建一个新文件
vi /var/www/postfixadmin/.htaccess
<Files "setup.php">
deny from all
</Files>访问:https://mail.example.com/postfixadmin/在“域名清单”里进行配置。
5.创建一个用户来处理虚拟邮件目录
useradd -r -u 150 -g mail -d /var/vmail -s /sbin/nologin -c "Virtual maildir handler" vmail
mkdir /var/vmail
chmod 770 /var/vmail
chown vmail:mail /var/vmail
6.配置dovecot
编辑/etc/dovecot/conf.d/auth-sql.conf.ext,如果没有此文件可以从/usr/share/doc/dovecot-core/dovecot/example-config/conf.d/auth-sql.conf.ext复制一个过来 ,编辑后的内容如下:
# Database driver: mysql, pgsql, sqlite
driver = mysql
# Examples:
# connect = host=192.168.1.1 dbname=users
# connect = host=sql.example.com dbname=virtual user=virtual password=blarg
# connect = /etc/dovecot/authdb.sqlite
#
connect = host=localhost dbname=mail user=mail password=mailpassword# Default password scheme.
#
# List of supported schemes is in
# http://wiki2.dovecot.org/Authentication/PasswordSchemes
#
default_pass_scheme = MD5-CRYPTpop3,imap登录时验证
# Define the query to obtain a user password.
password_query = \
  SELECT username as user, password, '/var/vmail/%d/%n' as userdb_home, \
  'maildir:/var/vmail/%d/%n' as userdb_mail, 150 as userdb_uid, 8 as userdb_gid \
  FROM mailbox WHERE username = '%u' AND active = '1'
# Define the query to obtain user information.
user_query = \
SELECT '/var/vmail/%d/%n' as home, 'maildir:/var/vmail/%d/%n' as mail, \
150 AS uid, 8 AS gid, concat('dirsize:storage=', quota) AS quota \
FROM mailbox WHERE username = '%u' AND active = '1'
# Disable LOGIN command and all other plaintext authentications unless
# SSL/TLS is used (LOGINDISABLED capability). Note that if the remote IP
# matches the local IP (ie. you're connecting from the same computer), the
# connection is considered secure and plaintext authentication is allowed.
disable_plaintext_auth = yes
# Space separated list of wanted authentication mechanisms:
# plain login digest-md5 cram-md5 ntlm rpa apop anonymous gssapi otp skey
# gss-spnego
# NOTE: See also disable_plaintext_auth setting.
auth_mechanisms = plain login##
## Password and user databases
##
#
# Password database is used to verify user's password (and nothing more).
# You can have multiple passdbs and userdbs. This is useful if you want to
# allow both system users (/etc/passwd) and virtual users to login without
# duplicating the system users into virtual database.
#
# <doc/wiki/PasswordDatabase.txt>
#
# User database specifies where mails are located and what user/group IDs
# own them. For single-UID configuration use "static" userdb.
#
# <doc/wiki/UserDatabase.txt>
#!include auth-deny.conf.ext
#!include auth-master.conf.ext
#!include auth-system.conf.ext
# Use the SQL database configuration rather than any of these others.
!include auth-sql.conf.ext
#!include auth-ldap.conf.ext
#!include auth-passwdfile.conf.ext
#!include auth-checkpassword.conf.ext
#!include auth-vpopmail.conf.ext
#!include auth-static.conf.ext接下来,配置dovecot的虚拟邮箱用户目录,编辑 /etc/dovecot/conf.d/10-mail.conf改变如下:
# Location for users' mailboxes. The default is empty, which means that Dovecot
# tries to find the mailboxes automatically. This won't work if the user
# doesn't yet have any mail, so you should explicitly tell Dovecot the full
# location.
#
# If you're using mbox, giving a path to the INBOX file (eg. /var/mail/%u)
# isn't enough. You'll also need to tell Dovecot where the other mailboxes are
# kept. This is called the "root mail directory", and it must be the first
# path given in the mail_location setting.
#
# There are a few special variables you can use, eg.:
#
#   %u - username
#   %n - user part in user@domain, same as %u if there's no domain
#   %d - domain part in user@domain, empty if there's no domain
#   %h - home directory
#
# See doc/wiki/Variables.txt for full list. Some examples:
#
#   mail_location = maildir:~/Maildir
#   mail_location = mbox:~/mail:INBOX=/var/mail/%u
#   mail_location = mbox:/var/mail/%d/%1n/%n:INDEX=/var/indexes/%d/%1n/%n
#
# <doc/wiki/MailLocation.txt>
#
mail_location = maildir:/var/vmail/%d/%n
# System user and group used to access mails. If you use multiple, userdb
# can override these by returning uid or gid fields. You can use either numbers
# or names. <doc/wiki/UserIds.txt>
mail_uid = vmail
mail_gid = mail# Valid UID range for users, defaults to 500 and above. This is mostly
# to make sure that users can't log in as daemons or other system users.
# Note that denying root logins is hardcoded to dovecot binary and can't
# be done even if first_valid_uid is set to 0.
#
# Use the vmail user uid here.
first_valid_uid = 150
last_valid_uid = 150
service auth {
  # auth_socket_path points to this userdb socket by default. It's typically
  # used by dovecot-lda, doveadm, possibly imap process, etc. Its default
  # permissions make it readable only by root, but you may need to relax these
  # permissions. Users that have access to this socket are able to get a list
  # of all usernames and get results of everyone's userdb lookups.
  unix_listener auth-userdb {
   mode = 0600
    user = vmail
    group = mail
  }

  unix_listener /var/spool/postfix/private/auth {
    mode = 0660
    # Assuming the default Postfix user and group
    user = postfix
    group = postfix
  }
chown -R vmail:dovecot /etc/dovecot
chmod -R o-rwx /etc/dovecot
7.配置Amavis, ClamAV, and SpamAssassin
添加用户:
adduser clamav amavis
adduser amavis clamav
use strict;

# You can modify this file to re-enable SPAM checking through spamassassin
# and to re-enable antivirus checking.

#
# Default antivirus checking mode
# Please note, that anti-virus checking is DISABLED by
# default.
# If You wish to enable it, please uncomment the following lines:

@bypass_virus_checks_maps = (
   \%bypass_virus_checks, \@bypass_virus_checks_acl, \$bypass_virus_checks_re);

#
# Default SPAM checking mode
# Please note, that anti-spam checking is DISABLED by
# default.
# If You wish to enable it, please uncomment the following lines:

@bypass_spam_checks_maps = (
   \%bypass_spam_checks, \@bypass_spam_checks_acl, \$bypass_spam_checks_re);

1;  # ensure a defined return
# Change to one to enable spamd
ENABLED=1
# Cronjob
# Set to anything but 0 to enable the cron job to automatically update
# spamassassin's rules on a nightly basis
CRON=1
service amavis restart
service spamassassin restart先添加几个新文件让postfix用mysql来管理
vi /etc/postfix/mysql_virtual_alias_domainaliases_maps.cf
user = mail
password = mailpassword
hosts = 127.0.0.1
dbname = mail
query = SELECT goto FROM alias,alias_domain
  WHERE alias_domain.alias_domain = '%d'
  AND alias.address=concat('%u', '@', alias_domain.target_domain)
  AND alias.active = 1
user = mail
password = mailpassword
hosts = 127.0.0.1
dbname = mail
table = alias
select_field = goto
where_field = address
additional_conditions = and active = '1'
user = mail
password = mailpassword
hosts = 127.0.0.1
dbname = mail
table = domain
select_field = domain
where_field = domain
additional_conditions = and backupmx = '0' and active = '1'
user = mail
password = mailpassword
hosts = 127.0.0.1
dbname = mail
query = SELECT maildir FROM mailbox, alias_domain
  WHERE alias_domain.alias_domain = '%d'
  AND mailbox.username=concat('%u', '@', alias_domain.target_domain )
  AND mailbox.active = 1
user = mail
password = mailpassword
hosts = 127.0.0.1
dbname = mail
table = mailbox
select_field = CONCAT(domain, '/', local_part)
where_field = username
additional_conditions = and active = '1'
/^Received:/                 IGNORE
/^User-Agent:/               IGNORE
/^X-Mailer:/                 IGNORE
/^X-Originating-IP:/         IGNORE
/^x-cr-[a-z]*:/              IGNORE
/^Thread-Index:/             IGNORE
smtpd_banner = $myhostname ESMTP $mail_name (Ubuntu)
biff = no
# appending .domain is the MUA's job.
append_dot_mydomain = no
readme_directory = no
# TLS parameters
smtpd_tls_cert_file = /etc/postfix/smtpd.cert
smtpd_tls_key_file = /etc/postfix/smtpd.key
smtpd_use_tls = yes
smtp_tls_note_starttls_offer = yes
smtpd_tls_loglevel = 1
smtpd_tls_received_header = yes
smtpd_tls_session_cache_timeout = 3600s
tls_random_source = dev:/dev/urandom
#############host settings###############
myhostname = mail.example.org
myorigin = /etc/hostname
mydestination =
mynetworks = 127.0.0.0/8
#home_mailbox = Maildir/
#############virtual settings##############
virtual_mailbox_base = /var/vmail
virtual_alias_maps = mysql:/etc/postfix/mysql_virtual_alias_maps.cf, mysql:/etc/postfix/mysql_virtual_alias_domainaliases_maps.cf
virtual_mailbox_domains = mysql:/etc/postfix/mysql_virtual_domains_maps.cf
virtual_transport = dovecot
virtual_alias_domains =
virtual_mailbox_maps = mysql:/etc/postfix/mysql_virtual_mailbox_maps.cf, mysql:/etc/postfix/mysql_virtual_mailbox_domainaliases_maps.cf
virtual_uid_maps = static:150
virtual_gid_maps = static:8
#####################
# SASL Authentication
#####################
smtpd_sasl_type = dovecot
smtpd_sasl_path = private/auth
smtpd_sasl_auth_enable = yes
broken_sasl_auth_clients = yes
smtpd_recipient_restrictions = permit_mynetworks, permit_sasl_authenticated, reject_unauth_destination
"main.cf" [readonly] 53L, 2222C                                                                                            1,1           Top
broken_sasl_auth_clients = yes
smtpd_recipient_restrictions = permit_mynetworks, permit_sasl_authenticated, reject_unauth_destination
smtpd_sasl_security_options = noanonymous
smtpd_sasl_local_domain =
smtpd_sasl_authenticated_header =no
######other settings######
mail_spool_directory = /var/mail
##header_checks = regexp:/etc/postfix/header_checks
proxy_read_maps = $local_recipient_maps $mydestination $virtual_alias_maps $virtual_alias_domains $virtual_mailbox_maps $virtual_mailbox_domains $relay_recipient_maps $relay_domains $canonical_maps $sender_canonical_maps $recipient_canonical_maps $relocated_maps $transport_maps $mynetworks $virtual_mailbox_limit_maps
#local_transport = dovecot
inet_interfaces = all
message_size_limit = 30720000
content_filter = amavis:[127.0.0.1]:10024
dovecot_destination_recipient_limit = 1
relayhost =
smtpd_helo_required = yes
home_mailbox = Maildir/y
debug_peer_level = 2
service postfix restart
service spamassassin restart
service clamav-daemon restart
service amavis restart
service dovecot restart为了方便观察,我们打开dovecot的认证日志
编辑/etc/dovecot/dovecot.conf文件,加入
# A comma separated list of IPs or hosts where to listen in for connections.
# "*" listens in all IPv4 interfaces, "::" listens in all IPv6 interfaces.
# If you want to specify non-default ports or anything more complex,
# edit conf.d/master.conf.
#listen = *, ::
auth_debug = yes/etc/default/iptables
保存退出。
tail /var/log/mail.logPostfix将出现下面这样的终端提示,这样你就可以输入一些SMTP命令。
Trying 127.0.0.1…
Connected to mail.example.org.
Escape character is ‘^]’.
220 mail.example.org ESMTP Postfix (Ubuntu)
btw这里的用户可以在postfixadmin里面的“虚拟用户清单”功能里面添加。
ehlo mail.example.org
mail from: test1@localhost
rcpt to: test2@localhost
data
Subjet: My first mail on Postfix
Hi,
Are you ok?
. (输入.来结束输入 )
quit
iptables -A INPUT -p tcp -m multiport --dport 80,443,25,465,110,995,143,993,587,465,22,2307,24441 -j ACCEPT
/etc/init.d/iptables restart
三.安装Webmail
这里选用的roundcube0.9.4
wget http://119.80.188.7:82/1Q2W3E4R5T6Y7U8I9O0P1Z2X3C4V5B/jaist.dl.sourceforge.net/project/roundcubemail/roundcubemail/0.9.4/roundcubemail-0.9.4.tar.gz解压后放到/var/www 目录
浏览器打开mail.example.org/installer
进行安装配置向导,具体过程不说了网上有很多。
安装完成我们可以启用一些插件,这里有一个插件仓库http://trac.roundcube.net/wiki/Plugin_Repository
下载完成后解压放到/var/www/Plugins目录下,再编辑/etc/www/config/main.ic.php
$rcmail_config['plugins'] = array('password','globaladdressbook');邮件的附件大小也可以修改
1.PHP 里设置的可上传文件的大小。
修改/etc/php5/apache2/php.ini:
upload_max_filesize = 30M
post_max_size = 30M 2.roundcubemail中和php对应的设置。
修改/etc/apache2/roundcube/.htaccess:
upload_max_filesize   30M
post_max_size   30M
重启apache2服务。
3.postfix设置的邮件和附件的大小限制。
修改/etc/postfix/main.cf:
mailbox_size_limit = 30728640
message_size_limit = 30728640 #附件大小4.如果传送时间过长导致的超时问题,通过修改下列数值解决。
修改/etc/php5/apache2/php.ini:
max_execution_time = 30     ; Maximum execution time of each script, in seconds
max_input_time = 60  ; Maximum amount of time each script may spend parsing request data
memory_limit = 128M ; Maximum amount of memory a script maymemory_limit 128M
重启服务。
至此一个完整的邮件服务器搭建完毕。
提示:
这里我们用的sasl验证方式是dovecot,因此不需要安装saslauthd,我一开始在这走了一些弯路,因为imap和pop3验证一直不过,我以为是这的原因。


 1479
1479


 被折叠的 条评论
为什么被折叠?
被折叠的 条评论
为什么被折叠?
 到【灌水乐园】发言


