Buildroot配置
下载最新的buildroot,然后进入 buildroot中进行配置
make mini2440_defconfig
make xconfig
进入到Kernel配置与选择子项目中进行版本选择,使用4.04版本的Linuxkernel,因为低版本的3.3内核不合适学习的3.4.2内核的I2C驱动。如下图:
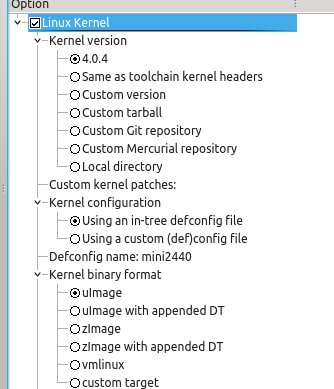
配置完成后save,关闭。
Kenrel配置
使用make linux-menuconfig打开内核的menuconfig配置选项
1. 选中i2c-adapater与slave,完成对IIC的支持:
Symbol: I2C_SLAVE_EEPROM [=y] │
│ Type : tristate │
│ Prompt: I2C eeprom slave driver │
│ Location: │
│ -> Device Drivers │
│ -> I2C support │
│ -> I2C support (I2C [=y]) │
│ -> I2C slave support (I2C_SLAVE [=y]) │
│ Defined at drivers/i2c/Kconfig:118 │
│ Depends on: I2C [=y] && I2C_SLAVE [=y]
2. 同时Kernel不用dtb,在选择使用dtb
配置好了后,直接make -j4,编译生成各个需要的文件
Qemu模拟Mini2440的构建
启动qemu Mini2440的nand文件制作,可以参考Qemu Mini440的文章
但是,Qemu在Ubuntu 14.04中编译会出错:
undefined reference to symbol 'timer_settime@@GLIBC_2.3.3
这个可以在Makefile中添加-lrt的链接即可:
diff --git a/Makefile.target b/Makefile.target
index 50dc60a..e9c520d 100644
--- a/Makefile.target
+++ b/Makefile.target
@@ -495,6 +495,7 @@ OBJS+=kvm.o kvm-all.o
endif
LIBS+=-lz
+LIBS+=-lrt
ifdef CONFIG_ALSA
LIBS += -lasound
Qemu启动模拟2440可以使用nfs启动
sudo ifconfig tap0 192.168.3.1
qemu-system-arm -M mini2440 -serial stdio -mtdblock nand.bin -kernel uImage -net nic -net tap,ifname=tap0,script=no,downscript=no
# in u-boot command line use below to boot:
nboot kernel
setenv bootargs 'console=ttySAC0,115200 root=/dev/nfs rw nfsroot=192.168.3.1:/home/hexiongjun/2440/nfs ip=192.168.3.2'
saveenv
bootm
需注意的是,这个qemu内部已经有AT24C0X的设备模拟了;
且运行qemu的时候不需要指定-device来指示使用I2C AT24C0X,
因为已经是qemu machine mini2440的机器模拟器中就已经存在了。
Qemu Mini2440中的IIC的验证与使用
在进入到了命令行以后可以按照下面的方式来查看是否有模拟AT24C0X:
# dmesg | grep at24
at24 0-0050: 1024 byte 24c08 EEPROM, writable, 16 bytes/write
然后可以使用下面命令来读写一下这个EEPROM设备:
echo 'Hello AT24' > /sys/class/i2c-adapter/i2c-0/0-0050/eepro
hexdump -c /sys/class/i2c-adapter/i2c-0/0-0050/eeprom
例如下面的log,就是正确读写了设备:
# echo 'Hello AT24' > /sys/class/i2c-adapter/i2c-0/0-0050/eepro
QEMU ee24c08_tx: write 0000=48
QEMU ee24c08_tx: write 0001=65
QEMU ee24c08_tx: write 0002=6c
QEMU ee24c08_tx: write 0003=6c
QEMU ee24c08_tx: write 0004=6f
QEMU ee24c08_tx: write 0005=20
QEMU ee24c08_tx: write 0006=41
QEMU ee24c08_tx: write 0007=54
QEMU ee24c08_tx: write 0008=32
QEMU ee24c08_tx: write 0009=34
QEMU ee24c08_tx: write 000a=0a
然后读出来的数据如下:
# hexdump -c /sys/class/i2c-adapter/i2c-0/0-0050/eeprom
0000000 H e l l o A T 2 4 \n 377 377 377 377 377
*
0000100 377 377 377 377 377 377 377 377 377 377 377 377 377 377 377 377
*
0000400
[root@buildroot ~]#
可以看到写进去与读出来的数据一致。