


Building Input Functions with tf.contrib.learn
This tutorial introduces you to creating input functions in tf.contrib.learn. You’ll get an overview of how to construct an input_fn to preprocess and feed data into your models. Then, you’ll implement an input_fn that feeds training, evaluation, and prediction data into a neural network regressor for predicting median house values.
本教程将介绍如何在tf.contrib.learn中创建输入函数。 您将了解如何构建一个input_fn来预处理并将数据馈送到模型中的概述。 然后,您将实施一个input_fn,将训练,评估和预测数据提供给神经网络回归器,用于预测房屋中值。
Custom Input Pipelines with input_fn:(通过input_fn自定义输入通道)
When training a neural network using tf.contrib.learn, it’s possible to pass your feature and target data directly into your fit, evaluate, or predict operations. Here’s an example taken from the tf.contrib.learn quickstart tutorial:
当使用tf.contrib.learn训练神经网络时,可以将您的功能和目标数据直接传递到fit,evaluate或predict操作中。 这是一个从tf.contrib.learn快速入门教程中获取的示例(https://www.tensorflow.org/versions/r0.12/tutorials/tflearn/index.html):
training_set = tf.contrib.learn.datasets.base.load_csv_with_header(
    filename = IRIS_TRAINNING,target_dtype = np.int,features_dtype = np.float32)
test_set = tf.contrib.learn.datasets.base.load_csv_with_header(
    filename = IRIS_TEST,target_dtype = np.int,features_dtype = np.float32)
...
classifier.fit(x = training_set.data,
               y = training_set.target,
               steps = 2000)
This approach works well when little to no manipulation of source data is required. But in cases where more feature engineering is needed, tf.contrib.learn supports using a custom input function (input_fn) to encapsulate the logic for preprocessing and piping data into your models.
当需要对源数据进行很少的操作时,这种方法很好。 但是在需要很多特征的情况下,tf.contrib.learn支持使用自定义输入函数(input_fn)将预处理和管道数据的逻辑封装到模型中。
Anatomy of an input_fn (一个input_fn的解剖)
The following code illustrates the basic skeleton for an input function:
以下代码说明了输入函数的基本框架:
def my_input_fn():
    #Preprocess your data here
    #return
        #1) a mapping of feature columns to Tensors with the corresponding feature data
        #2) a Tensor containing labels return feature_cols,labels
The body of the input function contains the specific logic for preprocessing your input data, such as scrubbing out bad examples or feature scaling.
输入函数的正文包含用于预处理输入数据的特定逻辑,例如清除不良示例或特征缩放。
Input functions must return the following two values containing the final feature and label data to be fed into your model (as shown in the above code skeleton):
输入函数必须返回以下两个值,其中包含要馈送到模型中的最终特征和标签数据(如上述代码框架所示):
feature_cols:
A dict containing key/value pairs that map feature column names to Tensors (or SparseTensors) containing the corresponding feature data.
这字典是一个key/value的键值对,特征列的名字映射到一个包含相应特征数据的Tensor或者SparseTensor。
labels:
A Tensor containing your label (target) values: the values your model aims to predict.
这个Tensor包含您的标签(目标)值,这值也就是模型想要预测的值。
Converting Feature Data to Tensors(将特征数据转换成Tensors)
If your feature/label data is stored in pandas dataframes or numpy arrays, you’ll need to convert it to Tensors before returning it from your input_fn.
如果您的功能/标签数据存储在pandas数据帧(http://pandas.pydata.org/)或numpy(http://www.numpy.org/)数组中,则需要将其转换为Tensors,然后再从input_fn返回。
For continuous data, you can create and populate a Tensor using tf.constant:
对于continuous data,您可以使用tf.constant创建和填充Tensor
feature_column_data = [1,2.4,0,9.9,3,120]
feature_tensor = tf.constant(feature_column_data)
For sparse, categorical data (data where the majority of values are 0), you’ll instead want to populate a SparseTensor, which is instantiated with three arguments:
对于稀疏的分类数据(https://en.wikipedia.org/wiki/Sparse_matrix)
(大多数值为0的数据),您将需要填充一个SparseTensor,该实例使用三个参数进行实例化:
dense_shape
The shape of the tensor. Takes a list indicating the number of elements in each dimension. For example, shape=[3,6] specifies a two-dimensional 3x6 tensor, shape=[2,3,4] specifies a three-dimensional 2x3x4 tensor, and shape=[9] specifies a one-dimensional tensor with 9 elements.
张量的形状。获取一个列表,指示每个维度中元素的数量。例如,shape = [3,6]指定二维3x6张量,shape = [2,3,4]指定三维2x3x4张量,shape = [9]指定具有9个元素的一维张量。
indices
The indices of the elements in your tensor that contain nonzero values. Takes a list of terms, where each term is itself a list containing the index of a nonzero element. (Elements are zero-indexed—i.e., [0,0] is the index value for the element in the first column of the first row in a two-dimensional tensor.) For example, indices=[[1,3], [2,4]] specifies that the elements with indexes of [1,3] and [2,4] have nonzero values.
您的张量中包含非零值的元素的索引。获取术语列表,其中每个术语本身都是包含非零元素索引的列表。 (元素为零索引 - 即[0,0]是二维张量中第一行第一列中元素的索引值。)例如,indices = [[1,3],[ 2,4]]指定索引为[1,3]和[2,4]的元素具有非零值。
values
A one-dimensional tensor of values. Term i in values corresponds to term i in indices and specifies its value. For example, given indices=[[1,3], [2,4]], the parameter values=[18, 3.6] specifies that element [1,3] of the tensor has a value of 18, and element [2,4] of the tensor has a value of 3.6.
价值的一维张量。值i中的项i对应于索引中的项i,并指定其值。例如,给定索引= [[1,3],[2,4]],参数值= [18,3.6]指定张量的元素[1,3]的值为18,元素[2 ,4]的值为3.6。
The following code defines a two-dimensional SparseTensor with 3 rows and 5 columns. The element with index [0,1] has a value of 6, and the element with index [2,4] has a value of 0.5 (all other values are 0):
以下代码定义了具有3行和5列的二维SparseTensor。索引[0,1]的元素的值为6,索引[2,4]的元素的值为0.5(所有其他值为0):
sparse_tensor = tf.SparseTensor(
    indices = [[0,1],[2,4]],
    values = [6,0.5],
    dense_shape = [3,5])
即:
[[0, 6, 0, 0, 0]
 [0, 0, 0, 0, 0]
 [0, 0, 0, 0, 0.5]]
更多关于SparseTensor的信息,请参考:https://www.tensorflow.org/versions/r0.12/api_docs/python/sparse_ops.html#SparseTensor
Passing input_fn Data to Your Model
To feed data to your model for training, you simply pass the input function you’ve created to your fit operation as the value of the input_fn parameter, e.g.:
要将数据提供给您的模型进行培训,您只需将创建的输入函数传递给fit操作,作为input_fn参数的值,例如:
classifier.fit(input_fn = my_input_fn,steps = 2000)Note that the input_fn is responsible for supplying both feature and label data to the model, and replaces both the x and y parameters in fit. If you supply an input_fn value to fit that is not None in conjunction with either an x or y parameter that is not None, it will result in a ValueError.
请注意,input_fn负责将特征和标签数据提供给模型,并以fit中替换x和y参数。 如果您提供一个非空的input_fn值给fit,结合x或y参数不为None,它将导致一个ValueError。
Also note that the input_fn parameter must receive a function object (i.e., input_fn=my_input_fn), not the return value of a function call (input_fn=my_input_fn()). This means that if you try to pass parameters to the input function in your fit call, as in the following code, it will result in a TypeError:
另请注意,input_fn参数必须接收一个函数对象(即input_fn = my_input_fn),而不是函数调用的返回值(input_fn = my_input_fn())。 这意味着如果您尝试将参数传递给适合调用中的输入函数,如以下代码中那样会导致TypeError
classifier.fit(input_fn = my_input_fn(training_set),steps = 2000)However, if you’d like to be able to parameterize your input function, there are other methods for doing so. You can employ a wrapper function that takes no arguments as your input_fn and use it to invoke your input function with the desired parameters. For example:
但是,如果您希望能够参数化输入函数,还有其他方法可以这样做。
1. 您可以使用一个不需要参数作为input_fn的包装函数,并使用它来使用所需的参数来调用输入函数。 例如:
def my_input_function_training_set():
    return my_input_function(training_set)
classifier.fit(input_fn = my_input_function_training_set,steps = 2000)
Alternatively, you can use Python’s functools.partial function to construct a new function object with all parameter values fixed:
2. 或者,您可以使用Python的functools.partial(https://docs.python.org/2/library/functools.html#functools.partial)函数构造一个新的函数对象,其中所有参数值都是固定的:
classifier.fit(input_fn = functools.partial(my_input_function,data_set=training_set),steps = 2000)A third option is to wrap your input_fn invocation in a lambda(https://docs.python.org/3/tutorial/controlflow.html#lambda-expressions) and pass it to the input_fn parameter:
3. 第三个方法是将input_fn调用包装在lambda中,并将其传递给input_fn参数:
classifier.fit(input_fn = lambda:my_input_fn(training_set),steps = 2000)One big advantage of architecting your input pipeline as shown above—to accept a parameter for data set—is that you can pass the same input_fn to evaluate and predict operations by just changing the data set argument, e.g.:
如上所示构建输入管道的一个主要优点是接受数据集的参数,那么您可以传递相同的input_fn来通过更改数据集参数来评估和预测操作,例如:
classifier.evaluate(input_fn = lambda:my_input_fn(test_set),steps = 2000)This approach enhances code maintainability: no need to capture x and y values in separate variables (e.g., x_train, x_test, y_train, y_test) for each type of operation.
这种方法增强了代码可维护性:不需要为每种类型的操作捕获单独变量(例如,x_train,x_test,y_train,y_test)中的x和y值。
A Neural Network Model for Boston House Values(波士顿房价数据模型)
In the remainder of this tutorial, you’ll write an input function for preprocessing a subset of Boston housing data pulled from the UCI Housing Data Set and use it to feed data to a neural network regressor for predicting median house values.
在本教程的其余部分,您将编写一个输入函数,用于预处理从UCI住房数据集提取的波士顿住房数据的子集,并将其用于将数据馈送到神经网络回归器以预测房屋中值。
The Boston CSV data sets you’ll use to train your neural network contain the following feature data for Boston suburbs:
您将用于训练神经网络的波士顿CSV数据集包含波士顿郊区的以下功能数据:
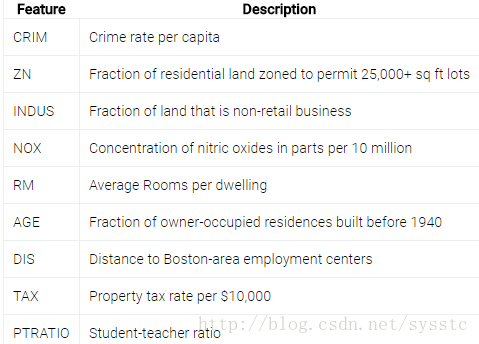
And the label your model will predict is MEDV, the median value of owner-occupied residences in thousands of dollars.
而您的模型可以预测的标签是MEDV,拥有自住住宅的中位数以千美元计。
数据准备
- 下载三种数据:boston_train.csv(http://download.tensorflow.org/data/boston_train.csv),boston_test.csv(http://download.tensorflow.org/data/boston_test.csv)和boston_predict.csv(http://download.tensorflow.org/data/boston_predict.csv)
The following sections provide a step-by-step walkthrough of how to create an input function, feed these data sets into a neural network regressor, train and evaluate the model, and make house value predictions. The full, final code is available here.
以下部分提供了如何创建输入函数的逐步演练,将这些数据集合馈入神经网络回归器,训练和评估模型,并进行房屋价值预测。 这里提供了完整的最终代码(https://github.com/tensorflow/tensorflow/blob/r0.12/tensorflow/examples/tutorials/input_fn/boston.py)。
Importing the Housing Data
To start, set up your imports (including pandas and tensorflow) and set logging verbosity to INFO for more detailed log output:
首先,设置你的imports(包括pandas和tensorflow),并且设置log的级别为INFO,以便获得更多日志输出:
from __future__ import absolute_import
from __future__ import division
from __future__ import print_function
import pandas as pd
import tensorflow as tf

tf.logging.set_verbosity(tf.logging.INFO)
Define the column names for the data set in COLUMNS. To distinguish features from the label, also define FEATURES and LABEL. Then read the three CSVs (train, test, and predict) into pandas DataFrames:
定义COLUMNS中数据集的列名。为了区分功能与标签,还需要定义FEATURES和LABEL。然后阅读三个CSV(train,test和predict)到pandas DataFrames:
COLUMNS = ["crim","zn","indus","nox","rm","age",
           "dis","tax","ptratio","medv"]
FEATURES = ["crim","zn","indus","nox","rm","age",
            "dis","tax","ptratio"]
LABEL = "medv"
training_set = pd.read_csv("boston_train.csv",
                           skipinitialspace=True,skiprows = 1,names=COLUMNS)
test_set = pd.read_csv("boston_test.csv",skipinitialspace = True,
                       skiprows = 1,names = COLUMNS)
prediction_set = pd.read_csv("boston_predict.csv",
                             skipinitialspace = True,skiprows = 1,names = COLUMNS)
Defining FeatureColumns and Creating the Regressor(定义特征列并创建回归器)
Next, create a list of FeatureColumns for the input data, which formally specify the set of features to use for training. Because all features in the housing data set contain continuous values, you can create their FeatureColumns using the tf.contrib.layers.real_valued_column() function:
接下来,为输入数据创建一个FeatureColumn列表,该列表正式指定要用于training的功能集。 由于房屋特征数据集中包含连续值(continuous values),因此您可以使用tf.contrib.layers.real_valued_column()函数创建其FeatureColumns:
feature_cols = [tf.contrib.layers.real_valued_column(k) for k in FEATURES]NOTE: For a more in-depth overview of feature columns, see this introduction, and for an example that illustrates how to define FeatureColumns for categorical data, see the Linear Model Tutorial.
注意:有关功能列的更深入的概述,请参阅此介绍(https://www.tensorflow.org/versions/r0.12/tutorials/linear/overview.html#feature-columns-and-transformations),以及说明如何为分类数据定义FeatureColumn的示例,请参阅线性模型教程(https://www.tensorflow.org/versions/r0.12/tutorials/wide/index.html)。
Now, instantiate a DNNRegressor for the neural network regression model. You’ll need to provide two arguments here: hidden_units, a hyperparameter specifying the number of nodes in each hidden layer (here, two hidden layers with 10 nodes each), and feature_columns, containing the list of FeatureColumns you just defined:
现在,将神经网络回归模型的DNNRegressor实例化。 您需要在此提供两个参数:hidden_units,一个超参数,指定每个隐藏层中的节点数(此处为每个具有10个节点的两个隐藏层)和feature_columns,其中包含刚刚定义的FeatureColumn列表:
regressor = tf.contrib.learn.DNNRegressor(feature_columns = feature_cols,hidden_units = [10,10])Building the input_fn
To pass input data into the regressor, create an input function, which will accept a pandas Dataframe and return feature column and label values as Tensors:
为了将输入数据传送到regressor中,需要创建一个输入函数,它将接受一个pandas Dataframe,并返回特征列和标签值作为Tensors:
def input_fn(data_set):
    feature_cols = {k:tf.constant(data_set[k].values) for k in FEATURES}
    labels = tf.constant(data_set[LABEL].values)
    return feature_cols,labels
Note that the input data is passed into input_fn in the data_set argument, which means the function can process any of the DataFrames you’ve imported: training_set, test_set, and prediction_set.
请注意,输入数据被传递到data_set参数中的input_fn,这意味着该函数可以处理您导入的任何DataFrames:training_set,test_set和prediction_set。
Training the Regressor
To train the neural network regressor, run fit with the training_set passed to the input_fn as follows:
通过将training_set参数传递给fit方法中的input_fn,以训练神经网络回归
regressor.fit(input_fn=lambda:input_fn(training_set),steps=5000)You should see log output similar to the following, which reports training loss for every 100 steps:
您应该看到类似于以下的日志输出,其中每100步骤报告训练损失:
INFO:tensorflow:loss = 28.5473, step = 4701 (0.075 sec)
INFO:tensorflow:global_step/sec: 1404.64
INFO:tensorflow:loss = 28.3609, step = 4801 (0.071 sec)
INFO:tensorflow:global_step/sec: 1608.74
INFO:tensorflow:loss = 28.5152, step = 4901 (0.061 sec)
INFO:tensorflow:Saving checkpoints for 5000 into C:\Users\smile\AppData\Local\Temp\tmpl_jpg2i0\model.ckpt.
INFO:tensorflow:Loss for final step: 28.4342.
Evaluating the Model
Next, see how the trained model performs against the test data set. Run evaluate, and this time pass the test_set to the input_fn:\
接下来,看看训练模型对测试数据集的执行情况。 运行评估,这次将test_set传递给input_fn:
ev = regressor.evaluate(input_fn=lambda:input_fn(test_set),steps = 1)Retrieve the loss from the ev results and print it to output:
从ev结果中检索损失并打印输出:
loss_score = ev["loss"]
print("Loss:{0:f}".format(loss_score))
You should see results similar to the following:
你可能会得到类似下面的结果
INFO:tensorflow:Saving dict for global step 5000: global_step = 5000, loss = 13.6908
WARNING:tensorflow:Skipping summary for global_step, must be a float or np.float32.
Loss:13.690834
Making Prediction
Finally, you can use the model to predict median house values for the prediction_set, which contains feature data but no labels for six examples:
最后,您可以使用该模型预测中心值,其中包含特征数据,但没有六个示例的标签:
y = regressor.predict(input_fn = lambda:input_fn(prediction_set))
print("Prediction{}",foramt(str(y)))
Your results should contain six house-value predictions in thousands of dollars, e.g:
您的结果应包含六项房屋价值预测,数千美元,例如:
Additional Resources
This tutorial focused on creating an input_fn for a neural network regressor. To learn more about using input_fns for other types of models, check out the following resources:
Large-scale Linear Models with TensorFlow: This introduction to linear models in TensorFlow provides a high-level overview of feature columns and techniques for transforming input data.
TensorFlow Linear Model Tutorial(https://www.tensorflow.org/versions/r0.12/tutorials/wide/index.html): This tutorial covers creating FeatureColumns and an input_fn for a linear classification model that predicts income range based on census data.
TensorFlow Wide(https://www.tensorflow.org/versions/r0.12/tutorials/wide/index.html) & Deep Learning() Tutorial: Building on the Linear Model Tutorial, this tutorial covers FeatureColumn and input_fn creation for a “wide and deep” model that combines a linear model and a neural network using DNNLinearCombinedClassifier.


 333
333


 被折叠的 条评论
为什么被折叠?
被折叠的 条评论
为什么被折叠?
 到【灌水乐园】发言


