


双网卡绑定单个IP 地址 为了提供网络的高可用性,我们可能需要将多块网卡绑定成一块虚拟网卡对外提供服务,这样即使其中的一块物理网卡出现故障,也不会导致连接中断。多网卡绑。
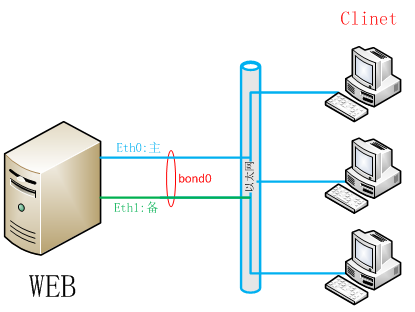
为了提供网络的高可用性,我们可能需要将多块网卡绑定成一块虚拟网卡对外提供服务,这样即使其中的一块物理网卡出现故障,也不会导致连接中断。在Linux下叫bonding,IBM称为etherchanel,broadcom叫team,但是名字怎么变,效果都是将两块或更多的网卡当做一块网卡使用,在增加带宽的同时也可以提高冗余性。比如我们在CentOS 6.3下可以将eth0和eth1绑定成虚拟网卡bond0。
如图:
实验配置:
mode=1:表示fault-tolerance (active-backup)提供冗余功能,工作方式是主备的工作方式,其中一块网卡在工作(若eth0断掉),则自动切换到另一个块网卡(eth1做备份)。
| 系 统 | 设备名称 | IP地址 | 子网掩码 |
|
CentOS 6.3_64bit | eth0 |
| |
| eth1 |
| ||
| bond0 | 10.1.3.210 | 255.255.255.0 |
1、查看主机网卡
[root@web ~]# cd /etc/sysconfig/network-scripts/
[root@web1 network-scripts]# ll
total 200
-rw-r--r--. 1 root root 212 Mar 20 22:15 ifcfg-eth0
-rw-r--r-- 1 root root 212 Mar 23 19:10 ifcfg-eth1
2、复制ifcfg-bond0
[root@web network-scripts]# cp ifcfg-eth0 ifcfg-bond0
[root@web network-scripts]# ll
total 204
-rw-r--r-- 1 root root 212 Mar 23 19:12 ifcfg-bond0
-rw-r--r--. 1 root root 212 Mar 20 22:15 ifcfg-eth0
-rw-r--r-- 1 root root 212 Mar 23 19:10 ifcfg-eth1
3、编辑ifcfg-bond0、ifcfg-eth0、ifcfg-eth1
[root@web network-scripts]# vim ifcfg-bond0
DEVICE=bond0
BOOTPROTO=static
IPADDR=10.1.3.210
NETMASK=255.255.255.0
GATEWAY=10.1.3.254
ONBOOT=yes
USERCTL=no
[root@web1 network-scripts]# vim ifcfg-eth0
DEVICE=eth0
ONBOOT=yes
BOOTPROTO=none
MASTER=bond0
SLAVE=yes
USERCTL=no
[root@web1 network-scripts]# vim ifcfg-eth1
DEVICE=eth1
ONBOOT=yes
BOOTPROTO=none
MASTER=bond0
SLAVE=yes
USERCTL=no
4、模块加载
[root@web1 ~]# vim /etc/modprobe.d/dist.conf
在最后添加以下内容:
#加载bonding模块,对外虚拟网络接口设备为 bond0
alias bond0 bonding
options bond0 miimon=100 mode=1
[root@web1 ~]# grep bond0 /etc/modprobe.d/dist.conf
alias bond0 bonding
options bond0 miimon=100 mode=1
说明:
miimon是用来进行链路监测的。 比如:miimon=100,单位是ms(毫秒)这边的100,是100ms,即是0.1秒那么系统每100ms监测一次链路连接状态,如果有一条线路不通就转入另一条线路;mode的值表示工作模式,他共有0,1,2,3四种模式,常用的为0、1两种。
mode共有七种(0~6),这里解释两个常用的选项。
mode=0:表示load balancing (round-robin)为负载均衡方式,两块网卡都在工作。
mode=1:表示fault-tolerance (active-backup)提供冗余功能,工作方式是主备的工作方式,其中一块网卡在工作(若eth0断掉),则自动切换到另一个块网卡(eth1做备份)。
bonding只能提供链路监测,即从主机到交换机的链路是否接通。如果只是交换机对外的链路down掉了,而交换机本身并没有故障,那么bonding会认为链路没有问题而继续使用。
5、重启网络服务,使配置生效
[root@web1 ~]# service network restart
Shutting down interface eth0: [ OK ]
Shutting down interface eth1: [ OK ]
Shutting down loopback interface: [ OK ]
Bringing up loopback interface: [ OK ]
Bringing up interface bond0: RTNETLINK answers: File exists
Error adding address 10.1.3.210 for bond0.
RTNETLINK answers: File exists [ OK ]
6、查看bond0接口状态
[root@web1 ~]# cat /proc/net/bonding/bond0
Ethernet Channel Bonding Driver: v3.6.0 (September 26, 2009)
Bonding Mode: fault-tolerance (active-backup)
Primary Slave: None
Currently Active Slave: eth0 // eth0主模式
MII Status: up
MII Polling Interval (ms): 100
Up Delay (ms): 0
Down Delay (ms): 0
Slave Interface: eth0
MII Status: up
Speed: 1000 Mbps
Duplex: full
Link Failure Count: 0
Permanent HW addr: 00:0c:29:c9:6d:18
Slave queue ID: 0
Slave Interface: eth1
MII Status: up
Speed: 1000 Mbps
Duplex: full
Link Failure Count: 0
Permanent HW addr: 00:0c:29:c9:6d:22
Slave queue ID: 0
7、查看中路由表状态:
[root@web1 ~]# route -n
Kernel IP routing table
Destination Gateway Genmask Flags Metric Ref Use Iface
10.1.3.0 0.0.0.0 255.255.255.0 U 0 0 0 bond0
169.254.0.0 0.0.0.0 255.255.0.0 U 1004 0 0 bond0
0.0.0.0 10.1.3.254 0.0.0.0 UG 0 0 0 bond0
[root@web1 ~]# lsmod | grep bond
bonding 127060 0
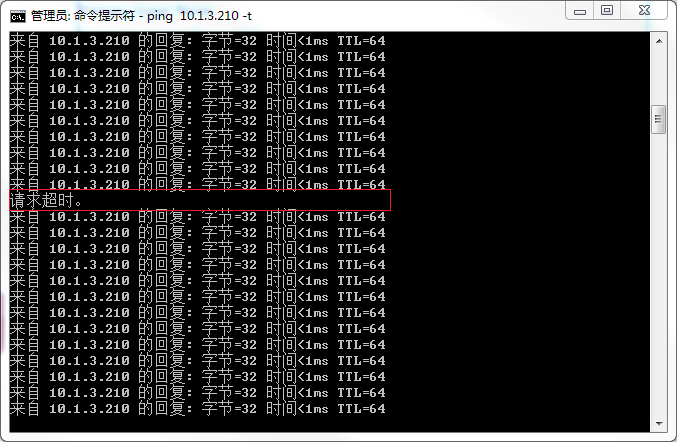
8、测试
选择一台windows 7机器ping测试机,然后停掉当前使用的网卡eth0,查看是否能够继续ping通;
测试结果:丢失一个包。
查看bond0接口状态
[root@web1 ~]#cat /proc/net/bonding/bond0
Ethernet Channel Bonding Driver: v3.6.0 (September 26, 2009)
Bonding Mode: fault-tolerance (active-backup)
Primary Slave: None
Currently Active Slave: eth1 //eth1为主模式
MII Status: up
MII Polling Interval (ms): 100
Up Delay (ms): 0
Down Delay (ms): 0
Slave Interface: eth0
MII Status: down
Speed: Unknown
Duplex: Unknown
Link Failure Count: 1
Permanent HW addr: 00:0c:29:c9:6d:18
Slave queue ID: 0
Slave Interface: eth1
MII Status: up
Speed: 1000 Mbps
Duplex: full
Link Failure Count: 1
Permanent HW addr: 00:0c:29:c9:6d:22
Slave queue ID: 0
配置完成!
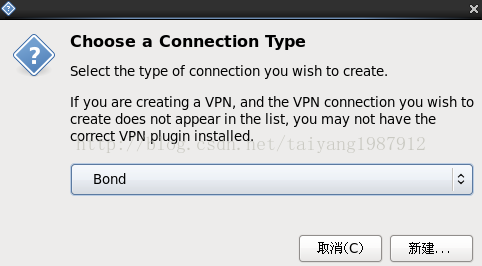
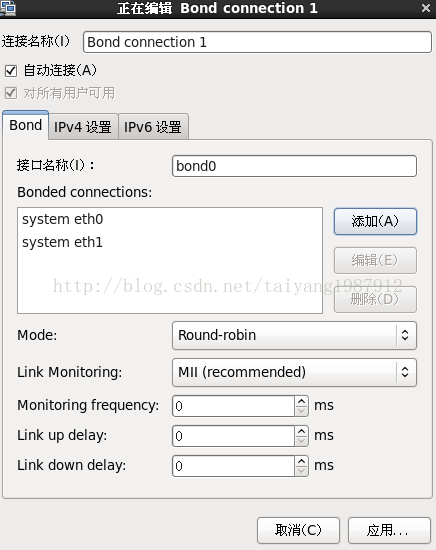
9、支持NetworkManager的centos系统
只需要通过界面配置即可以完成多块网卡的绑定
10、一个网桥、bond实例
/etc/sysconfig/network-scripts/下的文件:(1)ifcfg-ebr
DEVICE=ebr
STP=yes
BRIDGING_OPTS=priority=128
TYPE=Bridge
BOOTPROTO=none
IPADDR=192.168.1.2
NETMASK=255.255.255.0
GATEWAY=192.168.1.1
DNS1=
DNS2=
DEFROUTE=yes
IPV4_FAILURE_FATAL=no
NAME=ebr
UUID=1ce71742-a273-42fe-b358-3b0a0ee77c50
ONBOOT=yes
DEVICE=ebrbond
BONDING_OPTS="miimon=100 mode=balance-alb"
TYPE=Bond
BONDING_MASTER=yes
BRIDGING_OPTS="priority=50 path_cost=33"
NAME=ebrbond
UUID=d0baebf0-282b-4dfe-b6d4-f6ff30ad81d1
ONBOOT=yes
BRIDGE=ebrDEVICE=eth0
HWADDR=90:B1:1C:6E:AE:09
TYPE=Ethernet
NAME=eth0
UUID=c2eee5d8-34ee-4c0c-8d77-90029520b249
ONBOOT=yes
MASTER=ebrbond
SLAVE=yesDEVICE=eth1
HWADDR=00:10:18:EA:9E:FC
TYPE=Ethernet
NAME=eth1
UUID=71ee5282-ce19-49f4-972d-37ab030b8011
ONBOOT=yes
MASTER=ebrbond
SLAVE=yes


 1516
1516


 被折叠的 条评论
为什么被折叠?
被折叠的 条评论
为什么被折叠?
 到【灌水乐园】发言


