一、 Volley 的地位
自2013年Google I/O 大会上,Google 推出 Volley 之后,一直到至今,由于其使用简单、代码轻量、通信速度快、并发量大等特点,倍受开发者们的青睐。
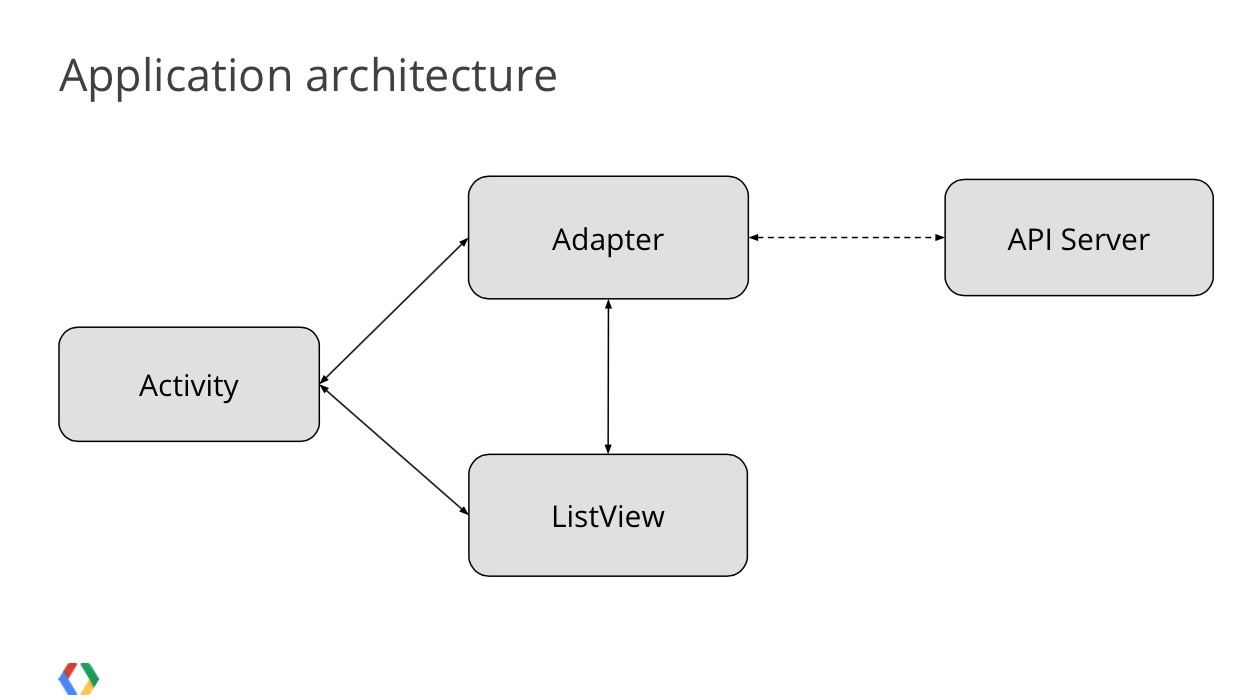
先看两张图,让图片告诉我们 Volley 的用处;
第一张 Volley 的经典图

通过上图,我们可以发现 Volley适合网络通信频繁操作,并能同时实现多个网络通信。
第二张图

我们在以前在 ListView 的 item 中如果有网络请求,一般都是通过Task 异步任务来完成,并在完成之后通知 Adapter 更新数据。而Volley 不需要这么麻烦,因为里面已经为我们封装好了处理的线程,网络请求,缓存的获取,数据的回掉都是对应不同的线程。
二、Volley使用步骤及基本分析
volley 的使用遵循以下四步:
1、获取请求队里RequestQueue
RequestQueue mRequestQueue = Vollay.newRequestQueue(Context context) ;
2、启动请求队列
mRequestQueue.start();
以上这两步通常也归为一步
3、获取请求Request
Request mRequest = new ObjectRequest(…) ;
ObjectRequest需要根据自己请求返回的数据来定制,继承之抽象类Request,Vollay 已经为我们实现了 StringRequest、JsonArrayRequest、JsonObjectRequest、ImageRequest请求;
4、把请求添加到请求队列中
mRequestQueue.add(mRequest);
说明:在一个项目中,请求队列不需要出现多个,一般整个项目中共用同一个mRequestQueue,因为请求队列启动的时候会做以下事情
<code class="hljs java has-numbering">    <span class="hljs-javadoc">/**
     * Starts the dispatchers in this queue.
     */</span>
    <span class="hljs-keyword">public</span> <span class="hljs-keyword">void</span> <span class="hljs-title">start</span>() {
    <span class="hljs-comment">//结束队列中所有的线程</span>
        stop();  <span class="hljs-comment">// Make sure any currently running dispatchers are stopped.</span>
        <span class="hljs-comment">// Create the cache dispatcher and start it.</span>
        <span class="hljs-comment">//初始化缓存处理线程</span>
        mCacheDispatcher = <span class="hljs-keyword">new</span> CacheDispatcher(mCacheQueue, mNetworkQueue, mCache, mDelivery);
        <span class="hljs-comment">//启动缓存线程</span>
        mCacheDispatcher.start();

        <span class="hljs-comment">// Create network dispatchers (and corresponding threads) up to the pool size.</span>
        <span class="hljs-comment">//启动网络请求处理线程,默认为5个,可以自己设定 size</span>
        <span class="hljs-keyword">for</span> (<span class="hljs-keyword">int</span> i = <span class="hljs-number">0</span>; i < mDispatchers.length; i++) {
            NetworkDispatcher networkDispatcher = <span class="hljs-keyword">new</span> NetworkDispatcher(mNetworkQueue, mNetwork,
                    mCache, mDelivery);
            <span class="hljs-comment">//保存网络请求线程</span>
            mDispatchers[i] = networkDispatcher;
            <span class="hljs-comment">//启动网络请求处理线程</span>
            networkDispatcher.start();
        }
    }</code><ul style="display: block;" class="pre-numbering"><li>1</li><li>2</li><li>3</li><li>4</li><li>5</li><li>6</li><li>7</li><li>8</li><li>9</li><li>10</li><li>11</li><li>12</li><li>13</li><li>14</li><li>15</li><li>16</li><li>17</li><li>18</li><li>19</li><li>20</li><li>21</li><li>22</li><li>23</li></ul>
启动一个缓存mCacheDispatcher线程,用来读取缓存数据,启动若干个网络请求mDispatchers线程,用来实现网络通信。
mCacheDispatcher线程的 run 方法
<code class="hljs java has-numbering">    <span class="hljs-annotation">@Override</span>
    <span class="hljs-keyword">public</span> <span class="hljs-keyword">void</span> <span class="hljs-title">run</span>() {
        <span class="hljs-keyword">if</span> (DEBUG) VolleyLog.v(<span class="hljs-string">"start new dispatcher"</span>);
        Process.setThreadPriority(Process.THREAD_PRIORITY_BACKGROUND);

        <span class="hljs-comment">// Make a blocking call to initialize the cache.</span>
        <span class="hljs-comment">//初始化缓存</span>
        mCache.initialize();
        <span class="hljs-comment">//循环获取缓存请求</span>
        <span class="hljs-keyword">while</span> (<span class="hljs-keyword">true</span>) {
            <span class="hljs-keyword">try</span> {
                <span class="hljs-comment">// Get a request from the cache triage queue, blocking until</span>
                <span class="hljs-comment">// at least one is available.</span>
                <span class="hljs-comment">//从缓存队列中获取缓存请求,如果没有缓存请求,这个方法会阻塞在这里</span>
                <span class="hljs-keyword">final</span> Request request = mCacheQueue.take();
                <span class="hljs-comment">//打印 log 信息</span>
                request.addMarker(<span class="hljs-string">"cache-queue-take"</span>);

                <span class="hljs-comment">// If the request has been canceled, don't bother dispatching it.</span>
                <span class="hljs-comment">//如果请求终止了,结束本次循环</span>
                <span class="hljs-keyword">if</span> (request.isCanceled()) {
                    request.finish(<span class="hljs-string">"cache-discard-canceled"</span>);
                    <span class="hljs-keyword">continue</span>;
                }

                <span class="hljs-comment">// Attempt to retrieve this item from cache.</span>
               <span class="hljs-comment">//获取缓存数据,如果没有,把请求加入到网络请求的队列中</span>
                Cache.Entry entry = mCache.get(request.getCacheKey());
                <span class="hljs-keyword">if</span> (entry == <span class="hljs-keyword">null</span>) {
                    request.addMarker(<span class="hljs-string">"cache-miss"</span>);
                    Log.i(<span class="hljs-string">"CacheDispatcher"</span>, <span class="hljs-string">"没有缓存数据:"</span> + request.getUrl());
                    mNetworkQueue.put(request);
                    <span class="hljs-keyword">continue</span>;
                }

                <span class="hljs-comment">// If it is completely expired, just send it to the network.</span>
                <span class="hljs-comment">//判断缓存是否已经过期,如果过期,把请求加入到网络请求的队列中,直接请求网络获取数据</span>
                <span class="hljs-keyword">if</span> (entry.isExpired()) {
                    request.addMarker(<span class="hljs-string">"cache-hit-expired"</span>);
                    request.setCacheEntry(entry);
                    Log.i(<span class="hljs-string">"CacheDispatcher"</span>, <span class="hljs-string">"缓存数据过期:"</span> + request.getUrl());
                    mNetworkQueue.put(request);
                    <span class="hljs-keyword">continue</span>;
                }

                <span class="hljs-comment">// We have a cache hit; parse its data for delivery back to the request.</span>
                <span class="hljs-comment">// 已经获取到了有效的缓存数据,回调给 request 的parseNetworkResponse,需要自己根据需求来解析数据</span>
                request.addMarker(<span class="hljs-string">"cache-hit"</span>);
                Response<?> response = request.parseNetworkResponse(
                        <span class="hljs-keyword">new</span> NetworkResponse(entry.data, entry.responseHeaders));
                request.addMarker(<span class="hljs-string">"cache-hit-parsed"</span>);
                <span class="hljs-comment">//判断缓存是否需要刷新</span>
                <span class="hljs-keyword">if</span> (!entry.refreshNeeded()) {
                    <span class="hljs-comment">// Completely unexpired cache hit. Just deliver the response.</span>
                    Log.i(<span class="hljs-string">"CacheDispatcher"</span>, <span class="hljs-string">"获取缓存数据:"</span> + request.getUrl());
                    mDelivery.postResponse(request, response);
                } <span class="hljs-keyword">else</span> {
                    <span class="hljs-comment">// Soft-expired cache hit. We can deliver the cached response,</span>
                    <span class="hljs-comment">// but we need to also send the request to the network for</span>
                    <span class="hljs-comment">// refreshing.</span>
                    request.addMarker(<span class="hljs-string">"cache-hit-refresh-needed"</span>);
                    request.setCacheEntry(entry);

                    <span class="hljs-comment">// Mark the response as intermediate.</span>
                    response.intermediate = <span class="hljs-keyword">true</span>;

                    <span class="hljs-comment">// Post the intermediate response back to the user and have</span>
                    <span class="hljs-comment">// the delivery then forward the request along to the network.</span>
                    mDelivery.postResponse(request, response, <span class="hljs-keyword">new</span> Runnable() {
                        <span class="hljs-annotation">@Override</span>
                        <span class="hljs-keyword">public</span> <span class="hljs-keyword">void</span> <span class="hljs-title">run</span>() {
                            <span class="hljs-keyword">try</span> {
                                mNetworkQueue.put(request);
                            } <span class="hljs-keyword">catch</span> (InterruptedException e) {
                                <span class="hljs-comment">// Not much we can do about this.</span>
                            }
                        }
                    });
                }

            } <span class="hljs-keyword">catch</span> (InterruptedException e) {
                <span class="hljs-comment">// We may have been interrupted because it was time to quit.</span>
                <span class="hljs-keyword">if</span> (mQuit) {
                    <span class="hljs-keyword">return</span>;
                }
                <span class="hljs-keyword">continue</span>;
            }
        }
    }</code><ul style="display: block;" class="pre-numbering"><li>1</li><li>2</li><li>3</li><li>4</li><li>5</li><li>6</li><li>7</li><li>8</li><li>9</li><li>10</li><li>11</li><li>12</li><li>13</li><li>14</li><li>15</li><li>16</li><li>17</li><li>18</li><li>19</li><li>20</li><li>21</li><li>22</li><li>23</li><li>24</li><li>25</li><li>26</li><li>27</li><li>28</li><li>29</li><li>30</li><li>31</li><li>32</li><li>33</li><li>34</li><li>35</li><li>36</li><li>37</li><li>38</li><li>39</li><li>40</li><li>41</li><li>42</li><li>43</li><li>44</li><li>45</li><li>46</li><li>47</li><li>48</li><li>49</li><li>50</li><li>51</li><li>52</li><li>53</li><li>54</li><li>55</li><li>56</li><li>57</li><li>58</li><li>59</li><li>60</li><li>61</li><li>62</li><li>63</li><li>64</li><li>65</li><li>66</li><li>67</li><li>68</li><li>69</li><li>70</li><li>71</li><li>72</li><li>73</li><li>74</li><li>75</li><li>76</li><li>77</li><li>78</li><li>79</li><li>80</li><li>81</li><li>82</li><li>83</li><li>84</li><li>85</li><li>86</li><li>87</li><li>88</li><li>89</li></ul>
mDispatchers线程的 run 方法
<code class="hljs java has-numbering">    <span class="hljs-annotation">@Override</span>
    <span class="hljs-keyword">public</span> <span class="hljs-keyword">void</span> <span class="hljs-title">run</span>() {
        Process.setThreadPriority(Process.THREAD_PRIORITY_BACKGROUND);
        Request request;
        <span class="hljs-keyword">while</span> (<span class="hljs-keyword">true</span>) {
            <span class="hljs-keyword">try</span> {
                <span class="hljs-comment">// Take a request from the queue.</span>
                <span class="hljs-comment">//获取网络请求,当队列中为空的时候,阻塞</span>
                request = mQueue.take();
            } <span class="hljs-keyword">catch</span> (InterruptedException e) {
                <span class="hljs-comment">// We may have been interrupted because it was time to quit.</span>
                <span class="hljs-keyword">if</span> (mQuit) {
                    <span class="hljs-keyword">return</span>;
                }
                <span class="hljs-keyword">continue</span>;
            }

            <span class="hljs-keyword">try</span> {
                request.addMarker(<span class="hljs-string">"network-queue-take"</span>);

                <span class="hljs-comment">// If the request was cancelled already, do not perform the</span>
                <span class="hljs-comment">// network request.</span>
                <span class="hljs-keyword">if</span> (request.isCanceled()) {
                    request.finish(<span class="hljs-string">"network-discard-cancelled"</span>);
                    <span class="hljs-keyword">continue</span>;
                }

                <span class="hljs-comment">// Tag the request (if API >= 14)</span>
                <span class="hljs-keyword">if</span> (Build.VERSION.SDK_INT >= Build.VERSION_CODES.ICE_CREAM_SANDWICH) {
                    TrafficStats.setThreadStatsTag(request.getTrafficStatsTag());
                }

                <span class="hljs-comment">// Perform the network request.</span>
                <span class="hljs-comment">//网络请求的基本操作(核心操作),从网络中获取数据</span>
                NetworkResponse networkResponse = mNetwork.performRequest(request);
                request.addMarker(<span class="hljs-string">"network-http-complete"</span>);

                <span class="hljs-comment">// If the server returned 304 AND we delivered a response already,</span>
                <span class="hljs-comment">// we're done -- don't deliver a second identical response.</span>
                <span class="hljs-keyword">if</span> (networkResponse.notModified && request.hasHadResponseDelivered()) {
                    request.finish(<span class="hljs-string">"not-modified"</span>);
                    <span class="hljs-keyword">continue</span>;
                }

                <span class="hljs-comment">// Parse the response here on the worker thread.</span>
                Response<?> response = request.parseNetworkResponse(networkResponse);
                request.addMarker(<span class="hljs-string">"network-parse-complete"</span>);

                <span class="hljs-comment">// Write to cache if applicable.</span>
                <span class="hljs-comment">// TODO: Only update cache metadata instead of entire record for 304s.</span>
                <span class="hljs-comment">//判断是否需要缓存,如果需要则缓存。</span>
                <span class="hljs-keyword">if</span> (request.shouldCache() && response.cacheEntry != <span class="hljs-keyword">null</span>) {
                    mCache.put(request.getCacheKey(), response.cacheEntry);
                    request.addMarker(<span class="hljs-string">"network-cache-written"</span>);
                }

                <span class="hljs-comment">// Post the response back.</span>
                request.markDelivered();
                mDelivery.postResponse(request, response);
            } <span class="hljs-keyword">catch</span> (VolleyError volleyError) {
                parseAndDeliverNetworkError(request, volleyError);
            } <span class="hljs-keyword">catch</span> (Exception e) {
                VolleyLog.e(e, <span class="hljs-string">"Unhandled exception %s"</span>, e.toString());
                mDelivery.postError(request, <span class="hljs-keyword">new</span> VolleyError(e));
            }
        }
    }</code><ul style="display: block;" class="pre-numbering"><li>1</li><li>2</li><li>3</li><li>4</li><li>5</li><li>6</li><li>7</li><li>8</li><li>9</li><li>10</li><li>11</li><li>12</li><li>13</li><li>14</li><li>15</li><li>16</li><li>17</li><li>18</li><li>19</li><li>20</li><li>21</li><li>22</li><li>23</li><li>24</li><li>25</li><li>26</li><li>27</li><li>28</li><li>29</li><li>30</li><li>31</li><li>32</li><li>33</li><li>34</li><li>35</li><li>36</li><li>37</li><li>38</li><li>39</li><li>40</li><li>41</li><li>42</li><li>43</li><li>44</li><li>45</li><li>46</li><li>47</li><li>48</li><li>49</li><li>50</li><li>51</li><li>52</li><li>53</li><li>54</li><li>55</li><li>56</li><li>57</li><li>58</li><li>59</li><li>60</li><li>61</li><li>62</li><li>63</li><li>64</li><li>65</li><li>66</li><li>67</li></ul>
这两个线程处理类型基本相同,都是采用循环的方法,在队列中获取请求,有请求则执行相应的请求,没有则阻塞在下面两行代码中
<code class="hljs oxygene has-numbering"><span class="hljs-comment">//阻塞线程的执行</span>
<span class="hljs-comment">//缓存线程阻塞的地方</span>
<span class="hljs-keyword">final</span> Request request = mCacheQueue.<span class="hljs-keyword">take</span>();
<span class="hljs-comment">//网络请求阻塞的地方</span>
request = mQueue.<span class="hljs-keyword">take</span>();</code><ul style="display: block;" class="pre-numbering"><li>1</li><li>2</li><li>3</li><li>4</li><li>5</li></ul>
所以我们一般只需要根据不同的接口,实例化不同的请求 Request,往队列中添加 即可,它首先判断请求是否需要缓存,如果不需要,直接添加到网络请求的队列中,结束下面的操作,如果需要缓存,则把请求添加到缓存队列中,具体看代码。
<code class="hljs java has-numbering">    <span class="hljs-keyword">public</span> Request <span class="hljs-title">add</span>(Request request) {
        <span class="hljs-comment">// Tag the request as belonging to this queue and add it to the set of current requests.</span>
        request.setRequestQueue(<span class="hljs-keyword">this</span>);
        <span class="hljs-keyword">synchronized</span> (mCurrentRequests) {
            mCurrentRequests.add(request);
        }

        <span class="hljs-comment">// Process requests in the order they are added.</span>
        request.setSequence(getSequenceNumber());
        request.addMarker(<span class="hljs-string">"add-to-queue"</span>);

        <span class="hljs-comment">// If the request is uncacheable, skip the cache queue and go straight to the network.</span>
        <span class="hljs-comment">//判断请求是否需要缓存,如果不需要,直接添加到网络请求的队列中,结束下面的操作,如果需要缓存,则把请求添加到缓存队列中</span>
        <span class="hljs-keyword">if</span> (!request.shouldCache()) {
            mNetworkQueue.add(request);
            <span class="hljs-keyword">return</span> request;
        }

        <span class="hljs-comment">// Insert request into stage if there's already a request with the same cache key in flight.</span>
        <span class="hljs-keyword">synchronized</span> (mWaitingRequests) {
            String cacheKey = request.getCacheKey();
            <span class="hljs-keyword">if</span> (mWaitingRequests.containsKey(cacheKey)) {
                <span class="hljs-comment">// There is already a request in flight. Queue up.</span>
                Queue<Request> stagedRequests = mWaitingRequests.get(cacheKey);
                <span class="hljs-keyword">if</span> (stagedRequests == <span class="hljs-keyword">null</span>) {
                    stagedRequests = <span class="hljs-keyword">new</span> LinkedList<Request>();
                }

                stagedRequests.add(request);
                mWaitingRequests.put(cacheKey, stagedRequests);
                <span class="hljs-keyword">if</span> (VolleyLog.DEBUG) {
                    VolleyLog.v(<span class="hljs-string">"Request for cacheKey=%s is in flight, putting on hold."</span>, cacheKey);
                }
            } <span class="hljs-keyword">else</span> {
                <span class="hljs-comment">// Insert 'null' queue for this cacheKey, indicating there is now a request in</span>
                <span class="hljs-comment">// flight.</span>
                mWaitingRequests.put(cacheKey, <span class="hljs-keyword">null</span>);
                mCacheQueue.add(request);
            }
            <span class="hljs-keyword">return</span> request;
        }
    }</code><ul style="display: block;" class="pre-numbering"><li>1</li><li>2</li><li>3</li><li>4</li><li>5</li><li>6</li><li>7</li><li>8</li><li>9</li><li>10</li><li>11</li><li>12</li><li>13</li><li>14</li><li>15</li><li>16</li><li>17</li><li>18</li><li>19</li><li>20</li><li>21</li><li>22</li><li>23</li><li>24</li><li>25</li><li>26</li><li>27</li><li>28</li><li>29</li><li>30</li><li>31</li><li>32</li><li>33</li><li>34</li><li>35</li><li>36</li><li>37</li><li>38</li><li>39</li><li>40</li><li>41</li><li>42</li></ul>
所以如果需要缓存的话,一开始会从mCacheQueue.take()会得到执行,当不符合要求的时候,请求会添加到真正的网络请求队列中,以下是不符合要求的代码
<code class="hljs avrasm has-numbering">                //没有缓存
                if (entry == null) {
                    request<span class="hljs-preprocessor">.addMarker</span>(<span class="hljs-string">"cache-miss"</span>)<span class="hljs-comment">;</span>
                    Log<span class="hljs-preprocessor">.i</span>(<span class="hljs-string">"CacheDispatcher"</span>, <span class="hljs-string">"没有缓存数据:"</span> + request<span class="hljs-preprocessor">.getUrl</span>())<span class="hljs-comment">;</span>
                    mNetworkQueue<span class="hljs-preprocessor">.put</span>(request)<span class="hljs-comment">;</span>
                    continue<span class="hljs-comment">;</span>
                }

                // If it is completely expired, just send it to the network.
                //缓存已过期
                if (entry<span class="hljs-preprocessor">.isExpired</span>()) {
                    request<span class="hljs-preprocessor">.addMarker</span>(<span class="hljs-string">"cache-hit-expired"</span>)<span class="hljs-comment">;</span>
                    request<span class="hljs-preprocessor">.setCacheEntry</span>(entry)<span class="hljs-comment">;</span>
                    Log<span class="hljs-preprocessor">.i</span>(<span class="hljs-string">"CacheDispatcher"</span>, <span class="hljs-string">"缓存数据过期:"</span> + request<span class="hljs-preprocessor">.getUrl</span>())<span class="hljs-comment">;</span>
                    mNetworkQueue<span class="hljs-preprocessor">.put</span>(request)<span class="hljs-comment">;</span>
                    continue<span class="hljs-comment">;</span>
                }</code><ul style="display: block;" class="pre-numbering"><li>1</li><li>2</li><li>3</li><li>4</li><li>5</li><li>6</li><li>7</li><li>8</li><li>9</li><li>10</li><li>11</li><li>12</li><li>13</li><li>14</li><li>15</li><li>16</li><li>17</li></ul>
如果缓存不符合要求,网络线程终止阻塞得到执行;
我们一般习惯用法是在 Application 中全局初始化RequestQueue mRequestQueue,并启动它,让整个应用都能获取到。具体运用将会在下面用到。
三、Volley 实战 GET 请求和 POST 请求
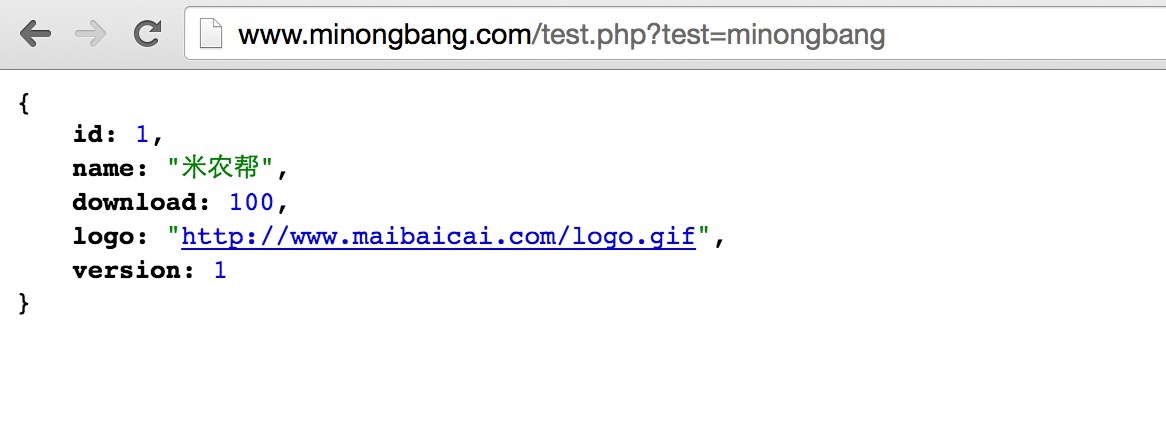
先来来看下测试的接口http://www.minongbang.com/test.php?test=minongbang
返回数据:

这里 get 请求和 post 请求都是用同一个接口来测试,所以先把返回的基本数据类型定义出来
<code class="hljs java has-numbering"><span class="hljs-javadoc">/**
 * Created by gyzhong on 15/3/3.
 */</span>
<span class="hljs-keyword">public</span> <span class="hljs-class"><span class="hljs-keyword">class</span> <span class="hljs-title">TestBean</span> {</span>
    <span class="hljs-annotation">@Expose</span>
    <span class="hljs-keyword">private</span> <span class="hljs-keyword">int</span> id ;
    <span class="hljs-annotation">@Expose</span>
    <span class="hljs-keyword">private</span> String name ;
    <span class="hljs-annotation">@Expose</span>
    <span class="hljs-keyword">private</span> <span class="hljs-keyword">int</span> download ;
    <span class="hljs-annotation">@Expose</span>
    <span class="hljs-keyword">private</span> <span class="hljs-keyword">int</span> version ;


    <span class="hljs-keyword">public</span> <span class="hljs-keyword">int</span> <span class="hljs-title">getId</span>() {
        <span class="hljs-keyword">return</span> id;
    }

    <span class="hljs-keyword">public</span> <span class="hljs-keyword">void</span> <span class="hljs-title">setId</span>(<span class="hljs-keyword">int</span> id) {
        <span class="hljs-keyword">this</span>.id = id;
    }

    <span class="hljs-keyword">public</span> String <span class="hljs-title">getName</span>() {
        <span class="hljs-keyword">return</span> name;
    }

    <span class="hljs-keyword">public</span> <span class="hljs-keyword">void</span> <span class="hljs-title">setName</span>(String name) {
        <span class="hljs-keyword">this</span>.name = name;
    }

    <span class="hljs-keyword">public</span> <span class="hljs-keyword">int</span> <span class="hljs-title">getDownload</span>() {
        <span class="hljs-keyword">return</span> download;
    }

    <span class="hljs-keyword">public</span> <span class="hljs-keyword">void</span> <span class="hljs-title">setDownload</span>(<span class="hljs-keyword">int</span> download) {
        <span class="hljs-keyword">this</span>.download = download;
    }

    <span class="hljs-keyword">public</span> <span class="hljs-keyword">int</span> <span class="hljs-title">getVersion</span>() {
        <span class="hljs-keyword">return</span> version;
    }

    <span class="hljs-keyword">public</span> <span class="hljs-keyword">void</span> <span class="hljs-title">setVersion</span>(<span class="hljs-keyword">int</span> version) {
        <span class="hljs-keyword">this</span>.version = version;
    }
}</code><ul style="display: block;" class="pre-numbering"><li>1</li><li>2</li><li>3</li><li>4</li><li>5</li><li>6</li><li>7</li><li>8</li><li>9</li><li>10</li><li>11</li><li>12</li><li>13</li><li>14</li><li>15</li><li>16</li><li>17</li><li>18</li><li>19</li><li>20</li><li>21</li><li>22</li><li>23</li><li>24</li><li>25</li><li>26</li><li>27</li><li>28</li><li>29</li><li>30</li><li>31</li><li>32</li><li>33</li><li>34</li><li>35</li><li>36</li><li>37</li><li>38</li><li>39</li><li>40</li><li>41</li><li>42</li><li>43</li><li>44</li><li>45</li><li>46</li></ul>
1、GET 请求
第一步:在 Application 中初始化RequestQueue,
<code class="hljs cs has-numbering">    <span class="hljs-comment">//初始化请求队列</span>
    <span class="hljs-keyword">private</span> <span class="hljs-keyword">void</span> <span class="hljs-title">initRequestQueue</span>(){
        <span class="hljs-comment">//初始化 volley</span>
        VolleyUtil.initialize(mContext);
    }</code><ul style="display: block;" class="pre-numbering"><li>1</li><li>2</li><li>3</li><li>4</li><li>5</li></ul>
<code class="hljs java has-numbering"><span class="hljs-javadoc">/**
 * Created by gyzhong on 15/3/1.
 */</span>
<span class="hljs-keyword">public</span> <span class="hljs-class"><span class="hljs-keyword">class</span> <span class="hljs-title">VolleyUtil</span> {</span>

    <span class="hljs-keyword">private</span> <span class="hljs-keyword">static</span> RequestQueue mRequestQueue ;

    <span class="hljs-keyword">public</span> <span class="hljs-keyword">static</span> <span class="hljs-keyword">void</span> <span class="hljs-title">initialize</span>(Context context){
        <span class="hljs-keyword">if</span> (mRequestQueue == <span class="hljs-keyword">null</span>){
            <span class="hljs-keyword">synchronized</span> (VolleyUtil.class){
                <span class="hljs-keyword">if</span> (mRequestQueue == <span class="hljs-keyword">null</span>){
                    mRequestQueue = Volley.newRequestQueue(context) ;
                }
            }
        }
        mRequestQueue.start();
    }

    <span class="hljs-keyword">public</span> <span class="hljs-keyword">static</span> RequestQueue <span class="hljs-title">getRequestQueue</span>(){
        <span class="hljs-keyword">if</span> (mRequestQueue == <span class="hljs-keyword">null</span>)
            <span class="hljs-keyword">throw</span> <span class="hljs-keyword">new</span> RuntimeException(<span class="hljs-string">"请先初始化mRequestQueue"</span>) ;
        <span class="hljs-keyword">return</span> mRequestQueue ;
    }
}</code><ul style="display: block;" class="pre-numbering"><li>1</li><li>2</li><li>3</li><li>4</li><li>5</li><li>6</li><li>7</li><li>8</li><li>9</li><li>10</li><li>11</li><li>12</li><li>13</li><li>14</li><li>15</li><li>16</li><li>17</li><li>18</li><li>19</li><li>20</li><li>21</li><li>22</li><li>23</li><li>24</li></ul>
第二步:定制 Request
先来分析接口所返回的数据,我们看到是一条 json 数据,虽然 Volley 中已经为我们定制好了JsonObjectRequest请求,但我们知道,在数据具体显示的时候,是需要把 json 数据转化为对象进行处理,所以这里我们可以定制通用的对象请求。如何定制呢?
先看StringRequest的实现代码
<code class="hljs axapta has-numbering"><span class="hljs-comment">//继承Request<String>,String 为请求解析之后的数据</span>
<span class="hljs-keyword">public</span> <span class="hljs-class"><span class="hljs-keyword">class</span> <span class="hljs-title">StringRequest</span> <span class="hljs-inheritance"><span class="hljs-keyword">extends</span></span> <span class="hljs-title">Request</span><<span class="hljs-title">String</span>> {</span>
    <span class="hljs-comment">//正确数据回调接口</span>
    <span class="hljs-keyword">private</span> <span class="hljs-keyword">final</span> Listener<String> mListener;
    <span class="hljs-keyword">public</span> StringRequest(<span class="hljs-keyword">int</span> method, String url, Listener<String> listener,
            ErrorListener errorListener) {
        <span class="hljs-keyword">super</span>(method, url, errorListener);
        mListener = listener;
    }
    <span class="hljs-keyword">public</span> StringRequest(String url, Listener<String> listener, ErrorListener errorListener) {
        <span class="hljs-keyword">this</span>(Method.GET, url, listener, errorListener);
    }

    <span class="hljs-comment">//回调解析之后的数据</span>
    @Override
    <span class="hljs-keyword">protected</span> <span class="hljs-keyword">void</span> deliverResponse(String response) {
        mListener.onResponse(response);
    }

    <span class="hljs-comment">//解析数据,把网络请求,或者中缓存中获取的数据,解析成 String</span>
    @Override
    <span class="hljs-keyword">protected</span> Response<String> parseNetworkResponse(NetworkResponse response) {
        String parsed;
        <span class="hljs-keyword">try</span> {
            parsed = <span class="hljs-keyword">new</span> String(response.data, HttpHeaderParser.parseCharset(response.headers));
        } <span class="hljs-keyword">catch</span> (UnsupportedEncodingException e) {
            parsed = <span class="hljs-keyword">new</span> String(response.data);
        }
        <span class="hljs-keyword">return</span> Response.success(parsed, HttpHeaderParser.parseCacheHeaders(response));
    }
}</code><ul style="display: block;" class="pre-numbering"><li>1</li><li>2</li><li>3</li><li>4</li><li>5</li><li>6</li><li>7</li><li>8</li><li>9</li><li>10</li><li>11</li><li>12</li><li>13</li><li>14</li><li>15</li><li>16</li><li>17</li><li>18</li><li>19</li><li>20</li><li>21</li><li>22</li><li>23</li><li>24</li><li>25</li><li>26</li><li>27</li><li>28</li><li>29</li><li>30</li><li>31</li></ul>
通过上面代码可知,StringRequest继承了 Request 并实现了两个抽象方法parseNetworkResponse()和 deliverResponse(),这两个方法很好理解,parseNetworkResponse()把获取到的数据解析成我们所定义的数据类型;deliverResponse()把所解析的数据通过回调接口回调给展示处。
为了简化回调接口,这里把错误回调Response.ErrorListener 和正确的数据回调Response.Listener合并成一个ResponseListener
<code class="hljs php has-numbering"><span class="hljs-comment">/**
 * Created by gyzhong on 15/3/1.
 * 简化回调接口
 */</span>
<span class="hljs-keyword">public</span> <span class="hljs-class"><span class="hljs-keyword">interface</span> <span class="hljs-title">ResponseListener</span><<span class="hljs-title">T</span>> <span class="hljs-keyword">extends</span> <span class="hljs-title">Response</span>.<span class="hljs-title">ErrorListener</span>,<span class="hljs-title">Response</span>.<span class="hljs-title">Listener</span><<span class="hljs-title">T</span>> {</span>
}</code><ul style="display: block;" class="pre-numbering"><li>1</li><li>2</li><li>3</li><li>4</li><li>5</li><li>6</li></ul>
根据 StringRequest,如法炮制
<code class="hljs scala has-numbering"><span class="hljs-javadoc">/**
 * Created by gyzhong on 15/3/1.
 */</span>
public <span class="hljs-class"><span class="hljs-keyword">class</span> <span class="hljs-title">GetObjectRequest</span><<span class="hljs-title">T</span>> <span class="hljs-keyword">extends</span> <span class="hljs-title">Request</span><<span class="hljs-title">T</span>> {</span>

    <span class="hljs-javadoc">/**
     * 正确数据的时候回掉用
     */</span>
    <span class="hljs-keyword">private</span> ResponseListener mListener ;
    <span class="hljs-comment">/*用来解析 json 用的*/</span>
    <span class="hljs-keyword">private</span> Gson mGson ;
    <span class="hljs-comment">/*在用 gson 解析 json 数据的时候,需要用到这个参数*/</span>
    <span class="hljs-keyword">private</span> Type mClazz ;

    public GetObjectRequest(String url,Type <span class="hljs-keyword">type</span>, ResponseListener listener) {
        <span class="hljs-keyword">super</span>(Method.GET, url, listener);
        <span class="hljs-keyword">this</span>.mListener = listener ;
        mGson = <span class="hljs-keyword">new</span> GsonBuilder().excludeFieldsWithoutExposeAnnotation().create() ;
        mClazz = <span class="hljs-keyword">type</span> ;
    }

    <span class="hljs-javadoc">/**
     * 这里开始解析数据
     * <span class="hljs-javadoctag">@param</span> response Response from the network
     * <span class="hljs-javadoctag">@return</span>
     */</span>
    <span class="hljs-annotation">@Override</span>
    <span class="hljs-keyword">protected</span> Response<T> parseNetworkResponse(NetworkResponse response) {
        <span class="hljs-keyword">try</span> {
            T result ;
            String jsonString =
                    <span class="hljs-keyword">new</span> String(response.data, HttpHeaderParser.parseCharset(response.headers));
            result = mGson.fromJson(jsonString,mClazz) ;
            <span class="hljs-keyword">return</span> Response.success(result,
                    HttpHeaderParser.parseCacheHeaders(response));
        } <span class="hljs-keyword">catch</span> (UnsupportedEncodingException e) {
            <span class="hljs-keyword">return</span> Response.error(<span class="hljs-keyword">new</span> ParseError(e));
        }
    }

    <span class="hljs-javadoc">/**
     * 回调正确的数据
     * <span class="hljs-javadoctag">@param</span> response The parsed response returned by
     */</span>
    <span class="hljs-annotation">@Override</span>
    <span class="hljs-keyword">protected</span> void deliverResponse(T response) {
        mListener.onResponse(response);
    }
}</code><ul style="display: block;" class="pre-numbering"><li>1</li><li>2</li><li>3</li><li>4</li><li>5</li><li>6</li><li>7</li><li>8</li><li>9</li><li>10</li><li>11</li><li>12</li><li>13</li><li>14</li><li>15</li><li>16</li><li>17</li><li>18</li><li>19</li><li>20</li><li>21</li><li>22</li><li>23</li><li>24</li><li>25</li><li>26</li><li>27</li><li>28</li><li>29</li><li>30</li><li>31</li><li>32</li><li>33</li><li>34</li><li>35</li><li>36</li><li>37</li><li>38</li><li>39</li><li>40</li><li>41</li><li>42</li><li>43</li><li>44</li><li>45</li><li>46</li><li>47</li><li>48</li><li>49</li></ul>
以上代码中在实例化 Gson 的时候用到的是mGson = new GsonBuilder().excludeFieldsWithoutExposeAnnotation(),主要是用于过滤字段用的.如果有疑问的同学可以参考我前面写的一篇文章Gson 过滤字段的几种方法
第三步:获取 request
<code class="hljs vbscript has-numbering"><span class="hljs-built_in">Request</span> <span class="hljs-built_in">request</span> = <span class="hljs-keyword">new</span> GetObjectRequest(url,<span class="hljs-keyword">new</span> TypeToken<TestBean>(){}.getType(),listener) ;</code><ul style="display: block;" class="pre-numbering"><li>1</li></ul>
1、url -> http://www.minongbang.com/test.php?test=minongbang
2、new TypeToken(){}.getType() ->为 gson 解析 json 数据所要的 type
3、listener -> 为我们定义的ResponseListener回调接口
第四步:添加请求到队列中
<code class="hljs avrasm has-numbering">VolleyUtil<span class="hljs-preprocessor">.getRequestQueue</span>()<span class="hljs-preprocessor">.add</span>(request) <span class="hljs-comment">;</span></code><ul style="display: block;" class="pre-numbering"><li>1</li></ul>
所以,此接口的代码即为
<code class="hljs java has-numbering">    <span class="hljs-javadoc">/**
     * Minong 测试数据get网络请求接口
     *<span class="hljs-javadoctag"> @param</span> value 要搜索的关键字
     *<span class="hljs-javadoctag"> @param</span> listener 回调接口,包含错误回调和正确的数据回调
     */</span>
    <span class="hljs-keyword">public</span> <span class="hljs-keyword">static</span> <span class="hljs-keyword">void</span> <span class="hljs-title">getObjectMiNongApi</span>(String value,ResponseListener listener){
        String url ;
        <span class="hljs-keyword">try</span> {
            url = Constant.MinongHost +<span class="hljs-string">"?test="</span>+ URLEncoder.encode(value, <span class="hljs-string">"utf-8"</span>) ;
        } <span class="hljs-keyword">catch</span> (UnsupportedEncodingException e) {
            e.printStackTrace();
            url = Constant.MinongHost +<span class="hljs-string">"?test="</span>+ URLEncoder.encode(value) ;
        }
        Request request = <span class="hljs-keyword">new</span> GetObjectRequest(url,<span class="hljs-keyword">new</span> TypeToken<TestBean>(){}.getType(),listener) ;
        VolleyUtil.getRequestQueue().add(request) ;
    }</code><ul style="display: block;" class="pre-numbering"><li>1</li><li>2</li><li>3</li><li>4</li><li>5</li><li>6</li><li>7</li><li>8</li><li>9</li><li>10</li><li>11</li><li>12</li><li>13</li><li>14</li><li>15</li><li>16</li></ul>
第五步:代码测试
<code class="hljs java has-numbering"><span class="hljs-keyword">public</span> <span class="hljs-class"><span class="hljs-keyword">class</span> <span class="hljs-title">GetRequestActivity</span> <span class="hljs-keyword">extends</span> <span class="hljs-title">ActionBarActivity</span> {</span>

    <span class="hljs-comment">/*数据显示的View*/</span>
    <span class="hljs-keyword">private</span> TextView mIdTxt,mNameTxt,mDownloadTxt,mLogoTxt,mVersionTxt ;
    <span class="hljs-comment">/*弹出等待对话框*/</span>
    <span class="hljs-keyword">private</span> ProgressDialog mDialog ;
    <span class="hljs-annotation">@Override</span>
    <span class="hljs-keyword">protected</span> <span class="hljs-keyword">void</span> <span class="hljs-title">onCreate</span>(Bundle savedInstanceState) {
        <span class="hljs-keyword">super</span>.onCreate(savedInstanceState);
        setContentView(R.layout.activity_get);
        mIdTxt = (TextView) findViewById(R.id.id_id) ;
        mNameTxt = (TextView) findViewById(R.id.id_name) ;
        mDownloadTxt = (TextView) findViewById(R.id.id_download) ;
        mLogoTxt = (TextView) findViewById(R.id.id_logo) ;
        mVersionTxt = (TextView) findViewById(R.id.id_version) ;
        mDialog = <span class="hljs-keyword">new</span> ProgressDialog(<span class="hljs-keyword">this</span>) ;
        mDialog.setMessage(<span class="hljs-string">"get请求中..."</span>);
        mDialog.show();
        <span class="hljs-comment">/*请求网络获取数据*/</span>
        MiNongApi.getObjectMiNongApi(<span class="hljs-string">"minongbang"</span>,<span class="hljs-keyword">new</span> ResponseListener<TestBean>() {
            <span class="hljs-annotation">@Override</span>
            <span class="hljs-keyword">public</span> <span class="hljs-keyword">void</span> <span class="hljs-title">onErrorResponse</span>(VolleyError error) {
                mDialog.dismiss();
            }

            <span class="hljs-annotation">@Override</span>
            <span class="hljs-keyword">public</span> <span class="hljs-keyword">void</span> <span class="hljs-title">onResponse</span>(TestBean response) {
                mDialog.dismiss();
                <span class="hljs-comment">/*显示数据*/</span>
                mIdTxt.setText(response.getId()+<span class="hljs-string">""</span>);
                mNameTxt.setText(response.getName());
                mDownloadTxt.setText(response.getDownload()+<span class="hljs-string">""</span>);
                mLogoTxt.setText(response.getLogo());
                mVersionTxt.setText(response.getVersion()+<span class="hljs-string">""</span>);
            }
        });
    }

}</code><ul style="display: block;" class="pre-numbering"><li>1</li><li>2</li><li>3</li><li>4</li><li>5</li><li>6</li><li>7</li><li>8</li><li>9</li><li>10</li><li>11</li><li>12</li><li>13</li><li>14</li><li>15</li><li>16</li><li>17</li><li>18</li><li>19</li><li>20</li><li>21</li><li>22</li><li>23</li><li>24</li><li>25</li><li>26</li><li>27</li><li>28</li><li>29</li><li>30</li><li>31</li><li>32</li><li>33</li><li>34</li><li>35</li><li>36</li><li>37</li><li>38</li><li>39</li></ul>
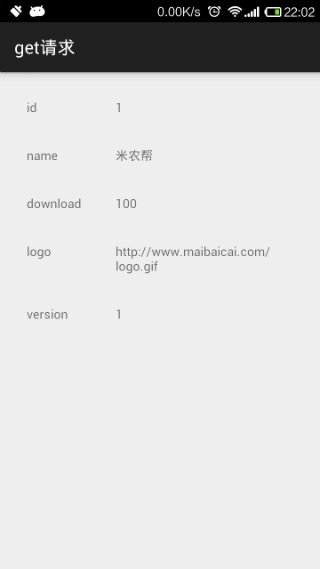
测试效果图如下:


可以看到和我们在浏览器中请求的数据一模一样!
2、POST请求
因为在讲 get 请求的时候花了很大篇幅讲原理,所以在 post 请求的时候,需要注意的东西相对来说比较少, 不管是 get 请求还是 post 请求,实现步骤是不会变。 这里post 请求,我们也是用http://www.minongbang.com/test.php?test=minongbang这个 api 来测试!
在前面我们已经讲到了,在同一个应用中共用同一个 RequestQueue,所以第一步可以省略,因为我们已经实现过了。这里直接到定制Request,我们在学习网络编程的时候就已经知道,用 GET方式请求,请求的数据是直接跟在 URL的后面用”?”去分开了,如果有多个数据则用”&”分开。而 POST则把数据直接封装在HTTP的包体中,两者各有优缺点,自己衡量着用。
因为 api 接口还是同一个,所以返回的数据类型肯定是一样的,在解析数据的时候就可以和 GetObjectRequest 复用,所以 PostObjectRequest 的实现可以通过继承GetObjectRequest的方式,也可以直接拷贝一份出来,为了更好的区分,我这里就直接拷贝一份,然后再稍加修改。
<code class="hljs scala has-numbering"><span class="hljs-javadoc">/**
 * Created by gyzhong on 15/3/1.
 */</span>
public <span class="hljs-class"><span class="hljs-keyword">class</span> <span class="hljs-title">PostObjectRequest</span><<span class="hljs-title">T</span>> <span class="hljs-keyword">extends</span> <span class="hljs-title">Request</span><<span class="hljs-title">T</span>> {</span>

    <span class="hljs-javadoc">/**
     * 正确数据的时候回掉用
     */</span>
    <span class="hljs-keyword">private</span> ResponseListener mListener ;
    <span class="hljs-comment">/*用来解析 json 用的*/</span>
    <span class="hljs-keyword">private</span> Gson mGson ;
    <span class="hljs-comment">/*在用 gson 解析 json 数据的时候,需要用到这个参数*/</span>
    <span class="hljs-keyword">private</span> Type mClazz ;
    <span class="hljs-comment">/*请求 数据通过参数的形式传入*/</span>
    <span class="hljs-keyword">private</span> Map<String,String> mParams;
    <span class="hljs-comment">//需要传入参数,并且请求方式不能再为 get,改为 post</span>
    public PostObjectRequest(String url, Map<String,String> params,Type <span class="hljs-keyword">type</span>, ResponseListener listener) {
        <span class="hljs-keyword">super</span>(Method.POST, url, listener);
        <span class="hljs-keyword">this</span>.mListener = listener ;
        mGson = <span class="hljs-keyword">new</span> GsonBuilder().excludeFieldsWithoutExposeAnnotation().create() ;
        mClazz = <span class="hljs-keyword">type</span> ;
        setShouldCache(<span class="hljs-keyword">false</span>);
        mParams = params ;
    }

    <span class="hljs-javadoc">/**
     * 这里开始解析数据
     * <span class="hljs-javadoctag">@param</span> response Response from the network
     * <span class="hljs-javadoctag">@return</span>
     */</span>
    <span class="hljs-annotation">@Override</span>
    <span class="hljs-keyword">protected</span> Response<T> parseNetworkResponse(NetworkResponse response) {
        <span class="hljs-keyword">try</span> {
            T result ;
            String jsonString =
                    <span class="hljs-keyword">new</span> String(response.data, HttpHeaderParser.parseCharset(response.headers));
            Log.v(<span class="hljs-string">"zgy"</span>, <span class="hljs-string">"====jsonString==="</span> + jsonString);
            result = mGson.fromJson(jsonString,mClazz) ;
            <span class="hljs-keyword">return</span> Response.success(result,
                    HttpHeaderParser.parseCacheHeaders(response));
        } <span class="hljs-keyword">catch</span> (UnsupportedEncodingException e) {
            <span class="hljs-keyword">return</span> Response.error(<span class="hljs-keyword">new</span> ParseError(e));
        }
    }

    <span class="hljs-javadoc">/**
     * 回调正确的数据
     * <span class="hljs-javadoctag">@param</span> response The parsed response returned by
     */</span>
    <span class="hljs-annotation">@Override</span>
    <span class="hljs-keyword">protected</span> void deliverResponse(T response) {
        mListener.onResponse(response);
    }

<span class="hljs-comment">//关键代码就在这里,在 Volley 的网络操作中,如果判断请求方式为 Post 则会通过此方法来获取 param,所以在这里返回我们需要的参数,</span>
    <span class="hljs-annotation">@Override</span>
    <span class="hljs-keyword">protected</span> Map<String, String> getParams() <span class="hljs-keyword">throws</span> AuthFailureError {
        <span class="hljs-keyword">return</span> mParams;
    }
}</code><ul style="display: block;" class="pre-numbering"><li>1</li><li>2</li><li>3</li><li>4</li><li>5</li><li>6</li><li>7</li><li>8</li><li>9</li><li>10</li><li>11</li><li>12</li><li>13</li><li>14</li><li>15</li><li>16</li><li>17</li><li>18</li><li>19</li><li>20</li><li>21</li><li>22</li><li>23</li><li>24</li><li>25</li><li>26</li><li>27</li><li>28</li><li>29</li><li>30</li><li>31</li><li>32</li><li>33</li><li>34</li><li>35</li><li>36</li><li>37</li><li>38</li><li>39</li><li>40</li><li>41</li><li>42</li><li>43</li><li>44</li><li>45</li><li>46</li><li>47</li><li>48</li><li>49</li><li>50</li><li>51</li><li>52</li><li>53</li><li>54</li><li>55</li><li>56</li><li>57</li><li>58</li><li>59</li><li>60</li></ul>
再来看看 api 接口怎么实现,
<code class="hljs vbscript has-numbering">    /*
    * *Minong 测试数据post网络请求接口
    * @param value 测试数据
    * @param listener 回调接口,包含错误回调和正确的数据回调
    */
    <span class="hljs-keyword">public</span> static void postObjectMinongApi(<span class="hljs-built_in">String</span> value,ResponseListener listener){
        Map<<span class="hljs-built_in">String</span>,<span class="hljs-built_in">String</span>> param = <span class="hljs-keyword">new</span> HashMap<<span class="hljs-built_in">String</span>,<span class="hljs-built_in">String</span>>() ;
        param.put(<span class="hljs-string">"test"</span>,value) ;
        <span class="hljs-built_in">Request</span> <span class="hljs-built_in">request</span> = <span class="hljs-keyword">new</span> PostObjectRequest(Constant.MinongHost,param,<span class="hljs-keyword">new</span> TypeToken<TestBean>(){}.getType(),listener);
        VolleyUtil.getRequestQueue().add(<span class="hljs-built_in">request</span>) ;
    }</code><ul style="display: block;" class="pre-numbering"><li>1</li><li>2</li><li>3</li><li>4</li><li>5</li><li>6</li><li>7</li><li>8</li><li>9</li><li>10</li><li>11</li></ul>
跟 get 请求还是很相似的,只是在实例化 Request 的时候多传入了一个param参数,并且 url 不能再是包含请求数据的 url。
接口 api测试代码
<code class="hljs java has-numbering"><span class="hljs-keyword">public</span> <span class="hljs-class"><span class="hljs-keyword">class</span> <span class="hljs-title">PostRequestActivity</span> <span class="hljs-keyword">extends</span> <span class="hljs-title">ActionBarActivity</span> {</span>

    <span class="hljs-comment">/*数据显示的View*/</span>
    <span class="hljs-keyword">private</span> TextView mIdTxt,mNameTxt,mDownloadTxt,mLogoTxt,mVersionTxt ;
    <span class="hljs-comment">/*弹出等待对话框*/</span>
    <span class="hljs-keyword">private</span> ProgressDialog mDialog ;
    <span class="hljs-annotation">@Override</span>
    <span class="hljs-keyword">protected</span> <span class="hljs-keyword">void</span> <span class="hljs-title">onCreate</span>(Bundle savedInstanceState) {
        <span class="hljs-keyword">super</span>.onCreate(savedInstanceState);
        setContentView(R.layout.activity_get);
        mIdTxt = (TextView) findViewById(R.id.id_id) ;
        mNameTxt = (TextView) findViewById(R.id.id_name) ;
        mDownloadTxt = (TextView) findViewById(R.id.id_download) ;
        mLogoTxt = (TextView) findViewById(R.id.id_logo) ;
        mVersionTxt = (TextView) findViewById(R.id.id_version) ;
        mDialog = <span class="hljs-keyword">new</span> ProgressDialog(<span class="hljs-keyword">this</span>) ;
        mDialog.setMessage(<span class="hljs-string">"post请求中..."</span>);
        mDialog.show();
        <span class="hljs-comment">/*请求网络获取数据*/</span>
        MiNongApi.postObjectMinongApi(<span class="hljs-string">"minongbang"</span>,<span class="hljs-keyword">new</span> ResponseListener<TestBean>() {
            <span class="hljs-annotation">@Override</span>
            <span class="hljs-keyword">public</span> <span class="hljs-keyword">void</span> <span class="hljs-title">onErrorResponse</span>(VolleyError error) {
                mDialog.dismiss();
            }

            <span class="hljs-annotation">@Override</span>
            <span class="hljs-keyword">public</span> <span class="hljs-keyword">void</span> <span class="hljs-title">onResponse</span>(TestBean response) {
                mDialog.dismiss();
                <span class="hljs-comment">/*显示数据*/</span>
                mIdTxt.setText(response.getId()+<span class="hljs-string">""</span>);
                mNameTxt.setText(response.getName());
                mDownloadTxt.setText(response.getDownload()+<span class="hljs-string">""</span>);
                mLogoTxt.setText(response.getLogo());
                mVersionTxt.setText(response.getVersion()+<span class="hljs-string">""</span>);
            }
        });
    }
}</code><ul style="display: block;" class="pre-numbering"><li>1</li><li>2</li><li>3</li><li>4</li><li>5</li><li>6</li><li>7</li><li>8</li><li>9</li><li>10</li><li>11</li><li>12</li><li>13</li><li>14</li><li>15</li><li>16</li><li>17</li><li>18</li><li>19</li><li>20</li><li>21</li><li>22</li><li>23</li><li>24</li><li>25</li><li>26</li><li>27</li><li>28</li><li>29</li><li>30</li><li>31</li><li>32</li><li>33</li><li>34</li><li>35</li><li>36</li><li>37</li><li>38</li></ul>
测试数据显示跟 get 请求完全相同;ok,以上就是 Volley GET请求和 POST请求的全部内容!接下来又到了总结的时候
四、总结
1、volley 适用于轻量高并发的网络请求,这里补充一个知识点,因为 Volley 请求网络的数据全部保存在内存中,所以 volley 不适合请求较大的数据,比如下载文件,下载大图片等。
2、volley 的使用遵循四个步骤
a、RequestQueue mRequestQueue = Vollay.newRequestQueue(Context context) ;
b、mRequestQueue.start()
c、Request mRequest = new ObjectRequst(…)
d、mRequestQueue.add(mRequest)
3、同一个程序中最好共用一个 RequestQueue。
4、可以根据接口的放回数据类型定制任意的 Request,volley 已经默认为我们实现了 StringRequest、JsonArrayRequest、JsonObjectRequest、ImageRequest四个请求类型。
最后如果觉得有用请继续关注我的 blog,我将会在下篇 blog 中讲解,Volley解析(二)之表单提交篇。
转载自:http://blog.csdn.net/jxxfzgy/article/details/44022435


 671
671


 被折叠的 条评论
为什么被折叠?


