


比较难掌握的UI控件
ProgressBar
- XML属性:
android:progressBarStyle:默认进度条样式
android:progressBarStyleHorizontal:水平样式
android:progress:初始化进度条的值
android:max:最大进度值
style=”?android:attr/progressBarStyleHorizontal”:设置风格为水平长形 - 重要方法:
getMax():返回这个进度条的范围的上限
getProgress():返回进度
getSecondaryProgress():返回次要进度
incrementProgressBy(int diff):在原来进度的基础上指定增加的进度,可传负数进去
setVisibility(int v):设置该进度条是否可视,传入参数,View.VISIBLE、View.INVISIBLE、View.GONE三种值
AlertDialog
AlertDialog可以在当前的界面弹出一个对话框,屏蔽掉其他控件的交互能力。
创建过程:
1、创建一个AlertDialog.Builder实例
AlertDialog.Builder dialog =new AlertDialog.Builder(Context context);
2、配置Builder的属性,如:
dialog.setTitle();
dialog.setMessage();
dialog.setCancelable();
还可以设置响应按钮点击事件的代码:
        builder.setPositiveButton("OK", new DialogInterface.OnClickListener() {
            @Override
            public void onClick(DialogInterface dialog, int which) {
                //设置按钮点击事件
            }
        });
        builder.setNegativeButton("Cancel", new DialogInterface.OnClickListener() {
            @Override
            public void onClick(DialogInterface dialog, int which) {

            }
        });
3、显示对话框
dialog.show();
- Android中其他类型的对话框的实现。
自定义控件
引入布局
1、创建自定义控件的布局,custom_view.xml
2、在需要的布局文件引入布局,< include layout=”@layout/custom_view”/>
创建自定义控件
1、自定义一个继承自LinerLayout的布局类CustomLayout, 重写LinearLayout的带两个参数的构造函数,通过LayoutInflater.from(context).inflate(@LayoutRes int resource, @Nullable ViewGroup root)构建出一个LayoutInflater对象实现自定义布局的动态加载,并响应布局内的控件点击响应。
public class CustomLayout extends LinearLayout {
    public CustomLayout(Context context, AttributeSet attrs) {
        super(context, attrs);
        LayoutInflater.from(context).inflate(R.layout.custom_view, this);
        ImageButton button_back=(ImageButton)findViewById(R.id.Button_1);
        ImageButton button_edit=(ImageButton)findViewById(R.id.Button_2);
        button_back.setOnClickListener(new OnClickListener() {
            @Override
            public void onClick(View v) {
                ((Activity)getContext()).finish();
            }
        });
        button_edit.setOnClickListener(new OnClickListener() {
            @Override
            public void onClick(View v) {
                Toast.makeText(getContext(),"yout click the editButton.",Toast.LENGTH_SHORT).show();
            }
        });
    }
}
2、在有需要的布局文件引入自定义控件,要指定完整类名,包名不能省略
<com.example.users.uilayouttest.CustomLayout
        android:layout_width="match_parent"
        android:layout_height="wrap_content">
    </com.example.users.uilayouttest.CustomLayout>
ListView
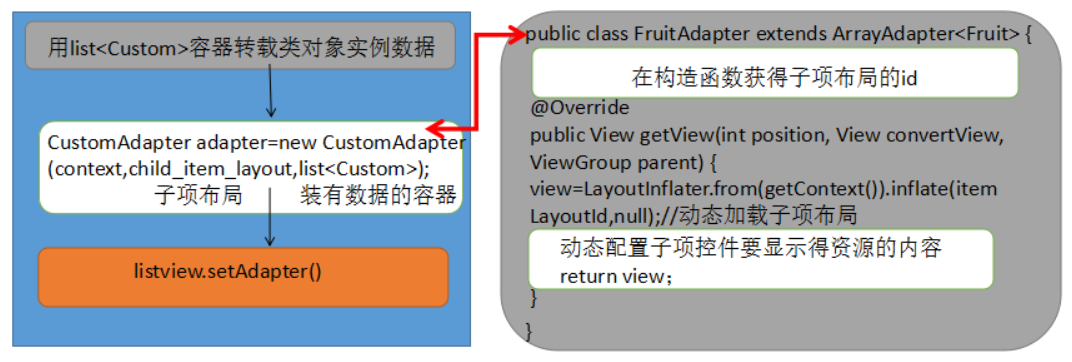
优化方法:
a)、每一个子项被滚动到屏幕内都会调用getView()方法,为了优化快速滚动的性能,不必每次都要加载一次布局,因为getView()方法中有一个convertView参数,用于将之前加载好的布局进行缓存以便重用。
b)、不必每次都要用findViewById()获取子项布局控件的实例,将子项布局中的控件各个字段封装成一个类,利用view.setTag()和view.getTag()来存储和获取子项布局中的控件。
为了响应listview的点击事件,需要在listview中注册监听器,回调onItemClick()方法,通过其中的position参数判断用户点击的是哪个子项。
msgListView.setOnItemClickListener(new AdapterView.OnItemClickListener() {
            @Override
            public void onItemClick(AdapterView<?> parent, View view, int position, long id) {
                String message = list.get(position).getMessage();
                Toast.makeText(MainActivity.this, message, Toast.LENGTH_SHORT).show();
            }
        });
优化后的自定义adaptor类
public class FruitAdapter extends ArrayAdapter<Fruit> {
    class ViewHolder {
        TextView fruit_name;
        ImageView fruit_image;
    }
    private int itemLayoutId;
    public FruitAdapter(Context context, int resource, List<Fruit> objects) {
        super(context, resource, objects);
        itemLayoutId=resource;
    }

    @Override
    public View getView(int position, View convertView, ViewGroup parent) {
        Fruit item=getItem(position);
        View view;
        ViewHolder viewHolder;
        if(convertView==null){
            view=LayoutInflater.from(getContext()).inflate(itemLayoutId,null);
            viewHolder=new ViewHolder();
            viewHolder.fruit_image=(ImageView)view.findViewById(R.id.Fruit_Image);
            viewHolder.fruit_name=(TextView)view.findViewById(R.id.Fruit_Name);
            view.setTag(viewHolder);
        }else {
            view=convertView;
            viewHolder=(ViewHolder)view.getTag();
        }
        viewHolder.fruit_name.setText(item.getName());
        viewHolder.fruit_image.setImageResource(item.getImageId());
//        View view= LayoutInflater.from(getContext()).inflate(itemLayoutId, null);
//        TextView nameId=(TextView)view.findViewById(R.id.Fruit_Name);
//        ImageView imageId=(ImageView)view.findViewById(R.id.Fruit_Image);
//        nameId.setText(item.getName());
//        imageId.setImageResource(item.getImageId());
        return view;
    }
}
四大基本布局
- LinearLayout
线性布局,关键属性:
- android:orientation=”vertical/horizontal” 用于指定排列方向
- android:layout_gravity=”?” 用于指定空间对齐方式,而android:layout指定的是文字在控件的对齐方式
- android:layout_weight=”?” 用于使用比例指定空间的大小
- RelativeLayout
相对布局,通过相对定位的方式让空间出现在布局的任何位置。
关键属性:
- 第一类:属性值为true或false
android:layout_centerHrizontal 水平居中
android:layout_centerVertical 垂直居中
android:layout_centerInparent 相对于父元素完全居中
android:layout_alignParentBottom 贴紧父元素的下边缘
android:layout_alignParentLeft 贴紧父元素的左边缘
android:layout_alignParentRight 贴紧父元素的右边缘
android:layout_alignParentTop 贴紧父元素的上边缘
android:layout_alignWithParentIfMissing 如果对应的兄弟元素找不到的话就以父元素做参照物 - 第二类:属性值必须为id的引用名“@id/id-name”
android:layout_below 在某元素的下方
android:layout_above 在某元素的的上方
android:layout_toLeftOf 在某元素的左边
android:layout_toRightOf 在某元素的右边
android:layout_alignTop 本元素的上边缘和某元素的的上边缘对齐
android:layout_alignLeft 本元素的左边缘和某元素的的左边缘对齐
android:layout_alignBottom 本元素的下边缘和某元素的的下边缘对齐
android:layout_alignRight 本元素的右边缘和某元素的的右边缘对齐 - 第三类:属性值为具体的像素值,如30dip,40px
android:layout_marginBottom 离某元素底边缘的距离
android:layout_marginLeft 离某元素左边缘的距离
android:layout_marginRight 离某元素右边缘的距离
android:layout_marginTop 离某元素上边缘的距离
- 第一类:属性值为true或false
- FrameLayout
所有的控件都摆放到布局的左上角,比较另类。 - TableLayout
使用表格的方式来排列控件,具体请看这里还有这里。
参考的资料和文献:
一网打尽Android UI 控件系列集锦:http://mobile.51cto.com/abased-405966.htm
RelativeLayout布局属性详解:http://blog.sina.com.cn/s/blog_6ca887bb01011wwr.html
Android ProgressBar 相关设置讲解:http://blog.csdn.net/brokge/article/details/8532662
Android多种进度条使用详解:http://www.codeceo.com/article/android-progressbars.html
多式样ProgressBar:http://www.apkbus.com/android-735-1-1.html


 1397
1397


 被折叠的 条评论
为什么被折叠?
被折叠的 条评论
为什么被折叠?
 到【灌水乐园】发言


