


Sentinel主要功能有:
1.监控(Monitoring): Redis Sentinel实时监控主服务器和从服务器运行状态。
2.提醒(Notification):当被监控的某个 Redis 服务器出现问题时, Redis Sentinel 可以向系统管理员发送通知, 也可以通过 API 向其他程序发送通知。
3.自动故障转移(Automatic failover): 当一个主服务器不能正常工作时, Sentinel 会开始一次自动故障迁移操作,它会将失效主服务器的其中一个从服务器升级为新的主服务器,并让失效主服务器的其他从服务器改为复制新的主服务器; 当客户端试图连接失效的主服务器时, 集群也会向客户端返回新主服务器的地址, 使得集群可以使用新主服务器代替失效服务器。
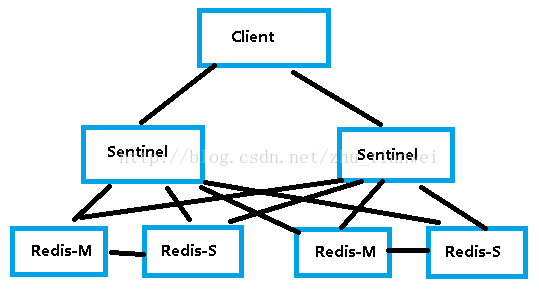
Redis Sentinel 是一个分布式系统, 你可以在一个架构中运行多个 Sentinel 进程(progress), 这些进程使用流言协议(gossip protocols)来接收关于主服务器是否下线的信息, 并使用投票协议(agreement protocols)来决定是否执行自动故障迁移, 以及选择哪个从服务器作为新的主服务器。通过Redis Sentinel可以实现Redis零手工干预并且短时间内进行M-S切换,减少业务影响时间。
官网:http://redis.io/topics/sentinel
中文文档:http://redis.readthedocs.org/en/latest/topic/sentinel.html
一、常用拓扑结构
在两个服务器中分别都部署Redis和Redis Sentinel。当Master中的Redis出现故障时(Redis进程终止、服务器僵死、服务器断电等),由Redis Sentinel将Master权限切换至Slave Redis中,并将只读模式更改为可读可写模式。应用程序通过Redis Sentinal确定当前Master Redis位置,进行重新连接。根据业务模式,可以制定两种拓扑结构:单M-S结构和双M-S结构。如果有足够多的服务器,可以配置多M-S结构。
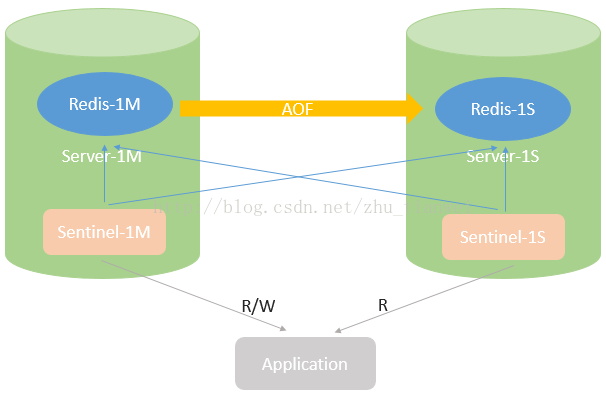
1.单M-S结构单M-S结构特点是在Master服务器中配置Master Redis(Redis-1M)和Master Sentinel(Sentinel-1M)。Slave服务器中配置Slave Redis(Redis-1S)和Slave Sentinel(Sentinel-1S)。其中 Master Redis可以提供读写服务,但是Slave Redis只能提供只读服务。因此,在业务压力比较大的情况下,可以选择将只读业务放在Slave Redis中进行。
双M-S结构的特点是在每台服务器上配置一个Master Redis,同时部署一个Slave Redis。由两个Redis Sentinel同时对4个Redis进行监控。两个Master Redis可以同时对应用程序提供读写服务,即便其中一个服务器出现故障,另一个服务器也可以同时运行两个Master Redis提供读写服务。缺点是两个Master redis之间无法实现数据共享,不适合存在大量用户数据关联的应用使用。
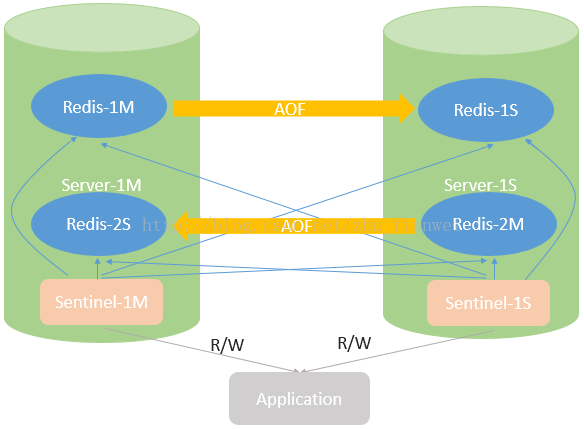
单M-S结构适用于不同用户数据存在关联,但应用可以实现读写分离的业务模式。Master主要提供写操作,Slave主要提供读操作,充分利用硬件资源。双(多)M-S结构适用于用户间不存在或者存在较少的数据关联的业务模式,读写效率是单M-S的两(多)倍,但要求故障时单台服务器能够承担两个Mater Redis的资源需求。
二、集群部署
单M-S结构和双M-S结构配置相差无几,下面以双M-S结构配置为例,并使用客户端工具实现分片。
1.架构图
环境如下:
192.168.100.90 6000 sentinel节点
192.168.110.71 6000 sentinel节点
shard_a:
192.168.100.90 6379 redis主
192.168.110.71 6379 redis备
shard_b:
192.168.110.71 6380 redis主
192.168.100.90 6380 redis备
2.部署
安装redis参考:http://blog.csdn.net/zhu_tianwei/article/details/44890579
1)配置redis主从
下面我们以shard_a为例,shard_b大家仿造一下:
redis主:
daemonize  yes
pidfile /home/slim/redis/data/redis_6379.pid
port 6379
bind 192.168.100.90
unixsocket /home/slim/redis/data/redis_6379.sock
timeout 300
loglevel verbose
logfile /home/slim/redis/logs/redis_6379.log
databases 16
dbfilename dump_6379.rdb
dir /home/slim/redis/data/
daemonize  yes
pidfile /home/slim/redis/data/redis_6379.pid
port 6379
bind 192.168.110.71
unixsocket /home/slim/redis/data/redis_6379.sock
timeout 300
loglevel verbose
logfile /home/slim/redis/logs/redis_6379.log
databases 16
dbfilename dump_6379.rdb
dir /home/slim/redis/data/
slaveof 192.168.100.90 6379复制一份默认配置文件,(两台机器相同操作)
cp /home/slim/redis-2.8.19/sentinel.conf ./conf/
mkdir tmp
vi conf/sentinel.conf
port 6000
daemonize yes
logfile  /home/slim/redis/logs/sentinel.log
dir /home/slim/redis/tmp
sentinel monitor shard_a 192.168.100.90 6379 1
sentinel down-after-milliseconds shard_a 30000
sentinel parallel-syncs shard_a 1
sentinel failover-timeout shard_a 180000

sentinel monitor shard_b 192.168.110.71 6380 1
sentinel down-after-milliseconds shard_b 30000
sentinel parallel-syncs shard_b 1
sentinel failover-timeout shard_b 1800001)启动两台机器主从redis服务
./bin/redis-server ./conf/redis-6379.conf;tail -f logs/redis_6379.log
./bin/redis-server ./conf/redis-6380.conf;tail -f logs/redis_6380.log
查看主从状态:
./bin/redis-cli -h 192.168.100.90 -p 6379 info Replication
# Replication
role:master
connected_slaves:1
slave0:ip=192.168.110.71,port=6379,state=online,offset=50748,lag=1
master_repl_offset:50748
repl_backlog_active:1
repl_backlog_size:1048576
repl_backlog_first_byte_offset:2
repl_backlog_histlen:50747
# Replication
role:master
connected_slaves:1
slave0:ip=192.168.100.90,port=6380,state=online,offset=58630,lag=0
master_repl_offset:58630
repl_backlog_active:1
repl_backlog_size:1048576
repl_backlog_first_byte_offset:2
repl_backlog_histlen:58629./bin/redis-sentinel ./conf/sentinel.conf;tail -f logs/sentinel.log
也可以使用如下命令启动:
./bin/redis-server --sentinel ./conf/sentinel.conf;tail -f logs/sentinel.log
启动日志:
[18871] 10 Apr 13:28:21.542 # Sentinel runid is 11b2696c7f6911bf9fa347c8e670571a63be0002
[18871] 10 Apr 13:28:21.542 # +monitor master shard_a 192.168.100.90 6379 quorum 1
[18871] 10 Apr 13:28:21.542 # +monitor master shard_b 192.168.110.71 6380 quorum 1
[18871] 10 Apr 13:28:21.543 * +slave slave 192.168.110.71:6379 192.168.110.71 6379 @ shard_a 192.168.100.90 6379
[18871] 10 Apr 13:28:21.545 * +slave slave 192.168.100.90:6380 192.168.100.90 6380 @ shard_b 192.168.110.71 6380
[18871] 10 Apr 13:28:49.589 * +sentinel sentinel 192.168.110.71:6000 192.168.110.71 6000 @ shard_b 192.168.110.71 6380
[18871] 10 Apr 13:28:49.624 * +sentinel sentinel 192.168.110.71:6000 192.168.110.71 6000 @ shard_a 192.168.100.90 6379./bin/redis-cli -h 192.168.110.71 -p 6000 info Sentinel
# Sentinel
sentinel_masters:2
sentinel_tilt:0
sentinel_running_scripts:0
sentinel_scripts_queue_length:0
master0:name=shard_b,status=ok,address=192.168.110.71:6380,slaves=1,sentinels=2
master1:name=shard_a,status=ok,address=192.168.100.90:6379,slaves=1,sentinels=2./bin/redis-cli -h 192.168.110.71 -p 6000 sentinel slaves shard_a
1)  1) "name"
    2) "192.168.110.71:6379"
    3) "ip"
    4) "192.168.110.71"
    5) "port"
    6) "6379"
    7) "runid"
    8) "629e59944e4da9af14477737da9e959751549177"
    9) "flags"
   10) "slave"
   11) "pending-commands"
   12) "0"
   13) "last-ping-sent"
   14) "0"
   15) "last-ok-ping-reply"
   16) "91"
   17) "last-ping-reply"
   18) "91"
   19) "down-after-milliseconds"
   20) "30000"
   21) "info-refresh"
   22) "8621"
   23) "role-reported"
   24) "slave"
   25) "role-reported-time"
   26) "560540"
   27) "master-link-down-time"
   28) "0"
   29) "master-link-status"
   30) "ok"
   31) "master-host"
   32) "192.168.100.90"
   33) "master-port"
   34) "6379"
   35) "slave-priority"
   36) "100"
   37) "slave-repl-offset"
38) "80652"需要注意的几个地方:
1)sentinel配置中sentinel monitor最后的数字1,意思是当有1个sentinel实例同时检测到redis异常时,才会有反应。
2)主从切换后,redis.conf、sentinel.conf内容都会改变,主要还想要原来的主从架构,要再修改配置文件;
3)master挂掉,sentinel已经选择了新的master,但是还没有将其改成master,但是已经将old master改成了slave。那么这时候如果重启old master,就会处于无主状态。所以一方面要等sentinel稳定后再启动old master,或者重新人工修改配置文件,重新启动集群。
4)sentinel只是在server端做主从切换,app端要自己开发,例如Jedis库的SentinelJedis,能够监控sentinel的状态。这样才能完整的实现高可用性的主从切换。
三、测试
1.我们将shard_a中的主服务器(192.168.100.90:6379)关闭掉,查看一下故障转移情况
ps -ef | grep redis
slim 18514 1 0 13:20 ? 00:00:00 ./bin/redis-server 192.168.100.90:6379
slim 18635 1 0 13:22 ? 00:00:00 ./bin/redis-server 192.168.100.90:6380
slim 18871 1 0 13:28 ? 00:00:00 ./bin/redis-sentinel *:6000
kill -2 18514
查看一下shard_a从服务器日志
[23815] 10 Apr 14:10:01.706 # Error condition on socket for SYNC: Connection refused
[23815] 10 Apr 14:10:02.181 * Discarding previously cached master state.
[23815] 10 Apr 14:10:02.181 * MASTER MODE enabled (user request)
[23815] 10 Apr 14:10:02.184 # CONFIG REWRITE executed with success.
[23815] 10 Apr 14:10:02.204 - Accepted 192.168.100.90:43533
[23815] 10 Apr 14:10:02.209 * 1 changes in 900 seconds. Saving...
[23815] 10 Apr 14:10:02.210 * Background saving started by pid 24343
[24343] 10 Apr 14:10:02.246 * DB saved on disk
[24343] 10 Apr 14:10:02.247 * RDB: 0 MB of memory used by copy-on-write
[23815] 10 Apr 14:10:02.310 * Background saving terminated with success
[23815] 10 Apr 14:10:02.712 - 4 clients connected (0 slaves), 835472 bytes in use
[24107] 10 Apr 14:10:01.930 # +sdown master shard_a 192.168.100.90 6379
[24107] 10 Apr 14:10:01.931 # +odown master shard_a 192.168.100.90 6379 #quorum 1/1
[24107] 10 Apr 14:10:01.931 # +new-epoch 1
[24107] 10 Apr 14:10:01.931 # +try-failover master shard_a 192.168.100.90 6379
[24107] 10 Apr 14:10:01.964 # +vote-for-leader 4383f49c49059f2a223e12c428f7eb446667ff61 1
[24107] 10 Apr 14:10:02.005 # 192.168.100.90:6000 voted for 4383f49c49059f2a223e12c428f7eb446667ff61 1
[24107] 10 Apr 14:10:02.018 # +elected-leader master shard_a 192.168.100.90 6379
[24107] 10 Apr 14:10:02.018 # +failover-state-select-slave master shard_a 192.168.100.90 6379
[24107] 10 Apr 14:10:02.080 # +selected-slave slave 192.168.110.71:6379 192.168.110.71 6379 @ shard_a 192.168.100.90 6379
[24107] 10 Apr 14:10:02.080 * +failover-state-send-slaveof-noone slave 192.168.110.71:6379 192.168.110.71 6379 @ shard_a 192.168.100.90 6379
[24107] 10 Apr 14:10:02.181 * +failover-state-wait-promotion slave 192.168.110.71:6379 192.168.110.71 6379 @ shard_a 192.168.100.90 6379
[24107] 10 Apr 14:10:03.048 # +promoted-slave slave 192.168.110.71:6379 192.168.110.71 6379 @ shard_a 192.168.100.90 6379
[24107] 10 Apr 14:10:03.049 # +failover-state-reconf-slaves master shard_a 192.168.100.90 6379
[24107] 10 Apr 14:10:03.087 # +failover-end master shard_a 192.168.100.90 6379
[24107] 10 Apr 14:10:03.087 # +switch-master shard_a 192.168.100.90 6379 192.168.110.71 6379
[24107] 10 Apr 14:10:03.087 * +slave slave 192.168.100.90:6379 192.168.100.90 6379 @ shard_a 192.168.110.71 6379
[24107] 10 Apr 14:10:33.090 # +sdown slave 192.168.100.90:6379 192.168.100.90 6379 @ shard_a 192.168.110.71 6379./bin/redis-cli -h 192.168.110.71 -p 6000 info Sentinel
# Sentinel
sentinel_masters:2
sentinel_tilt:0
sentinel_running_scripts:0
sentinel_scripts_queue_length:0
master0:name=shard_b,status=ok,address=192.168.110.71:6380,slaves=1,sentinels=2
master1:name=shard_a,status=ok,address=192.168.110.71:6379,slaves=1,sentinels=22.再启动192.168.100.90:6379 redis服务
可以看到启动日志,192.168.100.90:6379 变成从服务器。
[20225] 10 Apr 14:15:33.277 * SLAVE OF 192.168.110.71:6379 enabled (user request)
[20225] 10 Apr 14:15:33.278 # CONFIG REWRITE executed with success.
[20225] 10 Apr 14:15:33.278 - Accepted 192.168.100.90:59955
[20225] 10 Apr 14:15:34.249 * Connecting to MASTER 192.168.110.71:6379
[20225] 10 Apr 14:15:34.249 * MASTER <-> SLAVE sync started
[20225] 10 Apr 14:15:34.249 * Non blocking connect for SYNC fired the event.
[20225] 10 Apr 14:15:34.250 * Master replied to PING, replication can continue...
[20225] 10 Apr 14:15:34.250 * Partial resynchronization not possible (no cached master)
[20225] 10 Apr 14:15:34.251 * Full resync from master: 629e59944e4da9af14477737da9e959751549177:1
[20225] 10 Apr 14:15:34.358 * MASTER <-> SLAVE sync: receiving 18 bytes from master./bin/redis-cli -h 192.168.110.71 -p 6000 info Sentinel
# Sentinel
sentinel_masters:2
sentinel_tilt:0
sentinel_running_scripts:0
sentinel_scripts_queue_length:0
master0:name=shard_b,status=ok,address=192.168.110.71:6380,slaves=1,sentinels=2
master1:name=shard_a,status=ok,address=192.168.110.71:6379,slaves=1,sentinels=21.备份策略
Redis提供两种相对有效的备份方法:RDB和AOF。
RDB是在某个时间点将内存中的所有数据的快照保存到磁盘上,在数据恢复时,可以恢复备份时间以前的所有数据,但无法恢复备份时间点后面的数据。
AOF是以协议文本的方式,将所有对数据库进行过写入的命令(及其参数)记录到 AOF 文件,以此达到记录数据库状态的目的。优点是基本可以实现数据无丢失(缓存的数据有可能丢失),缺点是随着数据量的持续增加,AOF文件也会越来越大。
在保证数据安全的情况下,尽量避免因备份数据消耗过多的Redis资源,采用如下备份策略:
Master端:不采用任何备份机制
Slave端:采用AOF(严格数据要求时可同时开启RDB),每天将AOF文件备份至备份服务器。
为了最大限度减少Master端的资源干扰,将备份相关全部迁移至Slave端完成。同时这样也有缺点,当Master挂掉后,应用服务切换至Slave端,此时的Slave端的负载将会很大。目前Redis不支持RDB和AOF参数动态修改,需要重启Redis生效,希望能在新的版本中实现更高效的修改方式。
2.灾难恢复
当Master端Redis服务崩溃(包含主机断电、进程消失等),Redis sentinel将Slave切换为读写状态,提供生产服务。通过故障诊断修复Master,启动后会自动加入Sentinel并从Slave端完成数据同步,但不会切换。
当Master和Slave同时崩溃(如机房断电),启动服务器后,将备份服务器最新的AOF备份拷贝至Master端,启动Master。一切完成后再启动Slave。
五、sentinel配置说明
##sentinel实例之间的通讯端口
##redis-0
port 6000
##sentinel需要监控的master信息:<mastername> <masterIP> <masterPort> <quorum>
##sentinel建议部署大于3的奇数n,<quorum>建议为n/2+1,只有当至少<quorum>个sentinel实例提交"master失效"
##才会认为master为O_DWON("客观"失效)
sentinel monitor def_master 127.0.0.1 6379 2
sentinel auth-pass def_master 012_345^678-90
##master被当前sentinel实例认定为“失效”的间隔时间
##如果当前sentinel与master直接的通讯中,在指定时间内没有响应或者响应错误代码,那么
##当前sentinel就认为master失效(SDOWN,“主观”失效)
##<mastername> <millseconds>
##默认为30秒
sentinel down-after-milliseconds def_master 30000

##当前sentinel实例是否允许实施“failover”(故障转移)
##no表示当前sentinel为“观察者”(只参与"投票".不参与实施failover),
##全局中至少有一个为yes
sentinel can-failover def_master yes

##当新master产生时,同时进行“slaveof”到新master并进行“SYNC”的slave个数。
##默认为1,建议保持默认值
##在salve执行salveof与同步时,将会终止客户端请求。
##此值较大,意味着“集群”终止客户端请求的时间总和和较大。
##此值较小,意味着“集群”在故障转移期间,多个salve向客户端提供服务时仍然使用旧数据。
sentinel parallel-syncs def_master 1

##failover过期时间,当failover开始后,在此时间内仍然没有触发任何failover操作,
##当前sentinel将会认为此次failoer失败。
sentinel failover-timeout def_master 900000

##当failover时,可以指定一个“通知”脚本用来告知系统管理员,当前集群的情况。
##脚本被允许执行的最大时间为60秒,如果超时,脚本将会被终止(KILL)
##脚本执行的结果:
## 1	-> 稍后重试,最大重试次数为10;
## 2	-> 执行结束,无需重试
##sentinel notification-script mymaster /var/redis/notify.sh

##failover之后重配置客户端,执行脚本时会传递大量参数,请参考相关文档
# sentinel client-reconfig-script <master-name> <script-path>
针对Sentinel集群客户端如何使用,下一节我们以java客户端为例,讲解其使用。
参考文章:
1.Redis-sentinel功能介绍
2.Redis Sentinel部署使用
3.基于Redis Sentinel的Redis集群(主从&Sharding)高可用方案
4.基于keepalived、redis sentinel的高可用redis集群
5.redis sentinel 主从切换(failover)解决方案,详细配置
6.Redis高可用部署及监控
7.Redis Sentinel:集群Failover解决方案
8.Redis Sentinel机制与用法
https://segmentfault.com/a/1190000002680804


 463
463

 被折叠的 条评论
为什么被折叠?
被折叠的 条评论
为什么被折叠?
 到【灌水乐园】发言


