


1、去oracle官网下载安装包和安装指南。
安装包:http://www.oracle.com/technetwork/database/enterprise-edition/downloads/index.html
安装指南:http://www.oracle.com/technetwork/database/enterprise-edition/documentation/index.html
2、根据安装指南检查操作系统对应的硬件和软件要求(针对Oracle12c Release 2)
a) 硬件
计算机(虚拟机)硬件要求:
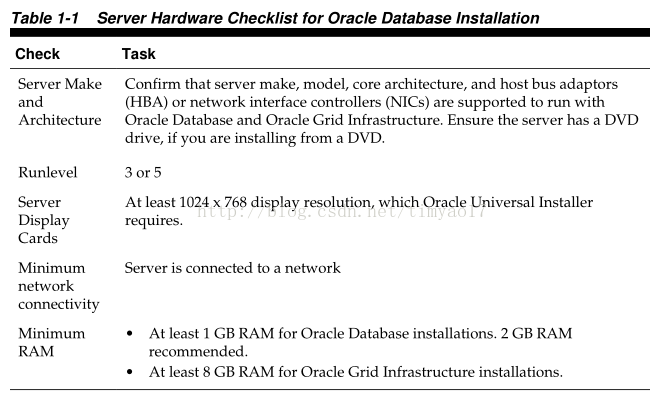
数据库需要硬件配置:
1) 查询系统cpu命令:grep "model name" /proc/cpuinfo
2) 查询系统内存命令:# grep MemTotal /proc/meminfo或者# free
3) 查询系统交换空间命令:# grep SwapTotal /proc/meminfo或者# free
4) 查询系统磁盘命令:# df -h /tmp和# df -h
b) 软件
可安装LINUX系统: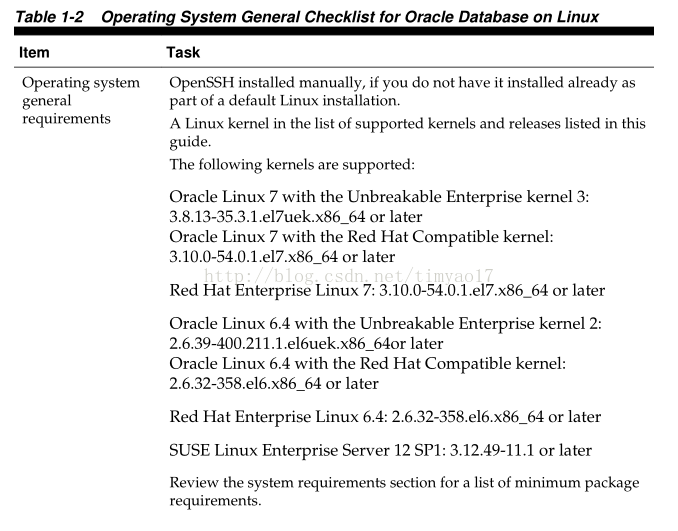
1) 查询系统位数命令:# uname -m
2) 查询系统版本命令:# more /etc/issue或# cat /proc/version或# cat /etc/redhat-release或# lsb_release -id
3) 查询系统内核版本:# uname -r。
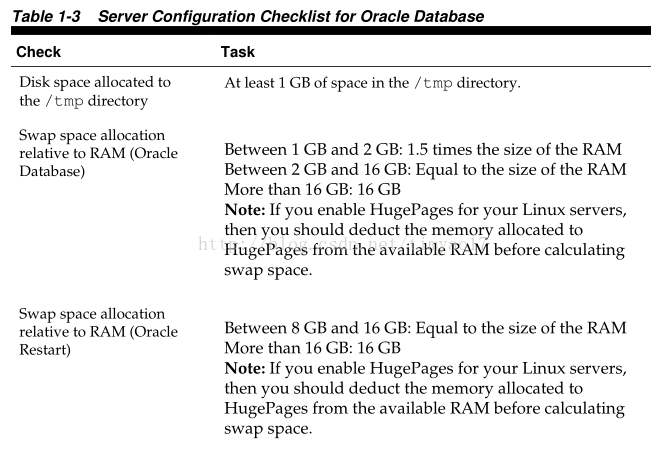
3、安装前系统配置准备
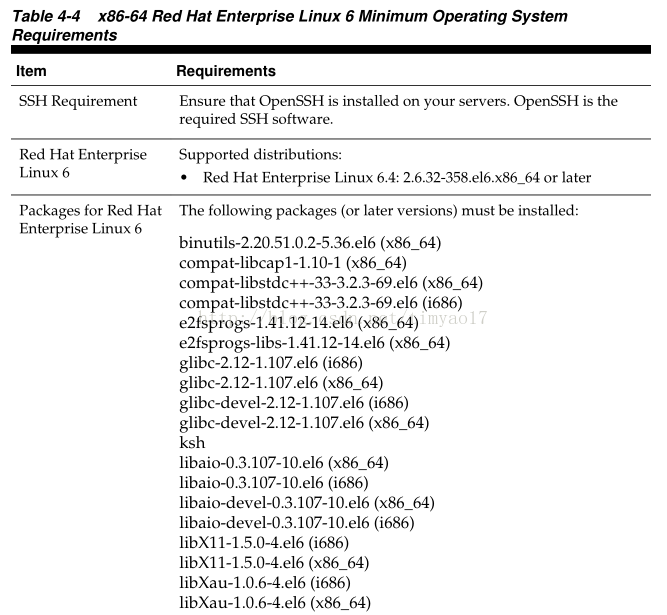

a) 查看安装指南找到对应的LINUX系统版本所需要的rpm
b) 使用命令【rpm -q 对应的rpm,多个用空格间隔】,检查缺少的rpm
c) 然后使用命令【yum install 对应缺少的rpm名称】安装
d)可能遇到问题
I、yum install 命令出现 "This system is not registered with RHN"
红帽中出现这个的原因是因为系统没有注册RHN,所以无法下载谷歌Chrome的软件包,解决方案可以使用从Redhat演化而来的免费Linux版本CentOS,通过CentOS的yum更新源来实现RHEL5的yum功能。
重装安装yum(也可解决-bash: yum: command not found问题)
第一步:(查看)rpm -qa |grep yum
第二步:(卸载)rpm -qa|grep yum|xargs rpm -e --nodeps
第三步:(下载 CentOS YUM包)
# wget http://centos.ustc.edu.cn/centos/5/os/i386/CentOS/yum-3.2.22-40.el5.centos.noarch.rpm
# wget http://centos.ustc.edu.cn/centos/5/os/i386/CentOS/yum-fastestmirror-1.1.16-21.el5.centos.noarch.rpm
# wget http://centos.ustc.edu.cn/centos/5/os/i386/CentOS/yum-metadata-parser-1.1.2-4.el5.i386.rpm
(如找不到,光盘或系统镜像iso文件中Server文件夹中有)
第四步:(安装) rpm -ivh yum-* 或 rpm -ivh *.rpm
第五步:下载CentOS配置文件
# cd /etc/yum.repos.d/
# wget http://docs.linuxtone.org/soft/lemp/CentOS-Base.repo
第六步:(生成缓存)yum clean metadata ==> yum makecache
注:
参考出处:http://blog.csdn.net/ludwig_/article/details/52683926
常用镜像网站
1.国外镜像源http://ftp.heanet.ie/pub/centos/5/os/i386/CentOS/
2.中国科技大学http://centos.ustc.edu.cn/centos/5/os/i386/CentOS/
3.网易开源镜像http://mirrors.163.com/centos/5/os/i386/CentOS/
4.搜狐开源镜像http://mirrors.ustc.edu.cn/centos/6/os/x86_64/Packages/
(如果yum没有对应rpm资源,可以在http://rpm.pbone.net/上查找下载相关的rpm资源,然后安装。)
II、rpm 软件包报错:
error: Failed dependencies:
rpmlib(FileDigests) <= 4.6.0-1 is needed by compat-libcap1-1.10-1.x86_64
rpmlib(PayloadIsXz) <= 5.2-1 is needed by compat-libcap1-1.10-1.x86_64
解决办法:
方法一:后面加 --force --nodeps 忽视依赖强制进行。
方法二:rpm版本太低,升级。
查看rpm版本:# rpm --version
切换root:# su root
升级rpm:# yum update rpm
error: unpacking of archive failed: cpio: Bad magic:
系统和软件版本不对应,可以升级系统或使用较低版本的软件。
III、配置oracle的yum数据源
下载oracle yum数据源,yum地址: http://public-yum.oracle.com/
Oracle Linux 7
# cd /etc/yum.repos.d
# wget http://public-yum.oracle.com/public-yum-ol7.repo
Oracle Linux 6
# cd /etc/yum.repos.d
# wget http://public-yum.oracle.com/public-yum-ol6.repo
Oracle Linux 5
# cd /etc/yum.repos.d
# wget http://public-yum.oracle.com/public-yum-el5.repo
Oracle Linux 4, Update 6 or Newer
# cd /etc/yum.repos.d
# mv Oracle-Base.repo Oracle-Base.repo.disabled
# wget http://public-yum.oracle.com/public-yum-el4.repo
Oracle VM 2
# cd /etc/yum.repos.d
# wget http://public-yum.oracle.com/public-yum-ovm2.repo
注:
源按照上面的方式下载下来之后,还需要手动修改文件中的配置参数,将里面对应项的enable=1 否则不能生效。
4、安装Oracle系统配置准备可查看安装指南
a)创建Oracle用户和用户组
创建oracle用户组:# groupadd oinstall创建oracle用户组:# groupadd dba
创建Oracle用户并加入新建的2个用户组:# useradd -g oinstall -G dba oracle
设置oracle用户的密码:# passwd oracle
查看oracle用户:# id oracle
b)创建安装目录
创建oracle安装目录:mkdir -p /usr/oracle更改oracle目录用户组:chown -R oracle:oinstall /usr/oracle
更改oracle目录权限:chmod -R 775 /usr/oracle
注:chown 775和777的区别
读取权限 r = 4,写入权限 w = 2,执行权限 x = 1,775 这三个数字代表拥有者,组用户,其他用户的权限。例如:7 拥有者有读取、写入、执行权限7 组用户有读取、写入、执行权限,5 其他用户有、读取、执行权限(4+1 = 5)。
所以777与775的区别是其他用户有写入权限,而775的没有。
c)配置系统内核参数
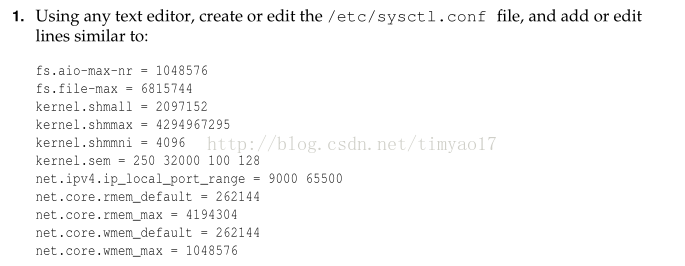
添加内容至末尾:
-----------------------------------------------------------------------------------------------------
#Controls the maximum number of shared memory segments,in page
kernel.shmall = 4294967296
#use of oracle
kernel.shmall = 2097152
kernel.shmmax = 2147483648
kernel.shmmni = 4096
kernel.sem =250 32000 100 128
net.ipv4.ip_local_port_range =9000 65500
net.core.rmem_default = 262144
net.core.rmem_max = 4194304
net.core.wmem_default = 262144
net.core.wmem_max = 1048576
fs.file-max=6815744
fs.aio-max-nr=1048576
-----------------------------------------------------------------------------------------------------
生效新配置的系统内核参数:# sysctl -p
d)设置oracle用户限制
在/etc/security/limits.conf中添加如下配置执行命令:# vi /etc/security/limits.conf
添加内容至末尾:
-----------------------------------------------------------------------------------------------------
#use for oracle
oracle soft nproc 2047
oracle hard nproc 16384
oracle soft nofile 1024
oracle hard nofile 65536
oracle soft stack 10240
oracle hard stack 10240
-----------------------------------------------------------------------------------------------------
e)编辑登录配置文件
在/etc/security/limits.conf中添加如下配置执行命令:# vi /etc/pam.d/login
在文本最后添加:
session required pam_limits.so或者session required /lib/security/pam_limits.so
使oracle用户限制生效。
f)Oracle用户环境变量配置
切换至oracle用户:# su – oracle打开主目录下的用户环境变量配置文件:# vi .bash_profile
添加内容至末尾:
-----------------------------------------------------------------------------------------------------
# use for oracle
export ORACLE_BASE=/usr/oracle
export ORACLE_HOME=$ORACLE_BASE/product
export ORACLE_SID=orcl
export PATH=$PATH:$HOME/bin:$ORACLE_HOME/bin
export LD_LIBRARY_PATH=$ORACLE_HOME/lib:/usr/lib
export LANG=en_US----防止Oracle安装界面乱码,先把语言环境改为英文
if [ $USER = "oracle" ];then
if [ $SHELL = "/bin/ksh" ];then
ulimit -p 16384
ulimit -n 65536
else
ulimit -u 16384 -n 65536
fi
fi
-----------------------------------------------------------------------------------------------------
使配置文件生效:# source .bash_profile
g)配置修改/etc/hosts文件
不修改安装时可能会出现PRVF-0002 : Could not retrieve local nodename的错误使用ifconfig命令和hostname命名查看本机ip和用户名
执行命令:# vi /etc/hosts
在末尾加上在/etc/hosts文件末尾加上本机ip以及本机用户名hostname
5、解压安装
a)解压下载的安装包
解压安装包至oracle用户目录:unzip FileName.zip -d /home/oracle/注:
.zip
解压:unzip FileName.zip
压缩:zip FileName.zip DirName
.rar
解压:rar -x FileName.rar
压缩:rar -a FileName.rar DirName
.gz
解压:gzip -d FileName.gz (或者 gunzip FileName.gz)
压缩:gzip FileName.gz DirName
.bz2
解压:bzip2 -d FileName.gz (或者 bunzip2 FileName.gz)
压缩:bzip2 FileName.gz DirName
.tar.gz或tgz
解压:tar -zxvf FileName.tar.gz
压缩:tar -zcvf FileName.tar.gz DirName
.tar
解压:tar -xvf FileName.tar
压缩:tar -cvf FileName.tar DirName
可用帮助命令查看shell --help或man shell
b)切换root:$ su root
c)执行可视化命令:# xhost +
d)切换oracle用户:# su - oracle
e)进入安装包执行安装命令:$ ./runInstaller
f)可能会遇到的问题:
I、X connection to localhost:10.0 broken 问题
切换root:# su root查看DISPLAY的值:# env |grep DISPLAY或者# echo$DISPLAY
修改DISPLAY的值:# export DISPLAY=本机ip:0.0
执行可视化命令:# xhost +
(如不行退出,直接用oracle用户登录)
II、xhost: unable to open display "192.168.194.207"
切换root:# su root启动vnc服务:# vncserver
修改DISPLAY的值:# export DISPLAY=localhost:1(:0.0是只在本机显示)
执行可视化命令:# xhost +


 288
288


 被折叠的 条评论
为什么被折叠?
被折叠的 条评论
为什么被折叠?
 到【灌水乐园】发言


