


*百度了很久一直没有找到关于相册获取条形码的Demo,真心是醉了,只能苦逼的去自己看
闲话不说直接搞起
分析:
*核心
1,通过路径转换成bitmp对象
2,再bitmap对象转换成二进制图片(二值化) == 将图像进行二值化处理,1 , 0 代表黑和白
3,最后解析二进制图片中的code(获取到有用的信息) ==对符号码矩阵按照编码规范进行解码,得到需要的信息
ZXing源码:
*ZXiong代码中是使用HybridBinarizer进行二值化计算的的,其实本质都是是使用Binarizer实现了
*看代码我们发现关系如下
*HybridBinarizer extends GlobalHistogramBinarizer
*GlobalHistogramBinarizer extends Binarizer
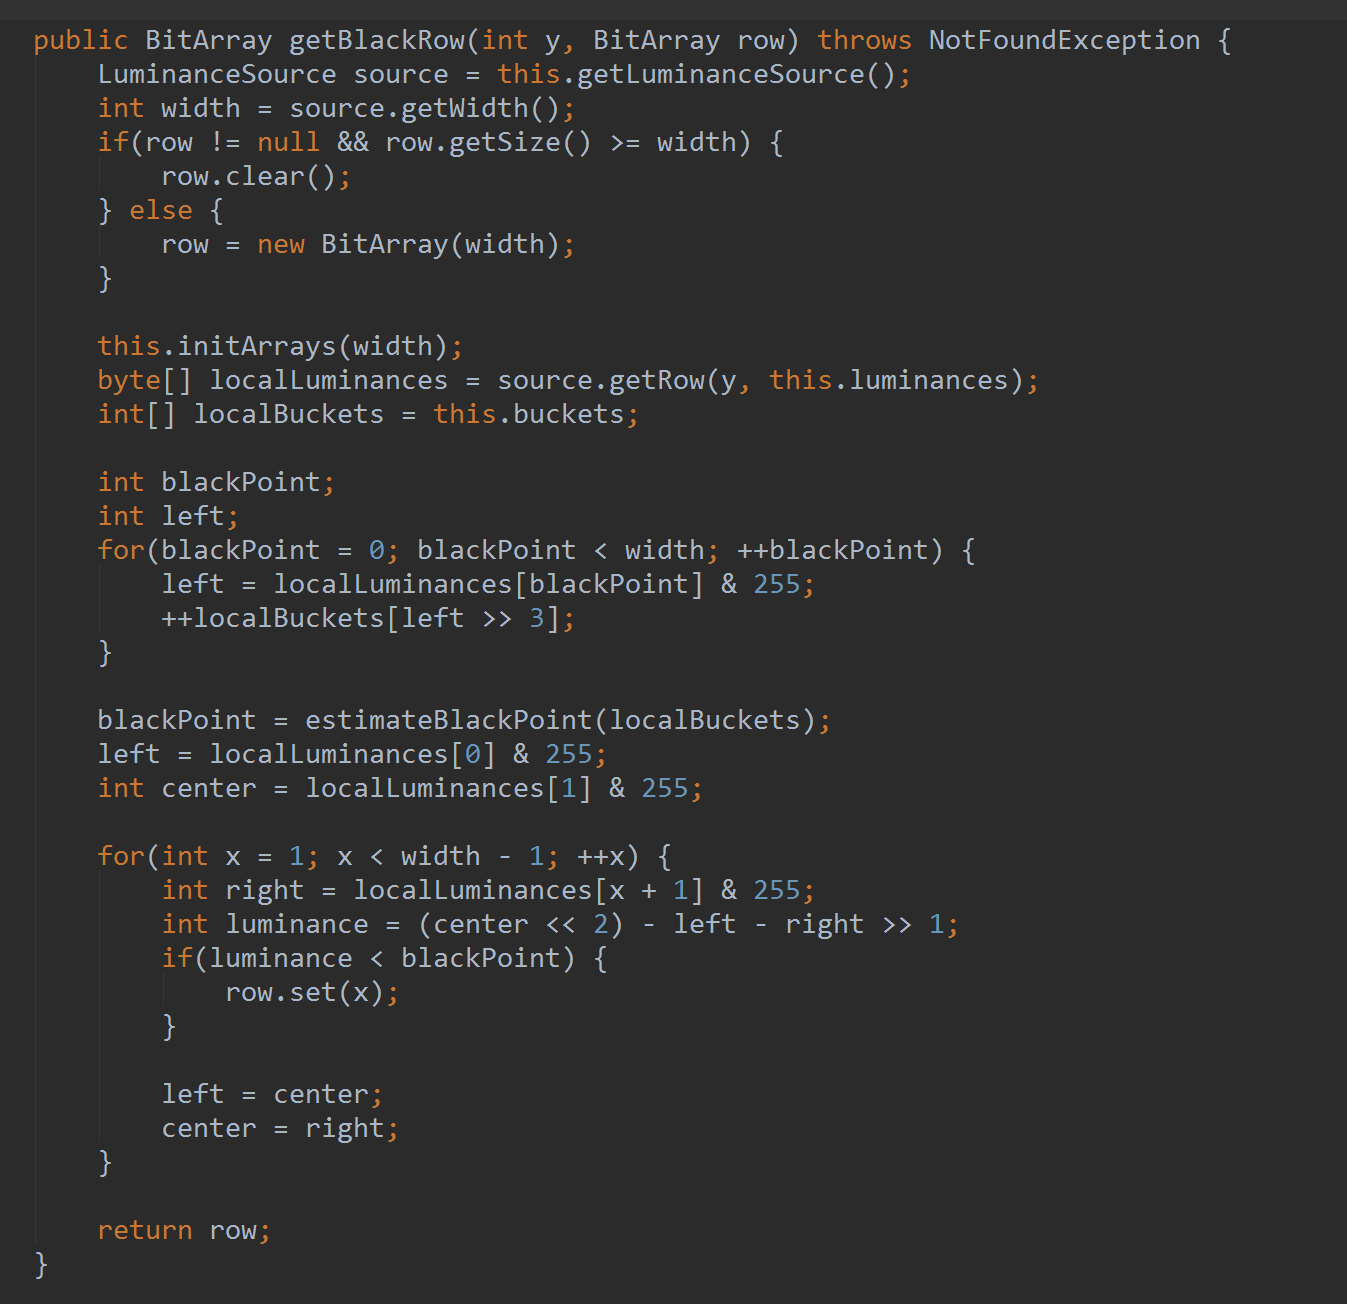
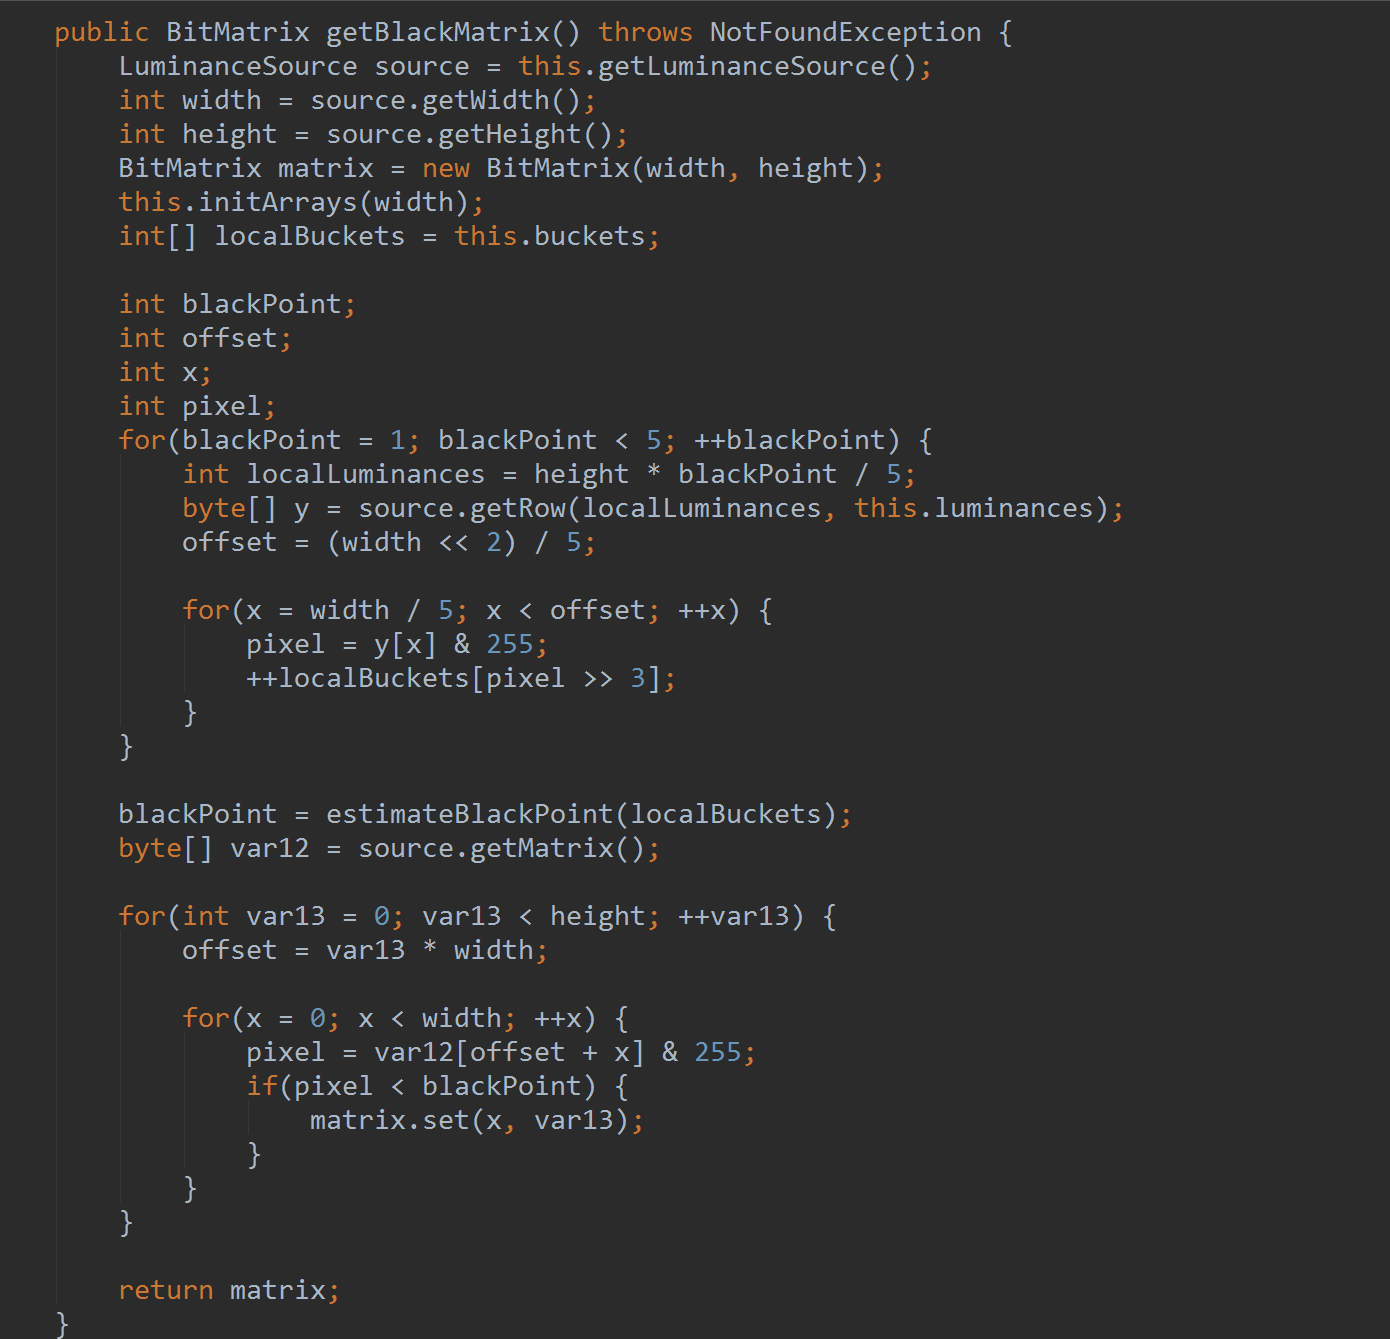
*在GlobalHistogramBinarizer中,有解析一二维码的方法
解析一维的方法如下图
解析二维的方法如下图
*好了我们看看如何实现
==============================华丽的分割线================================
第一种:
第一步:在ZXing的CaptureActivity中,点击跳转到系统的相册选择图片,其实这里因为android版本的不同返回的uri也会有三种情况,一共有两种方式(相册跳转和路径判断)解决,在刚刚开始的博客中,我两种都写了,看着看着就乱了,这里我决定优化下我的博客,就写一种解决方式==路径判断
按照我的步骤写,可以解决两个问题,问题一:android系统不同返回照片路径不同问题,问题二:解析图片图片OOM问题(进行了bitmap大小判断是否压缩),
    /**
     * 跳转到系统相册选图片
     * android版本不同,返回路径不同的情况(一共三种情况,无法解析图片直接奔溃bug),
     *content://com.android.providers.media.documents/document/image%3A137424  sony
     *file:///storage/emulated/0/Tencent/QQ_Images/3afe8750f0b4b8ce.jpg       xiaomi
     *content://media/external/images/media/13323                           smartOS
     *
     */
    private void switchSelectedImage() {
        Intent intent = new Intent();
        intent.setType("image/*");
        intent.setAction(Intent.ACTION_GET_CONTENT);
        startActivityForResult(intent, REQUESTCODE_IMAGE);
    }
第二步:根据请求码REQUESTCODE_IMAGE,在onActivityResult中进行结果的处理
      @Override
    protected void onActivityResult(int requestCode, int resultCode, Intent data) {
        super.onActivityResult(requestCode, resultCode, data);
        if (resultCode == RESULT_OK) {
            switch (requestCode) {
                case REQUESTCODE_IMAGE:
                 /**
                 *解决问题1,路径的判断,拿到真确的路径
                 */
                   String filePath = "$$";
                    int sdkInt = Build.VERSION.SDK_INT; //兼容4.4
                    Uri contentUri = data.getData();
                    if (sdkInt == 19 && DocumentsContract.isDocumentUri(CaptureActivity.this, contentUri)) {
                        String wholeID = DocumentsContract
                                .getDocumentId(contentUri);
                        String id = wholeID.split(":")[1];
                        String[] column = {MediaStore.Images.Media.DATA};
                        String sel = MediaStore.Images.Media._ID + "=?";
                        Cursor cursor = CaptureActivity.this.getContentResolver().query(
                                MediaStore.Images.Media.EXTERNAL_CONTENT_URI,
                                column, sel, new String[]{id}, null);
                        int columnIndex = cursor.getColumnIndex(column[0]);
                        if (cursor.moveToFirst()) {
                            filePath = cursor.getString(columnIndex);
                        }
                        cursor.close();
                    } else if (!TextUtils.isEmpty(contentUri.getAuthority())) {
                        Cursor cursor = getContentResolver().query(contentUri,
                                new String[]{MediaStore.Images.Media.DATA},
                                null, null, null);
                        if (null == cursor) {
                            showToast("图片没找到");
                        }
                        cursor.moveToFirst();
                        filePath = cursor.getString(cursor
                                .getColumnIndex(MediaStore.Images.Media.DATA));
                        cursor.close();
                    } else {
                        filePath = data.getData().getPath();
                    }
        /**到此为止路径判断完成,问题一解决*/
                    try {
                        Bitmap bitmap = BitmapFactory.decodeFile(filePath);
                        long bitmapsize = getBitmapsize(bitmap);
                        if (bitmapsize > Contants.SCAN_DEFAULT_SIZE) {  //大图
                        //解析并且请求数据
                        /**这里就解决了问题二*/
                            analysisAndRequestResultCode(filePath,false);
                        } else {  //小图  true表示要不用压缩
                            analysisAndRequestResultCode(filePath,true);
                        }
                    } catch (NotFoundException e) {
                        showToast("图片解析失败");
                        e.printStackTrace();
                    } catch (FileNotFoundException e) {
                        showToast("图片解析失败");
                        e.printStackTrace();
                    }
                    break;
                default:
                    LogUtil.d(TAG, "onActivityResult,error,default.");
                    break;
            }
        }
    }

    /**
     * 解析并且请求药品(这里请求药品是我的业务逻辑 可以忽略)
     *RGBLuminanceSourcee(filePath,  isAvailableSize); 这个方法是我在ZXing里面写的重载的方法
     * @param filePath
     * @throws FileNotFoundException
     * @throws NotFoundException
     */
    private void analysisAndRequestResultCode(String filePath,boolean isAvailableSize ) throws FileNotFoundException, NotFoundException {
        RGBLuminanceSourcee rgbLuminanceSource = new RGBLuminanceSourcee(filePath,  isAvailableSize);
        BinaryBitmap binaryBitmap = new BinaryBitmap(new HybridBinarizer(rgbLuminanceSource));//把可视图片转为二进制图片
        Result result = new MultiFormatReader().decode(binaryBitmap);//解析图片中的code
        handleDecode(result);//根据code,执行网络请求
    }


    /**
     * 获取bitmap的size
     *
     * @param bitmap
     * @return
     */
    public long getBitmapsize(Bitmap bitmap) {

        if (Build.VERSION.SDK_INT >= Build.VERSION_CODES.HONEYCOMB_MR1) {
            return bitmap.getByteCount();
        }
        // Pre HC-MR1
        return bitmap.getRowBytes() * bitmap.getHeight();

    }
相册中选择图片二维码和条形码解析的核心代码(理解看看就可以了,可以忽略)
//根据相册的path,返回一个bitmap对象
    scanBitmap = BitmapFactory.decodeFile(path, options);

        //bitmap对象转换成二进制图片 (说明:输入bitmap获得解析结果source二进制的byte图片RGBLuminanceSource这个类继承了LuminanceSource,)
        RGBLuminanceSource source = new RGBLuminanceSource(scanBitmap);


        //二进制图片转换成bitmap对象(说明:创建HybridBinarizer对象,需要传入LuminanceSource,所以传入source(二进制的图片),并且通过BinaryBitmap转换成bitmap对象)
        BinaryBitmap bitmap1 = new BinaryBitmap(new HybridBinarizer(source));
        //CodaBarReader codaBarReader= new CodaBarReader();    //codaBarReader  二维码
        try {
            //MultiFormatReader是读取图像的类(在core包)
            return  new MultiFormatReader().decode(bitmap1,hints);      //识别条形码,和二维码(说明:获取到我们需要的信息)

        } catch (NotFoundException e) {
            e.printStackTrace();
        }
这个是我在ZXing包中的RGBLuminanceSourcee类,对loadBitmap()写的重载方法,在这里,更具传进来的boolean值=isOkSize;进行判断是否进行图片压缩,true表示小图不压缩,false表示大图要压缩,
具体的压缩临界值我是更具自己打印出来的size来写的
    /**扫描选择相册图片,判断是否压缩的临界值*/
    public static final Long SCAN_DEFAULT_SIZE=(long)4000000;
    /**4000000,我发现的问题手机3000000就挂了,所以给了这个值具体的临界值我也不是很清楚,你可能会问为什么要给个临界值盘判断是否压缩,那是因为有些小图压缩了不能解析识别,所以我进行了判断,大图压缩解析,小图直接解析*/
private static Bitmap loadBitmap(String path, boolean isOkSize) throws FileNotFoundException {
Bitmap bitmap = null;
if (isOkSize) { //小图,直接调用功能系统的解析返回
bitmap = BitmapFactory.decodeFile(path);
} else { //大图 先压缩在返回
bitmap = BitmapUtil.compress(path);
}
//ZXing源码
if (bitmap == null) {
throw new FileNotFoundException("Couldn't open " + path);
}
return bitmap;
}封装的压缩px(存寸)的方法
public static Bitmap compress(String srcPath) {
        BitmapFactory.Options newOpts = new BitmapFactory.Options();
        //开始读入图片,此时把options.inJustDecodeBounds 设回true了
        newOpts.inJustDecodeBounds = true;
        Bitmap bitmap = BitmapFactory.decodeFile(srcPath, newOpts);//此时返回bm为空

        newOpts.inJustDecodeBounds = false;
        int w = newOpts.outWidth;
        int h = newOpts.outHeight;
        //现在主流手机比较多是800*480分辨率,所以高和宽我们设置为
        float hh = 800f;//这里设置高度为800f           这里我写死了尺寸
        float ww = 480f;//这里设置宽度为480f           这里我写死了尺寸
        //缩放比。由于是固定比例缩放,只用高或者宽其中一个数据进行计算即可
        int be = 1;//be=1表示不缩放
        if (w > h && w > ww) {//如果宽度大的话根据宽度固定大小缩放
            be = (int) (newOpts.outWidth / ww);
        } else if (w < h && h > hh) {//如果高度高的话根据宽度固定大小缩放
            be = (int) (newOpts.outHeight / hh);
        }
        if (be <= 0)
            be = 1;
        newOpts.inSampleSize = be;//设置缩放比例
        //重新读入图片,注意此时已经把options.inJustDecodeBounds 设回false了
        bitmap = BitmapFactory.decodeFile(srcPath, newOpts);

        return bitmap;//压缩好比例大小后再进行质量压缩
        //return bitmap;
    }
总结:
**其实实现最为核心的就是这几行代码
scanBitmap = BitmapFactory.decodeFile(path, options);
        //输入bitmap解析出结果
        RGBLuminanceSource source = new RGBLuminanceSource(scanBitmap);
        BinaryBitmap bitmap1 = new BinaryBitmap(new HybridBinarizer(source));
        //CodaBarReader codaBarReader= new CodaBarReader();    //codaBarReader  二维码
        try {
            return  new MultiFormatReader().decode(bitmap1,hints);      //识别条形码

        } catch (NotFoundException e) {
            e.printStackTrace();
        }
        return null;
还有就是打开相册返回的路径问题,系统版本不同一共有三种情况
解决方法1;直接使用这样的方式打开相册
    Intent intent = new Intent(Intent.ACTION_PICK,android.provider.MediaStore.Images.Media.EXTERNAL_CONTENT_URI);
    intent.setDataAndType(MediaStore.Images.Media.EXTERNAL_CONTENT_URI,"image/*");
    activity.startActivityForResult(intent, START_ALBUM_CODE);
解决方法2;在onActivityResult中对路径进行三次判断获取到正确的路径,在转车bitmap对象或者直接把path传递给RGBLuminanceSourcee解析类,进行解析
        /**对路径进行的判断(因为我们不知道是三种情况中的那一种)*/
                    String filePath = "$$";
                    Uri contentUri = data.getData();
                    if (DocumentsContract.isDocumentUri(CaptureActivity.this, contentUri)) {
                        String wholeID = DocumentsContract
                                .getDocumentId(contentUri);
                        String id = wholeID.split(":")[1];
                        String[] column = {MediaStore.Images.Media.DATA};
                        String sel = MediaStore.Images.Media._ID + "=?";
                        Cursor cursor = CaptureActivity.this.getContentResolver().query(
                                MediaStore.Images.Media.EXTERNAL_CONTENT_URI,
                                column, sel, new String[]{id}, null);
                        int columnIndex = cursor.getColumnIndex(column[0]);
                        if (cursor.moveToFirst()) {
                            filePath = cursor.getString(columnIndex);
                        }
                        cursor.close();
                    } else {
                        if (!TextUtils.isEmpty(contentUri.getAuthority())) {
                            Cursor cursor = getContentResolver().query(contentUri,
                                    new String[]{MediaStore.Images.Media.DATA},
                                    null, null, null);
                            if (null == cursor) {
                                showToast("图片没找到");
                            }
                            cursor.moveToFirst();
                            filePath = cursor.getString(cursor
                                    .getColumnIndex(MediaStore.Images.Media.DATA));
                            cursor.close();
                        } else {
                            filePath = data.getData().getPath();
                        }
                    }
图片压缩
public static Bitmap compress(String srcPath) {
        BitmapFactory.Options newOpts = new BitmapFactory.Options();
        //开始读入图片,此时把options.inJustDecodeBounds 设回true了
        newOpts.inJustDecodeBounds = true;
        Bitmap bitmap = BitmapFactory.decodeFile(srcPath, newOpts);//此时返回bm为空

        newOpts.inJustDecodeBounds = false;
        int w = newOpts.outWidth;
        int h = newOpts.outHeight;
        //现在主流手机比较多是800*480分辨率,所以高和宽我们设置为
        float hh = 800f;//这里设置高度为800f
        float ww = 480f;//这里设置宽度为480f
        //缩放比。由于是固定比例缩放,只用高或者宽其中一个数据进行计算即可
        int be = 1;//be=1表示不缩放
        if (w > h && w > ww) {//如果宽度大的话根据宽度固定大小缩放
            be = (int) (newOpts.outWidth / ww);
        } else if (w < h && h > hh) {//如果高度高的话根据宽度固定大小缩放
            be = (int) (newOpts.outHeight / hh);
        }
        if (be <= 0)
            be = 1;
        newOpts.inSampleSize = be;//设置缩放比例
        //重新读入图片,注意此时已经把options.inJustDecodeBounds 设回false了
        bitmap = BitmapFactory.decodeFile(srcPath, newOpts);

        return bitmap;//压缩好比例大小后再进行质量压缩
        //return bitmap;
    }
在华丽的分割线上和下,都可以实现,我给的Demo就是第二种,其实第一种更为的简单利索,直接在CaptureActivity,Copy我的代码,进行相对应的改动即可
第二种的Demo链接:http://download.csdn.net/download/tongzhengtong/9561178
—————以上的代码就能满足相册获取二维码,条形码,和解决上述问题,下面的补充知识方法二,—————可以忽略不看,因为我也没有实践过,看网上的博客分享下而已————–
========================华丽的分割线=============================
看了别人的一波博客感觉也很好,但是只能相册选择二维码,想要实现二维码和条形码都都能识别,那么只需要添加一行
new MultiFormatReader().decode(bitmap1,hints); 代码即可,最后面我会贴上修改后的Demo
*可以参考他的博客http://blog.csdn.net/aaawqqq/article/details/24880209
我在他的基础上修改了,实现识别条形码和二维码
第二种:
实现思路
*在Zxing扫描识别和图片识别的解析对象是相同的
1,获取相册的照片
2,解析二维码图片
3,返回结果
第一步:获取相册照片
    /**
     * 获取带二维码的相片进行扫描
     */
    Intent intent = new Intent(Intent.ACTION_PICK,android.provider.MediaStore.Images.Media.EXTERNAL_CONTENT_URI);
    intent.setDataAndType(MediaStore.Images.Media.EXTERNAL_CONTENT_URI,"image/*");
    this.startActivityForResult(intent, START_ALBUM_CODE);
第二步:选择了照片后,然后返回的数据在onActivityResult方法中获取
    /**
    * 对相册获取的结果进行分析
     */
    @Override
    protected void onActivityResult(int requestCode, int resultCode, Intent data) {
        // TODO Auto-generated method stub

        if (resultCode == RESULT_OK) {   //成功且有数据
            switch (requestCode) {
            case 1://不同手机返回的照片路径可能不同
                try {   //情况一,不是绝对路径的时候,游标获取路径
                    Uri uri = data.getData();
                    if (!TextUtils.isEmpty(uri.getAuthority())) {
                        Cursor cursor = getContentResolver().query(uri,
                                new String[] { MediaStore.Images.Media.DATA },
                                null, null, null);
                        if (null == cursor) {
                            Toast.makeText(this, "图片没找到", Toast.LENGTH_SHORT)
                                    .show();
                            return;
                        }
                        cursor.moveToFirst();
                        photo_path = cursor.getString(cursor
                                .getColumnIndex(MediaStore.Images.Media.DATA));
                        cursor.close();
                    } else {//情况2,绝对路径直接获取
                        photo_path = data.getData().getPath();
                    }
                    Log.e("main","###############"+photo_path);
                    mProgress = new ProgressDialog(CaptureActivity.this);
                    //一些progressbar
                    mProgress.setMessage("正在扫描...");
                    mProgress.setCancelable(false);
                    mProgress.show();

                    /**重点,开启线程,解析图片返回code*/

                    new Thread(new Runnable() {
                        @Override
                            /**重点方法下面详细分析其实和我上面分析的差不多*/
                            Result result = scanningImage(photo_path);

                            if (result != null) {
                                Message m = mHandler.obtainMessage();
                                m.what = 1;
                                m.obj = result.getText();

                                mHandler.sendMessage(m);
                            } else {
                                Message m = mHandler.obtainMessage();
                                m.what = 2;
                                m.obj = "Scan failed!";
                                mHandler.sendMessage(m);
                            }

                        }
                    }).start();
                } catch (Exception e) {
                    Toast.makeText(CaptureActivity.this, "解析错误!",
                            Toast.LENGTH_LONG).show();
                }

                break;

            default:
                break;
            }
        }

        super.onActivityResult(requestCode, resultCode, data);
    }
重点方法的分析:scanningImage(String path)
/**
     * 扫描二维码图片的方法,返回结果
     *
     * @param path
     * @return 返回结果
     */
    public Result scanningImage(String path) {
        if (TextUtils.isEmpty(path)) {
            return null;
        }
        Hashtable<DecodeHintType, String> hints = new Hashtable<DecodeHintType, String>();
        hints.put(DecodeHintType.TRY_HARDER, "UTF8"); // 设置二维码内容的编码
        BitmapFactory.Options options = new BitmapFactory.Options();
        options.inJustDecodeBounds = true; // 先获取原大小
        scanBitmap = BitmapFactory.decodeFile(path, options);
        options.inJustDecodeBounds = false; // 获取新的大小
        int sampleSize = (int) (options.outHeight / (float) 100);
        if (sampleSize <= 0)
            sampleSize = 1;
        options.inSampleSize = sampleSize;

        //获取到bitmap对象(相册图片对象通过path)
        scanBitmap = BitmapFactory.decodeFile(path, options);
        //输入bitmap解析的二值化结果(就是图片的二进制形式)
        RGBLuminanceSource source = new RGBLuminanceSource(scanBitmap);
        //再把图片的二进制形式转换成,图片bitmap对象
        BinaryBitmap bitmap1 = new BinaryBitmap(new HybridBinarizer(source));
        //CodaBarReader codaBarReader= new CodaBarReader();    //codaBarReader  二维码
        try {
            /**创建MultiFormatReader对象,调用decode()获取我们想要的信息,比如条形码的code,二维码的数据等等.这里的MultiFormatReader可以理解为就是一个读取获取数据的类,最核心的就是decode()方法 */
            return  new MultiFormatReader().decode(bitmap1,hints);      //识别条形码

        } catch (NotFoundException e) {
            e.printStackTrace();
        }
        return null;
    }


 580
580

 被折叠的 条评论
为什么被折叠?
被折叠的 条评论
为什么被折叠?
 到【灌水乐园】发言


