


一,OnMeasure详解
Android开发中偶尔会用到自定义View,一般情况下,自定义View都需要继承View类的onMeasure方法,那么,为什么要继承onMeasure()函数呢?什么情况下要继承onMeasure()?系统默认的onMeasure()函数行为是怎样的 ?本文就探究探究这些问题。这篇文章获取可以加深多自定义view的理解。
首先,我们写一个自定义View,直接调用系统默认的onMeasure函数,看看会是怎样的现象:
package com.tuke.customviewonmeasure;

import android.content.Context;
import android.util.AttributeSet;
import android.view.View;

/**
 * 作者:tuke on 2017/6/15 11:05
 * 邮箱:2297535832@qq.com
 */
public class CustomViewOnMeasure extends View {

    public CustomViewOnMeasure(Context context) {
        super(context);
    }

    public CustomViewOnMeasure(Context context, AttributeSet attrs) {
        super(context, attrs);
    }

    @Override
    protected void onMeasure(int widthMeasureSpec, int heightMeasureSpec) {
        super.onMeasure(widthMeasureSpec, heightMeasureSpec);
    }
}
<LinearLayout xmlns:android="http://schemas.android.com/apk/res/android"
xmlns:tools="http://schemas.android.com/tools"
android:layout_width="match_parent"
android:layout_height="match_parent"
android:orientation="vertical"
>
<com.tuke.customviewonmeasure.CustomViewOnMeasure
android:layout_width="match_parent"
android:layout_height="match_parent"
android:layout_margin="50dp"
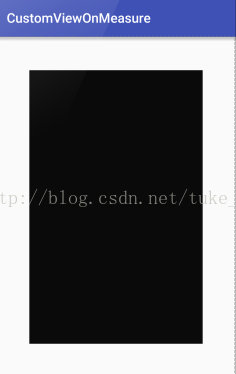
android:background="#000000"/>
</LinearLayout>这里加了10dp的margin并且把View的背景设置为了黑色,是为了方便辨别我们的CustomView,效果如下:
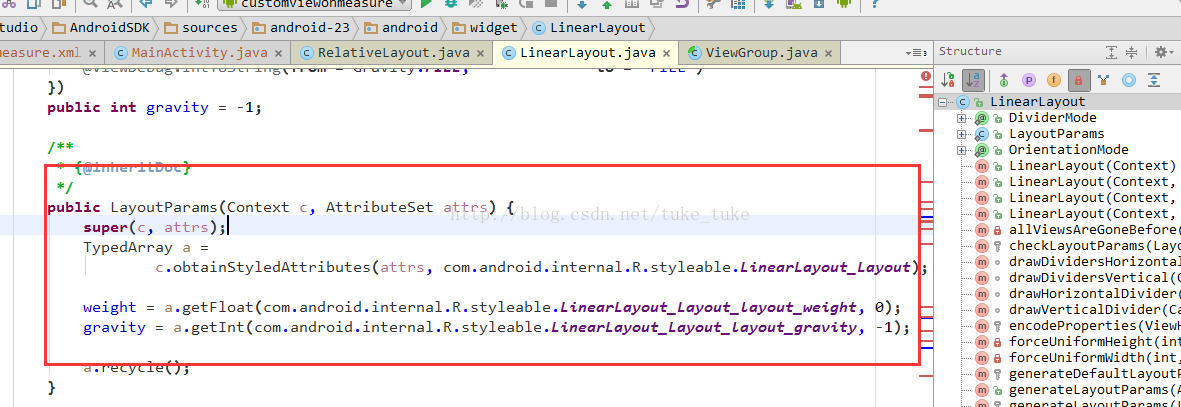
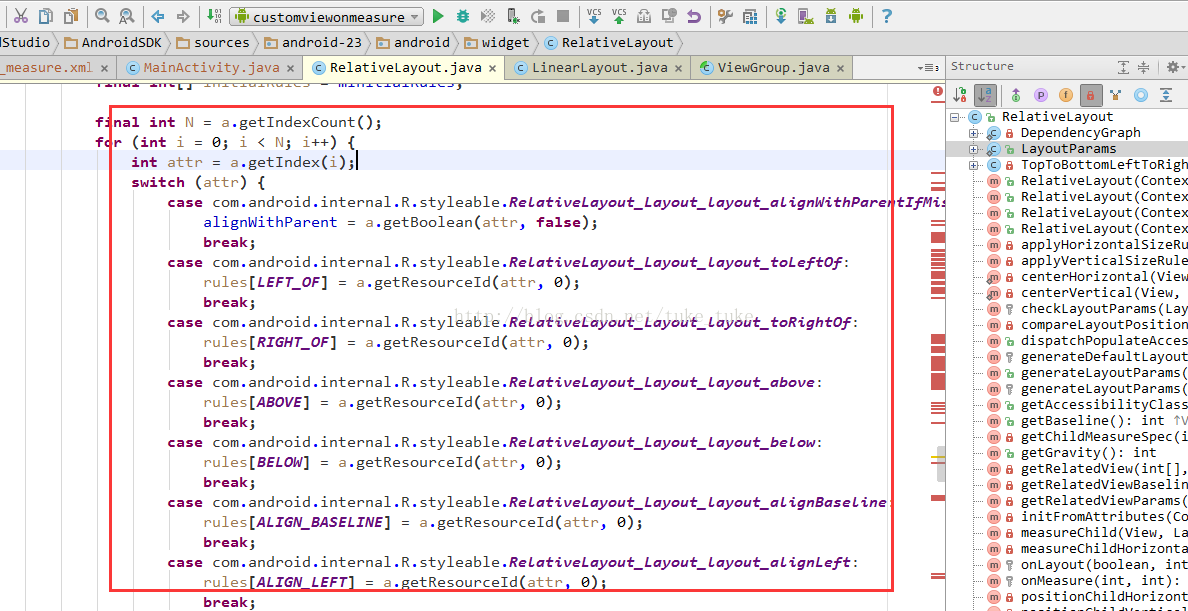
LinearLayout.LayoutParams继承了ViewGroup.MarginLayoutParams,并且增加了weight,gravity两个属性,而RelativeLayout.LayoutParams也继承了ViewGroup.MarginLayoutParams,并且增加了对齐属性,如left_to,right_to,above,below,align_baseline,align_left,align_top,align_right等等
所以在下一篇自定义ViewGroup中,如果要使得margin属性有效,必须创建一个静态内部类并继承ViewGroup.MarginLayoutParams,这个下次再讲。
2. 父控件使用match_parent,CustomView使用wrap_content
把layout文件中,CustomViewOnMeasure的layout_width/layout_height替换为wrap_content,你会发现,结果依然是充满父控件。
3. 父控件使用match_parent,CustomView使用固定的值
把layout文件中,CustomView的layout_width/layout_height替换为200dp,你会发现,CustomView的显示结果为200dpx200dp,如图所示:

5 结论
如果当父控件设置为match_parent时,自定义的CustomView采用默认的onMeasure函数,行为如下:
(1) CustomView设置为 match_parent 或者 wrap_content 没有任何区别,其显示大小由父控件决定,它会填充满整个父控件的空间。
(2) CustomView设置为固定的值,则其显示大小为该设定的值。
如果你的自定义控件的大小计算就是跟系统默认的行为一致的话,那么你就不需要重写onMeasure函数了。
就是说系统OnMeasure时,父控件设置为match_parent,自定义View是match_parent 和wrap_content 是一样的,充满整个父控件,自定义View设置固定值,就是该设定的值。这是为什么,看源码。
那么我们就要看看这个默认的系统onMeasure函数是个什么样子了。View中onMeasure方法已经默认为我们的控件测量了宽高,我们看看它做了什么工作:
protected void onMeasure( int widthMeasureSpec, int heightMeasureSpec) {
    setMeasuredDimension( getDefaultSize(getSuggestedMinimumWidth(), widthMeasureSpec),
            getDefaultSize(getSuggestedMinimumHeight(), heightMeasureSpec));
}
/**
 * 为宽度获取一个建议最小值
 */
protected int getSuggestedMinimumWidth () {
    return (mBackground == null) ? mMinWidth : max(mMinWidth , mBackground.getMinimumWidth());
}
/**
 * 获取默认的宽高值
 */
public static int getDefaultSize (int size, int measureSpec) {
    int result = size;
    int specMode = MeasureSpec. getMode(measureSpec);
    int specSize = MeasureSpec. getSize(measureSpec);
    switch (specMode) {
    case MeasureSpec. UNSPECIFIED:
        result = size;
        break;
    case MeasureSpec. AT_MOST:
    case MeasureSpec. EXACTLY:
        result = specSize;
        break;
    }
    return result;
}
源码可以看出,onMeasure方法调用了setMeasuredDimension(int measuredWidth, int measuredHeight)方法,而传入的参数已经是测量过的默认宽和高的值了;我们看看getDefaultSize 方法是怎么计算测量宽高的。根据父控件给予的约束,发现AT_MOST (相当于wrap_content )和EXACTLY (相当于match_parent )两种情况返回的测量宽高都是specSize,而这个specSize正是我们上面说的父控件剩余的宽高,所以默认onMeasure方法中wrap_content 和match_parent 的效果是一样的,都是填充剩余的空间。
onMeasure方法的作用时测量空间的大小,什么时候需要测量控件的大小呢?创建一个View(执行构造方法)的时候不需要测量控件的大小,只有将这个view放入一个容器(父控件)中的时候才需要测量,而这个测量方法就是父控件唤起调用的。当控件的父控件要放置该控件的时候,父控件会调用子控件的onMeasure方法询问子控件:“你有多大的尺寸,我要给你多大的地方才能容纳你?”,然后传入两个参数(widthMeasureSpec和heightMeasureSpec),这两个参数就是父控件告诉子控件可获得的空间以及关于这个空间的约束条件(好比我在思考需要多大的碗盛菜的时候我要看一下碗柜里最大的碗有多大,菜的分量不能超过这个容积,这就是碗对菜的约束),子控件拿着这些条件就能正确的测量自身的宽高了。
那么现在就需要认识widthMeasureSpec和heightMeasureSpec参数,MeasureSpec类,自定义View的三种测量模式。
widthMeasureSpec和heightMeasureSpec参数其实就是此自定义View的父控件(此处是LinearLayout)根据layout文件中自定义控件的layout_height和layout_width设置的值测量的宽和高,并加入模式通过MeasureSpec类计算得出的widthMeasureSpec和heightMeasureSpec参数,传入我们重写的OnMeasure中,其实就是父控件已经知道了此自定义view的宽和高,传过来供开发者参考修改。
widthMeasureSpec和heightMeasureSpec 并不是真正的宽高。是一个32位int值。高2位 代表SpecMode,低30为代表SpecSize 。
了解了这两个参数的来源,还要知道这两个值的作用。我们只取heightMeasureSpec作说明。这个值由高32位和低16位组成,高32位保存的值叫specMode,可以通过如代码中所示的MeasureSpec.getMode()获取;低16位为specSize,同样可以由MeasureSpec.getSize()获取。那么specMode和specSize的作用有是什么呢?要想知道这一点,我们需要知道代码中的最后一行,所有的View的onMeasure()的最后一行都会调用setMeasureDimension()函数的作用——这个函数调用中传进去的值是View最终的视图大小。也就是说onMeasure()中之前所作的所有工作都是为了最后这一句话服务的。
MeasureSpec类
上面说到MeasureSpec约束是由父控件传递给子控件的,这个类里面到底封装了什么东西?我们看一看源码:
public static class MeasureSpec {
    private static final int MODE_SHIFT = 30;
    private static final int MODE_MASK = 0x3 << MODE_SHIFT;
    /**
     * 父控件不强加任何约束给子控件,它可以是它想要任何大小
     */
    public static final int UNSPECIFIED = 0 << MODE_SHIFT;
    /**
     * 父控件已为子控件确定了一个确切的大小,孩子将被给予这些界限,不管子控件自己希望的是多大
     */
    public static final int EXACTLY = 1 << MODE_SHIFT;
    /**
     * 父控件会给子控件尽可能大的尺寸
     */
    public static final int AT_MOST = 2 << MODE_SHIFT;

    /**
     * 根据所提供的大小和模式创建一个测量规范
     */
    public static int makeMeasureSpec(int size, int mode) {
        if (sUseBrokenMakeMeasureSpec) {
            return size + mode;
        } else {
            return (size & ~MODE_MASK) | (mode & MODE_MASK);
        }
    }
    /**
     * 从所提供的测量规范中提取模式
     */
    public static int getMode(int measureSpec) {
        return (measureSpec & MODE_MASK);
    }
    /**
     * 从所提供的测量规范中提取尺寸
     */
    public static int getSize(int measureSpec) {
        return (measureSpec & ~MODE_MASK);
    }
    ...
}1,EXACTLY:表示设置了自定义的view精确的值,一般当自定义的view设置其宽、高为精确值、match_parent时,其父控件为其计算出的widthMeasureSpec和heightMeasureSpec参数中的Mode为EXACTLY,specSize是父控件测量所得的值,就是精确值或者match_parent,父控件都能精确测量;
2,AT_MOST:表示自定义的view被限制在一个最大值内,一般当自定义的view设置其宽、高为wrap_content时,其父控件为其计算出的widthMeasureSpec和heightMeasureSpec参数中的Mode为为AT_MOST,specSize不确定,需要在重写OnMeasure中为其设置最大值;
3,UNSPECIFIED:自定义view想要多大就多大,一般出现在AadapterView的item的heightMode中、ScrollView的childView的heightMode中;此种模式比较少见。
当自定义View不需要过多的考虑尺寸时,可以不重写OnMeasure函数,因为系统View已经为什么提供了默认的计算方法,如上面的方法。只需要重写OnDraw函数,其基本过程就是根据那三种测量模式,计算宽和高,然后set进去。也可以把这个过程自己写一遍,如下:
package com.tuke.customviewonmeasure;

import android.content.Context;
import android.util.AttributeSet;
import android.view.View;

/**
 * 作者:tuke on 2017/6/15 19:42
 * 邮箱:2297535832@qq.com
 */
public class CustomViewOnMeasure1 extends View {
    //设置默认的宽和高
    private static final int DEFUALT_VIEW_WIDTH=100;
    private static final int DEFUALT_VIEW_HEIGHT=100;

    public CustomViewOnMeasure1(Context context) {
        super(context);
    }

    public CustomViewOnMeasure1(Context context, AttributeSet attrs) {
        super(context, attrs);
    }

    @Override
    protected void onMeasure(int widthMeasureSpec, int heightMeasureSpec) {

        int width=measureDimension(DEFUALT_VIEW_WIDTH,widthMeasureSpec);
        int height=measureDimension(DEFUALT_VIEW_HEIGHT,heightMeasureSpec);
        //将计算的宽和高设置进去,保存,最后一步一定要有
        setMeasuredDimension(width,height);

    }


    /**
     * @param defualtSize   设置的默认大小
     * @param measureSpec   父控件传来的widthMeasureSpec,heightMeasureSpec
     * @return  结果
     */
    public int measureDimension(int defualtSize,int measureSpec){
        int result=defualtSize;
        int specMode=MeasureSpec.getMode(measureSpec);
        int specSize=MeasureSpec.getSize(measureSpec);

        //1,layout中自定义组件给出来确定的值,比如100dp
        //2,layout中自定义组件使用的是match_parent,但父控件的size已经可以确定了,比如设置的具体的值或者match_parent
        if(specMode==MeasureSpec.EXACTLY){
            result=specSize;
        }
        //layout中自定义组件使用的wrap_content
        else if(specMode==MeasureSpec.AT_MOST){
            result=Math.min(defualtSize,specSize);//建议:result不能大于specSize
        }
        //UNSPECIFIED,没有任何限制,所以可以设置任何大小
        else {
            result=defualtSize;
        }
        return result;
    }
}
这样重载了onMeasure函数之后,你会发现,当CustomView使用match_parent的时候,它会占满整个父控件,而当CustomView使用wrap_content的时候,它的大小则是代码中定义的默认大小100x100像素。当然,你也可以根据自己的需求改写measureDimension()的实现。
二,自定义View过程
对于一个Android攻城狮来说,自定义控件是一项必须掌握的重要技能点,然而对于大部分人而言,感觉自定义控件并不是那么容易。在工作过程中难免遇到一些特效需要自己定义控件实现,如果你不会,内心会有强烈的挫败感,这对一个程序员来说是决不能容忍的,接下来我将写一系列博客,和大家一起学习自定义控件,让她赤裸裸的站在我们的面前,让我们为所欲为。
View这个类代表用户界面组件的基本构建块。View在屏幕上占据一个矩形区域,并负责绘制和事件处理。View是用于创建交互式用户界面组件(按钮、文本等)的基础类。它的子类ViewGroup是所有布局的父类,它是一个可以包含其他view或者viewGroup并定义它们的布局属性的看不见的容器。
实现一个自定义View,你通常会覆盖一些framework层在所有view上调用的标准方法。你不需要重写所有这些方法。事实上,你可以只是重写onDraw(android.graphics.Canvas)。
如果我们要自定义View,最简单的只需要重写onDraw(android.graphics.Canvas)即可,听起来是不是很简单?那我们就动手自定义一个属于自己的TextView吧。
| 分类 | 方法 | 说明 |
构造 | Constructors | 有一种形式的构造方法是使用代码创建的时候调用的,另一种形式是View被布局文件填充时被调用的。第二种形式应该解析和使用一些属性定义在布局文件中 |
| onFinishInflate() | 当View和他的所有子控件被XML布局文件填充完成时被调用。(这个方法里面可以完成一些初始化,比如初始化子控件) | |
| 布局 | onMeasure(int, int) | 当决定view和他的孩子的尺寸需求时被调用(也就是测量控件大小时调用) |
| onLayout(boolean, int, int, int, int) | 当View给他的孩子分配大小和位置的时候调用(摆放子控件) | |
| onSizeChanged(int, int, int, int) | 当view大小发生变化时调用 | |
| 绘制 | onDraw(android.graphics.Canvas) | 当视图应该呈现其内容时调用(绘制) |
| 事件处理 | onKeyDown(int, KeyEvent) | 按键时被调用 |
| onKeyUp(int, KeyEvent) | 按键被抬起时调用 | |
| onTrackballEvent(MotionEvent) | Called when a trackball motion event occurs. | |
| onWindowFocusChanged(boolean) | 窗口获取或者失去焦点是调用 | |
| Attaching | onAttachedToWindow() | 当视图被连接到一个窗口时调用 |
| onDetachedFromWindow() | 当视图从窗口分离时调用 | |
| onWindowVisibilityChanged(int) | 当View的窗口的可见性发生改变时调用 | |
| 焦点 | onFocusChanged(boolean, int, android.graphics.Rect) | 获取到或者失去焦点是调用 |
| onTouchEvent(MotionEvent) | 触摸屏幕时调用 |
1,继承View,重写onDraw方法
创建一个类MyTextView继承View,发现报错,因为要覆盖他的构造方法(因为View中没有参数为空的构造方法),View有四种形式的构造方法,其中四个参数的构造方法是API 21才出现,所以一般我们只需要重写其他三个构造方法即可。它们的参数不一样分别对应不同的创建方式,比如只有一个Context参数的构造方法通常是通过代码初始化控件时使用;而两个参数的构造方法通常对应布局文件中控件被映射成对象时调用(需要解析属性);通常我们让这两个构造方法最终调用三个参数的构造方法,然后在第三个构造方法中进行一些初始化操作
package com.tuke.customviewonmeasure;

import android.content.Context;
import android.graphics.Canvas;
import android.graphics.Color;
import android.graphics.Paint;
import android.graphics.Rect;
import android.graphics.Typeface;
import android.util.AttributeSet;
import android.view.View;

/**
 * 作者:tuke on 2017/6/16 10:21
 * 邮箱:2297535832@qq.com
 */
public class MyTextView extends View {

    //设置默认的宽和高
    private static final int DEFUALT_VIEW_WIDTH=100;
    private static final int DEFUALT_VIEW_HEIGHT=100;
    //要绘制的文字
    private  String mText;
    //文字颜色
    private  int mTextColor;
    //文字大小
    private  int mTextSize;
    //绘制时控制文本绘制范围
    private  Rect mBound;
    private Paint mPaint;
    //绘制文本的基坐标
    private float BaseX,BaseY;

    //这三个构造函数一定要重写,因为在Android加载的layout文件中的组件的原理是初始化该组件实例,要调用该组件构造函数
    public MyTextView(Context context) {
        this(context,null);
    }

    public MyTextView(Context context, AttributeSet attrs) {
        this(context, attrs,0);
    }

    public MyTextView(Context context, AttributeSet attrs, int defStyleAttr) {
        super(context, attrs, defStyleAttr);
        //初始化工作
        init();
    }

    public void init(){
        //初始化
        mText="I LOVE YOU";
        mTextColor= Color.BLACK;
        mTextSize=50;
        //设置画笔的文字大小和颜色
        mPaint=new Paint();
        mPaint.setTextSize(mTextSize);
        mPaint.setColor(mTextColor);
        mPaint.setTypeface(Typeface.DEFAULT_BOLD);

        mBound=new Rect();
        mPaint.getTextBounds(mText,0,mText.length(),mBound);

    }

    @Override
    protected void onDraw(Canvas canvas) {
        //绘制文字
        BaseX=getWidth()/2-mBound.width()/2;
        BaseY=getHeight()/2+mBound.height()/2;
        canvas.drawText(mText,BaseX,BaseY,mPaint);


        /*Paint.FontMetrics fontMetrics=mPaint.getFontMetrics();
        BaseX=getWidth()/2-mPaint.measureText(mText)/2;
        BaseY=getHeight()/2+(fontMetrics.descent-fontMetrics.ascent)/2-fontMetrics.bottom;
        canvas.drawText(mText,BaseX,BaseY,mPaint);*/

    }
}
<?xml version="1.0" encoding="utf-8"?>
<LinearLayout xmlns:android="http://schemas.android.com/apk/res/android"
              android:layout_width="match_parent"
              android:layout_height="match_parent">

    <com.tuke.customviewonmeasure.MyTextView
        android:layout_width="200dp"
        android:layout_height="200dp"
        android:text="TuKe"
        android:textSize="20sp"
        android:background="#ff0000"
        />
</LinearLayout>

上面我只是重写了一个onDraw方法,文本已经绘制出来,说明到此为止这个自定义控件已经算成功了。可是发现了一个问题,如果我要绘制另外的文本呢?比如写i love you,那是不是又得重新定义一个自定义控件?跟上面一样,只是需要修改mText就可以了;行,再写一遍,那如果我现在又想改变文字颜色为蓝色呢?在写一遍?这时候就用到了新的知识点:自定义属性
2,自定义属性
Android自定义属性的的使用步骤
1.首先定义自定义属性。
2.其次在layout文件中使用自定义属性,为属性赋值。
3.在Java代码中获取自定义属性,并使用属性值。
2.1 在res/values/下创建一个名为attrs.xml的文件,然后定义如下属性: format的意思是该属性的取值是什么类型(支持的类型有string,color,demension,integer,enum,reference,float,boolean,fraction,flag)
其中资源文件根节点为<resources></resource>里面拥有的子节点可以为<attr> ,<declare-styleable>,
2.1.1 <attr>节点
attr节点的属性有name,format.
name就是给自定义属性命名的,最好能做到见明知意,
关于format是给自定义的属性定义一个类型,有以下的类型
-reference 引用类型 比如说自定义图片属性<attr name="icon" format="reference"></attr>
-color 颜色类型 用来自定义颜色的类型
-string 字符串类型 。。
-demension 尺寸类型 用来定义尺寸类型
1.1.2 <declare-styleable>节点
declare-styleable节点也拥有子节点<attr>
把<resource>节点内的子节点<attr>节点定义的自定义属性全部Copy到<declare-styleable>节点中,这个时候<declare-styleable>节点的子节点<attr>里面只需要name属性,自定义属性的format就可以去掉了(前提是你已经在resources节点下自定义属性节点中声明了format,当然你也可以在自定义属性的时候不声明fomat,在<declare-styleable>的子节点<attr>中来声明)。
其中你需要给<declare-styleable>节点定义一个name属性,给name属性赋值,(自定义属性多用在自定义组件,所以这里最好使用自定义组件的名字)
上面给name赋值,是为了使用自定义属性,是非常有意义的,而且是必须的。下面贴下代码加强理解
<?xml version="1.0" encoding="utf-8"?>
<resources>
    <!--属性声明-->
    <attr name="mText" format="string"></attr>
    <attr name="mTextColor" format="color"></attr>
    <attr name="mTextSize" format="dimension"></attr>
    <!--属性使用-->
    <declare-styleable name="MyTextView">
        <attr name="mText"></attr>
        <attr name="mTextColor"></attr>
        <attr name="mTextSize"></attr>
    </declare-styleable>

</resources>
2.2自定义属性完成后,接下来要使用自定义属性了
首先我们来比较一下自定义属性与系统自带的属性,比如说
        android:layout_width="match_parent"
        android:layout_height="0dp"
android命名空间完毕,使用自己的自定义属性,给属性值赋值,贴代码命名空间完毕,使用自己的自定义属性,给属性值赋值,贴代码:layout_weight="1" ><LinearLayout xmlns:android="http://schemas.android.com/apk/res/android"而这里我们自己使用自己的自定义属性 就必须要加入自己的命名空间,还是与自定义搭上边
自定义命名空间的方法:
xmlns:tuke="http://schemas.android.com/apk/res-auto"
<?xml version="1.0" encoding="utf-8"?>
<LinearLayout xmlns:android="http://schemas.android.com/apk/res/android"
xmlns:tuke="http://schemas.android.com/apk/res-auto"
android:layout_width="match_parent"
android:layout_height="match_parent"
android:background="#D6D6D6"
>
<com.tuke.customviewonmeasure.MyTextView
android:layout_width="200dp"
android:layout_height="200dp"
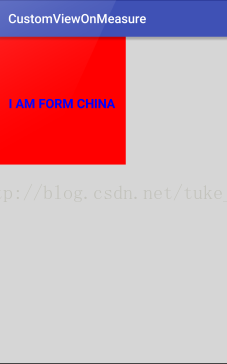
tuke:mText="I AM FORM CHINA"
tuke:mTextColor="#0000ff"
tuke:mTextSize="20dp"
android:background="#ff0000"
/>
</LinearLayout>
2.3最后一步了,是时候在java代码中使用自定义的属性了,并获取自定义属性的值去进行一系列操作
java代码中获取自定义的属性值我们就不得不说到两个重要的类的了,第一个重要的类是TypedArray,第二个重要的类是TypedValue
package com.tuke.customviewonmeasure;

import android.content.Context;
import android.content.res.TypedArray;
import android.graphics.Canvas;
import android.graphics.Color;
import android.graphics.Paint;
import android.graphics.Rect;
import android.graphics.Typeface;
import android.util.AttributeSet;
import android.view.View;

/**
 * 作者:tuke on 2017/6/16 10:21
 * 邮箱:2297535832@qq.com
 */
public class MyTextView extends View {

    //设置默认的宽和高
    private static final int DEFUALT_VIEW_WIDTH=100;
    private static final int DEFUALT_VIEW_HEIGHT=100;
    //要绘制的文字
    private  String mText;
    //文字颜色
    private  int mTextColor;
    //文字大小
    private  int mTextSize;
    //绘制时控制文本绘制范围
    private  Rect mBound;
    private Paint mPaint;
    //绘制文本的基坐标
    private float BaseX,BaseY;

    //这三个构造函数一定要重写,因为在Android加载的layout文件中的组件的原理是初始化该组件实例,要调用该组件构造函数
    public MyTextView(Context context) {
        this(context,null);
    }

    public MyTextView(Context context, AttributeSet attrs) {
        this(context, attrs,0);
    }

    public MyTextView(Context context, AttributeSet attrs, int defStyleAttr) {
        super(context, attrs, defStyleAttr);
        //获取自定义属性的值
        TypedArray a=context.obtainStyledAttributes(attrs,R.styleable.MyTextView, defStyleAttr,0);
        mText     =a.getString(R.styleable.MyTextView_mText);
        mTextColor=a.getColor(R.styleable.MyTextView_mTextColor,Color.BLACK);
        mTextSize = (int) a.getDimension(R.styleable.MyTextView_mTextSize,100);
        a.recycle();;

        //初始化画笔
        init();

    }

    public void init(){

        //设置画笔的文字大小和颜色
        mPaint=new Paint();
        mPaint.setTextSize(mTextSize);
        mPaint.setColor(mTextColor);
        mPaint.setTypeface(Typeface.DEFAULT_BOLD);

        mBound=new Rect();
        mPaint.getTextBounds(mText,0,mText.length(),mBound);

    }

    @Override
    protected void onDraw(Canvas canvas) {
        //绘制文字
        BaseX=getWidth()/2-mBound.width()/2;
        BaseY=getHeight()/2+mBound.height()/2;
        canvas.drawText(mText,BaseX,BaseY,mPaint);


        /*Paint.FontMetrics fontMetrics=mPaint.getFontMetrics();
        BaseX=getWidth()/2-mPaint.measureText(mText)/2;
        BaseY=getHeight()/2+(fontMetrics.descent-fontMetrics.ascent)/2-fontMetrics.bottom;
        canvas.drawText(mText,BaseX,BaseY,mPaint);*/

    }
}
接下来做一点小变化:
让绘制的文本长一点tuke:mText="I AM FORM CHINA,I AM FORM CHINA",运行结果:
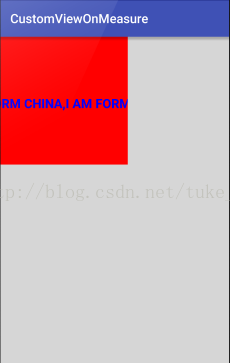
有没有发现不和谐的现象?文本超度超出了控件边界,控件太小,不足以显示辣么长的文本。
我们将自定义控件换成wrap_content试试。
<?xml version="1.0" encoding="utf-8"?>
<LinearLayout xmlns:android="http://schemas.android.com/apk/res/android"
              xmlns:tuke="http://schemas.android.com/apk/res-auto"
              android:layout_width="match_parent"
              android:layout_height="match_parent"
              android:background="#D6D6D6"
    >

    <com.tuke.customviewonmeasure.MyTextView
        android:layout_width="wrap_content"
        android:layout_height="wrap_content"

        tuke:mText="I AM FORM CHINA,I AM FORM CHINA"
        tuke:mTextColor="#0000ff"
        tuke:mTextSize="20dp"

        android:background="#ff0000"
        />
</LinearLayout>
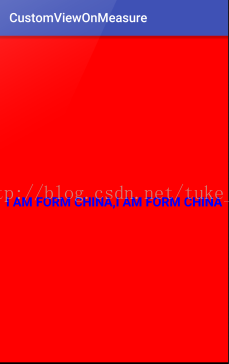
什么鬼?不是包裹内容吗?怎么填充整个屏幕了?这就是前面讲的了,当父控件设置的是match_parent且使用自定义控件的系统onMeasure时,自定义view无论设置的是match_parent还是wrap_content,都会填满父控件,自定义View设置固定值时,现实结果才是固定值。
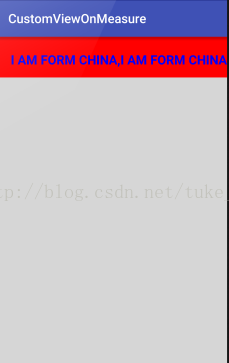
3,重写onMeasure方法
解决办法是不使用系统的onMeasure,我们自己重写onMeasure,根据不同的情况设置自定义View的宽和高。
package com.tuke.customviewonmeasure;

import android.content.Context;
import android.content.res.TypedArray;
import android.graphics.Canvas;
import android.graphics.Color;
import android.graphics.Paint;
import android.graphics.Rect;
import android.graphics.Typeface;
import android.util.AttributeSet;
import android.view.View;

/**
 * 作者:tuke on 2017/6/16 10:21
 * 邮箱:2297535832@qq.com
 */
public class MyTextView extends View {

    //设置默认的宽和高
    private static final int DEFUALT_VIEW_WIDTH=100;
    private static final int DEFUALT_VIEW_HEIGHT=100;
    //要绘制的文字
    private  String mText;
    //文字颜色
    private  int mTextColor;
    //文字大小
    private  int mTextSize;
    //绘制时控制文本绘制范围
    private  Rect mBound;
    private Paint mPaint;
    //绘制文本的基坐标
    private float BaseX,BaseY;

    //这三个构造函数一定要重写,因为在Android加载的layout文件中的组件的原理是初始化该组件实例,要调用该组件构造函数
    public MyTextView(Context context) {
        this(context,null);
    }

    public MyTextView(Context context, AttributeSet attrs) {
        this(context, attrs,0);
    }

    public MyTextView(Context context, AttributeSet attrs, int defStyleAttr) {
        super(context, attrs, defStyleAttr);
        //获取自定义属性的值
        TypedArray a=context.obtainStyledAttributes(attrs,R.styleable.MyTextView, defStyleAttr,0);
        mText     =a.getString(R.styleable.MyTextView_mText);
        mTextColor=a.getColor(R.styleable.MyTextView_mTextColor,Color.BLACK);
        mTextSize = (int) a.getDimension(R.styleable.MyTextView_mTextSize,100);
        a.recycle();

        //初始化画笔
        init();

    }

    public void init(){
        //设置画笔的文字大小和颜色
        mPaint=new Paint();
        mPaint.setTextSize(mTextSize);
        mPaint.setColor(mTextColor);
        mPaint.setTypeface(Typeface.DEFAULT_BOLD);

        mBound=new Rect();
        mPaint.getTextBounds(mText,0,mText.length(),mBound);

    }

    @Override
    protected void onMeasure(int widthMeasureSpec, int heightMeasureSpec) {

        int widthMode=MeasureSpec.getMode(widthMeasureSpec);
        int widthSize=MeasureSpec.getSize(widthMeasureSpec);

        int heightMode=MeasureSpec.getMode(heightMeasureSpec);
        int heightSize=MeasureSpec.getSize(heightMeasureSpec);

        int width=10,height=10;//计算自定义View最终的宽和高

        if(widthMode==MeasureSpec.EXACTLY){
            //如果match_parent或者具体的值,直接赋值
            width=widthSize;
        }else if(widthMode==MeasureSpec.AT_MOST){//专门讨论的wrap_content情况
            //如果是wrap_content,我们要得到控件需要多大的尺寸
            float textWidth=mBound.width();//文本的宽度

            width= (int) (getPaddingLeft() + textWidth + getPaddingRight());
        }
        //高度跟宽度处理方式一样
        if(heightMode==MeasureSpec.EXACTLY){
            height=widthSize;
        }else if(heightMode==MeasureSpec.AT_MOST){
            float textHeight=mBound.height();

            height=  (int) (getPaddingTop() + textHeight + getPaddingBottom());
        }

        //保存测量宽度和测量高度
        setMeasuredDimension(width,height);
    }

    @Override
    protected void onDraw(Canvas canvas) {
        //绘制文字
        BaseX=getWidth()/2-mBound.width()/2;
        BaseY=getHeight()/2+mBound.height()/2;
        canvas.drawText(mText,BaseX,BaseY,mPaint);


        /*Paint.FontMetrics fontMetrics=mPaint.getFontMetrics();
        BaseX=getWidth()/2-mPaint.measureText(mText)/2;
        BaseY=getHeight()/2+(fontMetrics.descent-fontMetrics.ascent)/2-fontMetrics.bottom;
        canvas.drawText(mText,BaseX,BaseY,mPaint);*/

    }
}
<?xml version="1.0" encoding="utf-8"?>
<LinearLayout xmlns:android="http://schemas.android.com/apk/res/android"
              xmlns:tuke="http://schemas.android.com/apk/res-auto"
              android:layout_width="match_parent"
              android:layout_height="match_parent"
              android:background="#D6D6D6"
    >

    <com.tuke.customviewonmeasure.MyTextView
        android:layout_width="wrap_content"
        android:layout_height="wrap_content"
        android:padding="20dip"

        tuke:mText="I AM FORM CHINA,I AM FORM CHINA"
        tuke:mTextColor="#0000ff"
        tuke:mTextSize="20dp"

        android:background="#ff0000"
        />
</LinearLayout>
到此为止,我们已经了解到自定义控件的基本步骤:
1. 继承View,重写构造方法
2. 自定义属性,在构造方法中初始化属性
3. 重写onMeasure方法测量宽高
4. 重写onDraw方法绘制控件
说白了,自定义View就是,两个方法onMeasure,onDraw,一个自定义属性。


 739
739


 被折叠的 条评论
为什么被折叠?
被折叠的 条评论
为什么被折叠?
 到【灌水乐园】发言


