


关键字:M:Model, V: View, C:Controllor, P:Presenter, IV:IView
说MVP之前先说说MVC模式。MVC其实就是Android默认开发模式,最多加过一个实体类(bean)
怎么说MVC就是Android默认开发模式呢,
因为M:实体类,基本不处理逻辑
V:xml,布局文件
C:对应Activity,处理逻辑(M,V它都可以参与)
弊端很明显:C端要处理逻辑,迟早一天会炸。
一定要把C端的逻辑处理(网络请求,复杂的数据运算等)解放出来,怎么办,那MVC模式就要进行改良优化,拆分C端的逻辑出来作为P,把C改为V端,P处理完用IView连接V和M。
针对MVP模式,大致可以这么划分:
M:实体类,
V:xml,Activity(不处理复杂逻辑,可以处理些简单的)
P:处理复杂的逻辑(网络请求)
IV:接口连接P和V的
说了怎么多,来看下代码比较的直观,以登录模块来说
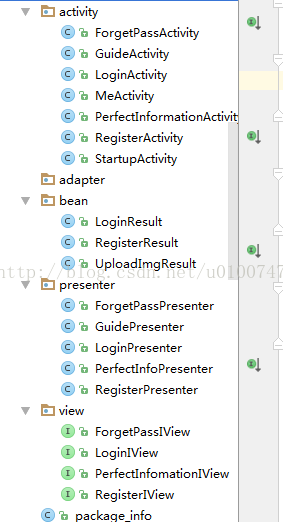
先看下项目结构
写一个模块,肯定先写xml布局的,以为布局写法都差不多,就不展示了。
默认写了xml,接下来写bean类,我们来看下LoginResult(基本都是get和set方法);
public class LoginResult extends WebResult {

    private ObjBean obj;

    public ObjBean getObj() {
        return obj;
    }

    public void setObj(ObjBean obj) {
        this.obj = obj;
    }

    public static class ObjBean extends UserResume {

    }

}public interface LoginIView extends BaseActivityIView<LoginResult> {
/**
* 启用登陆按钮
* Create by Peng on 2016年12月8日10:50:01
*/
void enableBtn();
/**
* 登录成后
* Create by Peng on 2016年12月8日10:50:01
*/
void onData(LoginResult result);
/**
* 授权登录跳转进MainActivity
* Create by cong
*/
void authorizeSuccess(LoginResult result);
/**
* 授权登录跳转进验证手机号
*/
void authorizePhone(LoginResult result);
}接下来写Presenter。也可以先写Activity。看个人习惯思维,有些人想先看下界面,界面通过了,再加逻辑。我很多情况也先写Activity,上面有操作按钮,要数据传到Presenter中处理,也是合理的。但你说先写Presenter也行,毕竟都是形参方法。
public class LoginPresenter {
    private static final String TAG = LoginPresenter.class.getName();
    private LoginIView iView;

    private String time = "";

    public LoginPresenter(LoginIView iView) {
        this.iView = iView;
    }


    /**
     * 登录
     * @param phone 手机号
     * @param pass  密码
     */
    public void login(String phone, String pass) {
        if (TextUtils.isEmpty(phone)) {
            iView.toast(R.string.phone_error);
            iView.enableBtn();
            return;
        }
        if (TextUtils.isEmpty(pass)) {
            iView.toast(R.string.pass_error);
            iView.enableBtn();
            return;
        }
        try {
            iView.showProgressDialog(R.string.loging);
            HashMap<String, Object> map = new HashMap<>();
            map.put("phone", phone);
            map.put("psw", AES128ECB.Encrypt(pass, AES128ECB.cKey));
            HttpUtils.noCacheRequest(iView.getContext(), Contacts.LOGIN, map, callBack, LoginResult.class);
            time = map.get("timestamp").toString();
        } catch (Exception e) {
            e.printStackTrace();
            if (BuildConfig.DEBUG) {
                iView.toast(R.string.error);
            }

            iView.enableBtn();
        }

    }

    /**
     * 登录的回调
     * Create by Peng
     */
    private ResponseCallBack callBack = new ResponseCallBack<LoginResult>() {
        @Override
        public void onError(int code, Throwable e) {
            iView.toast(R.string.request_error);
            iView.dismissProgressDialog();
            iView.enableBtn();
            e.printStackTrace();
        }

        @Override
        public void onCache(LoginResult cache) {

        }

        @Override
        public void onResponse(LoginResult obj) {
            if (obj.getCode() == 1) {
                //登录成功
                iView.onData(obj);
                iView.toast("登录成功");
            } else {
                iView.toast(obj.getMsg());
            }
            iView.enableBtn();
            iView.dismissProgressDialog();
        }

        @Override
        public void onFinish() {

        }
    };
}最后来看下Activity。也是大家所熟悉的,也有点不通,构造上复杂了点而已。
public class LoginActivity extends BaseActivity implements
         LoginIView {

    @BindView(R.id.et_phone_number)
    EditText et_phone_number;
    @BindView(R.id.et_pass)
    EditText et_pass;
    @BindView(R.id.btn_login)
    Button btn_login;
    @BindView(R.id.cb_pass_show)
    CheckBox cb_pass_show;
    @BindView(R.id.tv_one_yuan_user_agreement)
    TextView tv_one_yuan_user_agreement;
    @BindView(R.id.btn_res)
    Button btn_res;
    @BindView(R.id.btn_look)
    Button btn_look;
    @BindView(R.id.tv_forget_pass)
    TextView tv_forget_pass;
    @BindView(R.id.ll_wx_login)
    LinearLayout llWxLogin;

    private Context mContext;
    private LoginPresenter presenter;
    private int userId;

    @Override
    protected void onCreate(Bundle savedInstanceState) {
        super.onCreate(savedInstanceState);
        setContentView(R.layout.activity_login);
        ButterKnife.bind(this);

        mContext = this;

        et_pass.setInputType(InputType.TYPE_CLASS_TEXT | InputType.TYPE_TEXT_VARIATION_PASSWORD);
        et_pass.setTransformationMethod(PasswordTransformationMethod
                .getInstance());

        et_phone_number.setText(SharedPreferencesUtils.getString(this, Contacts.PHONE, ""));
        et_phone_number.setSelection(et_phone_number.getText().length());
        presenter = new LoginPresenter(this);
    }

    @Override
    protected void initRealView(View view) {

    }

    @Override
    protected void errorClick() {

    }

    public boolean onKeyDown(int keyCode, KeyEvent event) {
        if (keyCode == KeyEvent.KEYCODE_BACK) {
            //do something...
            ActivityUtils.closeAll();
            finish();
            return true;
        }
        return super.onKeyDown(keyCode, event);
    }


    @OnClick({R.id.btn_login, R.id.tv_one_yuan_user_agreement, R.id.btn_res, R.id.btn_look, R.id.tv_forget_pass, R.id.ll_wx_login})
    public void onClick(View view) {
        view.setEnabled(false);
        Intent intent = null;
        switch (view.getId()) {

            //登陆按钮
            case R.id.btn_login:
                view.setEnabled(false);
                if (valiData()) {
//                    presenter.regist(et_phone_number.getText().toString(), et_security_code.getText().toString(),
//                            et_pass.getText().toString());
                    //先清理缓存
                    HttpUtils.clearCache(MyApplication.getContext());
                    SharedPreferencesUtils.clear(MyApplication.getContext());
                    SharedPreferencesUtils.saveBoolean(this, Contacts.GUIDE, false);
                    SharedPreferencesUtils.saveString(this, Contacts.PHONE, et_phone_number.getText().toString());
                    presenter.login(et_phone_number.getText().toString(), et_pass.getText().toString());
                } else {
                    view.setEnabled(true);
                }

                break;

            //注册账号
            case R.id.btn_res:
                UtilsIntent.startRegisterActivity(this, 0, 0);
                break;

            //先看看
            case R.id.btn_look:
                //进入主页面
                UtilsIntent.startMainActivity(mContext);
                break;

            //忘记密码
            case R.id.tv_forget_pass:
                intent = new Intent(this, ForgetPassActivity.class);
                startActivity(intent);
                view.setEnabled(true);
                break;


            //用户协议跳转
            case R.id.tv_one_yuan_user_agreement:
                UtilsIntent.startWebActivity2(view.getContext());
                break;
        }
        view.setEnabled(true);

    }


    /**
     * 验证数据是否输入完整
     * Create by Peng on 2016年12月8日16:53:00
     *
     * @return 是否完整
     */
    private boolean valiData() {
        if (StringUtils.isEmpty(et_phone_number)) {
            toast(R.string.phone_error);
            return false;
        }
        SharedPreferencesUtils.saveString(this, Contacts.PHONE, et_phone_number.getText().toString());
        if (StringUtils.isEmpty(et_pass)) {
            toast(R.string.pass_error);
            return false;
        }
        if (et_pass.getText().toString().length() < 6) {
            toast(R.string.pass_error1);
            return false;
        }
        return true;
    }

    //显示隐藏密码的按钮
    @OnCheckedChanged(R.id.cb_pass_show)
    public void onCheckedChanged(CompoundButton buttonView, boolean isChecked) {
        if (isChecked) {
            //显示密码
            et_pass.setTransformationMethod(HideReturnsTransformationMethod
                    .getInstance());
            et_pass.setSelection(et_pass.getText().length());
        } else {
            //隐藏密码
            et_pass.setTransformationMethod(PasswordTransformationMethod
                    .getInstance());
            et_pass.setSelection(et_pass.getText().length());
        }
    }


    @Override
    public void enableBtn() {
        btn_login.setEnabled(true);
    }

    @Override
    public void onData(LoginResult result2) {
        if(result2.getObj() != null){
            SharedPreferencesUtils.saveInt(this, Contacts.USERID, result2.getObj().getId());
            try {
                Utils.saveUserResume(this, result2.getObj());
                MainActivity.toMain(this, true);
            } catch (Exception e) {
                e.printStackTrace();
                if (BuildConfig.DEBUG) {
                    toast(R.string.error);
                }

            }
        }


    }


    @Override
    public void onDataResult(LoginResult loginResult) {
        SharedPreferencesUtils.saveInt(this, Contacts.USERID, loginResult.getObj().getId());
        try {
            Utils.saveUserResume(this, loginResult.getObj());
            MainActivity.toMain(this, true);
        } catch (Exception e) {
            e.printStackTrace();
            if (BuildConfig.DEBUG) {
                toast(R.string.error);
            }

        }
    }
}
注:以上代码仅供参考,因为有些牵扯到瓦的项目,省去了。
MVP模式更容易排除,比如网络请求数据有错,只需要看P,请求到有数据,但页面没显示,看V是否赋值显示或者看M,是否已经定义该属性set和get方法。
用MVP后基本不再想用MVC,不好的哇,估计多了个前期的学习成本


 1605
1605


 被折叠的 条评论
为什么被折叠?
被折叠的 条评论
为什么被折叠?
 到【灌水乐园】发言


