


概述
Android 的属性动画框架允许你在所有Android控件上实现动画,无论它是否在屏幕上绘制出来的。你可以定义一组动画去改变一个动画对象的属性(一个属性或者多个属性),然后你可以设置各种属性。
首先我们了解一下,下面的定义:
- Duration:一次动画的持续时长,默认是300ms
- Time Interpolation:关于动画属性变化的函数,默认是线性变化(LinearInterpolator),内置了多种变化函数,当然也可以实现自定义的变化函数。
- Repeat Count:动画的持续次数。
- Animator Sets:你可以定义一组动画,让其一起执行,顺序执行或者延迟执行。
- Fragme refresh delay:动画的刷新时间,默认是10ms,可以根据需求和硬件情况进行设置。
工作原理
其实我这里说是工作原理,还不如说是一个动画的具体实现流程的概述。首先看一张图:
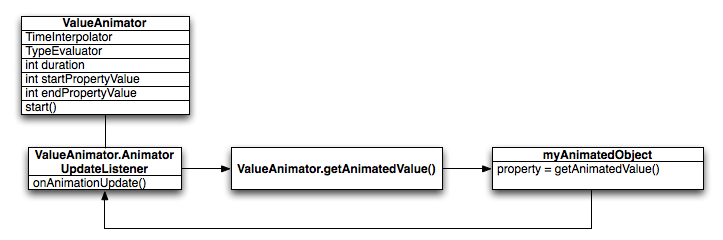
VlauAnimator 对象保存了你运行时需要的各种信息 TimeInterpolator计算出属性变化的一个百分比,然后 TypeEvaluator 根据百分比数值计算出具体的数值(可能是 int,可能是 float类型)
Property Animation 和 View Animation 对比
View Animation 只能用在 View 及其子类上,对于其它实现需要自己编写代码实现,但是 Property Animation 可以操作在任何对象上包括(非 View 或者非 View 子类)
View Animation 运行的动画效果有限,例如 透明度变化,移动,其它高级变化,例如改变背景颜色是不能通过 View Animation 实现的,但是Property Animation 可以实现更多的效果。
View Animation 的另一个缺点就是只改变了View绘制的地方,而不是View 自己本身。例如你使用 View Animation 移动了一个 Button,但是实际上,只是帮你把 button 绘制到指定区域,你点击移动后的 button是不会触发点击效果的。
相关类介绍
animator 类
演示实例
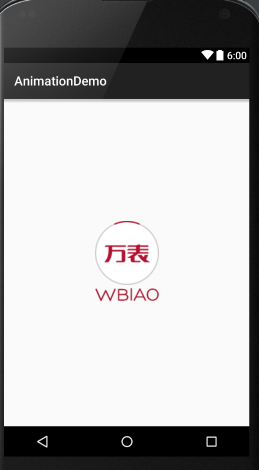
基本xml文件,activity_main.xml
<RelativeLayout xmlns:android="http://schemas.android.com/apk/res/android"
android:layout_width="match_parent"
android:layout_height="match_parent"
android:orientation="vertical"
android:gravity="center"
>
<ImageView
    android:layout_width="50dp"
    android:layout_height="50dp"
    android:id="@+id/imgv_bg"
    android:src="@drawable/common_loading_load_grey"
    />
<ImageView
    android:layout_width="50dp"
    android:layout_height="50dp"
    android:id="@+id/imgv_circle"
    android:src="@drawable/common_loading_load_arc"
    />
<ImageView
    android:layout_width="50dp"
    android:layout_height="15dp"
    android:src="@drawable/common_loading_wbiao"
    android:layout_below="@+id/imgv_bg"
    />
</RelativeLayout>
静态效果
Activity 中代码
package com.wbiao.kotlon.animationdemo;

import android.animation.ObjectAnimator;
import android.animation.ValueAnimator;
import android.app.Activity;
import android.os.Bundle;
import android.widget.ImageView;

public class MainActivity extends Activity {
private ImageView circleImgv;

@Override
protected void onCreate(Bundle savedInstanceState) {
    super.onCreate(savedInstanceState);
    setContentView(R.layout.activity_main);
    init();

}

private void init() {
    circleImgv  = (ImageView) findViewById(R.id.imgv_circle);
}

}
以后的执行代码,都写成一个方法,加入到 Activity 的代码中去
ObjectAnimator 类
它是 ValueAnimator 的子类,也封装了较为完全的 api 在里面,例如如下代码,可以帮助我们在 ImageView上实现一个旋转的效果:
private void propetyAnim(){
    //   public static ObjectAnimator ofFloat(Object target, String propertyName, float... values)
    // 这个方法中参数说明
    // Object target 是你需要实现动画的目标
    // String propertyName 是动画的String类型值,例如rotation,rotationY,例如字符串为"foo"
    // 如果预定义中的不存在,则没有效果,如果存在会调用setFoo()方法(这里当然用的是反射了)
    //剩下的float... values可变参数读取规则为,第一个参数为起始值,然后依次读取作为变化值
    ObjectAnimator objectAnimator = ObjectAnimator.ofFloat(circleImgv,"rotation",0f,360f);
    objectAnimator.setDuration(1500);//持续时间
    objectAnimator.setRepeatCount(100);//重复次数
    objectAnimator.setRepeatMode(ValueAnimator.REVERSE);// 动画模式为反转
    //objectAnimator.setAutoCancel(true);//如果其他 Animator 在此 Target上执行,则自动取消,api 18 android 4.3以上
    objectAnimator.setInterpolator(new AccelerateInterpolator());//设置插值函数
    objectAnimator.start();
}
那么我们简单来概括一下,使用 ObjectAnimator 的相关细节:
propertyName 的细节问题
情形一
- 如果你需要执行动画的动画对象存在在 offXXX()方法里面设置的形参 String propertyName 对应的 set方法,则对调用此set方法执行动画。
情形二
不存在情形一中的情况的时候
- 增加对应的 setter 方法
- 使用包装类,自行处理传递的数值
- 使用 ValueAnimator 代替
关于可变参数 values 的数组长度问题
我们可以在 offXXX()方法里面使用对应类型的可变参数,如果只有一个,则默认为动画的结束数值,同时对应的动画对象里面应该有 get方法。
关于是否需要调用 View invalidate() 方法的问题
存在部分情况,view 不会自动重新绘制,这时候需要你在 onAnimationUpdate()方法里面主动进行 view.invalidate()方法,进行View 的重绘。
自定义 TypeEvaluator
TypeEvaluator是用来传递和计算动画变化效果是,实际使用的单位类型,例如我在下面的代码中使用的是 PointFloat 类(其实就是存储了 float类型的 X 和 Y 坐标)
// 我这里实现的是抛物线的效果
private void customSetting(){
    ValueAnimator valueAnimator = new ValueAnimator();
    valueAnimator.setObjectValues(new PointF(0f, 0f));
    valueAnimator.setDuration(3000);
    valueAnimator.setInterpolator(new LinearInterpolator());
    valueAnimator.setInterpolator(new AccelerateInterpolator());
    // 自定义的 TypeEvaluator,其实就是 evaluate 返回的数值会在 AnimatorUpdateListener 的 onAnimationUpdate里面的形参数值
    // 这里 的形参float fraction,是根据 setInterpolator 插值器里面的数值计算出来的
    valueAnimator.setEvaluator(new TypeEvaluator<PointF>() {
        @Override
        public PointF evaluate(float fraction, PointF startValue, PointF endValue) {
            PointF pointF = new PointF();
            // // TODO: 2015/10/19   to change you point value

            pointF.x = 200 * fraction * 3;
            pointF.y = 0.5f * 200 * (fraction * 3) * (fraction * 3);
            return pointF;
        }
    });

    valueAnimator.start();

    valueAnimator.addUpdateListener(new ValueAnimator.AnimatorUpdateListener() {
        @Override
        public void onAnimationUpdate(ValueAnimator animation) {
            PointF pointF = (PointF) animation.getAnimatedValue();
            bgImagv.setX(pointF.x);
            bgImagv.setY(pointF.y);
        }
    });
}
自定义的 Interpolator
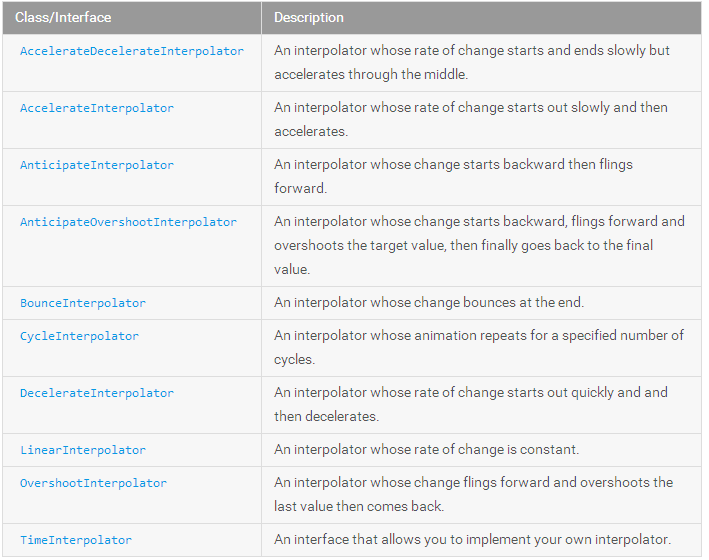
简单来说, Interpolator 控制着动画变化的速度(这种说法可能不是很好),我们有时候为了满足业务需求可能需要自己动手实现函数计算,系统提供了以下几种函数计算
我们先参考一下系统最简单的实现 LinearInterpolator 的实现,它提供的是一个常量变化
public class LinearInterpolator extends BaseInterpolator implements NativeInterpolatorFactory {

public LinearInterpolator() {
}

public LinearInterpolator(Context context, AttributeSet attrs) {
}

public float getInterpolation(float input) {
    return input;
}

/** @hide */
@Override
public long createNativeInterpolator() {
    return NativeInterpolatorFactoryHelper.createLinearInterpolator();
}
}
实际上这个 BaseInterpolator 只能在 api 21 以后被使用,我们再往前看看会发现 Interpolator 和 TimeInterpolator 这两个类,其中 TimeInterpolator 是在 api 11之后被加入的,Interpolator是api 11 之前就有的,但是 Interpolator 继承了 TimeInterpolator
 public interface Interpolator extends TimeInterpolator {
// A new interface, TimeInterpolator, was introduced for the new android.animation
// package. This older Interpolator interface extends TimeInterpolator so that users of
// the new Animator-based animations can use either the old Interpolator implementations or
// new classes that implement TimeInterpolator directly.
}
当然我们还是查看一下基类实现吧
 /**
 * 一个定义了动画改变速率的时间插值器,允许动画有非线性的改变,例如加速和减速
 * A time interpolator defines the rate of change of an animation. This allows animations
 * to have non-linear motion, such as acceleration and deceleration.
 */
public interface TimeInterpolator {

/**
 * 将动画消耗时间的百分比分数映射成一个插值百分比数值。然后将这个数值乘以当前的动画变化量,得出动画的当前变化数值。
 * Maps a value representing the elapsed fraction of an animation to a value that represents
 * the interpolated fraction. This interpolated value is then multiplied by the change in
 * value of an animation to derive the animated value at the current elapsed animation time.
 *
 * 一个介于 0 和 1 之间的数值,如果是 0,表示动画刚刚开始,如果是 1 表示动画结束
 * @param input A value between 0 and 1.0 indicating our current point
 *        in the animation where 0 represents the start and 1.0 represents
 *        the end
 * 返回值是插值数值,可以是大于1.0表示超过当前数值 也可以是小于0表示从当前数值递减
 * @return The interpolation value. This value can be more than 1.0 for
 *         interpolators which overshoot their targets, or less than 0 for
 *         interpolators that undershoot their targets.
 */
float getInterpolation(float input);
}
所以我们自定义 Interpolator 的时候,需要实现 Interpolator 这个接口类。
public class Interpolater implements Interpolator{

    @Override
    public float getInterpolation(float input) {
         // 这里进行你的函数编写
        return input;
    }
}
我们在这里对一种插值器的工作过程简单的进行分析一下
系统预定义的各种插值器 Interpolator
监听动画的生命周期
valueAnimator.addListener(new Animator.AnimatorListener() {
        @Override
        public void onAnimationStart(Animator animation) {
           // 动画开始.
        }

        @Override
        public void onAnimationEnd(Animator animation) {
            // 动画结束,假设我需要在动画结束之后,移除动画对象,使之透明或者
            bgImagv.setAlpha(0f);
           // bgImagv.setVisibility(View.GONE); // 这种性能略差于设置透明度,但是设置透明度,还能被触发点击事件等
        }

        @Override
        public void onAnimationCancel(Animator animation) {

        }

        @Override
        public void onAnimationRepeat(Animator animation) {

        }
    });
感觉这样的话,动画执行对象和动画执行器(animator)之间解耦得比较彻底,也就是说animator 不实际持有 动画执行对象。
ValueAnimator 类
ValueAnimator
// 实现旋转效果
private void valueAnim(){
    // ValueAnimator 和 ObjectAnimator 的区别是,不提供一下动画的默认实现(也就是不包含 propertyName这个参数设置)
    ValueAnimator valueAnimator = ValueAnimator.ofFloat(0,360.0f);
    valueAnimator.setTarget(circleImgv);
    valueAnimator.setDuration(1000);
    valueAnimator.setRepeatCount(100);
    valueAnimator.setRepeatMode(ValueAnimator.REVERSE);// 动画结束之后,下次动画效果反转
    valueAnimator.start();
    valueAnimator.addUpdateListener(new ValueAnimator.AnimatorUpdateListener() {
        @Override
        public void onAnimationUpdate(ValueAnimator animation) {
            // TODO: add your animation code
            // 例如我这里实现的是旋转效果
            circleImgv.setRotation((Float) animation.getAnimatedValue());
        }
    });
}
ValueAnimator 里面提供了一系列的 ofXXX(..)方法,形参使用的是可变参数,这种方法对应着一系列的 setXXX()方法,例如 ofFloat(float… valus) 对应着setFloatValues()方法,但是实际将数值存储的时候,确是存储在一个 PropertyValuesHolder 类。
高级用法:使用PropertyValuesHolder
我们查看源码可以知道,PropertyValuesHolder 类包含了我们众多的动画效果、
 // 这里实现了旋转和透明度的变化,复合动画
private void valueMultiAnim() {
    PropertyValuesHolder rotation = PropertyValuesHolder.ofFloat("rotation",0f,360f,0f);
    PropertyValuesHolder alpha = PropertyValuesHolder.ofFloat("alpha",0f,1f,1f);
    ValueAnimator valueAnimator = ObjectAnimator.ofPropertyValuesHolder(circleImgv,rotation,alpha);
    valueAnimator.setDuration(1000);
    valueAnimator.setRepeatCount(100);
    valueAnimator.start();
}
总的来说,ValueAnimator 类更灵活,可以帮助你实现一些自定义的效果
AnimatorSet 类
简单来说,这个类就是按照一定的顺序执行多个 animator的调度器(一起执行,顺序执行,或者延迟执行)。
private void animatorSet(){
    AnimatorSet animatorSet = new AnimatorSet();
    ObjectAnimator transcation = ObjectAnimator.ofFloat(circleImgv,"x",100f,150f,250f);
    transcation.setDuration(1000);//此设置无效
    ObjectAnimator rotation  = ObjectAnimator.ofFloat(circleImgv,"rotation",0f,360f);
    ObjectAnimator scale = ObjectAnimator.ofFloat(circleImgv,"scaleX",1.0f,1.5f);
    rotation.setDuration(1500);// 此设置无效
    animatorSet.play(transcation).with(rotation);//同时进行
    animatorSet.play(transcation).with(scale);
    animatorSet.setDuration(2500);

    AnimatorSet set = new AnimatorSet();
    ObjectAnimator y = ObjectAnimator.ofFloat(circleImgv,"y",100f,250f,350f);
    set.play(animatorSet).after(1000).after(y);
    set.setDuration(5000);
    set.start();
}
注意:
- 这里貌似可以使用链式编程,但是只支持两个动画链式,三个及三个以上动画,请拆分而写
- 其次,注意动画的执行顺序,如果存在某个动画在未执行完成又被操作,会报错
在 xml 文件中使用动画
在 Android studio 作为 IDE情况下
- 在res 下新建一个 animator 文件夹(IDE自动识别)
- 然后新建 animator resource file,输入节点标签为 objectAnimator
- 然后编写 xml 文件
下面是代码示例:
<?xml version="1.0" encoding="utf-8"?>
<objectAnimator xmlns:android="http://schemas.android.com/apk/res/android"
android:duration="1000"
android:propertyName="scaleY"
android:repeatCount="100"
android:valueTo="2.0"
android:valueFrom="1.0"
android:valueType="floatType"
>
</objectAnimator>
执行代码
private void loadXml(){
    Animator animator = AnimatorInflater.loadAnimator(getApplicationContext(),R.animator.sale);
    animator.setTarget(circleImgv);
    animator.start();
}
这种情况下也可以执行复合动画,xml 文件有 xml 文件的好处,大家自行琢磨。
布局动画(Layout 动画)
当你向布局中添加子 View 或者移除子 View的时候,允许对子 View 执行动画效果
通过setAnimator()方法向 LayoutTransition 实例传递 Animator 对象,可以通过向 LayoutTransition 传递以下常量(flag)设置动画的实现机制.
- APPEARING A flag indicating the animation that runs on items that are appearing in the container.
- 出现效果:当子 View 在父布局中显示时的动画效果标志。
- CHANGE_APPEARING A flag indicating the animation that runs on items that are changing due to a new item appearing in the container.
- 由于加入新的 View 引起当前View变化时的标志
- DISAPPEARING A flag indicating the animation that runs on items that are disappearing from the container.
- 当子 View 从父布局中消失的标志位(remove or setVisibity(View.GONE)
- CHANGE_DISAPPEARING A flag indicating the animation that runs on items that are changing due to an item disappearing from the container.
- 由于其他子View从父布局消失是的标志位
下面通过一个简单的案例来进行演示一下:
xml 文件
<?xml version="1.0" encoding="utf-8"?>
<LinearLayout xmlns:android="http://schemas.android.com/apk/res/android"
android:layout_width="match_parent"
android:layout_height="match_parent"
android:orientation="vertical"
android:id="@+id/container_main"
>
<Button
    android:layout_width="wrap_content"
    android:layout_height="wrap_content"
    android:text="add"
    android:id="@+id/but_add"
    />
<Button
    android:layout_width="wrap_content"
    android:layout_height="wrap_content"
    android:text="remove"
    android:id="@+id/but_remove"
    />
<LinearLayout
    android:layout_width="match_parent"
    android:layout_height="wrap_content"
    android:orientation="horizontal"
    >
    <CheckBox
        android:layout_width="wrap_content"
        android:layout_height="wrap_content"
        android:id="@+id/cb_appear"
        android:text="appear"
        />
    <CheckBox
        android:layout_width="wrap_content"
        android:layout_height="wrap_content"
        android:id="@+id/cb_disappear"
        android:text="disapper"
        />
    <CheckBox
        android:layout_width="wrap_content"
        android:layout_height="wrap_content"
        android:id="@+id/cb_changeappear"
        android:text="changeappear"
        />
    <CheckBox
        android:layout_width="wrap_content"
        android:layout_height="wrap_content"
        android:id="@+id/cb_changedisappear"
        android:text="changedisapper"
        />

</LinearLayout>

</LinearLayout>
activity 中代码
package com.wbiao.kotlon.animationdemo;

import android.animation.LayoutTransition;
import android.app.Activity;
import android.os.Bundle;
import android.view.View;
import android.view.ViewGroup;
import android.widget.Button;
import android.widget.CheckBox;
import android.widget.CompoundButton;
import android.widget.ImageView;

/**
 * Created by Administrator on 2015/10/20.
 */
public class LayoutAminActivity extends Activity implements View.OnClickListener, CompoundButton.OnCheckedChangeListener {
private Button addBut;
private Button removeBut;
private CheckBox appearCB;// 此处存在命名不规范,仅仅为了方便自动提示代码
private CheckBox disappearCB;
private CheckBox caCB;
private CheckBox cdCB;
private ViewGroup container;
private LayoutTransition transition;


@Override
protected void onCreate(Bundle savedInstanceState) {
    super.onCreate(savedInstanceState);
    setContentView(R.layout.activity_layoutaimi);
    init();
    onLayoutAnim();
}

private void init() {
    addBut = (Button) findViewById(R.id.but_add);
    removeBut = (Button) findViewById(R.id.but_remove);
    appearCB = (CheckBox) findViewById(R.id.cb_appear);
    disappearCB = (CheckBox) findViewById(R.id.cb_disappear);
    caCB = (CheckBox) findViewById(R.id.cb_changeappear);
    cdCB = (CheckBox) findViewById(R.id.cb_changedisappear);
    container = (ViewGroup) findViewById(R.id.container_main);

    addBut.setOnClickListener(this);
    removeBut.setOnClickListener(this);

    appearCB.setOnCheckedChangeListener(this);
    disappearCB.setOnCheckedChangeListener(this);
    caCB.setOnCheckedChangeListener(this);
    cdCB.setOnCheckedChangeListener(this);

    appearCB.setChecked(false);
    disappearCB.setChecked(false);
    caCB.setChecked(false);
    cdCB.setChecked(false);

    transition = new LayoutTransition();
}

private void onLayoutAnim() {
    // 默认是全部动画效果都在,当然你也可以执行自定义的动画机制
    container.setLayoutTransition(transition); // 也就是说不能多次使用同一个
}

@Override
public void onClick(View v) {
    switch (v.getId()) {
        case R.id.but_add:
            addView();

            break;
        case R.id.but_remove:
            removeView();
            break;
    }
}

@Override
public void onCheckedChanged(CompoundButton buttonView, boolean isChecked) {
    // 我总是在考虑一种更简明的代码写法,特别是在大量的 UI 交互中
    // 然而下面这种写法会有一个错误,一个是复用了LayoutTransition 会导致空指针异常
    // 另外一个考虑就是,每次触发 onCheckdChanged(),没有对四个CheckBox 的状态进行判断,是不准确的
    // 所以我们考虑有其他写法
 /*        switch (buttonView.getId()) {
        case R.id.cb_appear:
            if(isChecked){
                transition.setAnimator(LayoutTransition.APPEARING,transition.getAnimator(LayoutTransition.APPEARING));
            }else {
                transition.setAnimator(LayoutTransition.APPEARING,null);
            }
            break;

        case R.id.cb_disappear:
            if(isChecked){
                transition.setAnimator(LayoutTransition.DISAPPEARING,transition.getAnimator(LayoutTransition.APPEARING));
            }else {
                transition.setAnimator(LayoutTransition.DISAPPEARING,null);
            }
            break;

        case R.id.cb_changeappear:
            if(isChecked){
                transition.setAnimator(LayoutTransition.CHANGE_APPEARING,transition.getAnimator(LayoutTransition.APPEARING));
            }else {
                transition.setAnimator(LayoutTransition.CHANGE_APPEARING,null);
            }
            break;
        case R.id.cb_changedisappear:
            if(isChecked){
                transition.setAnimator(LayoutTransition.CHANGE_DISAPPEARING,transition.getAnimator(LayoutTransition.APPEARING));
            }else {
                transition.setAnimator(LayoutTransition.CHANGE_DISAPPEARING,null);
            }
            break;
    }*/
    LayoutTransition layoutTransition = new LayoutTransition();
    layoutTransition.setAnimator(LayoutTransition.APPEARING, appearCB.isChecked() ? layoutTransition.getAnimator(LayoutTransition.APPEARING) : null);
    layoutTransition.setAnimator(LayoutTransition.APPEARING, disappearCB.isChecked() ? layoutTransition.getAnimator(LayoutTransition.DISAPPEARING) : null);
    layoutTransition.setAnimator(LayoutTransition.APPEARING, caCB.isChecked() ? layoutTransition.getAnimator(LayoutTransition.CHANGE_APPEARING) : null);
    layoutTransition.setAnimator(LayoutTransition.APPEARING, caCB.isChecked() ? layoutTransition.getAnimator(LayoutTransition.CHANGE_DISAPPEARING) : null);
    container.setLayoutTransition(layoutTransition);
}

private ImageView getView() {
    ImageView imageView = new ImageView(this);
    ViewGroup.LayoutParams lp = new ViewGroup.LayoutParams(ViewGroup.LayoutParams.WRAP_CONTENT, ViewGroup.LayoutParams.WRAP_CONTENT);
    imageView.setLayoutParams(lp);
    imageView.setImageDrawable(getResources().getDrawable(R.drawable.watch));
    return imageView;
}

private void addView() {
    container.addView(getView());
}

private void removeView() {
    int childNumber = container.getChildCount();
    // 随机删除一个
    if (childNumber >= 4) {
        int removeIndex = (int) (Math.random() * (childNumber - 3)) + 3;
        container.removeViewAt(removeIndex);
    }
}

}
注意:实际上,我自己在编写代码的时候测试效果并不好,之前看到有人 使用 GridLayout 作为容器,效果挺不错的,但是 GridLayout 需要在 API 14 以上才能使用。
常见的 View 动画
我们在 ObjectAnimator 中 ofXXX()方法中需要传递一个 String 类型的 PropertyName,下面是 View 中自带的动画效果的类型总结(摘自官网 API)
- translationX and translationY: These properties control where the View is located as a delta from its left and top coordinates which are set by its layout container.
- 父布局中的位置变化
- rotation, rotationX, and rotationY: These properties control the rotation in 2D (rotation property) and 3D around the pivot point.
- 绕中心点旋转,绕X轴旋转,绕Y轴旋转,
- scaleX and scaleY: These properties control the 2D scaling of a View around its pivot point.
- 在X方向拉伸,在Y方向拉伸(不存在 scale呀,这个要注意了)
- pivotX and pivotY: These properties control the location of the pivot point, around which the rotation and scaling transforms occur. By default, the pivot point is located at the center of the object.
- 中心点变化,默认是物体的中心,这个属性控制了中心旋转和缩放动作
- x and y: These are simple utility properties to describe the final location of the View in its container, as a sum of the left and top values and translationX and translationY values.
- X平移或者Y平移
- alpha: Represents the alpha transparency on the View. This value is 1 (opaque) by default, with a value of 0 representing full transparency (not visible).
- 透明度变化


 4544
4544


 被折叠的 条评论
为什么被折叠?
被折叠的 条评论
为什么被折叠?
 到【灌水乐园】发言


