


一、贝塞尔曲线
参考来自下面的文章,这篇文章被转了很多次,原文都不见了
http://www.cnblogs.com/moyunmo/p/3600091.html?utm_source=tuicool&utm_medium=referral
首先说贝塞尔的各种划线方法
1.利用UIbezier的初始化方法,在UIView上画bezierPath
a.利用UIbezier的初始化方法,可以创建出圆形,矩形,圆角矩形
b.使用moveToPoint设置起始点,使用addLineToPoint增加点
下面的类继承于UIView,当此CircleView添加到父视图上时,会自动调用drawRect方法
//弧度转角度
#define RADIANS_TO_DEGREES(radians) ((radians) * (180.0 / M_PI))
//角度转弧度
#define DEGREES_TO_RADIANS(angle) ((angle) / 180.0 * M_PI)

#import "CircleView.h"

@implementation CircleView


-(void)drawRect:(CGRect)rect
{

    //1.圆形
    UIBezierPath *bPath = [UIBezierPath bezierPathWithArcCenter:CGPointMake(300, 300) radius:50
                          startAngle: DEGREES_TO_RADIANS(135) endAngle:M_PI*2 clockwise:YES];

    //设置颜色
    [[UIColor redColor]setStroke];
    //设置线宽
    [bPath setLineWidth:5];
    //绘制
    [bPath stroke];

    //2.椭圆
    UIBezierPath *ovalPath = [UIBezierPath bezierPathWithOvalInRect:CGRectMake(200, 150, 100, 200)];
    [ovalPath setLineWidth:5];
    [ovalPath stroke];

    //3.矩形
    UIBezierPath *myBezierPath = [UIBezierPath bezierPathWithRect:CGRectMake(20, 20, 100, 50)];

    [[UIColor whiteColor]setStroke];
    [myBezierPath setLineWidth:5];
    [myBezierPath stroke];


    //4.圆角矩形
    //UIRectCorner可以设置 哪几个角是圆角,其他不变
    UIBezierPath *tBPath = [UIBezierPath bezierPathWithRoundedRect:CGRectMake(220, 20, 100, 100)
                           byRoundingCorners:UIRectCornerTopLeft | UIRectCornerBottomLeft cornerRadii:CGSizeMake(20, 20)];

    [[UIColor greenColor]setStroke];
    [tBPath setLineWidth:5];
    [tBPath stroke];


    //5.通过添加点生成任意图形

    UIBezierPath* aPath = [UIBezierPath bezierPath];
    aPath.lineWidth = 15.0;

    aPath.lineCapStyle = kCGLineCapButt;  //线条终点
    //round 圆形
    //butt 平的 默认值 把线连接到精准的终点
    //Square 平的,会把线延伸到终点再加上线宽的一半
    aPath.lineJoinStyle = kCGLineJoinBevel;  //拐点处理
    //bevel 斜角斜面,角的外侧是平的不圆滑
    //miter 斜接 角的外侧是尖的
    //round 圆角

    //这是起点
    [aPath moveToPoint:CGPointMake(100.0, 200.0)];

    //添加点
    [aPath addLineToPoint:CGPointMake(200.0, 240.0)];
    [aPath addLineToPoint:CGPointMake(160, 340)];
    [aPath addLineToPoint:CGPointMake(40.0, 340)];
    [aPath addLineToPoint:CGPointMake(10.0, 240.0)];
    [aPath closePath]; //第五条线通过调用closePath方法得到的

    [aPath stroke]; //Draws line 根据坐标点连线

}
@end
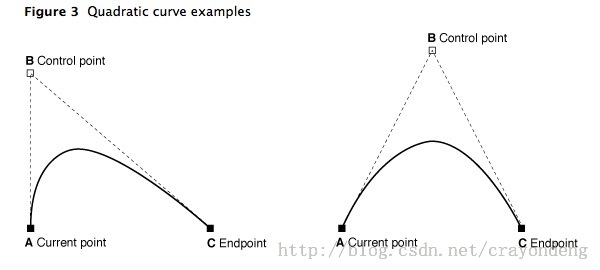
2.二次曲线和三次曲线
盗图两张,他们解释了控制点是怎么回事
划线方法很简单
二次曲线
  //创建一条贝塞尔
    UIBezierPath* aPath = [UIBezierPath bezierPath];

    aPath.lineWidth = 5.0;//宽度
    aPath.lineCapStyle = kCGLineCapRound;  //线条拐角
    aPath.lineJoinStyle = kCGLineJoinRound;  //终点处理
    //起始点
    [aPath moveToPoint:CGPointMake(20, 100)];
    //添加两个控制点
    [aPath addQuadCurveToPoint:CGPointMake(220, 100) controlPoint:CGPointMake(170, 0)];
    //划线
    [aPath stroke];
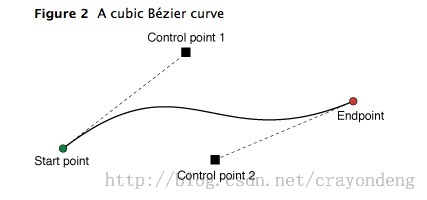
三次曲线
  //三次曲线

    UIBezierPath* bPath = [UIBezierPath bezierPath];


    bPath.lineWidth = 5.0;
    bPath.lineCapStyle = kCGLineCapRound;  //线条拐角
    bPath.lineJoinStyle = kCGLineCapRound;  //终点处理
    //起始点
    [bPath moveToPoint:CGPointMake(20, 250)];

    //添加两个控制点
    [bPath addCurveToPoint:CGPointMake(350, 250) controlPoint1:CGPointMake(310, 200) controlPoint2:CGPointMake(210, 400)];

    [bPath stroke];
3.了解一下底层的Core Graphics
这篇文章说的够了
http://www.mamicode.com/info-detail-841887.html
-(void)drawRect:(CGRect)rect
{
    // Create the path data
    //创建路径时间
    CGMutablePathRef cgPath = CGPathCreateMutable();


    //cgPath的画图接口
    //给一个cgPath里面添加了多个样式,圆和椭圆会发生关联

    //两个椭圆互不影响
    CGPathAddEllipseInRect(cgPath, NULL, CGRectMake(100, 100, 50, 100));

    CGPathAddEllipseInRect(cgPath, NULL, CGRectMake(250, 250, 100, 50));

    //矩形
    CGPathAddRect(cgPath, NULL, CGRectMake(200, 500, 30, 100));

//    圆形
//    CGPathAddArc(cgPath, NULL, 120, 400, 100, 0, M_PI*2, YES);

    //下面两句要搭配,先有起点
    CGPathMoveToPoint(cgPath, NULL, 200, 300);
    //加一段弧
    CGPathAddArcToPoint(cgPath, NULL, 320, 250, DEGREES_TO_RADIANS(150), M_PI*2, 50);

    //把CGPath赋给贝塞尔曲线
    UIBezierPath* aPath = [UIBezierPath bezierPath];

    aPath.CGPath = cgPath;

    aPath.usesEvenOddFillRule = YES;

   //并不在ARC的管理范围之内。所以需要手动释放对象,释放cgPath
    CGPathRelease(cgPath);

    //划线
    [[UIColor redColor]setStroke];
    [aPath setLineWidth:5];
    [aPath stroke];
}
4.通过shapeLayer画线
这样就不用去UIView的drawRect方法里面画图了,也就是可以在ViewController里面绘制了
//ShapeLayer
-(void)layerAnimation
{
    //贝塞尔画圆
    UIBezierPath *path = [UIBezierPath bezierPathWithArcCenter:CGPointMake(100, 100) radius:100 startAngle:0 endAngle:M_PI clockwise:NO];

    //初始化shapeLayer
    self.myShapeLayer = [CAShapeLayer layer];
    _myShapeLayer.frame = _redView.bounds;

    _myShapeLayer.strokeColor = [UIColor greenColor].CGColor;//边沿线色
    _myShapeLayer.fillColor = [UIColor grayColor].CGColor;//填充色

    _myShapeLayer.lineJoin = kCALineJoinMiter;//线拐点的类型
    _myShapeLayer.lineCap = kCALineCapSquare;//线终点


    //从贝塞尔曲线获得形状
    _myShapeLayer.path = path.CGPath;

    //线条宽度
    _myShapeLayer.lineWidth = 10;

    //起始和终止
    _myShapeLayer.strokeStart = 0.0;
    _myShapeLayer.strokeEnd = 1.0;


    //将layer添加进图层
    [self.redView.layer addSublayer:_myShapeLayer];

}
二、关键帧动画
//关键帧动画
-(void)layerKeyFrameAnimation
{
    //画一个path
    UIBezierPath *path = [UIBezierPath bezierPath];
    [path moveToPoint:CGPointMake(-40, 100)];
    [path addLineToPoint:CGPointMake(360, 100)];
    [path addLineToPoint:CGPointMake(360, 200)];
    [path addLineToPoint:CGPointMake(-40, 200)];
    [path addLineToPoint:CGPointMake(-40, 300)];
    [path addLineToPoint:CGPointMake(360, 300)];

    //几个固定点
    NSValue *orginalValue = [NSValue valueWithCGPoint:self.redView.layer.position];
    NSValue *value_1 = [NSValue valueWithCGPoint:CGPointMake(300, 300)];
    NSValue *value_2 = [NSValue valueWithCGPoint:CGPointMake(400, 300)];
    NSValue *value_3 = [NSValue valueWithCGPoint:CGPointMake(400, 400)];

    //变动的属性,keyPath后面跟的属性是CALayer的属性
    CAKeyframeAnimation *keyFA = [CAKeyframeAnimation animationWithKeyPath:@"position"];

    //value数组,放所有位置信息,如果设置path,此项会被忽略
    keyFA.values = @[orginalValue,value_1,value_2,value_3];
    //动画路径
//    keyFA.path = path.CGPath;
    //该属性是一个数组,用以指定每个子路径(AB,BC,CD)的时间。如果你没有显式地对keyTimes进行设置,则系统会默认每条子路径的时间为:ti=duration/(帧数),即每条子路径的duration相等
    keyFA.keyTimes = @[@(0.0),@(0.5),@(0.9),@(2)];
    //动画总时间
    keyFA.duration = 5.0f;
    //重复次数,小于0无限重复
    keyFA.repeatCount = 10;

    /*
    这个属性用以指定时间函数,类似于运动的加速度
    kCAMediaTimingFunctionLinear//线性
    kCAMediaTimingFunctionEaseIn//淡入
    kCAMediaTimingFunctionEaseOut//淡出
    kCAMediaTimingFunctionEaseInEaseOut//淡入淡出
    kCAMediaTimingFunctionDefault//默认
     */
    keyFA.timingFunction = [CAMediaTimingFunction functionWithName:kCAMediaTimingFunctionLinear];

   /*
    fillMode的作用就是决定当前对象过了非active时间段的行为. 比如动画开始之前,动画结束之后。如果是一个动画CAAnimation,则需要将其removedOnCompletion设置为NO,要不然fillMode不起作用.

    下面来讲各个fillMode的意义
    kCAFillModeRemoved 这个是默认值,也就是说当动画开始前和动画结束后,动画对layer都没有影响,动画结束后,layer会恢复到之前的状态
    kCAFillModeForwards 当动画结束后,layer会一直保持着动画最后的状态
    kCAFillModeBackwards 这个和kCAFillModeForwards是相对的,就是在动画开始前,你只要将动画加入了一个layer,layer便立即进入动画的初始状态并等待动画开始.你可以这样设定测试代码,将一个动画加入一个layer的时候延迟5秒执行.然后就会发现在动画没有开始的时候,只要动画被加入了layer,layer便处于动画初始状态
    kCAFillModeBoth 理解了上面两个,这个就很好理解了,这个其实就是上面两个的合成.动画加入后开始之前,layer便处于动画初始状态,动画结束后layer保持动画最后的状态.
        //添加动画
    */
    keyFA.fillMode = kCAFillModeForwards;

    /*
     在关键帧动画中还有一个非常重要的参数,那便是calculationMode,计算模式.该属性决定了物体在每个子路径下是跳着走还是匀速走,跟timeFunctions属性有点类似
     其主要针对的是每一帧的内容为一个座标点的情况,也就是对anchorPoint 和 position 进行的动画.当在平面座标系中有多个离散的点的时候,可以是离散的,也可以直线相连后进行插值计算,也可以使用圆滑的曲线将他们相连后进行插值计算. calculationMode目前提供如下几种模式

     kCAAnimationLinear calculationMode的默认值,表示当关键帧为座标点的时候,关键帧之间直接直线相连进行插值计算;
     kCAAnimationDiscrete 离散的,就是不进行插值计算,所有关键帧直接逐个进行显示;
     kCAAnimationPaced 使得动画均匀进行,而不是按keyTimes设置的或者按关键帧平分时间,此时keyTimes和timingFunctions无效;
     kCAAnimationCubic 对关键帧为座标点的关键帧进行圆滑曲线相连后插值计算,对于曲线的形状还可以通过tensionValues,continuityValues,biasValues来进行调整自定义,这里的数学原理是Kochanek–Bartels spline,这里的主要目的是使得运行的轨迹变得圆滑;
     kCAAnimationCubicPaced 看这个名字就知道和kCAAnimationCubic有一定联系,其实就是在kCAAnimationCubic的基础上使得动画运行变得均匀,就是系统时间内运动的距离相同,此时keyTimes以及timingFunctions也是无效的.
     */
    keyFA.calculationMode = kCAAnimationPaced;

    //旋转的模式,auto就是沿着切线方向动,autoReverse就是转180度沿着切线动
    keyFA.rotationMode = kCAAnimationRotateAuto;

    //结束后是否移除动画
    keyFrameAnimation.removedOnCompletion = NO;

     //添加动画
    [self.redView.layer addAnimation:keyFA forKey:@""];
}
这里有个泡泡动画的demo,结合了贝塞尔曲线和帧动画,很精致
https://github.com/bnb173yjx/BubbleAnimationDemo


 1100
1100


 被折叠的 条评论
为什么被折叠?
被折叠的 条评论
为什么被折叠?
 到【灌水乐园】发言


