


写在前面:看了很多博客之后,被大神这种分享精神给感染了。我也决定开始正式写博客了,前面也写过一两篇,不过发现自己描述能力实在有限,而且似懂非懂,就不好意思发出来,现在重新整理,以后会坚持写下去,希望大家多多支持。
2016.01.26 修正:
文中说如果填充的View没有parent,会传入一个默认的layoutParams,这个layoutParams默认属性为wrap_content。 这一段是错误的。
ViewGroup的不同子类,生成出来的LayoutParams属性会不一样。比如FrameLayout的是match_parent。
正文已修正
##1. LayoutInflater源码分析
想要真正的了解View, 我们需要从xml被inflate成View对象开始说起,对于LayoutInflater我们并不陌生,因为经常使用到。
将一个xml文件填充成View有好几种方式,但是归根到底都是用到了LayoutInflater这个类的inflate()方法。我们来简单的过一遍源码(有部分删减,便于理解)
TAG:tag1(这段代码在问中用tag1表示)
public View inflate(XmlPullParser parser, @Nullable ViewGroup root, boolean attachToRoot) {
    synchronized (mConstructorArgs) {

       final Context inflaterContext = mContext;
       final AttributeSet attrs = Xml.asAttributeSet(parser);
       Context lastContext = (Context) mConstructorArgs[0];
       mConstructorArgs[0] = inflaterContext;
       View result = root;
           // Look for the root node.
       int type;
       while ((type = parser.next()) != XmlPullParser.START_TAG &&
               type != XmlPullParser.END_DOCUMENT) {
           // Empty
       }

       if (type != XmlPullParser.START_TAG) {
           throw new InflateException(parser.getPositionDescription()
                   + ": No start tag found!");
       }

       final String name = parser.getName();

       // Temp is the root view that was found in the xml
       final View temp = createViewFromTag(root, name, inflaterContext, attrs);

       ViewGroup.LayoutParams params = null;

       if (root != null) {
           // Create layout params that match root, if supplied
           params = root.generateLayoutParams(attrs);
           if (!attachToRoot) {
               // Set the layout params for temp if we are not
               // attaching. (If we are, we use addView, below)
               temp.setLayoutParams(params);
           }
       }

       // Inflate all children under temp against its context.
       rInflateChildren(parser, temp, attrs, true);

       // We are supposed to attach all the views we found (int temp)
       // to root. Do that now.
       if (root != null && attachToRoot) {
           root.addView(temp, params);
       }

       // Decide whether to return the root that was passed in or the
       // top view found in xml.
       if (root == null || !attachToRoot) {
           result = temp;
       }
       return result;
   }
}
第24行:final View temp = createViewFromTag(root, name, inflaterContext, attrs)
见名知意,根据标签的名字通过反射创建对象,内部代码比较复杂,暂时没看懂,不过这不是我们的重点。
第39行:rInflateChildren(parser, temp, attrs, true);
final void rInflateChildren(XmlPullParser parser, View parent, AttributeSet attrs, boolean finishInflate) throws XmlPullParserException, IOException {
    rInflate(parser, parent, parent.getContext(), attrs, finishInflate);
}
void rInflate(XmlPullParser parser, View parent, Context context,
            AttributeSet attrs, boolean finishInflate) throws XmlPullParserException, IOException {

        final int depth = parser.getDepth();
        int type;

        while (((type = parser.next()) != XmlPullParser.END_TAG ||
                parser.getDepth() > depth) && type != XmlPullParser.END_DOCUMENT) {

            if (type != XmlPullParser.START_TAG) {
                continue;
            }

            final String name = parser.getName();

            if (TAG_REQUEST_FOCUS.equals(name)) {
                parseRequestFocus(parser, parent);
            } else if (TAG_TAG.equals(name)) {
                parseViewTag(parser, parent, attrs);
            } else if (TAG_INCLUDE.equals(name)) {
                if (parser.getDepth() == 0) {
                    throw new InflateException("<include /> cannot be the root element");
                }
                parseInclude(parser, context, parent, attrs);
            } else if (TAG_MERGE.equals(name)) {
                throw new InflateException("<merge /> must be the root element");
            } else {
                final View view = createViewFromTag(parent, name, context, attrs);
                final ViewGroup viewGroup = (ViewGroup) parent;
                final ViewGroup.LayoutParams params = viewGroup.generateLayoutParams(attrs);
                rInflateChildren(parser, view, attrs, true);
                viewGroup.addView(view, params);
            }
        }

        if (finishInflate) {
            parent.onFinishInflate();
        }
    }
第28行到最后一行:
上面这两段代码就是将整个解析流程的核心点了,通过递归一层一层的解析,然后将下一层解析的对象添加到上一层。rInflateChildren和rInflate方法互相调用,其实调用的都是rInflate方法本身,通过createViewFromTag方法创建view,并且添加到父view。这就是Android布局的层级结构,后面添加的控件会遮住前面的。
当整个xml都解析完毕的时候,会回调onFinishInflate方法,可以在自定义view中重写这个方法。
##2. 真正的理解inflate()方法
xml解析成View的整个过程看起来是不是很简单?因为我们忽略了其中很多实现方法,比如createViewFromTag。然而那并不是我们要掌握的重点,包括上面的递归我们也只是需要知道原理就够了。
本次我们真正需要了解的是inflate方法的几个参数。
inflate(int resourceId, ViewGroup root);
inflate(int resourceId, ViewGroup root, boolean attachToRoot);
这两个参数重载方法有什么区别呢,里面的参数又是什么作用呢,我们最常用的方法就是 inflate(R.layout.xxx, null); 但是我们从来没有真正关心过其他两个参数,也不知道它们的作用,现在我们通过研究源码来探究下。
假设我们先用两个参数的inflate,并且忽略第三个参数的作用来走一遍源码。看tag1:
第8行: 先给result 赋值, result = root;
第23-24行:根据找到的第一个标签(根节点)创建对象temp。
第43 -45行: 如果root != null, root.addView( temp ); 将temp添加进root
第49-51行: 如果root == null, result = temp;
第五十二行:返回result
用伪代码来表示就是这样:
public View inflate(View view, ViewGroup root) {
        View result = root;
        View temp = createViewFromTag(attr);
        if(root == null) {
            result = temp;
        } else {
            // 这里因为result和root指向都是同一个对象,所以相当于result.addView(temp)
            root.addView(temp);
        }
        return result;
    }
不完全结论:
1. 如果View view = inflate(resourceId, root)的第二个参数 root为null, 那么inflate返回的view就是xml解析出来的那个view,也就是第24行代码的那个temp。
2. 如果root 不为null, 那么inflate返回的 view就是root, 只是xml解析出来的view作为root的孩子了,也就是temp添加进root了, 看第43-45行代码。
这看起来是将两行代码结合成了一行,就像下面这样
	View view = View.inflate(this, R.layout.xxx, null);
	parent.addView(view);
View.inflate(this, R.layout.xxx, parent);
按照上面的结论, 这两段代码的效果是一样的。真的可以这样认为吗?
不是的,第二段代码还多做了一步。 那就是设置layoutParams,我们继续往下看。
##3. attachToRoot的用处
public View inflate(int resource, ViewGroup root) {
        return inflate(resource, root, root != null);
    }
看看inflate(int resourceId, ViewGroup root)的源码我们就明白了,内部调用的还是inflate(int resourceId, ViewGroup root, boolean attachToRoot), attchToRoot有默认的赋值 root!= null。
那么,attachToRoot 到底有什么作用,我们跟踪attachToRoot,再看一遍源码。
第一段代码 28 - 36行,41-45行:如下
if (root != null) {
            // Create layout params that match root, if supplied
            params = root.generateLayoutParams(attrs);
            if (!attachToRoot) {
                // Set the layout params for temp if we are not
                // attaching. (If we are, we use addView, below)
                temp.setLayoutParams(params);
            }
        }
// We are supposed to attach all the views we found (int temp)
// to root. Do that now.
                    if (root != null && attachToRoot) {
                        root.addView(temp, params);
                    }
谷歌的工程师注释的也很明白,attachToRoot其实就是“是否将解析出来的View添加进root里面“。当使用 inflate(resourceId, null)方法的时候,attachToRoot这个参数是完全没有作用的,因为前提条件是if(root != null)。
在说inflate(int resourceId, ViewGroup root, boolean attachToRoot)这个方法前,我们先有必要了解一下params = root.generateLayoutParams(attrs);此方法的作用是根据child的布局属性生成layoutParams, 比如layout_width,layout_height。
根据上面的代码可以知道,当root不为null, attachToRoot = false的时候,root只是生成了layoutParams设置进temp,最终返回的是temp。
当root为null, attachToRoot = true的时候,root不仅生成设置了layoutParams,并且将temp添加进root, 最终返回的是root。
源码已经走了一遍了,最后剩下的就只有一个问题了,设置了LayoutParams和没有设置的区别,然后再写个目前得出的结论。
不完全结论:
1. inflate(resourceId, null):将xml填充成View, 不设置params,没有父View。
2. inflate( resourceId, root): 将xml填充成View,设置params,父View是root。同4
3. inflate( resourceId, root, false):将xml填充成view, 设置params, 没有父View。
4. inflate( resourceId, root, true):将xml填充成View,设置params,父View是root。同2
现在,我们写个小案例来验证一下这四个方法的区别。
先看activity_main的布局文件,啥都没,加了个ID而已。
<LinearLayout xmlns:android="http://schemas.android.com/apk/res/android"
    android:layout_width="match_parent"
    android:layout_height="match_parent"
    android:id="@+id/root">
</LinearLayout>
然后看看button的布局文件,我们准备将这个button填充出来添加到root中。
<Button xmlns:android="http://schemas.android.com/apk/res/android"
    android:layout_width="300dp"
    android:layout_height="100dp"
    android:text="test" />
代码:
public class MainActivity extends Activity {

    @Override
    protected void onCreate(Bundle savedInstanceState) {
        super.onCreate(savedInstanceState);
        setContentView(R.layout.activity_main);

        LayoutInflater layoutInflater = getLayoutInflater();
        LinearLayout root = (LinearLayout) findViewById(R.id.root);

        // 1. 常用
//        View view = layoutInflater.inflate(R.layout.buttom, null);
//        root.addView(view);

        // 2. 这个同4
//        layoutInflater.inflate(R.layout.buttom, root);

        // 3. attachToRoot = false
//        View view = layoutInflater.inflate(R.layout.buttom, root, false);
//        root.addView(view);

        // 4. attachToRoot = true
//        layoutInflater.inflate(R.layout.buttom, root, true);

    }
}
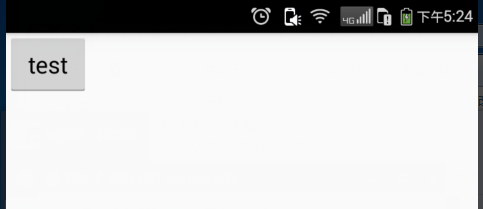
我依次解开注释测试这几个方法,看图。
1:
2,3,4一样的:
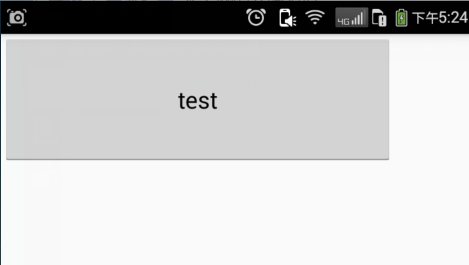
根据上一个结论得知, 没有设置layoutParams的话,button上的layout_width和layout_height就不起作用了,因为ViewGroup.addView()的时候,会判断是否有params,如果没有,parent就会为子类创建一个params,不同的ViewGroup子类创建出来的params也是不一样的,比如FrameLayout创建出来的是match_parent,而这里很明显是wrap_content,LinearLayout纵向布局和横向布局创建出来的params也是会不同的,这点请注意。
名字叫layout_xxx的属性,都是布局属性,而不是view自身的属性。所以layout_xxx是需要有parent或者说父布局的时候才会起作用。
而inflate(resourceId, null)因为没有parent,所以layout_xxx不起作用。其余三个方法,因为内部已经做了params = root.generateLayoutParams(attrs);并且设置了,所以就能正常了。
##4. 最终结论:
- getLayoutInflater().inflate(R.layout.xxx, parent);
父布局: parent
返回值: parent
layout_params : 有 - getLayoutInflater().inflate(R.layout.xxx, null);
父布局: null
返回值: 一个全新的View对象
layout_params : null - getLayoutInflater().inflate(R.layout.xxx, parent, false);
父布局: null
返回值: 一个全新的View对象
layout_params : 有 - getLayoutInflater().inflate(R.layout.xxx, parent, true);(同1)
父布局: parent
返回值: parent
layout_params : 有
对于LayoutInflate的inflate方法有以下几个结论(返回值view): - 当root = null的时候,attachToRoot不起作用,view没有父布局,并且没有设置layoutParams,布局属性(layout_xxx,下文不再赘述)不起作用,layout_width, layout_height默认为wrap_content。
- **当root != null, attachToRoot = false **, view没有父布局, 设置了layoutParams,布局属性将会起作用(将view添加到某个布局后)。
- 当root!=null, attachToRoot = true, 返回的view就是root,父布局是content(下文有说明),设置了layoutParams,布局属性将会起作用。
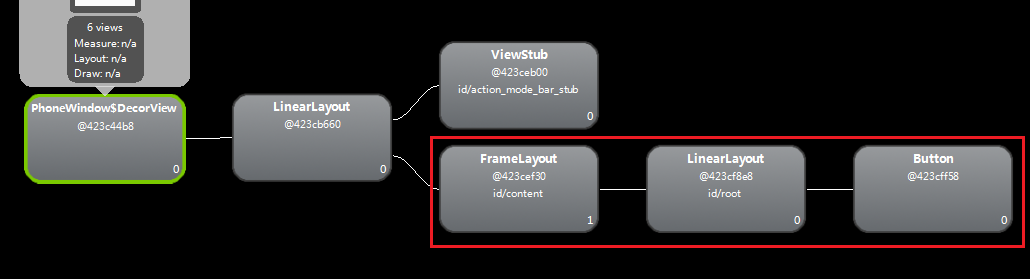
有些朋友可能就有疑问了,setContentView(R.layout.xxx)的布局属性怎么就能起作用呢?
那是因为setContentView(R.layout.xxx)这个方法内部,其实就已经给R.layout.xxx设置了parent,那个parent就是一个id为content的FrameLayout。Android最顶层的窗口叫DecorView, 本次就不细说了,直接打开sdk tools 中的hierarchyviewer.bat工具看看。
如果给上面的方法2或4加上addView,就像这样:
// 2. 因为这个和4是一样的,所以就不测试了
        View view = layoutInflater.inflate(R.layout.buttom, root);
        Log.e("test","view == root ?  "+ (view == root));
        root.addView(view);
log打印:

并且会报这个异常:

这再一次验证了以上结论的正确性。
OK,花了好几天时间终于写完了,苦于表达能力不行,如有发现,希望各位网友能指出文中的错误。下一篇准备写绘制流程,希望大家多多支持。


 2736
2736


 被折叠的 条评论
为什么被折叠?
被折叠的 条评论
为什么被折叠?
 到【灌水乐园】发言


