


 本文详细介绍环信集成过程中的会话框加载与数据展示方法,包括自定义cell、获取会话列表及显示会话数据等内容。
昨天,去忙别的事情了,今天继续更新环信集成的教程。
一、加载会话框
1. 新建一个cell
首先,我们自定义一个cell,用来实现会话框的好友昵称、消息、发送时间等。继承于YCBaseTableViewCell,这个是我自己写的一个自定义cell的基类,你如果没有引用我的YCBaseTableViewCell文件,直接继承苹果的UITableViewCell即可。然后,添加一些初始化控件的代码,如下:
#import "YCBaseTableViewCell.h"

@interface ConversationCell : YCBaseTableViewCell

@property (retain, nonatomic) UILabel *labName;
@property (retain, nonatomic) UILabel *labMsg;
@property (retain, nonatomic) UILabel *labTime;
@property (retain, nonatomic) UIImageView *imgHeader;

@end
#import "ConversationCell.h"
@implementation ConversationCell
- (id)initWithStyle:(UITableViewCellStyle)style reuseIdentifier:(NSString *)reuseIdentifier
{
self = [super initWithStyle:style reuseIdentifier:reuseIdentifier];
if (self) {
// Initialization code
self.backgroundColor = [UIColor whiteColor];
self.contentView.backgroundColor = [UIColor whiteColor];
self.selectionStyle = UITableViewCellSelectionStyleGray;
_imgHeader = [YCCommonCtrl commonImageViewWithFrame:CGRectMake(10, 5, 40, 40) image:[UIImage imageNamed:@""]];
[self addSubview:_imgHeader];
_labName = [YCCommonCtrl commonLableWithFrame:CGRectMake(55, 5, 250, 20)
text:@""
color:[UIColor blackColor]
font:[UIFont systemFontOfSize:17.0]
textAlignment:NSTextAlignmentLeft];
[self addSubview:_labName];
_labMsg = [YCCommonCtrl commonLableWithFrame:CGRectMake(55, 25, 250, 20)
text:@""
color:[UIColor grayColor]
font:[UIFont systemFontOfSize:17.0]
textAlignment:NSTextAlignmentLeft];
[self addSubview:_labMsg];
_labTime = [YCCommonCtrl commonLableWithFrame:CGRectMake(SCREEN_WIDTH-100, 5, 100, 20)
text:@""
color:[UIColor grayColor]
font:[UIFont systemFontOfSize:15.0]
textAlignment:NSTextAlignmentLeft];
[self addSubview:_labTime];
}
return self;
}
- (void)setDictInfo:(NSDictionary *)dictInfo
{
}
@end
2. 获取所有的会话
1、我们进入ChatListViewController.m文件中,在类的声明出遵循一些相关的协议,和添加相关的头文件:
#import "ChatListViewController.h"
#import "ChatViewController.h"
#import "ConversationCell.h"
#import "ConvertToCommonEmoticonsHelper.h"

@interface ChatListViewController ()<IChatManagerDelegate, EMCallManagerDelegate,ChatViewControllerDelegate>
{
    NSArray *arrConversations;

}

@end
2、获取聊天管理器对象
这个步骤很重要,缺少这个就加载不了会话的数据。
- (void)viewWillAppear:(BOOL)animated {
     [self getAllConversations]; //获取所有的会话
}

- (void)viewDidLoad {
    [super viewDidLoad];

    self.title = @"会话";

    //聊天管理器, 获取该对象后, 可以做登录、聊天、加好友等操作
    [[EaseMob sharedInstance].chatManager loadDataFromDatabase];
}
3、获取所有的会话
//获取所有的会话
- (void)getAllConversations
{
    arrConversations = [[EaseMob sharedInstance].chatManager conversations];
    [self.tableView reloadData];
}
二、显示会话数据
1. 显示好友昵称和头像
数据都已经加载好了,定义一个arrConversations数组接收数据,然后用列表显示出来。
#pragma mark - UITableView Delegate & DataSource
- (NSInteger)tableView:(UITableView *)tableView numberOfRowsInSection:(NSInteger)section {
    return arrConversations.count;
}

- (UITableViewCell *)tableView:(UITableView *)tableView cellForRowAtIndexPath:(NSIndexPath *)indexPath {
    static NSString *cellIdentifier = @"CELL";
    ConversationCell *cell = [tableView dequeueReusableCellWithIdentifier:cellIdentifier];
    if (cell == nil) {
        cell = [[ConversationCell alloc] initWithStyle:UITableViewCellStyleDefault reuseIdentifier:cellIdentifier];
    }

    EMConversation *conversation = [arrConversations objectAtIndex:indexPath.row];

    switch (conversation.conversationType) {
        //单聊会话
        case eConversationTypeChat:
        {
            cell.labName.text = conversation.chatter;
            cell.imgHeader.image = [UIImage imageNamed:@"chatListCellHead"];
            break;


        }
        //群聊会话
        case eConversationTypeGroupChat:
        {
            NSArray *groupArray = [[EaseMob sharedInstance].chatManager groupList];
                    for (EMGroup *group in groupArray) {
                        if ([group.groupId isEqualToString:conversation.chatter]) {
                            cell.labName.text = group.groupSubject;
                            cell.imgHeader.image = [UIImage imageNamed:group.isPublic ? @"groupPublicHeader" : @"groupPrivateHeader"]  ;
                            break;
                        }
                    }

        }
        //聊天室会话
        case eConversationTypeChatRoom:
        {

        }

        default:
            break;
    }

  //  cell.labMsg.text = [self subTitleMessageByConversation:conversation];

    return cell;
}
好吧,我们来编译一下。
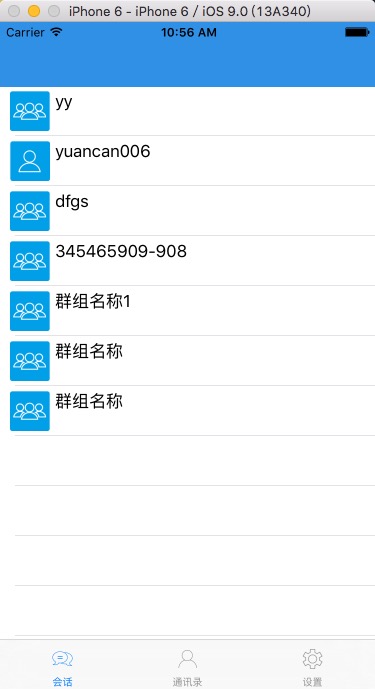
哎呦,不错喔,但是感觉还是少点什么。我们应该要显示最后收到的一条消息,和收到消息的时间,对吧。
2. 显示最后收到的消息
用下面这个方法,记得先引入一个转换表情的类:
#import "ConvertToCommonEmoticonsHelper.h"//得到最后消息文字或者类型
-(NSString *)subTitleMessageByConversation:(EMConversation *)conversation
{
NSString *ret = @"";
EMMessage *lastMessage = [conversation latestMessage];
if (lastMessage) {
id<IEMMessageBody> messageBody = lastMessage.messageBodies.lastObject;
switch (messageBody.messageBodyType) {
//图像类型
case eMessageBodyType_Image:
{
ret = NSLocalizedString(@"message.image1", @"[image]");
} break;
//文本类型
case eMessageBodyType_Text:
{
NSString *didReceiveText = [ConvertToCommonEmoticonsHelper
convertToSystemEmoticons:((EMTextMessageBody *)messageBody).text]; //表情映射
ret = didReceiveText;
} break;
//语音类型
case eMessageBodyType_Voice:
{
ret = NSLocalizedString(@"message.voice1", @"[voice]");
} break;
//位置类型
case eMessageBodyType_Location:
{
ret = NSLocalizedString(@"message.location1", @"[location]");
} break;
//视频类型
case eMessageBodyType_Video:
{
ret = NSLocalizedString(@"message.video1", @"[video]");
} break;
default:
break;
}
}
return ret;
}
OK ,一步一步来,我们编译一下,看看效果。
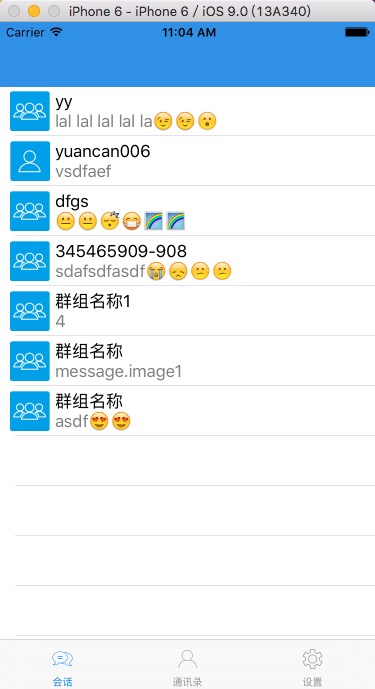
Very Good ! 然后我们在把收到消息的时间给加上。
3. 显示收到消息的时间
1、先引入一个处理时间的头文件:
#import "NSDate+Category.h"
2、添加处理时间的方法:
// 得到最后消息时间
-(NSString *)lastMessageTimeByConversation:(EMConversation *)conversation
{
    NSString *ret = @"";
    EMMessage *lastMessage = [conversation latestMessage];;
    if (lastMessage) {
        ret = [NSDate formattedTimeFromTimeInterval:lastMessage.timestamp];
    }

    return ret;
}
3、在列表中显示
在numberOfRowsInSection方法中添加:
cell.labTime.text = [self lastMessageTimeByConversation:conversation]; //显示收到消息的时间
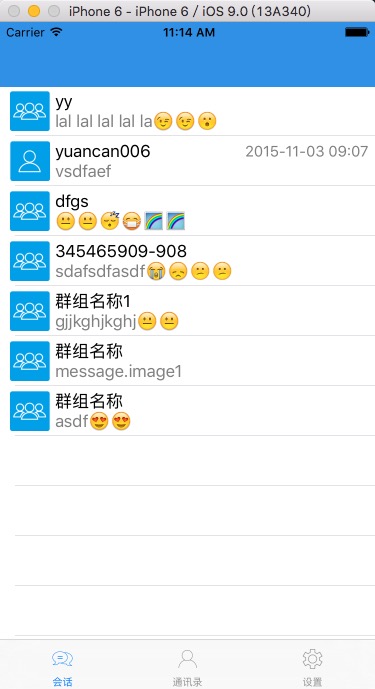
完工,编译看效果。
补充说明
有读者反馈,发送消息不显示时间,会话列表也不显示时间。原因是因为没有添加”Localizable.string”这个文件。添加进去,重新编译,即可显示时间。如下图:


 2089
2089


 到【灌水乐园】发言


