


环境:Windows 7
所需要的软件:
Apache :apache_2.0.55 1 个
Tomcat: apache-tomcat-5.5.17 (zip版) 2个
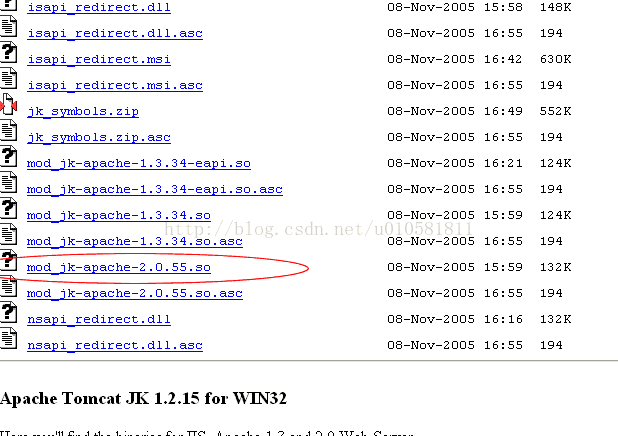
mod_jk:: mod_jk-apache-2.0.55.so 1个
准备相关软件并下载安装:
第一部分:负载均衡
负载均衡,就是apache将客户请求均衡的分给tomcat1,tomcat2....去处理
1.安装apche,tomcat
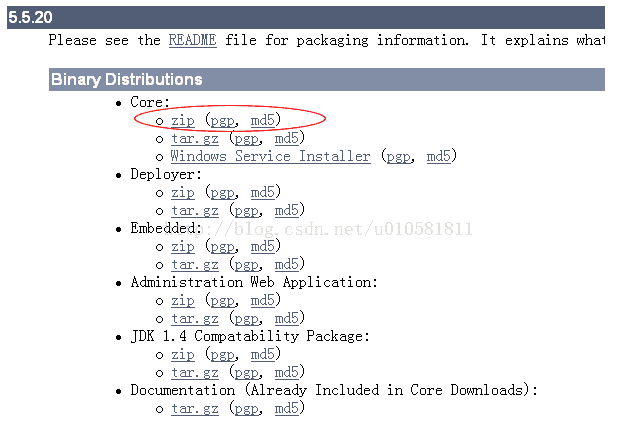
http://httpd.apache.org/ 下载Apache 2.0.55
http://tomcat.apache.org/download-55.cgi 下载tomcat5.5 zip版本(解压即可,绿色版)
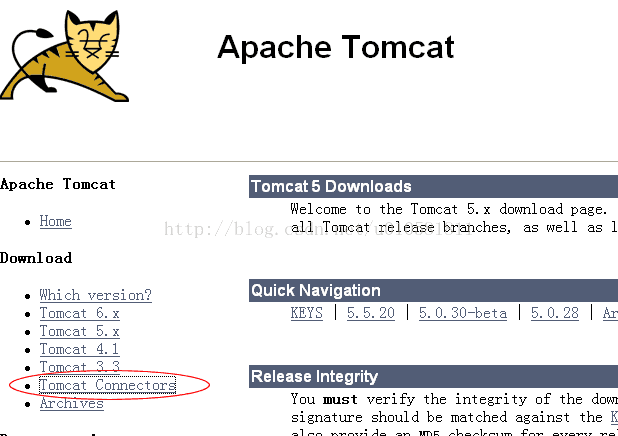
http://apache.justdn.org/tomcat/tomcat-connectors/jk/binaries/win32/jk-1.2.15/ 下载mod_jk,注意和 apache版本匹配
按照jdk,我的路径为:E:\ide\apache\Apache2
解压两份Tomcat, 路径分别为 E:\ide\tomcat1,E:\ide\tomcat2
| 0, 环境说明 Apache :apache_2.0.55 1 个 Tomcat: apache-tomcat-5.5.17 (zip版) 2个 mod_jk:: mod_jk-apache-2.0.55.so 1个 第一部分:负载均衡 负载均衡,就是apache将客户请求均衡的分给tomcat1,tomcat2....去处理 1.安装apche,tomcat http://httpd.apache.org/ 下载Apache 2.0.55 http://tomcat.apache.org/download-55.cgi 下载tomcat5.5 zip版本(解压即可,绿色版) http://apache.justdn.org/tomcat/tomcat-connectors/jk/binaries/win32/jk-1.2.15/ 下载mod_jk,注意和 apache版本匹配 按照jdk,我的路径为:E:\ide\apache\Apache2 解压两份Tomcat, 路径分别为 E:\ide\tomcat1,E:\ide\tomcat2 下载mod_jk
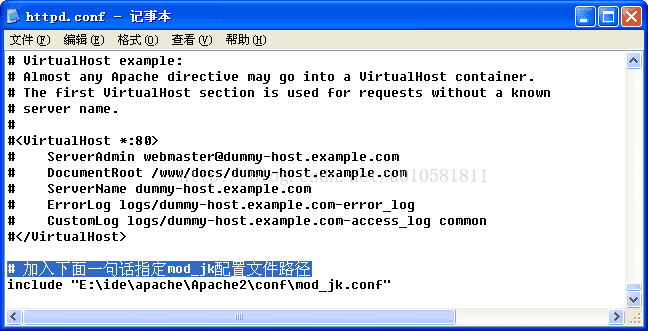
2.修改Apache配置文件http.conf 在apache安装目录下conf目录中找到http.conf 在文件最后加上下面一句话就可以了 include "E:\ide\apache\Apache2\conf\mod_jk.conf"
2. http.conf 同目录下新建mod_jk.conf文件,内容如下
#加载mod_jk Module #指定 workers.properties文件路径 #指定那些请求交给tomcat处理,"controller"为在workers.propertise里指定的负载分配控制器 JkMount /*.jsp controller 3.在http.conf同目录下新建 workers.properties文件,内容如下
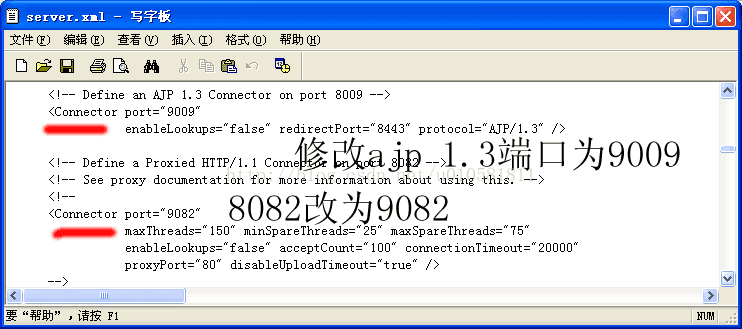
worker.list = controller,tomcat1,tomcat2 #server 列表 #========tomcat1======== worker.tomcat1.port=8009 #ajp13 端口号,在tomcat下server.xml配置,默认8009 #========tomcat2======== worker.tomcat2.port=9009 #ajp13 端口号,在tomcat下server.xml配置,默认8009
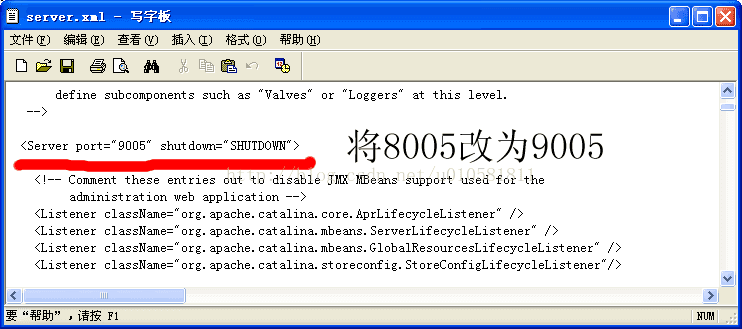
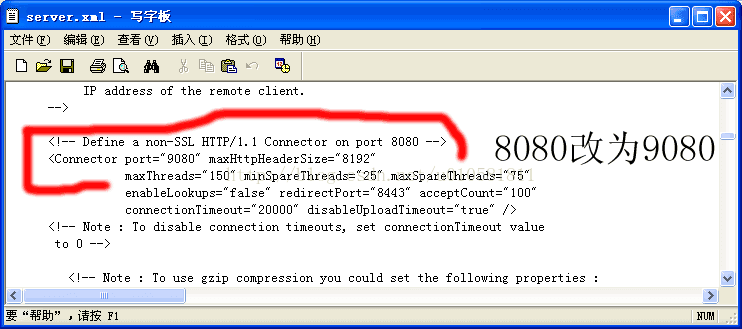
4.修改tomcat配置文件server.xml 如果你在不同电脑上安装tomcat,tomcat的安装数量为一个,可以不必修改tomcat配置文件 我这里是在同一台电脑上安装两个tomcat,所以需要更改其中一个的设置 打开tomcat2/conf/server.xml文件
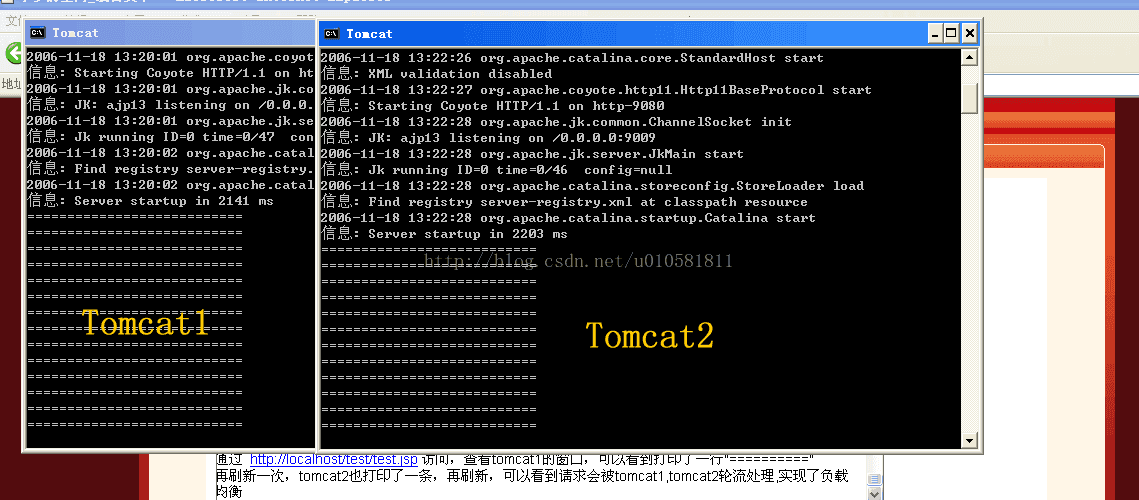
5.编写一个测试jsp
建立一个目录test.里面新建一个test.jsp,内容为 <% 把test放到tomcat1,tomcat2的webapps下 6.启动apache,tomcat1,tomcat2,进行测试 通过 http://localhost/test/test.jsp 访问,查看tomcat1的窗口,可以看到打印了一行"==========" 再刷新一次,tomcat2也打印了一条,再刷新,可以看到请求会被tomcat1,tomcat2轮流处理,实现了负载均衡
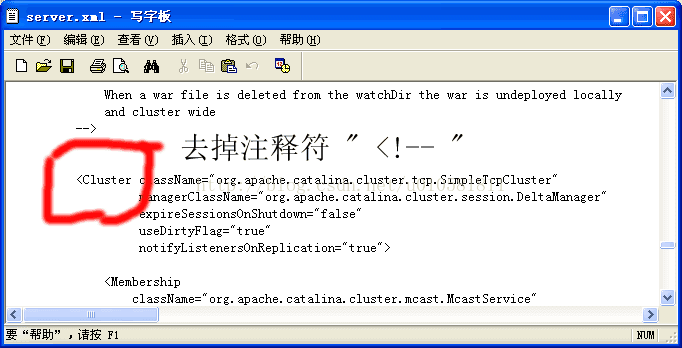
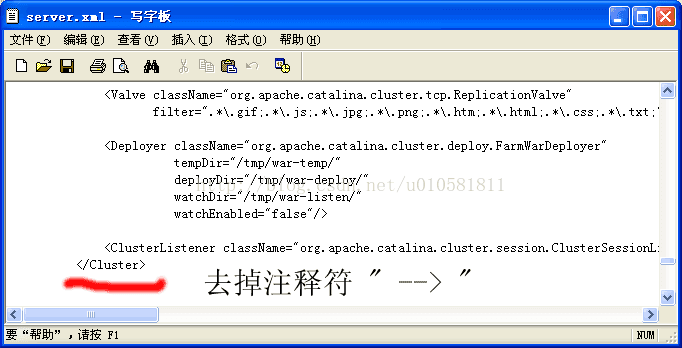
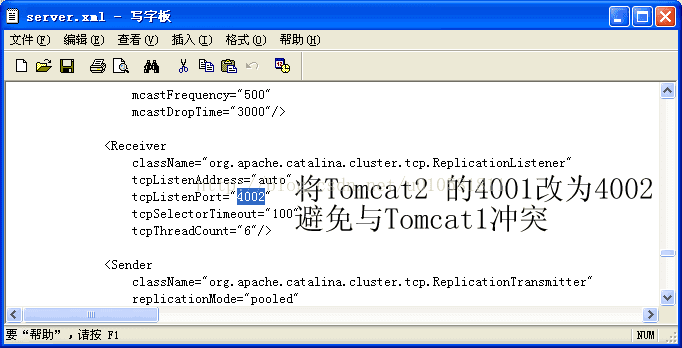
第二部分,配置集群 只配置负载均衡还不行,还要session复制,也就是说其中任何一个tomcat的添加的session,是要同步复制到其它tomcat, 集群内的tomcat都有相同的session 1. 修改tomcat1, tomcat2的server.xml,将集群部分配置的在注释符删掉,并将tomcat2的4001端口改为4002,以避免与tomcat冲突,当然,如果是两台电脑,是不用改端口的,去掉注释符即可
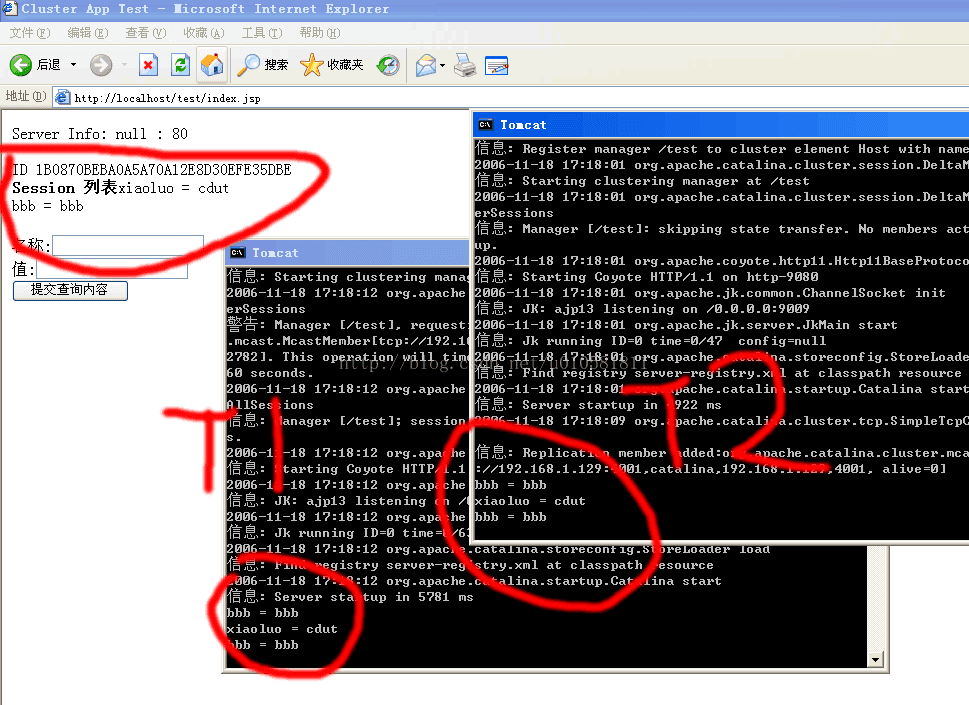
2,修改测试项目test 修改test.jsp,内容如下 <%@ page contentType="text/html; charset=GBK" %> // 如果有新的 Session 属性设置 out.print("<b>Session 列表</b>"); Enumeration e = session.getAttributeNames(); 然后在test 新建WEB-INF目录,WEB-INF下新建web.xml,内容如下 <web-app xmlns="http://java.sun.com/xml/ns/j2ee" xmlns:xsi="http://www.w3.org/2001/XMLSchema-instance" xsi:schemaLocation="http://java.sun.com/xml/ns/j2ee http://java.sun.com/xml/ns/j2ee/web-app_2_4.xsd" version="2.4"> 注意:在你的应用的web.xml加入 <distributable/> 即可 ok,讲test复制到tomcat1,tomcat2的webapps下,重启apache,tomcat1,tomcat2, 输入网址 http://localhost/test/test.jsp 新建一个 名称为 xiaoluo ,值为 cdut 的session,提交查询,新开一个ie窗口,再提交查询,如图,可以看到,两个tomcat 是负载均衡,并且session同步的
Tomcat1: <?xml version='1.0' encoding='utf-8'?> <!-- Licensed to the Apache Software Foundation (ASF) under one or more contributor license agreements. See the NOTICE file distributed with this work for additional information regarding copyright ownership. The ASF licenses this file to You under the Apache License, Version 2.0 (the "License"); you may not use this file except in compliance with the License. You may obtain a copy of the License at
http://www.apache.org/licenses/LICENSE-2.0
Unless required by applicable law or agreed to in writing, software distributed under the License is distributed on an "AS IS" BASIS, WITHOUT WARRANTIES OR CONDITIONS OF ANY KIND, either express or implied. See the License for the specific language governing permissions and limitations under the License. --> <!-- Note: A "Server" is not itself a "Container", so you may not define subcomponents such as "Valves" at this level. Documentation at /docs/config/server.html --> <Server port="8005" shutdown="SHUTDOWN">
<!--APR library loader. Documentation at /docs/apr.html --> <Listener className="org.apache.catalina.core.AprLifecycleListener" SSLEngine="on" /> <!--Initialize Jasper prior to webapps are loaded. Documentation at /docs/jasper-howto.html --> <Listener className="org.apache.catalina.core.JasperListener" /> <!-- JMX Support for the Tomcat server. Documentation at /docs/non-existent.html --> <Listener className="org.apache.catalina.mbeans.ServerLifecycleListener" /> <Listener className="org.apache.catalina.mbeans.GlobalResourcesLifecycleListener" />
<!-- Global JNDI resources Documentation at /docs/jndi-resources-howto.html --> <GlobalNamingResources> <!-- Editable user database that can also be used by UserDatabaseRealm to authenticate users --> <Resource name="UserDatabase" auth="Container" type="org.apache.catalina.UserDatabase" description="User database that can be updated and saved" factory="org.apache.catalina.users.MemoryUserDatabaseFactory" pathname="conf/tomcat-users.xml" /> </GlobalNamingResources>
<!-- A "Service" is a collection of one or more "Connectors" that share a single "Container" Note: A "Service" is not itself a "Container", so you may not define subcomponents such as "Valves" at this level. Documentation at /docs/config/service.html --> <Service name="Catalina">
<!--The connectors can use a shared executor, you can define one or more named thread pools--> <!-- <Executor name="tomcatThreadPool" namePrefix="catalina-exec-" maxThreads="150" minSpareThreads="4"/> -->
<!-- A "Connector" represents an endpoint by which requests are received and responses are returned. Documentation at : Java HTTP Connector: /docs/config/http.html (blocking & non-blocking) Java AJP Connector: /docs/config/ajp.html APR (HTTP/AJP) Connector: /docs/apr.html Define a non-SSL HTTP/1.1 Connector on port 8080 --> <Connector port="8080" protocol="HTTP/1.1" connectionTimeout="20000" redirectPort="8443" /> <!-- A "Connector" using the shared thread pool--> <!-- <Connector executor="tomcatThreadPool" port="8080" protocol="HTTP/1.1" connectionTimeout="20000" redirectPort="8443" /> --> <!-- Define a SSL HTTP/1.1 Connector on port 8443 This connector uses the JSSE configuration, when using APR, the connector should be using the OpenSSL style configuration described in the APR documentation --> <!-- <Connector port="8443" protocol="HTTP/1.1" SSLEnabled="true" maxThreads="150" scheme="https" secure="true" clientAuth="false" sslProtocol="TLS" /> -->
<!-- Define an AJP 1.3 Connector on port 8009 --> <Connector port="8009" protocol="AJP/1.3" redirectPort="8443" />
<!-- An Engine represents the entry point (within Catalina) that processes every request. The Engine implementation for Tomcat stand alone analyzes the HTTP headers included with the request, and passes them on to the appropriate Host (virtual host). Documentation at /docs/config/engine.html -->
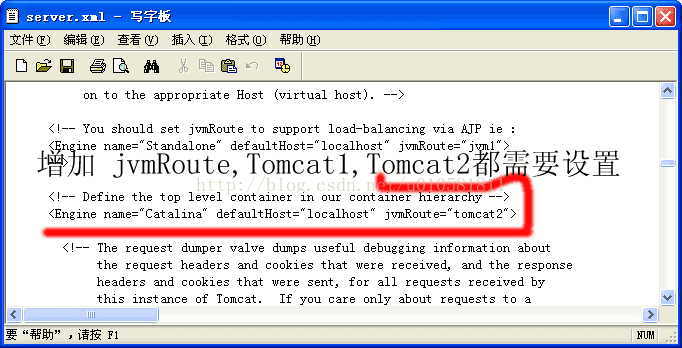
<!-- You should set jvmRoute to support load-balancing via AJP ie : <Engine name="Standalone" defaultHost="localhost" jvmRoute="jvm1"> --> <Engine name="Catalina" defaultHost="localhost" jvmRoute="tomcat1">
<!--For clustering, please take a look at documentation at: /docs/cluster-howto.html (simple how to) /docs/config/cluster.html (reference documentation) --> <!-- <Cluster className="org.apache.catalina.ha.tcp.SimpleTcpCluster"/> -->
<Cluster className="org.apache.catalina.ha.tcp.SimpleTcpCluster" channelSendOptions="6">
<Manager className="org.apache.catalina.ha.session.BackupManager" expireSessionsOnShutdown="false" notifyListenersOnReplication="true" mapSendOptions="6"/> <!-- <Manager className="org.apache.catalina.ha.session.DeltaManager" expireSessionsOnShutdown="false" notifyListenersOnReplication="true"/> --> <Channel className="org.apache.catalina.tribes.group.GroupChannel"> <Membership className="org.apache.catalina.tribes.membership.McastService" address="228.0.0.4" port="45564" frequency="500" dropTime="3000"/> <Receiver className="org.apache.catalina.tribes.transport.nio.NioReceiver" address="auto" port="4001" selectorTimeout="100" maxThreads="6"/>
<Sender className="org.apache.catalina.tribes.transport.ReplicationTransmitter"> <Transport className="org.apache.catalina.tribes.transport.nio.PooledParallelSender"/> </Sender> <Interceptor className="org.apache.catalina.tribes.group.interceptors.TcpFailureDetector"/> <Interceptor className="org.apache.catalina.tribes.group.interceptors.MessageDispatch15Interceptor"/> <Interceptor className="org.apache.catalina.tribes.group.interceptors.ThroughputInterceptor"/> </Channel>
<Valve className="org.apache.catalina.ha.tcp.ReplicationValve" filter=".*\.gif;.*\.js;.*\.jpg;.*\.png;.*\.htm;.*\.html;.*\.css;.*\.txt;"/>
<Deployer className="org.apache.catalina.ha.deploy.FarmWarDeployer" tempDir="/tmp/war-temp/" deployDir="/tmp/war-deploy/" watchDir="/tmp/war-listen/" watchEnabled="false"/>
<ClusterListener className="org.apache.catalina.ha.session.ClusterSessionListener"/> </Cluster>
<!-- The request dumper valve dumps useful debugging information about the request and response data received and sent by Tomcat. Documentation at: /docs/config/valve.html --> <!-- <Valve className="org.apache.catalina.valves.RequestDumperValve"/> -->
<!-- This Realm uses the UserDatabase configured in the global JNDI resources under the key "UserDatabase". Any edits that are performed against this UserDatabase are immediately available for use by the Realm. --> <Realm className="org.apache.catalina.realm.UserDatabaseRealm" resourceName="UserDatabase"/>
<!-- Define the default virtual host Note: XML Schema validation will not work with Xerces 2.2. --> <Host name="localhost" appBase="webapps" unpackWARs="true" autoDeploy="true" xmlValidation="false" xmlNamespaceAware="false">
<!-- SingleSignOn valve, share authentication between web applications Documentation at: /docs/config/valve.html --> <!-- <Valve className="org.apache.catalina.authenticator.SingleSignOn" /> -->
<!-- Access log processes all example. Documentation at: /docs/config/valve.html --> <!-- <Valve className="org.apache.catalina.valves.AccessLogValve" directory="logs" prefix="localhost_access_log." suffix=".txt" pattern="common" resolveHosts="false"/> -->
</Host> </Engine> </Service> </Server> |
Tomcat2
<?xml version='1.0' encoding='utf-8'?>
<!--
Licensed to the Apache Software Foundation (ASF) under one or more
contributor license agreements. See the NOTICE file distributed with
this work for additional information regarding copyright ownership.
The ASF licenses this file to You under the Apache License, Version 2.0
(the "License"); you may not use this file except in compliance with
the License. You may obtain a copy of the License at
http://www.apache.org/licenses/LICENSE-2.0
Unless required by applicable law or agreed to in writing, software
distributed under the License is distributed on an "AS IS" BASIS,
WITHOUT WARRANTIES OR CONDITIONS OF ANY KIND, either express or implied.
See the License for the specific language governing permissions and
limitations under the License.
-->
<!-- Note: A "Server" is not itself a "Container", so you may not
define subcomponents such as "Valves" at this level.
Documentation at /docs/config/server.html
-->
<Server port="9005" shutdown="SHUTDOWN">
<!--APR library loader. Documentation at /docs/apr.html -->
<Listener className="org.apache.catalina.core.AprLifecycleListener" SSLEngine="on" />
<!--Initialize Jasper prior to webapps are loaded. Documentation at /docs/jasper-howto.html -->
<Listener className="org.apache.catalina.core.JasperListener" />
<!-- JMX Support for the Tomcat server. Documentation at /docs/non-existent.html -->
<Listener className="org.apache.catalina.mbeans.ServerLifecycleListener" />
<Listener className="org.apache.catalina.mbeans.GlobalResourcesLifecycleListener" />
<!-- Global JNDI resources
Documentation at /docs/jndi-resources-howto.html
-->
<GlobalNamingResources>
<!-- Editable user database that can also be used by
UserDatabaseRealm to authenticate users
-->
<Resource name="UserDatabase" auth="Container"
type="org.apache.catalina.UserDatabase"
description="User database that can be updated and saved"
factory="org.apache.catalina.users.MemoryUserDatabaseFactory"
pathname="conf/tomcat-users.xml" />
</GlobalNamingResources>
<!-- A "Service" is a collection of one or more "Connectors" that share
a single "Container" Note: A "Service" is not itself a "Container",
so you may not define subcomponents such as "Valves" at this level.
Documentation at /docs/config/service.html
-->
<Service name="Catalina">
<!--The connectors can use a shared executor, you can define one or more named thread pools-->
<!--
<Executor name="tomcatThreadPool" namePrefix="catalina-exec-"
maxThreads="150" minSpareThreads="4"/>
-->
<!-- A "Connector" represents an endpoint by which requests are received
and responses are returned. Documentation at :
Java HTTP Connector: /docs/config/http.html (blocking & non-blocking)
Java AJP Connector: /docs/config/ajp.html
APR (HTTP/AJP) Connector: /docs/apr.html
Define a non-SSL HTTP/1.1 Connector on port 8080
-->
<Connector port="9080" protocol="HTTP/1.1"
connectionTimeout="20000"
redirectPort="8443" />
<!-- A "Connector" using the shared thread pool-->
<!--
<Connector executor="tomcatThreadPool"
port="8080" protocol="HTTP/1.1"
connectionTimeout="20000"
redirectPort="8443" />
-->
<!-- Define a SSL HTTP/1.1 Connector on port 8443
This connector uses the JSSE configuration, when using APR, the
connector should be using the OpenSSL style configuration
described in the APR documentation -->
<!--
<Connector port="8443" protocol="HTTP/1.1" SSLEnabled="true"
maxThreads="150" scheme="https" secure="true"
clientAuth="false" sslProtocol="TLS" />
-->
<!-- Define an AJP 1.3 Connector on port 8009 -->
<Connector port="9009" protocol="AJP/1.3" redirectPort="8443" />
<!-- An Engine represents the entry point (within Catalina) that processes
every request. The Engine implementation for Tomcat stand alone
analyzes the HTTP headers included with the request, and passes them
on to the appropriate Host (virtual host).
Documentation at /docs/config/engine.html -->
<!-- You should set jvmRoute to support load-balancing via AJP ie :
<Engine name="Standalone" defaultHost="localhost" jvmRoute="jvm1">
-->
<Engine name="Catalina" defaultHost="localhost" jvmRoute="tomcat2">
<!--For clustering, please take a look at documentation at:
/docs/cluster-howto.html (simple how to)
/docs/config/cluster.html (reference documentation) -->
<!--
<Cluster className="org.apache.catalina.ha.tcp.SimpleTcpCluster"/>
-->
<Cluster className="org.apache.catalina.ha.tcp.SimpleTcpCluster"
channelSendOptions="6">
<Manager className="org.apache.catalina.ha.session.BackupManager"
expireSessionsOnShutdown="false"
notifyListenersOnReplication="true"
mapSendOptions="6"/>
<!--
<Manager className="org.apache.catalina.ha.session.DeltaManager"
expireSessionsOnShutdown="false"
notifyListenersOnReplication="true"/>
-->
<Channel className="org.apache.catalina.tribes.group.GroupChannel">
<Membership className="org.apache.catalina.tribes.membership.McastService"
address="228.0.0.4"
port="45564"
frequency="500"
dropTime="3000"/>
<Receiver className="org.apache.catalina.tribes.transport.nio.NioReceiver"
address="auto"
port="4002"
selectorTimeout="100"
maxThreads="6"/>
<Sender className="org.apache.catalina.tribes.transport.ReplicationTransmitter">
<Transport className="org.apache.catalina.tribes.transport.nio.PooledParallelSender"/>
</Sender>
<Interceptor className="org.apache.catalina.tribes.group.interceptors.TcpFailureDetector"/>
<Interceptor className="org.apache.catalina.tribes.group.interceptors.MessageDispatch15Interceptor"/>
<Interceptor className="org.apache.catalina.tribes.group.interceptors.ThroughputInterceptor"/>
</Channel>
<Valve className="org.apache.catalina.ha.tcp.ReplicationValve"
filter=".*\.gif;.*\.js;.*\.jpg;.*\.png;.*\.htm;.*\.html;.*\.css;.*\.txt;"/>
<Deployer className="org.apache.catalina.ha.deploy.FarmWarDeployer"
tempDir="/tmp/war-temp/"
deployDir="/tmp/war-deploy/"
watchDir="/tmp/war-listen/"
watchEnabled="false"/>
<ClusterListener className="org.apache.catalina.ha.session.ClusterSessionListener"/>
</Cluster>
<!-- The request dumper valve dumps useful debugging information about
the request and response data received and sent by Tomcat.
Documentation at: /docs/config/valve.html -->
<!--
<Valve className="org.apache.catalina.valves.RequestDumperValve"/>
-->
<!-- This Realm uses the UserDatabase configured in the global JNDI
resources under the key "UserDatabase". Any edits
that are performed against this UserDatabase are immediately
available for use by the Realm. -->
<Realm className="org.apache.catalina.realm.UserDatabaseRealm"
resourceName="UserDatabase"/>
<!-- Define the default virtual host
Note: XML Schema validation will not work with Xerces 2.2.
-->
<Host name="localhost" appBase="webapps"
unpackWARs="true" autoDeploy="true"
xmlValidation="false" xmlNamespaceAware="false">
<!-- SingleSignOn valve, share authentication between web applications
Documentation at: /docs/config/valve.html -->
<!--
<Valve className="org.apache.catalina.authenticator.SingleSignOn" />
-->
<!-- Access log processes all example.
Documentation at: /docs/config/valve.html -->
<!--
<Valve className="org.apache.catalina.valves.AccessLogValve" directory="logs"
prefix="localhost_access_log." suffix=".txt" pattern="common" resolveHosts="false"/>
-->
</Host>
</Engine>
</Service>
</Server>
网友评论:
2
|
|
3
看测试结果图就知道了,worker.controller.sticky_session=true,是可以复制的。自己可以实践看看。
tomcat 是全局session复制,集群内每个tomcat的session完全同步(也就是任何时候都完全一样的)
在大规模应用的时候,用户过多,集群内tomcat数量过多,session的全局复制就会有问题,
因此,建议tomcat的数量不要太多,5个以下为好。
|
|
4
我按照你的步骤在打印=====的时候,为什么不是tomcat1,tomcat2轮流处理,只是在一个tomcat的窗口上打印,当我关掉一个tomcat以后,另一个才可以看到打印"=========="我想问下是为什么.急请教..谢谢!!!
|
|
5
恭喜你成功了!!
第一点, 这说明你实现了session复制
第二点,同一个ie窗口的请求,默认是让一个tomcat来处理的
第二个人请求,会均衡的让其它tomcat来处理
你关掉ie,重新再访问一下,第二个tomcat就会打印====了
本质的说,同一个ie窗口的请求,也就是和服务器的一次会话(session),sessio没有清掉的时候,是会让同一个tomcat处理的
session失效后,再次建立和服务器的会话,这样就会分配新的tomcat来处理
|
|
6
不是的,我session还没调,我就做了负载均衡,我打开测试页面做测试的时候,都是同一个TOMCAT在处理,我关掉IE再打开还是一样. 但是当我关掉一个TOMCAT,再刷新的时候另一个TOMCAT才会打印====号.可能我昨天描述的不准备,让你误解了...不好意思.我想问你一下, 这种情况该如何解决呢!!!真的比较急!!!
|
|
7
你是否加了 jvmRoute呢?????
如果是的话,那么你的结果就是正确的了
如果你配置了jvmRoute,
这跟session复制没有关系,一次会话,就有一个sessionID,这个sessionID后面会跟上jvmRoute设置的值,所以一次会话,会让同一个tomcat处理
后面的session复制,只是在刚才的基础上,让session在每一个tomcat都有一份拷贝,各个tomcat的session是同步的
|
|
8
我想问下不知道为什么,我复制就是不能成功,你能再详细一点吗?
|
|
14
|
|
21
我的怎么不好用啊 sessionid不固定 两个页面有两个sessionid 请问大家怎么回事
|
|
23
请问 我配置 apache服务器后 ,页面 在 访问后无法 显示 图片,以及样式表失去作用。这是怎么回事,需要做那些配置 ,请指点。
|
|
24
我按照配置了一下,负载成功了,可是复制session有问题,怎么也不会复制,不知道有可能是哪里没有设好?
|
|
25
我也配制了,负载也成功了,也在复制session那个地方出问题了,我不知道是哪里出了错!看您的文章,在添加jvmRoute那个地方看不懂,我觉得那个地方您写的不是很清楚!能给我解答一下吗?
|
|
28
不好意思,我把test.jsp改成index.jsp就好了,但是并没有出现你图上tomcat日志所打出来的内容。
|
|
29
非常感谢 照你的方法可以了 但是 能不能挂个tomcat 在挂个resin呢 又是怎么设置的呢 在着这个 均衡应该有参数的 我应该在那配置呢 能不能给我讲讲哦
|
|
30
用apache proxy而不用jkmod不行的原因可能因为apache proxy还没有做到.jsp级别的识别,只到到目录级别.
|
|
31
|
|
33
我的session不能相互复制,不知道为什么?我把test放在两个tomcat目录下,还防在apache下的htdocs目录下,才能不指定端口访问test的内容。
|
|
35
你好!
很感谢你的这篇文章。
有一个问题想请教您一下:
我在配置过程中,负载均衡一直失败。即apache一直不能将一个用户的请求分配到两个服务器结点上。请问这是什么问题呢?我需要注意哪些配置?
诚望得到您的帮助,小弟我为这事做了快一个星期了 - -
|
|
37
zcm790619
回答:zcm790619
JkMount /* controller
表示把所有的请求都发到tomcat
如果要具体如action可以这么写:
JkMount /*.action controller
|
|
38
|
|
39
上面的大哥,你写的文章真棒,但还是有个问题想问下你们啊:
几个不同的tomcat在实现群集session复制的时 候,session里面设置的值好像不能被复制,比如:session.setAttribute("username","zenghao"),当请求 在同一个tomcat里面的时候,可以得到并打印出session里面的username值,当请求被分配到另一个tomcat中的时候,我却得不到 username得数值.但是,在不同tomcat之间打印得sessionid相同.
请问下,这是怎么个回事啊?如果是这样的话,那我有一个首 页是由几个frame框架组成的,每个frame框架在主页面加载的时候都会请求不同的tomcat,登陆时候人员id会被设置到session中,这样 子的话跳转到首页,有的frame肯定会说找不到登陆人员id!肯定又说登陆不成功啦1
请大家帮个忙怎么解决,是配置的问题还是什么?跪求!!
|
|
41
|
|
42
我按照你上面所写配置httpd.conf文件,再加上include "D:\Apache Group\Apache2\conf\mod_jk.conf",结果apache就不能启动了,如果去掉这段就可以启动,这是怎么回事?
|
|
43
|
|
LZ 谢谢你的文章。这二天我配置了下。tomcat集群实现了。可是session却无法同步。
在不同的窗口可以看到不同的sessionID
新建一个 名称为 xiaoluo ,值为 cdut 的session,提交查询,新开一个ie窗口,再提交查询,如图,可以看到,两个tomcat 是负载均衡,并且session同步的
=========================================
单台主机多站点场景
在一台机器上配置多个站点,每个站点有自己独立的域名。假设服务器有两个站点www.fjj.com和www.lj.com,两个站点分别运行在一个tomcat下。为方便说明,下面分别简称为fjj和lj站点。
Apache配置
将Tomcat Connector文件mod_jk-1.2.26-httpd-2.2.4.so拷贝到Apache安装目录Apache2.2\modules下。
在Apache2.2\conf目录新建mod_jk.conf添加以下内容
在Apache配置目录Apache2.2\conf创建workers.properties配置文件,该文件主要用于配置Apache与Tomcat的集成要用到的Tomcat实例。
相同目录新建uriworkermap.properties
在Apache配置文件Apache2.2\conf\httpd.conf末尾增加以下内容;(在域名里指定了项目位置就可以不用在documentroot和directory里修改了)
配置完成以后使用命令窗口进入apache bin 目录 敲httpd.exe -w -n "Apache2.2" -k start 可以看到配置文件是否有错
开始程序菜单目录中的Apache HTTP Server 2.2.4à Configure Apache Serverà Test Configuration检查Apache配置文件是否正确。
Tomcat配置
Wap和bbs分别运行在两个Tomcat实例下,将刚才下载的Tomcat分别解压为两个目录tomcat1和tomcat2。
Tomcatbbs实例配置
打开tomcat1目录下的conf\server.xml,找到下面的节点内容
注意以上标注红色的配置,同一台机器的多个Tomcat不能重复使用以上端口,下半部分AJP的端口配置要和workers.properties的端口配置保持一致。
再找到Host节点配置更改一些内容
以上第一处是配置站点域名和站点内容路径,下面增加的内容是配置站点的根路径。
Tomcatwap实例配置
打开wap站点tomcat目录下的conf\server.xml,找到下面的节点内容
以上标注红色的配置,同一台机器的多个Tomcat不能重复使用以上端口,下半部分AJP的端口配置要和workers.properties的端口配置保持一致。请注意本次配置分别改了两个端口为9090和9009。
在找到Host节点配置更改一些内容
以上第一处是配置站点域名和站点内容路径,下面增加的内容是配置站点的根路径。
常见问题
修改host文件,加入www.fjj.com,www.lj.com解析至当前机器127.0.0.1。
分别启动Apache和两个Tomcat,打开两个浏览器分别输入www.fjj.com,www.lj.com测试是否显示不同的站点内容。
如果没有达到预期效果请检查一下几点配置:
Ø Apache2.2\conf\httpd.conf配置文件是否配置的两个Host是否配置了域名
Host中JkMount /* controller 配置tomcat对应的Service.xml中配置的域名是否一致
Ø Worker.properites中配置的tomcat实例端口是否和对应tomcat Service.xml文件中的AJP端口是否一致
Ø Tomcat Service.xml配置文件Host节点是否有<Context docBase="." path="" reloadable="true"/>配置内容
增加单台主机单站点集群、负载均衡支持
Apache配置
将Tomcat Connector文件mod_jk-1.2.26-httpd-2.2.4.so拷贝到Apache安装目录Apache2.2\modules下。
前面已经配好有关apache与tomcat的(work..properties/ mod_jk.conf/ uriworkermap.properties)
Tomcat配置
Tomcat配置文件Service.xml主要注意两个地方,一个是Engine节点需要增加节点标识jvmRoute,一个是将原本注释掉的Session复制节点改为有效。具体如下
我们分别将两个Tomcat配置文件中的jvmRoute设置为tomcat1、tomcat2,Server节点 端口分别配置为8101和8102,集群Receiver 节点tcpListenPort端口分别配置为4001和4002,Connector节点端口分别配置为8081和8082,AJPConnector端口分别配置为8201和8202,Connector端口配置参照单主机多站点场景。请注意两个Tomcat配置文件Host节点的域名配置必须一样,Server.xml中的jvmRoute名称必须和worker.properties中的tomcat实例名称一致,不然无法实现session_stricky。
tcpListenAddress="auto”如果为本机多tomcat session无法复制则应改为ip(ip应改和work..Properties里的host配置一致)
Web.xml配置
Web.xml配置文件加上<distributable/>节点,此配置说明当前Web工程处于分布式部署环境。如果不进行这个配置,每次访问页面tomcat都会产生一个新的sessionid。
常见问题
修改Host文件将www.fjj.com解析到本机。打开两个IE窗口分别提交session操作,然后在控制台观察效果。
正常情况为;同一个IE窗口的所有请求都分发到同一个Tomcat,当关闭其中一个Tomcat时,IE窗口重新请求会分发到另一个Tomat并且Session保持同步。
如果没有达到预期效果请检查一下几点;
Ø Apache配置文件中DirectoryIndex配置的文件是否存在tomcat应用的目录下
Ø Apache配置文件中JkMount是否分发到负责均衡控制器
Ø 两个Tomcat端口是否有重复,
Ø Worker.properties中tomcat端口是否和对应server.xmlAJPConnector端口一致
Ø Server.xml配置文件的Host节点name属性是否一致
Ø Server.xml配置文件的Engine节点是否配置jvnRoute,并且与worker.properties配置的名称保持一致
Ø Server.xmlHost节点内的Cluster节点是否设置为有效
相关优化配置
http://help.114la.com/Apache2/index.html Apache 在线帮助文档
tomcat的启动只需要在环境变量中配置java_home即可
如何将压缩版的tomcat写入系统服务Cmd命令进入命令窗口进入tomcat的bin目录
敲service install 【tomcatservicename】 即可
卸载服务直接用service remove 【tomcatservicename】
对于安装为服务的tomcat的配置可以在注册表修改其启动的初始内存和最大内存
RegeditàHKEY_LOCAL_MACHINE\SOFTWARE\Apache Software Foundation\Procrun 2.0\Tomcat6\Parameters\Java jvmms即初始值 jvmmx即最大值
对于绿色版的tomcat则可以直接在启动文件里加上 set JAVA_OPTS=-Xms128m -Xmx512m


 444
444

 被折叠的 条评论
为什么被折叠?
被折叠的 条评论
为什么被折叠?
 到【灌水乐园】发言


