


转载请注明出处:http://blog.csdn.net/linglongxin24/article/details/53415932
本文出自【DylanAndroid的博客】
Android将Library上传到jcenter超简单完整图文步骤以及遇到的各种坑
在【玩转SQLite系列】(七)打造轻量级ORM工具类SQLiteDbUtil操作数据库
中我们可以看到这个工具类的超简洁用法:只需要在gradle中引入:
compile 'cn.bluemobi.dylan:sqlitelibrary:0.1'即可使用,那么这到底是怎么回事?这个是Android项目所在jcenter的一个远程仓库。我们只需要将你的libray上传到jcenter即可,那么如和将一个项目上传到jcenter呢?
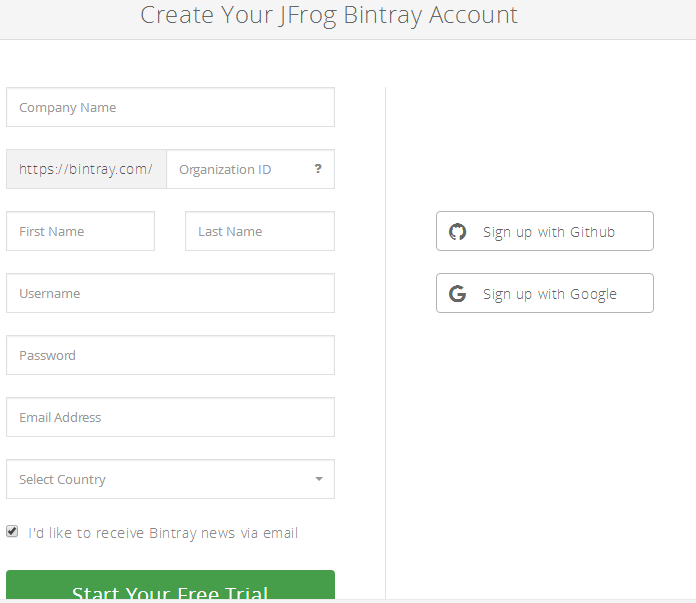
1.去jcenter官网注册个账号:https://bintray.com
注册界面如下图:
2.在项目根目录的build.gradle(Project)添加配置
在如下图中的位置加入如下配置
        classpath 'com.jfrog.bintray.gradle:gradle-bintray-plugin:1.2'
        classpath 'com.github.dcendents:android-maven-gradle-plugin:1.5'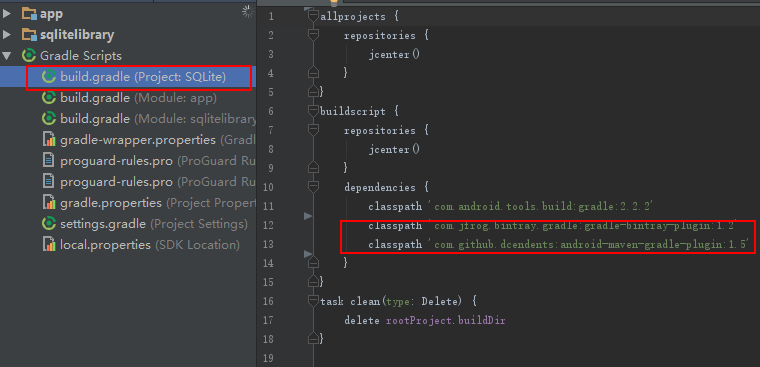
3.在你要上传的module的build.gradle中添加如下配置
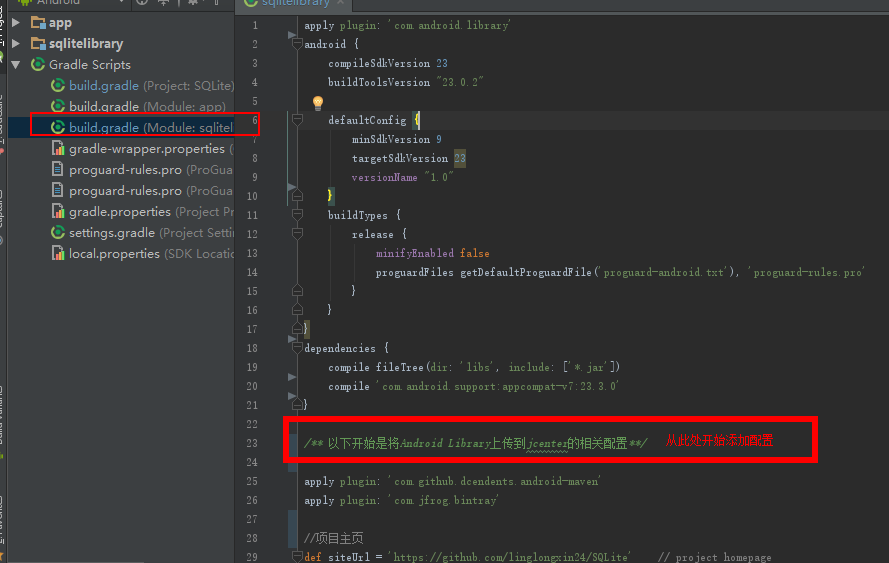
在如上图中的位置加入如下配置:配置中都有详细的注释是什么作用。
/** 以下开始是将Android Library上传到jcenter的相关配置**/

apply plugin: 'com.github.dcendents.android-maven'
apply plugin: 'com.jfrog.bintray'

//项目主页
def siteUrl = 'https://github.com/linglongxin24/SQLite'    // project homepage
//项目的版本控制地址
def gitUrl = 'https://github.com/linglongxin24/SQLite.git' // project git

//发布到组织名称名字,必须填写
group = "cn.bluemobi.dylan"
//发布到JCenter上的项目名字,必须填写
def libName = "AndroidFastDevFrame"
// 版本号,下次更新是只需要更改版本号即可
version = "1.0"
/**  上面配置后上传至jcenter后的编译路径是这样的: compile 'cn.bluemobi.dylan:sqlitelibrary:1.0'  **/

//生成源文件
task sourcesJar(type: Jar) {
    from android.sourceSets.main.java.srcDirs
    classifier = 'sources'
}
//生成文档
task javadoc(type: Javadoc) {
    source = android.sourceSets.main.java.srcDirs
    classpath += project.files(android.getBootClasspath().join(File.pathSeparator))
    options.encoding "UTF-8"
    options.charSet 'UTF-8'
    options.author true
    options.version true
    options.links "https://github.com/linglongxin24/FastDev/tree/master/mylibrary/docs/javadoc"
    failOnError false
}

//文档打包成jar
task javadocJar(type: Jar, dependsOn: javadoc) {
    classifier = 'javadoc'
    from javadoc.destinationDir
}
//拷贝javadoc文件
task copyDoc(type: Copy) {
    from "${buildDir}/docs/"
    into "docs"
}

//上传到jcenter所需要的源码文件
artifacts {
    archives javadocJar
    archives sourcesJar
}

// 配置maven库,生成POM.xml文件
install {
    repositories.mavenInstaller {
        // This generates POM.xml with proper parameters
        pom {
            project {
                packaging 'aar'
                name 'This is a lightweight SQLite database framework'
                url siteUrl
                licenses {
                    license {
                        name 'This is a lightweight SQLite database framework'
                        url 'https://github.com/linglongxin24/SQLite'
                    }
                }
                developers {
                    developer {
                        id 'linglongxin24'
                        name 'dylan'
                        email 'linglongxin24@163.com'
                    }
                }
                scm {
                    connection gitUrl
                    developerConnection gitUrl
                    url siteUrl
                }
            }
        }
    }
}

//上传到jcenter
Properties properties = new Properties()
properties.load(project.rootProject.file('local.properties').newDataInputStream())
bintray {
    user = properties.getProperty("bintray.user")    //读取 local.properties 文件里面的 bintray.user
    key = properties.getProperty("bintray.apikey")   //读取 local.properties 文件里面的 bintray.apikey
    configurations = ['archives']
    pkg {
        repo = "maven"
        name = libName    //发布到JCenter上的项目名字,必须填写
        desc = 'This is a lightweight SQLite database framework'    //项目描述
        websiteUrl = siteUrl
        vcsUrl = gitUrl
        licenses = ["Apache-2.0"]
        publish = true
    }
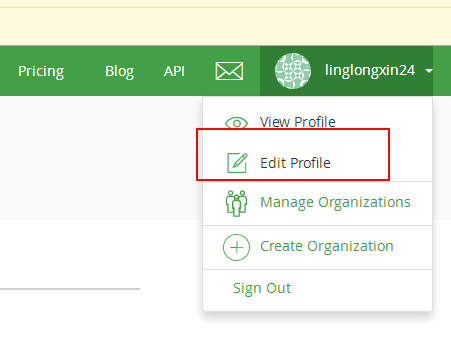
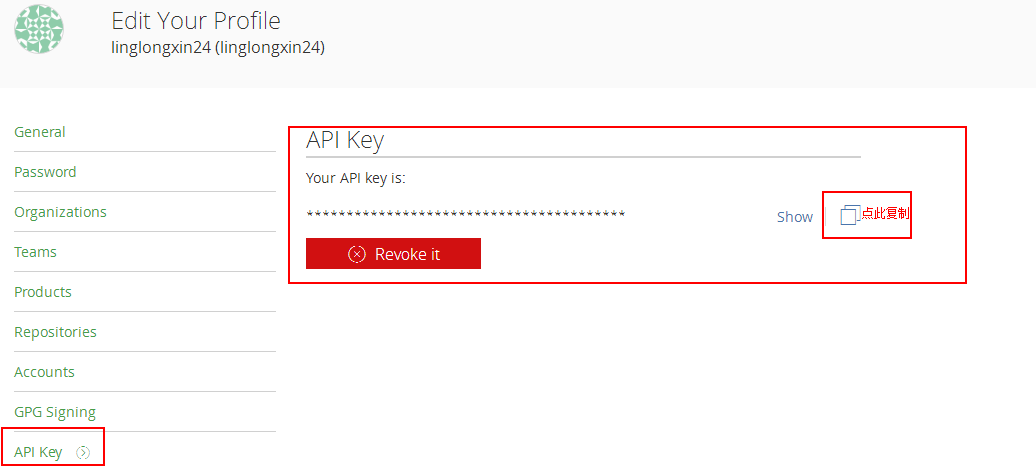
4.在你项目根目录的local.properties中添加用户名和API Key
在如下图中的位置先找到自己的APIkey:登录到Jcenter官网->Edit Profile->API Key
在如下图中的位置加入如下配置
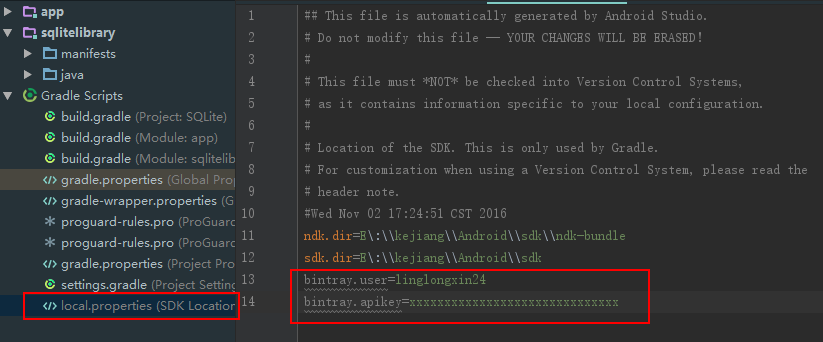
gradle
 bintray.user=linglongxin24
 bintray.apikey=xxxxxxxxxxxxxxxxxxxxxxxxxxxxxxxxxxxxxx
5.执行命令
- (1)生成maven库所需要的POM文件:graedlew install
graedlew install
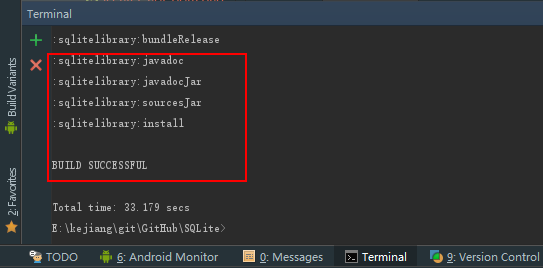
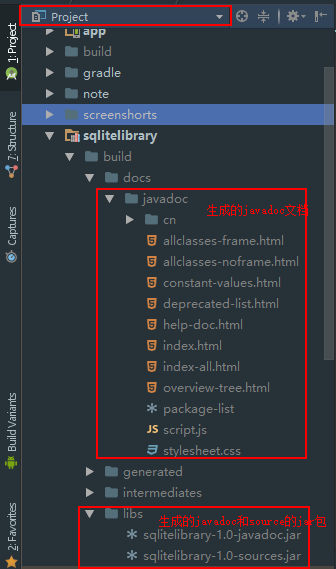
如果查看到BUILD SUCCESSFUL说明POM文件已经生成成功,并且在你的Android studio的Project视图中可以看到javadoc和javasource的jar包文件
- (2)上传你的Library库到jcenter的maven库:graedlew bintrayUpload
graedlew bintrayUpload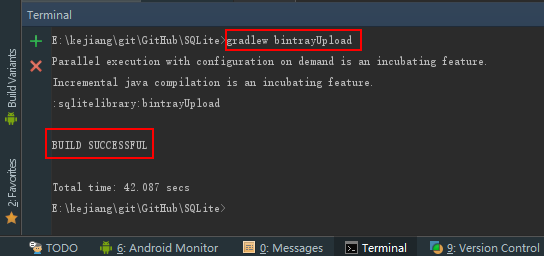
如果查看到BUILD SUCCESSFUL说明你的Library已经成功上传到了jcenter的maven库
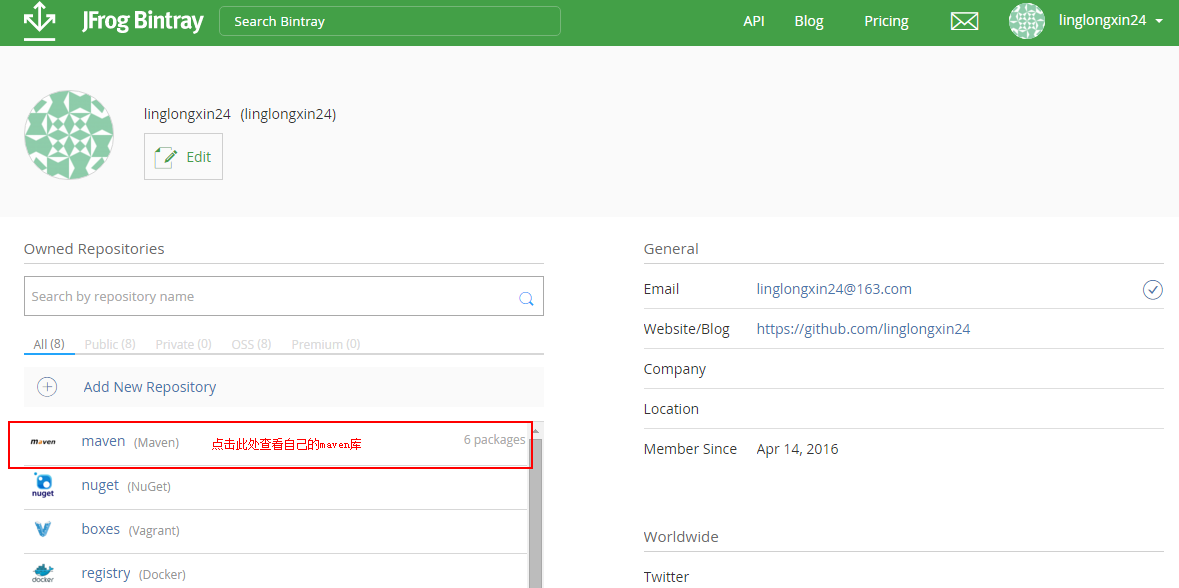
6.查看上传的maven库,并提交审核
登录jcenter首页->点击下方maven即可进入到你上传的maven库列表界面
在maven库列表界面找你你刚才上传的maven库点进去即可看到相关的项目详情
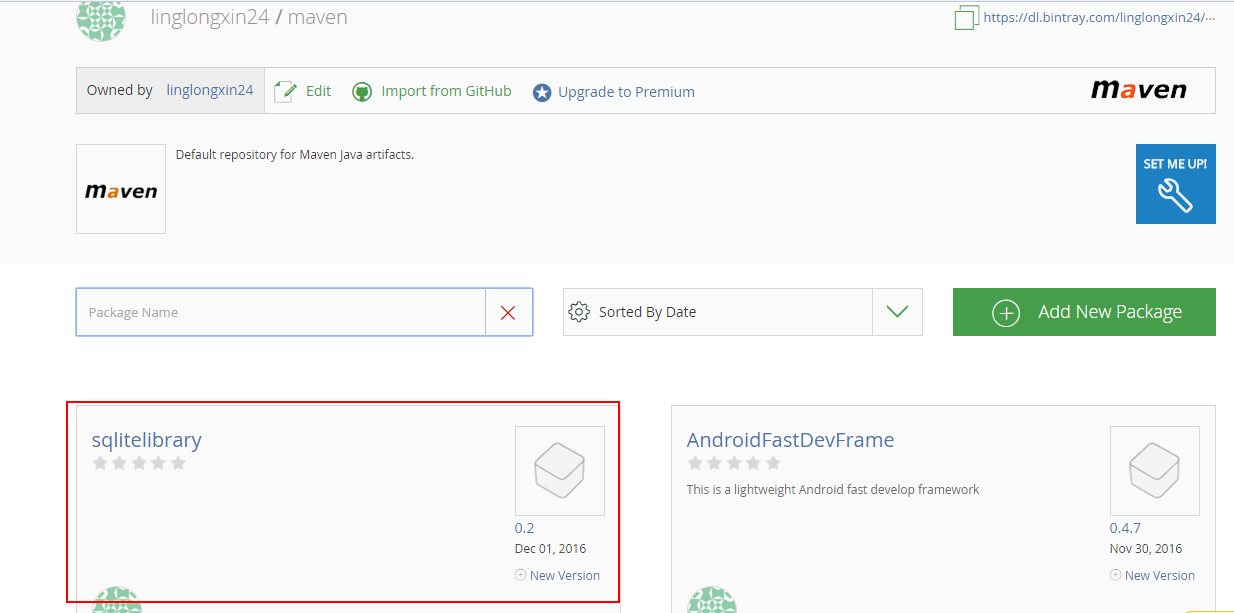
在你上传的maven库详情界面最下面可以看到:Add to JCenter 按钮

点击Add to JCenter 按钮填写项目描述即可提交。这个网站在国外维护,由于时差的原因一般他们上班时间在我们的晚上,等到第二天即可通过审核

第二天查看通过审核的界面

7.遇到的各种坑以及解决办法
- (1)坑一:错误: 编码GBK的不可映射字符->请正确配置javadoc编码
java//生成文档
       task javadoc(type: Javadoc) {
           options.encoding "UTF-8"
           options.charSet 'UTF-8'
       }
(2)坑二:错误: 不允许使用自关闭元素->请删除javadoc注释里面所有的含有html标签,

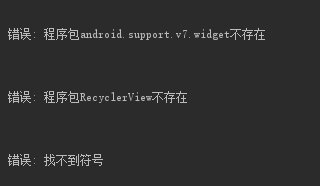
(3)坑三: 错误: 程序包android.support.v7.widget不存在;错误: 找不到符号 ->在javadoc中加入忽略错误配置
//生成文档
task javadoc(type: Javadoc) {
failOnError false
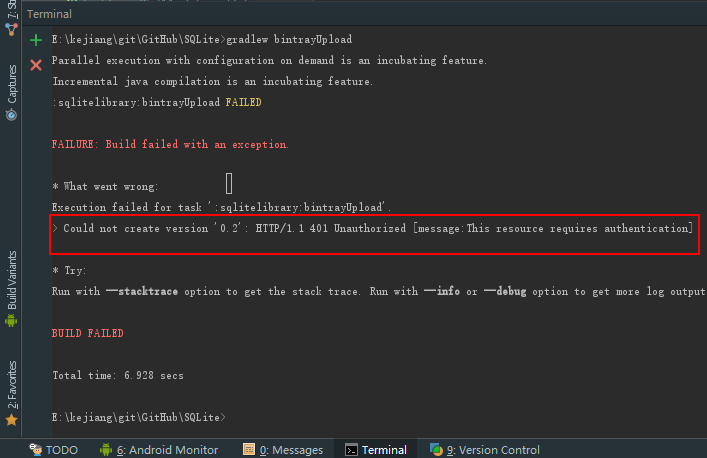
}(4)坑四:Could not create version ‘0.1’: HTTP/1.1 401 Unauthorized [message:This resource requires authentication],->没有配置正确的API Key
(5)坑五:没有有效的POM文件->一定要按步骤执行并没有配置正确的API Key:

(6)坑六:没有Add to JCenter按钮:
注意:在这个地址注册:https://bintray.com/signup/oss;不是https://bintray.com/signup;这两个地址不一样的!
如果后面还有什么问题,可以一起交流。
最后如果还有其他问题推荐查看这篇文章,写的很详细
Android快速发布项目到jcenter :http://blog.csdn.net/zhcswlp0625/article/details/54895584


 489
489


 被折叠的 条评论
为什么被折叠?
被折叠的 条评论
为什么被折叠?
 到【灌水乐园】发言


