addSubview,frame和bounds

先看代码:

    UIView *view1 = [[UIView alloc] initWithFrame:CGRectMake(100.0, 100.0, 300.0, 300.0)];
    view1.backgroundColor = [UIColor grayColor];
    [self.view addSubview:view1];
    
    UIView *view2 = [[UIView alloc] initWithFrame:CGRectMake(0.0, 0.0, 100.0, 100.0)];
    view2.backgroundColor = [UIColor redColor];
    [self.view addSubview:view2];

看看运行结果:


这个很简单没问题,做个对比而已。


将上面的代码修改如下:

//    [self.view addSubview:view2];
    [view1 addSubview:view2];

运行结果:


区别出来了,由于view1的位置为(100, 100, 300, 300),所以[view1 addSubview:view2]使得view2的位置发送了变化,view2的frame为(0, 0, 100, 100),因为addSubview时是以view1为参考坐标系add的,所以view2的frame是相对于view1的frame而言的。


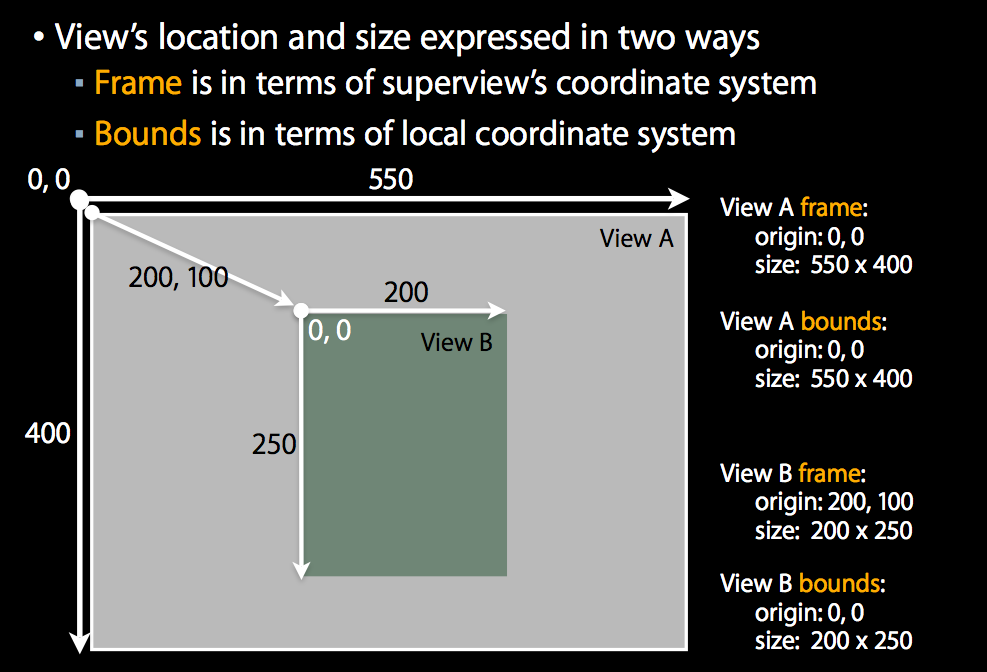
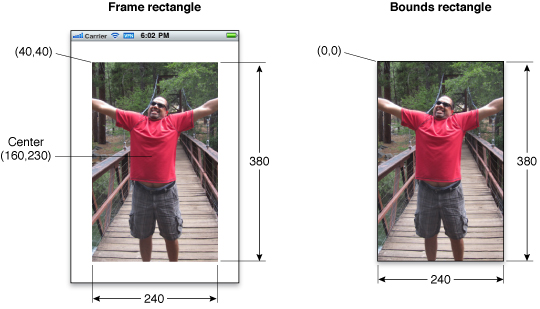
最后上两张很久以前看过的关于frame和bounds的区别的图,做个笔记:


  • 0
    点赞
  • 0
    收藏
    觉得还不错? 一键收藏
  • 0
    评论
Swift仿Twitter的导航条和页面,可以自定义页面数量。 // // PagingNavController.swift // SwiftPagingNav // // Created by Aubrey & Chad on 10/31/14. // Copyright (c) 2014 Aubrey Johnson / Chad Timmerman. All rights reserved. // import UIKit class PagingNavController: UIViewController, UIScrollViewDelegate { var scrollView:UIScrollView! var pageControl:UIPageControl! var navbarView:UIView! var navTitleLabel1:UILabel! var navTitleLabel2:UILabel! var navTitleLabel3:UILabel! var view1:UIView! var view2:UIView! var view3:UIView! override func viewDidLoad() { super.viewDidLoad() self.view.backgroundColor = UIColor.lightGrayColor() //Creating some shorthand for these values var wBounds = self.view.bounds.width var hBounds = self.view.bounds.height // This houses all of the UIViews / content scrollView = UIScrollView() scrollView.backgroundColor = UIColor.clearColor() scrollView.frame = self.view.frame scrollView.pagingEnabled = true scrollView.showsHorizontalScrollIndicator = false scrollView.delegate = self scrollView.bounces = false self.view.addSubview(scrollView) self.scrollView.contentSize = CGSize(width: self.view.bounds.size.width * 3, height: hBounds/2) //Putting a subview in the navigationbar to hold the titles and page dots navbarView = UIView() self.navigationController?.navigationBar.addSubview(navbarView) //Paging control is added to a subview in the uinavigationcontroller pageControl = UIPageControl() pageControl.frame = CGRect(x: 0, y: 35, width: 0, height: 0) pageControl.backgroundColor = UIColor.whiteColor() pageControl.numberOfPages = 3 pageControl.currentPage = 0 pageControl.currentPageIndicatorTintColor = UIColor(red:0.325, green:0.667, blue:0.922, alpha: 1) pageControl.pageIndicatorTintColor = UIColor.whiteColor() self.navbarView.addSubview(pageControl) //Titles for the nav controller (also added to a subview in the uinavigationcontroller) //Setting size for the titles. FYI changing width will break the paging fades/movement var titleSize = CGRect(x: 0, y: 8, width: wBounds, height: 20) navTitleLabel1 = UILabel() navTitleLabel1.frame = titleSize navTitleLabel1.text = "Home" navTitleLabel1.textAlignment = NSTextAlignment.Center self.navbarView.addSubview(navTitleLabel1) navTitleLabel2 = UILabel() navTitleLabel2.frame = titleSize navTitleLabel2.text = "Discover" navTitleLabel2.textAlignment = NSTextAlignment.Center self.navbarView.addSubview(navTitleLabel2) navTitleLabel3 = UILabel() navTitleLabel3.frame = titleSize navTitleLabel3.text = "Activity" navTitleLabel3.textAlignment = NSTextAlignment.Center self.navbarView.addSubview(navTitleLabel3) //Views for the scrolling view //This is where the content of your views goes (or you can subclass these and add them to ScrollView) view1 = UIView() view1.backgroundColor = UIColor(red:0.325, green:0.667, blue:0.922, alpha: 1) view1.frame = CGRectMake(0, 0, wBounds, hBounds) self.scrollView.addSubview(view1) self.scrollView.bringSubviewToFront(view1) //Notice the x position increases per number of views view2 = UIView() view2.backgroundColor = UIColor(red:0.231, green:0.529, blue:0.757, alpha: 1) view2.frame = CGRectMake(wBounds, 0, wBounds, hBounds) self.scrollView.addSubview(view2) self.scrollView.bringSubviewToFront(view2) //Notice the x position increases yet again (wBounds * 2) view3 = UIView() view3.backgroundColor = UIColor(red:0.529, green:0.600, blue:0.647, alpha: 1) view3.frame = CGRectMake(wBounds * 2, 0, wBounds, hBounds) self.scrollView.addSubview(view3) self.scrollView.bringSubviewToFront(view3) } override func viewDidLayoutSubviews() { super.viewDidLayoutSubviews() navbarView.frame = CGRect(x: 0, y: 0, width: self.view.bounds.width, height: 44) } func scrollViewDidScroll(scrollView: UIScrollView) { var xOffset: CGFloat = scrollView.contentOffset.x //Setup some math to position the elements where we need them when the view is scrolled var wBounds = self.view.bounds.width var hBounds = self.view.bounds.height var widthOffset = wBounds / 100 var offsetPosition = 0 - xOffset/widthOffset //Apply the positioning values created above to the frame's position based on user's scroll navTitleLabel1.frame = CGRectMake(offsetPosition, 8, wBounds, 20) navTitleLabel2.frame = CGRectMake(offsetPosition + 100, 8, wBounds, 20) navTitleLabel3.frame = CGRectMake(offsetPosition + 200, 8, wBounds, 20) //Change the alpha values of the titles as they are scrolled navTitleLabel1.alpha = 1 - xOffset / wBounds if (xOffset <= wBounds) { navTitleLabel2.alpha = xOffset / wBounds } else { navTitleLabel2.alpha = 1 - (xOffset - wBounds) / wBounds } navTitleLabel3.alpha = (xOffset - wBounds) / wBounds } func scrollViewDidEndDecelerating(scrollView: UIScrollView) { var xOffset: CGFloat = scrollView.contentOffset.x //Change the pageControl dots depending on the page / offset values if (xOffset < 1.0) { pageControl.currentPage = 0 } else if (xOffset < self.view.bounds.width + 1) { pageControl.currentPage = 1 } else { pageControl.currentPage = 2 } } }

“相关推荐”对你有帮助么?

  • 非常没帮助
  • 没帮助
  • 一般
  • 有帮助
  • 非常有帮助
提交
评论
添加红包

请填写红包祝福语或标题

红包个数最小为10个

红包金额最低5元

当前余额3.43前往充值 >
需支付:10.00
成就一亿技术人!
领取后你会自动成为博主和红包主的粉丝 规则
hope_wisdom
发出的红包
实付
使用余额支付
点击重新获取
扫码支付
钱包余额 0

抵扣说明:

1.余额是钱包充值的虚拟货币,按照1:1的比例进行支付金额的抵扣。
2.余额无法直接购买下载,可以购买VIP、付费专栏及课程。

余额充值