


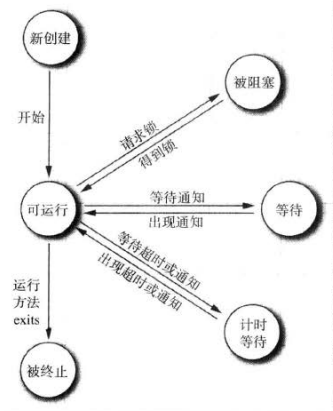
1. 线程的状态
2. 线程实现的两种方式
2.1 实现 Runnable 接口
class MyRunnable implements Runnable {

	@Override
	public void run() {
		// do something
	}
}

Thread t = new Thread(new Runnable());  //创建线程对象
t.start() //启动线程class MyThread extends Thread {
@Override
public void run() {
// do something
}
}
MyThread mt = new MyThread(); //创建线程对象
mt.start(); //启动线程3.1 ReentrantLock 锁对象
class Bank {
	private Lock myLock = new ReentrantLock(); //创建 ReentrantLock 锁对象

	public void m() {
		myLock.lock();
		try{
			// critical section
		}finally{
			myLock.unlock();
		}
	}
}线程在每次调用 lock 方法前,都会调用 unlock 方法释放锁,所以被一个锁保护的代码可以调用另一个使用相同锁的方法。

3.2 条件对象 Condition
class Bank {
	private final double[] accounts;
	private Lock bankLock = new ReentrantLock();
	private Condition sufficientFunds;

	public Bank(int n, double initialBalance) {
		sufficientFunds = bankLock.newCondition();  //获取条件对象
		accounts = new double[n];
		for (int i = 0; i < accounts.length; i ++) {
			accounts[i] = initialBalance;
		}
	}

	public void transfer(int from, int to, double amount) throws InterruptedException {
		bankLock.lock();
		try {
			while(accounts[from] < amount) {
				sufficientFunds.wait();  //设置当前线程由于该条件(condition)而处于阻塞状态,并释放锁
			}
			System.out.print(Thread.currentThread());
			accounts[from] -= amount;
			System.out.printf("%10.2f from %d to %d", amount, from, to);
			accounts[to] += amount;
			System.out.printf(" Total Balance: %10.2f%n", getTotalBalance());
			sufficientFunds.signalAll(); //在当前线程完成后,调用同一 condition 上的 signAll() 方法,重新激活因为这个条件(condition)而等待的所有线程
		} finally {
			bankLock.unlock();
		}
	}
}public synchronized void transfer(int from, int to, double amount) throws InterruptedException {
while(accounts[from] < amount) {
wait(); //相当于 condition.wait()
}
System.out.print(Thread.currentThread());
accounts[from] -= amount;
System.out.printf("%10.2f from %d to %d", amount, from, to);
accounts[to] += amount;
System.out.printf(" Total Balance: %10.2f%n", getTotalBalance());
notifyAll(); //相当于 condition.signAll()
}public volatile static boolean done;所有的线程都被阻塞,都在等待资源被释放
3.6 ThreadLocal 设置线程局部变量
public class ThreadStudy{
	public static final ThreadLocal<SimpleDateFormat> dateFormat;

	static {
		dateFormat = new ThreadLocal<SimpleDateFormat>() {
			protected SimpleDateFormat initialValue() { //初始化线程局部变量
				return new SimpleDateFormat("yyyy-MM-dd");
			}
		};
	}

	@Test
	public void testTreadLocal() {
		//在一个给定线程中,首次调用 get()时,会调用 initialValue(),然后 get() 方法会返回属于当前线程变量的实例
		String date = dateFormat.get().format(new Date());
		System.out.println(date);
	}

}class bank {
private ReentrantReadWriteLock rwl = new ReentrantReadWriteLock(); //创建读写锁对象
private Lock readLock = rwl.readLock(); //获取读锁
private Lock writeLock = rwl.writeLock(); //获取写锁
//为读取数据方法添加 read loc
public double getTotalBalance() {
readLock.lock();
try {
// ...
} finally {
readLock.unlock();
}
}
//为修改数据的方法添加 write lock
public void transfer() {
writeLock.lock();
try{
//...
} finally { writeLock.unlock(); }
}
}
4. 线程安全的集合
4.1 高效的映射表、集合和队列
java.util.concurrent 包提供了映射表、有序集合队列的高效实现:ConcurrentHashMap、ConcurrentSkipListMap、ConcurrentSkipListSet 和 ConcurrentLinkedQueue
4.2 CopyOnWriteArrayList 和 CopyOnWriteArraySet
任何集合类都可以通过 Collections 类的线程同步包装方法实现线程安全。
List<E> synchArrayList = Collections.synchronizedList(new ArrayList<E>());
Map<K,V> synchHashMap = Collections.synchronizedMap(new HashMap<k,V>);
最好使用 java.util.concurrent 包中定义的集合,不使用同步包装器中的。特别是假如它们被访问的是不同的桶,由于 ConcurrentHashMap 已经精心的实现了,多线程可以访问它而且不会彼此阻塞。有一个例外是经常被修改的数组列表,在那种情况下,同步的 ArrayList 可以胜过 CopyOnWriteArrayList
5. Callable 和 Future
Callable 和 Runnable 类似,但是 Callable 有返回值,返回值类型是 Callable 的类型参数
public interface Callable<V> {
    /**
     * Computes a result, or throws an exception if unable to do so.
     *
     * @return computed result
     * @throws Exception if unable to compute a result
     */
    V call() throws Exception;
}Callable<Integer> myComputation = ...;
FutureTask<Integer> task = new FutureTask<Integer>(myComputation);
Thread t = new Thread(task); // it's a Runnable
t.start();
Integer result = task.get(); // it's a Future6.1 线程池
构建一个新的线程是有代价的,因为涉及与操作系统的交互。如果程序中创建了大量的生命周期很短的线程,就应该使用线程池,它包含许多准备运行的空线程。
在使用线程池时应该做的步骤:
调用 Executors 类的静态方法 newCachedThreadPool 或 newFixedThreadPool,创建线程池;
调用 submit 方法提交 Runnable 或 Callable 对象;
保存 submit 方法返回的 Future 对象,如果需要取消任务或者别的对异步计算任务的操作;
当不提交任何任务时调用 shutdown;
		//如果没有现有的线程将会创建新线程,否则会重用以前构建的线程,空闲线程会被保留60s后从缓存中移除
		//这些池通常会提高执行许多生命周期短的异步任务程序的性能。
		ExecutorService pool = Executors.newCachedThreadPool();

		//创建一个固定线程数的线程池,池中的线程一直都存在,直到它被关闭
		//ExecutorService pool2 = Executors.newFixedThreadPool(10);

		//调用 submit 方法提交 Runnable 或 Callable 对象
		Future<?> result = pool.submit(new Runnable() {
			@Override
			public void run() {
				// do something...
				System.out.println("runnable......");
			}
		});

		result = pool.submit(new Callable<Integer>() {
			@Override
			public Integer call() throws Exception {
				System.out.println("callable......");
				return 0;
			}
		});

		try {
			result.get();  //获取异步执行的结果
			//result.cancel(true); //取消这个任务
		} catch (InterruptedException | ExecutionException e) {
			e.printStackTrace();
		}

		//获取线程池中最大的线程数
		((ThreadPoolExecutor) pool).getLargestPoolSize();

		//当不再提交任何任务时,调用 shutdown
pool.shutdown();ScheduleExecutorService 接口具有为预定执行和重复周期性执行任务而设计的方法。
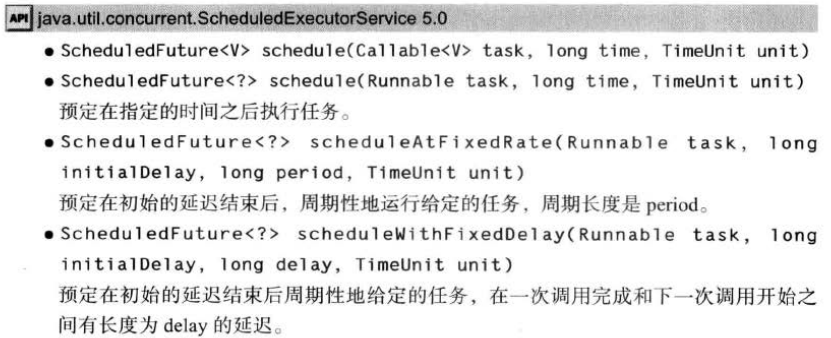
		//返回一个线程池,它使用指定的线程数来调度任务
		ScheduledExecutorService pool = Executors.newScheduledThreadPool(10);

		//预定在指定的时间之后执行任务
		ScheduledFuture<Integer> sfuture = pool.schedule(new Callable<Integer>() {
			@Override
			public Integer call() throws Exception {
				// TODO Auto-generated method stub
				return 0;
			}
}, 1000, TimeUnit.MILLISECONDS); public void testExecutorCompletionService() throws Exception{
//设置需要执行的任务数组
List<Callable<Integer>> tasks = new ArrayList<>();
tasks.add(new Callable<Integer>() {
@Override
public Integer call() {
System.out.println(0);
return 0;
}
});
tasks.add(new Callable<Integer>() {
@Override
public Integer call() {
System.out.println(1);
return 1;
}
});
//创建线程池
ExecutorService pool = Executors.newCachedThreadPool();
//创建一个 ExecutorCompletionService 来收集给定执行器的结果
ExecutorCompletionService<Integer> service = new ExecutorCompletionService<>(pool);
for (Callable<Integer> task : tasks) {
service.submit(task); //提交任务给 executor 执行
}
for (int i = 0; i< tasks.size(); i ++) {
Future<?> f = service.take(); //返回并移除下一个已完成的任务,如果没有任何已完成的结果可用,则阻塞
System.out.println(f.get());
}
}Fork-Join 框架是 Java7 提供的一个用于并行执行任务的框架, 是一个把大任务分割成若干个小任务,最终汇总每个小任务结果后得到大任务结果的框架。
public void testForkJoin() {
	final int SIZE = 10000000;
	double[] numbers = new double[SIZE];
	for (int i = 0; i < SIZE; i++) {
		numbers[i] = Math.random();
	}
	Counter counter = new Counter(numbers, 0, numbers.length, new Filter() {
		public boolean accept(double x) {
			return x > 0.5;
		}
	});
	ForkJoinPool pool = new ForkJoinPool(); // An ExecutorService for running ForkJoinTasks
	pool.invoke(counter);
	System.out.println(counter.join());
}

interface Filter {
	boolean accept(double t);
}

class Counter extends RecursiveTask<Integer> {
	/**
	 *
	 */
	private static final long serialVersionUID = 6015924121619834142L;

	public static final int THRESHOLD = 1000;
	private double[] values;
	private int from;
	private int to;
	private Filter filter;

	public Counter(double[] values, int from, int to, Filter filter) {
		this.values = values;
		this.from = from;
		this.to = to;
		this.filter = filter;
	}

	protected Integer compute() {
		if (to - from < THRESHOLD) {
			int count = 0;
			for (int i = from; i < to; i++) {
				if (filter.accept(values[i]))
					count++;
			}
			return count;
		} else {
			int mid = (from + to) / 2;
			Counter first = new Counter(values, from, mid, filter);
			Counter second = new Counter(values, mid, to, filter);
			invokeAll(first, second);
			return first.join() + second.join();
		}
	}
}


 1836
1836

 被折叠的 条评论
为什么被折叠?
被折叠的 条评论
为什么被折叠?
 到【灌水乐园】发言


