


Fragment(碎片)是Android3.0新增的概念,它与Activity非常相似,是一种可以嵌入在Activity当中的UI片段,它能让程序更加合理和充分的利用大屏幕的空间。当然,在小屏幕中它的用处也很大,后面会陆续讲到。更多信息可以参考官方文档(http://developer.android.com/guide/topics/fundamentals/fragments.html)
我们从Fragment最基本的使用开始吧!
1、Fragment的使用
注意:如果我们使用V4包,必须将MainActivity派生自FragmentActivity,否则无法启动程序!因为系统的Activity只能用来盛装系统自带的Fragment、根本无法识别V4包中的Fragment。如果不使用V4包,使用系统自带的Fragment则不必将MainActivity派生自FragmentActivity。
1.1 Fragment创建
创建一个Fragment,必须创建一个Fragment的子类,或者继承于另一个已经存在的Fragment,并重写其onCreateView()方法。示例代码如下:
public class MyFragment extends Fragment {
    @Override
    public View onCreateView(LayoutInflater inflater, ViewGroup container, Bundle savedInstanceState) {
        //从布局文件fragment_my.xml中加载布局
        View view = inflater.inflate(R.layout.fragment_my, container, true);
        return view;
   }
1.1.1 在布局xml文件中添加fragment(静态)
基本的代码片段如下:
<fragment
        android:id="@+id/bottomFragment"
        android:name="com.asus.mydemo1.Fragment.MyFragment"
        android:layout_width="match_parent"
        android:layout_height="match_parent"/>
其中name属性表明添加的fragment为MyFragment,而MyFragment已在前面创建过。如此一来我们即可以将xml文件中定义的fragment显示出来。这种方式也叫作静态使用,如同普通的view一样。
1.1.2 在代码中动态添加fragment
上面讲到了静态创建fragment,但在实际应用中很少这么用,而是直接在code中定义fragment,这样更加灵活并且逻辑也清晰。使用方法如下所示:
- 在activity的layout文件中定义装载fragment的container,常用的LinearLayout、FrameLayout等都可以。
<RelativeLayout xmlns:android="http://schemas.android.com/apk/res/android"
    android:layout_width="match_parent"
    android:layout_height="match_parent"
    android:orientation="vertical" >

    <FrameLayout
        android:id="@+id/container"
        android:layout_width="match_parent"
        android:layout_height="match_parent" >
    </FrameLayout>

    <LinearLayout
        android:layout_width="match_parent"
        android:layout_height="wrap_content"
        android:layout_alignParentBottom="true"
        android:orientation="horizontal" >

        <Button
            android:id="@+id/btn1"
            android:layout_width="wrap_content"
            android:layout_height="wrap_content"
            android:layout_weight="1"
            android:text="fragment1" />

        <Button
            android:id="@+id/btn2"
            android:layout_width="wrap_content"
            android:layout_height="wrap_content"
            android:layout_weight="1"
            android:text="fragment2" />

        <Button
            android:id="@+id/btn3"
            android:layout_width="wrap_content"
            android:layout_height="wrap_content"
            android:layout_weight="1"
            android:text="fragment3" />
    </LinearLayout>

</RelativeLayout>
从上面的布局文件中显而易见:下方水平摆放3个按钮(我们将用它们来切换fragment);上方是一个FrameLayout,用它来装载fragment。
2. 创建3个fragment,这一步在前面讲过,不在赘述。
3. 在MainActivity中显示默认的fragment,点击button切换fragment:
public class MainActivity extends Activity {

    private Fragment fragment1;
    private Fragment fragment2;
    private Fragment fragment3;

    private Button btn1, btn2, btn3;

    @Override
    protected void onCreate(Bundle savedInstanceState) {
        super.onCreate(savedInstanceState);
        setContentView(R.layout.activity_main);

        initView();
        initEvent();
    }

    private void initEvent() {
        btn1.setOnClickListener(new OnClickListener() {

            @Override
            public void onClick(View v) {
                if (fragment1 == null) {
                    fragment1 = new Fragment1();
                }
                FragmentManager manager = getFragmentManager();
                FragmentTransaction transaction = manager.beginTransaction();
                transaction.replace(R.id.container, fragment1);
                transaction.commit();
            }
        });

        btn2.setOnClickListener(new OnClickListener() {

            @Override
            public void onClick(View v) {
                if (fragment2 == null) {
                    fragment2 = new Fragment2();
                }
                FragmentManager manager = getFragmentManager();
                FragmentTransaction transaction = manager.beginTransaction();

                transaction.replace(R.id.container, fragment2);
                transaction.commit();
            }
        });

        btn3.setOnClickListener(new OnClickListener() {

            @Override
            public void onClick(View v) {
                if (fragment3 == null) {
                    fragment3 = new Fragment3();
                }
                FragmentManager manager = getFragmentManager();
                FragmentTransaction transaction = manager.beginTransaction();

                transaction.replace(R.id.container, fragment3);
                transaction.commit();
            }
        });
    }

    private void initView() {
        btn1 = (Button) findViewById(R.id.btn1);
        btn2 = (Button) findViewById(R.id.btn2);
        btn3 = (Button) findViewById(R.id.btn3);
        setDefaultFragment();
    }

    private void setDefaultFragment() {
        FragmentManager manager = getFragmentManager();
        FragmentTransaction transaction = manager.beginTransaction();

        fragment1 = new Fragment1();
        transaction.replace(R.id.container, fragment1);
        transaction.commit();
    }
}
这个界面非常简单,没有做任何美化,但是足够说明主题。
4. 其中3个Fragment的布局类似,只是一个简单的布局,里面显示一个text以示区分。如下所示:
<RelativeLayout xmlns:android="http://schemas.android.com/apk/res/android"
    xmlns:tools="http://schemas.android.com/tools"
    android:layout_width="match_parent"
    android:layout_height="match_parent">

    <TextView
        android:layout_width="wrap_content"
        android:layout_height="wrap_content"
        android:text="Fragment1" />

</RelativeLayout>
从中我们可以看到几个使用Fragment时重要的类:
FragmentManager:要管理activity中的fragments,你就需要使用FragmentManager。通过getFragmentManager()或getSupportFragmentManager()获得
FragmentTransaction:一般用来对当前的Fragment进行管理,包括add,replace,remove.
注意:除非特殊情况,不要在一个Fragment里面直接操作另一个Fragment。
1.2 Fragment中模拟返回栈
我们在以上示例中的连续点击Button fragment1,2,3之后,再点击Back key会发现直接退出程序,而没有像Activity一样先退回至第一个fragment,那么有没有办法使用回退栈呢?答案是肯定的。
只需要在replace之后,加上
transaction.addToBackStack(null);然后,再commit即可。具体效果大家可以自己试试。
如此一来,我们只需要根据业务和操作流程,将适当的fragment添加到返回栈中。
2、Fragment的生命周期
和Activity一样,活动也有它自己的生命周期,Fragment类中提供了一系列的回调方法,已覆盖Fragment的生命周期的每个环节。我们可从官网 (http://developer.Android.com/guide/components/fragments.html)看到如下两张图:
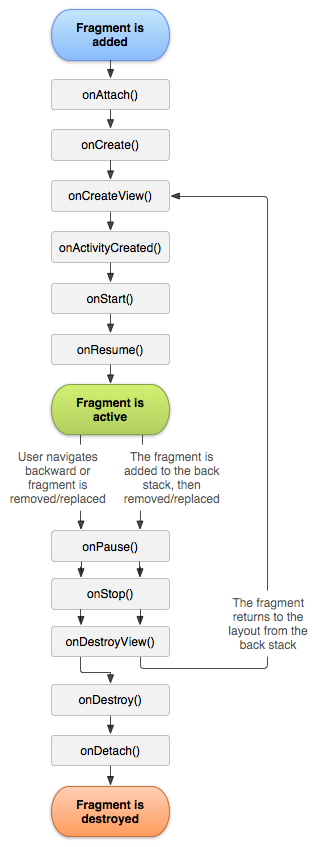
图1 Fragment生命周期
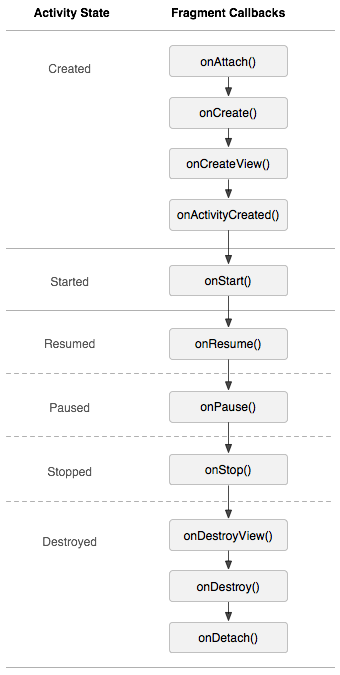
图2 Fragment与Activity生命周期对比
从以上两张图中,我们可以总出以下Fragment的生命周期:
Fragment生命周期:
1、 onAttach();//当fragment被添加到activity中时会回调这个方法;只会调用一次
2、 onCreate();//在fragment创建的时候回调这个方法;只会调用一次;
3、 onCreateView();//每次创建都会绘制Fragment的View组件时调用该方法,相当于fragment绑定一个布局,布局文件转换成view返回回来;
4、 onActivityCreated();//fragment所在的activity启动完成后调用;
5、 onStart():启动Fragment时会被回调,
6、 onResume()方法,调用onStart()方法后面一定会调用这个方法,恢复fragment时回调
7、 onPause():暂停Fragment
8、 onStop();//停止Fragment
9、 onDestroyView():销毁Fragment所包含的View组件,与onCreateView相对应
10、 onDestroy():销毁Fragment时会被回调
11、 onDetach():Fragment从Activity中删除时回调这个方法,并且只调用一次
几种常见场景下的生命周期:
- 启动fragment:
onAttach()->onCreate()->onCreateView()->onActivityCreated()->onStart()->onResume()
屏幕锁屏 :onPause()->onStop()
屏幕解锁: onStart()->onResume()
第一个fragment切换到第二个fragment:
第一个onPause()->onStop()->onDestoryView()->onDestory()->onDetach();
第二个和启动Fragment时一样
可以看出Fragment的生命周期比Activity的还要多,但是它和Activity的生命周期是息息相关的,也很有规律。
3、Fragment参数传递
Fragment&Activity之间的参数传递,无非分为三种:Activity和Fragment互相传参(注意:我们可以认为Activity是通信的主动一方,而Fragment是被动一方,它们之间传参的方式和复杂程度并不一样);还有就是Fragment传参到Fragment。
3.1 Activity->Fragment的传值
从Activity传值到Fragment应该算是最简单的一种了,我们要用到Fragment的setArguments()方法和getArguments()方法通过Bundle对象来传值。简单的示例如下:
<RelativeLayout xmlns:android="http://schemas.android.com/apk/res/android"
    xmlns:tools="http://schemas.android.com/tools"
    android:layout_width="match_parent"
    android:layout_height="match_parent"
    android:orientation="vertical"
    tools:context="com.lupu.demofrag.MainActivity"
    tools:ignore="MergeRootFrame" >

    <LinearLayout
        android:layout_width="match_parent"
        android:layout_height="wrap_content"
        android:layout_alignParentTop="true"
        android:orientation="vertical" >

        <Button
            android:id="@+id/sendBtn"
            android:layout_width="wrap_content"
            android:layout_height="wrap_content"
            android:layout_gravity="center_horizontal"
            android:text="点击发送“hello world" >
        </Button>
    </LinearLayout>

    <FrameLayout
        android:id="@+id/container"
        android:layout_width="match_parent"
        android:layout_height="match_parent" >
    </FrameLayout>

    <LinearLayout
        android:layout_width="match_parent"
        android:layout_height="wrap_content"
        android:layout_alignParentBottom="true"
        android:orientation="horizontal" >

        <Button
            android:id="@+id/btn1"
            android:layout_width="wrap_content"
            android:layout_height="wrap_content"
            android:layout_weight="1"
            android:text="fragment1" />

        <Button
            android:id="@+id/btn2"
            android:layout_width="wrap_content"
            android:layout_height="wrap_content"
            android:layout_weight="1"
            android:text="fragment2" />

        <Button
            android:id="@+id/btn3"
            android:layout_width="wrap_content"
            android:layout_height="wrap_content"
            android:layout_weight="1"
            android:text="fragment3" />
    </LinearLayout>

</RelativeLayout>
以上布局如下所示:
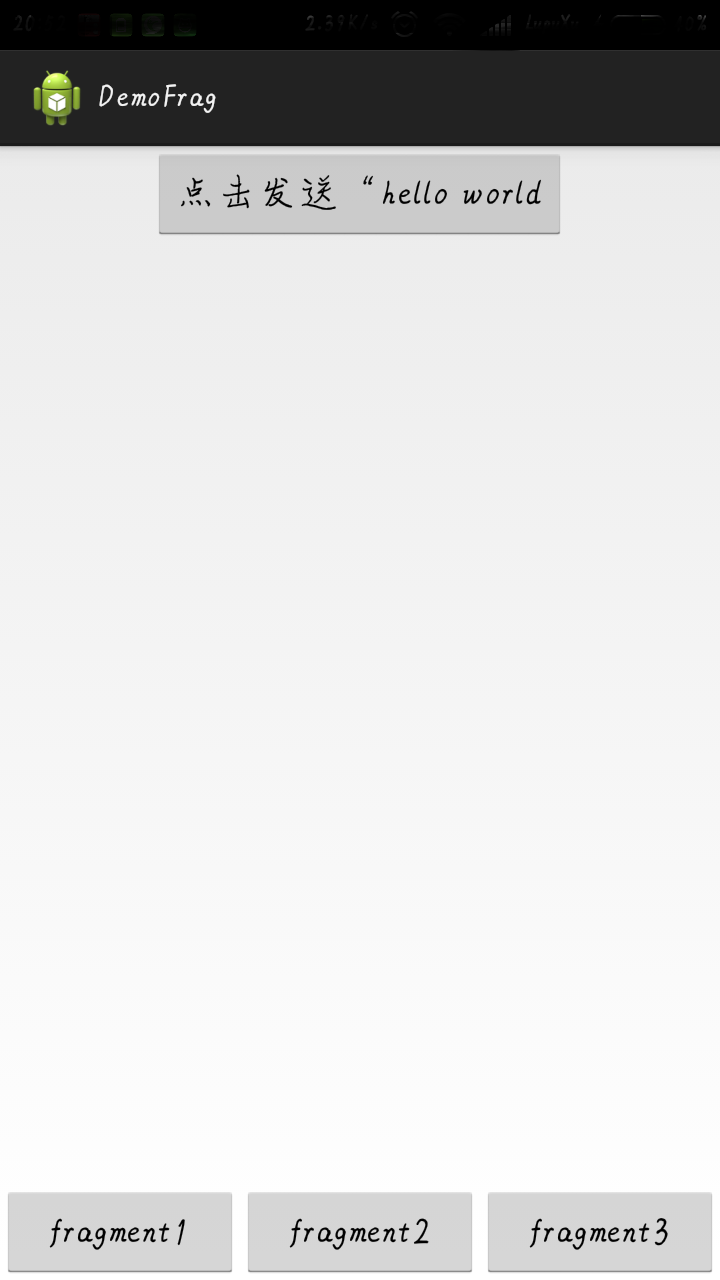
当我们点击上方的Button时将字符串发送到fragment2中,主要代码如下:
   //在activity中对按钮设置监听发送字符到fragment中
   sendBtn.setOnClickListener(new OnClickListener() {

            @Override
            public void onClick(View v) {
                Toast.makeText(getApplicationContext(), "发送到fragment2",
                        Toast.LENGTH_SHORT).show();
                if (fragment2 == null) {
                    fragment2 = new Fragment2();
                }
                Bundle bundle = new Bundle();
                bundle.putString("hello", "hello world from activity");
                fragment2.setArguments(bundle);
            }
        });
接着,我们应当在fragment2中去接收它,怎么接受呢?就是用我们提到过的方法getArguments(),主要代码片段如下所示:
@Override
public View onCreateView(LayoutInflater inflater, ViewGroup container,
Bundle savedInstanceState) {
View fragmentView = inflater.inflate(R.layout.fragment_2, container,
false);
//初始化显示接收到的字符串的TextView
tv = (TextView) fragmentView.findViewById(R.id.tvReceive);
return fragmentView;
}
@Override
public void onStart() {
super.onStart();
tv.setText(getArguments().getString("hello")+"!");
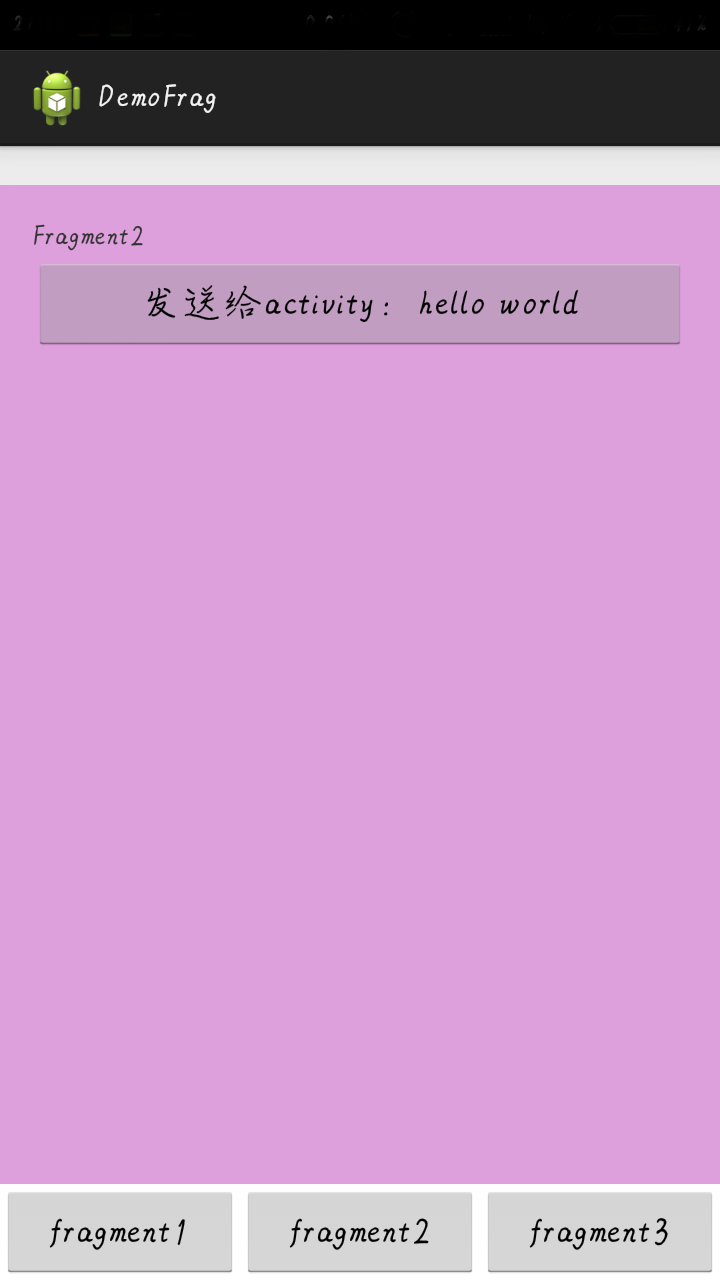
}运行之后效果如下图:

当我们切换到fragment2时可以看到有fragment发过来的数据,用这种方法我们就可以很方便的发送和接收所有Bundle支持的数据。
ps:从截图发现上方的按钮没有了,但是我们预计的是有的,因为我们在相对布局中没有做位置的限定,所以切换至fragment时消失了,知道原因即可,不多解释。
3.2 Fragment->Activity的传值
Fragment作为被Activity加载的被动一方,要想实现向Activity传值通信,要解决以下几个问题:
Fragment要知道是哪个Activity加载了它通过onAttach()方法可以让Fragment获取Activity的信息
在Fragment中创建一个Activity的对象,通过这个对象去调用Activity中的方法
Activity中的这个方法要满足如下条件:
    1、Fragment要传送给Activity的数据可以作为这个方法的参数
    2、这个方法是确定存在的
    3、Fragment知道Activity中有这个方法
通过接口回调可以完美的解决这几个问题。是不是有点抽象?下面我们用一个例子来理解一下就好了。
首先,我们要在fragment里面定义一个接口,并在它的宿主activity里实现它:
//fragment类中定义接口
public interface IHello {
        public void sayHello(String hello);
    }

//其宿主activity实现此接口
public class MainActivity extends Activity implements IHello {
    ...
    @Override
    public void sayHello(String hello) {
        Toast.makeText(getApplicationContext(), "hello from fragment2",
                Toast.LENGTH_SHORT).show();
        tv.setText("hello from fragment2");
    }
    ...
}
其次,在fragment的onAttach方法中,根据获取到的activity来得到接口对象,并在适当的地方调用(如:onStart方法中)
    @Override
    public void onAttach(Activity activity) {
        helloListener = (IHello) activity;
        super.onAttach(activity);
    }

    @Override
    public void onStart() {
        super.onStart();
        sendInfoBtn.setOnClickListener(new OnClickListener() {
            @Override
            public void onClick(View v) {
                helloListener.sayHello("hello from fragment2");
            }
        });
    }
我们在中间fragment2中加了一个button点击之后触发回调,在上方加了一个TextView来显示传过去的值(当然也可以换为其他任何操作),界面很简单就不贴出代码了。
点击之后,出现如下界面,可以证实完成了我们想要的功能。
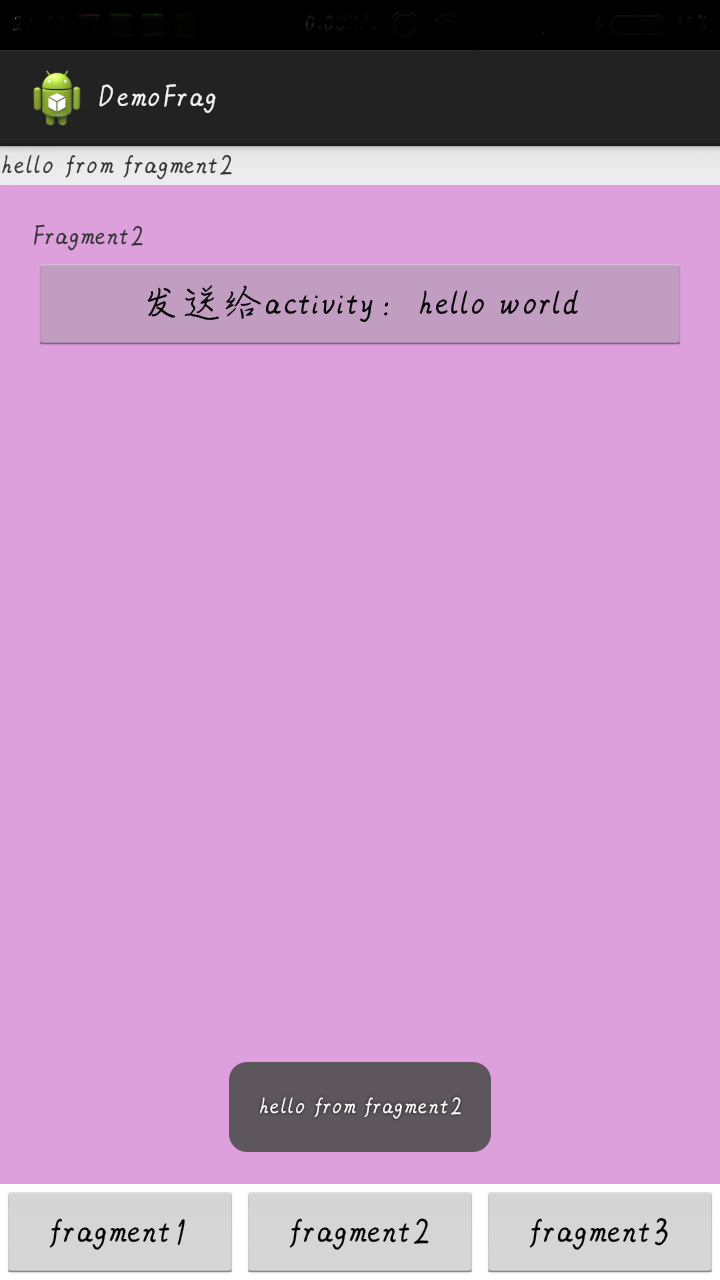
请注意:这里为了简单演示,我们只传入了一个固定的字符串,确认可以完成消息传递。你可以将参数换为任何你需要的内容,来实现更丰富的功能!
以上方式可以认为是动态传递数据的,有动态的当然就有静态的,静态的方式主要就是用到了自定义的getXXX()和setXXX方法(),它同样可以完成一些传递数据的要求,但是功能有限,有兴趣的可以试试。墙裂推荐使用接口回调的方法来完成数据传递。
3.3 Fragment->Fragment的传值
所有的Fragment间的通信都是通过跟关联的Activity来完成的。另个Fragment不应该直接通信。也就是说Fragment间不直接通信,通过Activity转一下,按Java常规,转一下多是使用Interface实现的。可以分为以下两步完成:
Fragment->Activity:用上一节讲到的方法即可
Activity->otherFragment:使用findFragmentById()方法捕获Fragment实例,宿主Activity可以把消息发送给该Fragment,然后直接调用该Fragment的公共方法。
这两步其实用到了上面讲到的东西,只是稍加变通而已,我相信如果一步步扎实的从开头看到现在应该可以完成它。
上述已经介绍完成了Fragment常用的基本方法,相信看完,大家一定清楚了Fragment的简单使用,这一部分就到此为止吧。更高级深入的知识点还有很多呢,后续会继续深入的介绍常用的东西。stay hungry, stay foolish,真的hungry了,O(∩_∩)O哈哈~。


 1097
1097

 被折叠的 条评论
为什么被折叠?
被折叠的 条评论
为什么被折叠?
 到【灌水乐园】发言


