


原文:Using IronPython with AutoCAD
我已经使用过Python一段时间了,现在随着IronPython2.0的发布(现在为2.7.4版,CC注)似乎已经到了开始尝试应用到AutoCAD中的时候了~
为什么要用Python?我的团队的许多人——包括Jeremy Tammik和一些支持在Maya和MotionBuilder中应用Python的媒体及娱乐工作组的同事——都强烈的支持Python。 他们告诉我这是一门非常简单、通用、动态的编程语言。听起来很有趣——虽然我必须承认我不太相信语言的类型动态化这一块的重要性:多年来我认为静态类型的语言具有很大的价值(即使F#也是静态类型的,尽管许多人甚至都没有意识到这一点……它类型推测系统可以让你安全的编码而不需要在所有的地方明确指定变量的类型)。
让我们回过头来简短的谈论下什么是动态语言。JavaScript便是动态语言最常见的一个例子,我相信大家对它已经都有所接触。在JavaScript中任何东西都可以声明为一个var,然后赋值,调用方法,希望他们在运行时工作。我承认我一直都不喜欢开发JavaScript,因为缺少很好的开发工具:我是一个智能补全的狂热粉丝(基于对象在编码时确定就类型的架构)并且我希望在我调用某一对象并不支持的方法时编译器能提醒我。也许很大程度上是因为我已经习惯于现代的开发工具所导致的,我一直试图对新生事物保持开放的态度,真的!
另一门我更喜欢的动态语言(虽然有时也令人沮丧)是LISP语言。但不同的是,和几乎所有早期的AutoCAD程序员一样,我选择它是因为必须使用它。当时它的编程环境,是非常简单的-然后我越来越喜欢它,直到现在都无法忘记它,即使出现了更具吸引力更有效率的开发环境。So I’m extremely loathe to paint it with the same brush as the one I’ve used for JavaScript。
我对Python也感兴趣,因为它具有跨平台的特性,并且它是一门开源的语言。虽然它起源于Unix/Linux,但是现在在各种操作系统平台上越来越流行(这也是我们的一个跨平台的产品Autodesk Maya采用它作为脚本语言的原因)。
微软现在对动态语言绝对是非常开放的:他们对支持动态语言运行时进行了大量的投入用以支持如IronPython和IronRuby这样的语言,并且在C# 4.0 中增加了更多的动态特性(最终会支持与VB类似的“后期绑定”的能力)。
总之,我们生活的世界似乎变得越来越动态化了。:-)
无论如何,现在开始使IronPython在AutoCAD中工作。我原本希望能建立一个直接使用IronPython的.NET assemble库(不太懂,CC注)然后加载到AutoCAD中——这个特性似乎在IronPython发布的2.0版中就已经提供支持了。但是不幸的是,实际的过程是很让人沮丧:AutoCAD使用了大量的自定义Attributes用以识别命令等操作,但是IronPython目前并不支持这些Attributes。通过编译带有自定义Attributes的C#代码然后从它派生子类(详情见此)的技巧至少在理论上能够将带有Attributes的代码加载至内存中(It is possible to do some clever stuff by compiling attributed C# on-the-fly and deriving classes from it (information on this is available here), which will – in theory, at least – get you something in memory that’s attributed——对.NET不是很熟练,不知道该如何翻译)。但是未能成功。我同样也花了大量的时间想从Autodesk.AutoCAD.Runtime.IExtensionApplication这个类中派生出子类从而让Initialize()函数在加载时被自动调用——但是这种方法还是行不通
然后,令人欣慰的是,最终Tim Riley给我提供了帮助,自从他开始开发PyAcad.NET的项目以来,我们一直保持着联系。 Tim把一些代码合并起来,并最终注册了一些命令后PyAcad.NET使IronPython代码在AutoCAD上运行。(后来我告诉他一些AutoCAD 2009的acmgdinternal.dll中未开放支持的assembly的函数,这些组件暴露了一些很有用的函数)最后他和Albert Szilvasy给我的建议一样,决定用C#实现一个“PYLOAD”命令用以选择并载入Python脚本。(毕竟,Python说到底是一个脚本语言而不是静态编译的组件)
在我们开始编写C#模块之前,我先列出我安装的是IronPython 2.0.1和IronPython Studio 1.0 for the Visual Studio 2008的查件。原来最终我们是依靠C #来实现Python的加载而不是编译为.NET的组件。IronPython Studio主要优势增强Visual Studio编写Python代码的能力 。
要成功将下面的C#代码编译成一个标准的.NET类库组件(一个DLL),你需要添加对IronPython.dll、IronPython.Modules.dll、Microsoft.Scripting.dll和 Microsoft.Scripting.Core.dll这几个文件的参考。所有这些文件都可以在IronPython的安装主目录中找到。(在我的系统中是在“C:\Program Files\IronPython 2.0.1”目录中)同时,显然还需要标准地添加对acmgd.dll和acdbmgd.dll的参考
下面就是C#代码:
using Autodesk.AutoCAD.ApplicationServices;
using Autodesk.AutoCAD.DatabaseServices;
using Autodesk.AutoCAD.Runtime;
using Autodesk.AutoCAD.EditorInput;
using IronPython.Hosting;
using Microsoft.Scripting.Hosting;
using System;

namespace PythonLoader
{
  public class CommandsAndFunctions
  {
    [CommandMethod("-PYLOAD")]
    public static void PythonLoadCmdLine()
    {
      PythonLoad(true);
    }

    [CommandMethod("PYLOAD")]
    public static void PythonLoadUI()
    {
      PythonLoad(false);
    }

    public static void PythonLoad(bool useCmdLine)
    {
      Document doc =
        Application.DocumentManager.MdiActiveDocument;
      Editor ed = doc.Editor;

      short fd =
        (short)Application.GetSystemVariable("FILEDIA");

      // As the user to select a .py file

      PromptOpenFileOptions pfo =
          new PromptOpenFileOptions(
            "Select Python script to load"
          );
      pfo.Filter = "Python script (*.py)|*.py";
      pfo.PreferCommandLine =
        (useCmdLine || fd == 0);
      PromptFileNameResult pr =
        ed.GetFileNameForOpen(pfo);

      // And then try to load and execute it

      if (pr.Status == PromptStatus.OK)
        ExecutePythonScript(pr.StringResult);
    }

    [LispFunction("PYLOAD")]
    public ResultBuffer PythonLoadLISP(ResultBuffer rb)
    {
      const int RTSTR = 5005;

      Document doc =
        Application.DocumentManager.MdiActiveDocument;
      Editor ed = doc.Editor;

      if (rb == null)
      {
        ed.WriteMessage("\nError: too few arguments\n");
      }
      else
      {
        // We're only really interested in the first argument

        Array args = rb.AsArray();
        TypedValue tv = (TypedValue)args.GetValue(0);

        // Which should be the filename of our script

        if (tv != null && tv.TypeCode == RTSTR)
        {
          // If we manage to execute it, let's return the
          // filename as the result of the function
          // (just as (arxload) does)

          bool success =
            ExecutePythonScript(Convert.ToString(tv.Value));
          return
            (success ?
              new ResultBuffer(
                new TypedValue(RTSTR, tv.Value)
              )
              : null);
        }
      }
      return null;
    }

    private static bool ExecutePythonScript(string file)
    {
      // If the file exists, let's load and execute it
      // (we could/should probably add some more robust
      // exception handling here)

      bool ret = System.IO.File.Exists(file);
      if (ret)
      {
        ScriptEngine engine = Python.CreateEngine();
        engine.ExecuteFile(file);
      }
      return ret;
    }
  }
}
PYLOAD命令的代码其实真的很简单。我本可以把它写的更简单一点,但是还是觉得这是演示一些最佳实践的好机会。所以我们不仅提供了标准的PYLOAD命令,这个命令根据FILEDIA变量来决定使用对话框或命令行。也提供了一个命令行版本-PYLOAD和Lisp函数(pyload)。所有这些调用了同一个函数来加载Python脚本。
好的,现在让我们来看看一个通过.NET API来操作AutoCAD的简单的IronPython脚本。再次感谢Tim Riley提供的帮助。即使是Python(显然)很容易学习,但是我这个新手如果没有他的帮助仍然会在黑暗中徘徊。
import clr
path = 'C:\\Program Files\\Autodesk\\AutoCAD 2009\\'
clr.AddReferenceToFileAndPath(path + 'acdbmgd.dll')
clr.AddReferenceToFileAndPath(path + 'acmgd.dll')
clr.AddReferenceToFileAndPath(path + 'acmgdinternal.dll')

import Autodesk
import Autodesk.AutoCAD.Runtime as ar
import Autodesk.AutoCAD.ApplicationServices as aas
import Autodesk.AutoCAD.DatabaseServices as ads
import Autodesk.AutoCAD.Geometry as ag
import Autodesk.AutoCAD.Internal as ai
from Autodesk.AutoCAD.Internal import Utils

# Function to register AutoCAD commands
# To be used via a function decorator

def autocad_command(function):

    # First query the function name
    n = function.__name__

    # Create the callback and add the command
    cc = ai.CommandCallback(function)
    Utils.AddCommand('pycmds', n, n, ar.CommandFlags.Modal, cc)

    # Let's now write a message to the command-line
    doc = aas.Application.DocumentManager.MdiActiveDocument
    ed = doc.Editor
    ed.WriteMessage("\nRegistered Python command: {0}", n)

# A simple "Hello World!" command

@autocad_command
def msg():
    doc = aas.Application.DocumentManager.MdiActiveDocument
    ed = doc.Editor
    ed.WriteMessage("\nOur test command works!")

# And one to do something a little more complex...
# Adds a circle to the current space

@autocad_command
def mycir():

    doc = aas.Application.DocumentManager.MdiActiveDocument
    db = doc.Database

    tr = doc.TransactionManager.StartTransaction()
    bt = tr.GetObject(db.BlockTableId, ads.OpenMode.ForRead)
    btr = tr.GetObject(db.CurrentSpaceId, ads.OpenMode.ForWrite)

    cir = ads.Circle(ag.Point3d(10,10,0),ag.Vector3d.ZAxis, 2)

    btr.AppendEntity(cir)
    tr.AddNewlyCreatedDBObject(cir, True)

    tr.Commit()
    tr.Dispose()
由于IronPython无法使用自定义Attributes,我们只能使用Autodesk.AutoCAD.Internal命名空间来动态注册命令。我不喜欢这样做,但是我没有选择的余地,除非我们选择找到另一种方式来调用代码。请注意,包含在Autodesk.AutoCAD.Internal命名空间的函数是不被支持的,并可能随时改变而不会通知用户。
现在,长吁一口气,我们完成了。让我们对上面的代码进行进一步的评论…
- 即使没有自定义Attributes,我们使用了Python一个很酷的被称为decorators的功能(*再次*感谢提醒~,Tim:-),这个功能能帮助我们将函数标记为命令。autocad_command函数能被每个装饰的函数调用,这样我们就能根据函数的名称注册的对应的命令~超酷的~
- 你会发现很明显,代码中没有声明类型(是的,这仍然让我害怕)。我之前曾试图在这段代码的基础上编译一份DLL,我在编译时就遇到了很多麻烦,显然在运行时会导致程序崩溃(在我实际执行任何代码之前:-S)。我觉得我还需要在头脑中做出这种权衡:我能看到它的简单、优雅、简洁——甚至在某些情况下带来的威力,但是我脑袋里的计算机学家呼喊着需要安全、可靠性、确定性(determinism)、调试性(debuggability)(如果这是一个单词的话)。然而,最主要的是至少我开始了这段旅程,我们会看到我最终会喜欢上它的:-)
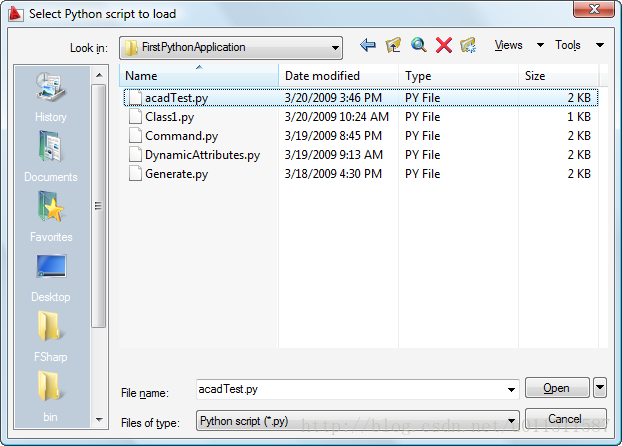
当我们编译并且用NETLOAD命令加载了我们用C#编写的PythonLoader程序并且执行PYLOAD命令后,我们就可以选择我们的Python脚本:
命令:PYLOAD
一旦选择后,Python脚本就被加载进来并且注册了一下两个命令:
Registered Python command: msg
Registered Python command: mycir
执行MSG命令将会执行一个简单的 "Hello World" 函数,在命令行中打印一行消息:
命令:MSG
Our test command works!
执行MYCIR命令应该在当前图形的模型空间中加入一个圆
命令:MYCIR

这就是我最初Python世界的一个探索。我希望你已经发现了它很有用并且喜欢在AutoCAD中用Python编程。如果你关于这个话题有任何经验或轶事,欢迎留下评论!


 1万+
1万+


 被折叠的 条评论
为什么被折叠?
被折叠的 条评论
为什么被折叠?
 到【灌水乐园】发言


