


如果把不同会议、tweets上出现的文章、相关话题全部考虑在内,容易给人以这样的错觉——Docker能够解决世界饥饿问题。如果真是那样固然是一件大好事,不过这显然是不可能的。不过,Docker确实很好的解决了一个问题。
让我们听一下@solomonstre是怎么说的。solomonstre是Docker这个项目的缔造者。
简单来说,Docker使软件的传播更加简单,简单从两个方面体现,一是更容易建立,二是共享包含你应用环境配置信息的镜像,应用环境配置也叫做应用操作系统。应用操作系统是什么?
一般来说,你的应用程序需要一个特定版本的操作系统,应用服务器,JDK,数据库服务器,还可能需要整合配置文件和其他各种各样的依赖。应用可能需要绑定特定的端口和特定大小的内存。这些运行你的应用所必须的组件和配置就是所谓的应用操作系统。当然,你可以写一个安装脚本,在脚本中完成下载并安装这些组件的功能。Docker能够简化这个过程,Docker允许创建包含你的应用和应用依赖的镜像文件。这些镜像可以被用来创建Docker containers,Docker containers运行在container虚拟化平台之上之上,这个平台由Docker提供。
Docker的主要组件是什么?
Docker有两大组件:- Docker:开源container虚拟化平台
- Docker Hub:共享和管理Docker镜像的SaaS平台
镜像是Docker的“build component”,这是一个只读的应用操作系统模板。Containers是运行时的表示,根据镜像创建。containers是Docker的“run component”。Containers可以被启动、开始、停止、移动和删除。镜像被存储在registry中,registry是Docker的“distribution component”。
第一个组件Docker又包括两个部分:
- Daemon运行在host machine上,承担创建、运行和分发Docker containers的繁重任务。
- Client从用户接收指令,并且和daemon通信。
Docker是怎么工作的?
Client和同一台host machine或另外一台host machine上的Daemon通信。Client使用pull指令请求Daemon从仓库下载一个镜像。收到指令之后,Daemon从Docker Hub下载相应的镜像。一台host machine上可以安装多个镜像。
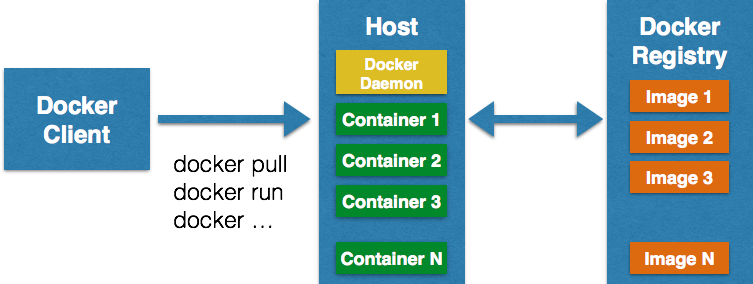
Client然后使用 run指令 启动Container。 完整的客户端指令列表 。
Client和Daemon通过sockets或者REST API通信。
因为Docker使用Linux内核,这是否就意味着只能在Linux平台上使用它?
Docker支持的操作系统可以 docs.docker.com/installation 中找到。事实上,Docker可以在许多平台下工作,包括Mac和Windows。
对于非Linux机器,需要安装一个轻量级的虚拟机,Daemon就是安装在这个虚拟机中。安装虚拟机后,就可以安装和Daemon通信的原生客户端了。下面是在Mac上启动Docker daemon的的日志:
- bash
- unset DYLD_LIBRARY_PATH ; unset LD_LIBRARY_PATH
- mkdir -p ~/.boot2docker
- if [ ! -f ~/.boot2docker/boot2docker.iso ]; then cp /usr/local/share/boot2docker/boot2docker.iso ~/.boot2docker/ ; fi
- /usr/local/bin/boot2docker init
- /usr/local/bin/boot2docker up && export DOCKER_HOST=tcp://$(/usr/local/bin/boot2docker ip 2>/dev/null):2375
- docker version
- ~> bash
- ~> unset DYLD_LIBRARY_PATH ; unset LD_LIBRARY_PATH
- ~> mkdir -p ~/.boot2docker
- ~> if [ ! -f ~/.boot2docker/boot2docker.iso ]; then cp /usr/local/share/boot2docker/boot2docker.iso ~/.boot2docker/ ; fi
- ~> /usr/local/bin/boot2docker init
- 2014/07/16 09:57:13 Virtual machine boot2docker-vm already exists
- ~> /usr/local/bin/boot2docker up && export DOCKER_HOST=tcp://$(/usr/local/bin/boot2docker ip 2>/dev/null):2375
- 2014/07/16 09:57:13 Waiting for VM to be started...
- .......
- 2014/07/16 09:57:35 Started.
- 2014/07/16 09:57:35 To connect the Docker client to the Docker daemon, please set:
- 2014/07/16 09:57:35 export DOCKER_HOST=tcp://192.168.59.103:2375
- ~> docker version
- Client version: 1.1.1
- Client API version: 1.13
- Go version (client): go1.2.1
- Git commit (client): bd609d2
- Server version: 1.1.1
- Server API version: 1.13
- Go version (server): go1.2.1
- Git commit (server): bd609d2
你可以按照docs.docker.com/installation/mac在Mac上安装Docker daemon和Client。
可以在CLI输入下面的指令关闭虚拟机:
- boot2docker stop
要重启,输入:
- boot2docker boot
登陆,输入:
- boot2docker ssh
输入help可以获取boot2docker指令的完整列表。
- ~> boot2docker help
- Usage: boot2docker [] []
- boot2docker management utility.
- Commands:
- init Create a new boot2docker VM.
- up|start|boot Start VM from any states.
- ssh [ssh-command] Login to VM via SSH.
- save|suspend Suspend VM and save state to disk.
- down|stop|halt Gracefully shutdown the VM.
- restart Gracefully reboot the VM.
- poweroff Forcefully power off the VM (might corrupt disk image).
- reset Forcefully power cycle the VM (might corrupt disk image).
- delete|destroy Delete boot2docker VM and its disk image.
- config|cfg Show selected profile file settings.
- info Display detailed information of VM.
- ip Display the IP address of the VM's Host-only network.
- status Display current state of VM.
- download Download boot2docker ISO image.
- version Display version information.
一个示例
一些JBoss项目的Docker镜像可以从 www.jboss.org/docker 获得,按照页面上的提示安装。比如说,WildFly Docker镜像可以这样安装:
- ~> docker pull jboss/wildfly
- Pulling repository jboss/wildfly
- 2f170f17c904: Download complete
- 511136ea3c5a: Download complete
- c69cab00d6ef: Download complete
- 88b42ffd1f7c: Download complete
- fdbe853b54e1: Download complete
- bc93200c3ba0: Download complete
- 0daf76299550: Download complete
- 3a7e1274035d: Download complete
- e6e970a0db40: Download complete
- 1e34f7a18753: Download complete
- b18f179f7be7: Download complete
- e8833789f581: Download complete
- 159f5580610a: Download complete
- 3111b437076c: Download complete
验证镜像,使用:
- ~> docker images
- REPOSITORY TAG IMAGE ID CREATED VIRTUAL SIZE
- jboss/wildfly latest 2f170f17c904 8 hours ago 1.048 GB
当镜像下载完毕,使用下面的指令启动container:
- docker run jboss/wildfly
Docker默认不提供交互式的shell。如果WildFly像上面这样启动,就不能使用Ctrl + C的组合键终止它。-i选项开启交互式功能,-t选项分配一个伪终端。
另外,在启动container之前需要开启8080端口,在localhost上,开启8080端口可以输入-p 80:8080,80是host的端口。
综上所述,输入下面指令启动container:
- docker run -i -t -p 80:8080 jboss/wildfly
- =========================================================================
- JBoss Bootstrap Environment
- JBOSS_HOME: /opt/wildfly
- JAVA: java
- JAVA_OPTS: -server -Xms64m -Xmx512m -XX:MaxPermSize=256m -Djava.net.preferIPv4Stack=true -Djboss.modules.system.pkgs=org.jboss.byteman -Djava.awt.headless=true
- =========================================================================
- 22:08:29,943 INFO [org.jboss.modules] (main) JBoss Modules version 1.3.3.Final
- 22:08:30,200 INFO [org.jboss.msc] (main) JBoss MSC version 1.2.2.Final
- 22:08:30,297 INFO [org.jboss.as] (MSC service thread 1-6) JBAS015899: WildFly 8.1.0.Final "Kenny" starting
- 22:08:31,935 INFO [org.jboss.as.server] (Controller Boot Thread) JBAS015888: Creating http management service using socket-binding (management-http)
- 22:08:31,961 INFO [org.xnio] (MSC service thread 1-7) XNIO version 3.2.2.Final
- 22:08:31,974 INFO [org.xnio.nio] (MSC service thread 1-7) XNIO NIO Implementation Version 3.2.2.Final
- 22:08:32,057 INFO [org.wildfly.extension.io] (ServerService Thread Pool -- 31) WFLYIO001: Worker 'default' has auto-configured to 16 core threads with 128 task threads based on your 8 available processors
- 22:08:32,108 INFO [org.jboss.as.clustering.infinispan] (ServerService Thread Pool -- 32) JBAS010280: Activating Infinispan subsystem.
- 22:08:32,110 INFO [org.jboss.as.naming] (ServerService Thread Pool -- 40) JBAS011800: Activating Naming Subsystem
- 22:08:32,133 INFO [org.jboss.as.security] (ServerService Thread Pool -- 45) JBAS013171: Activating Security Subsystem
- 22:08:32,178 INFO [org.jboss.as.jsf] (ServerService Thread Pool -- 38) JBAS012615: Activated the following JSF Implementations: [main]
- 22:08:32,206 WARN [org.jboss.as.txn] (ServerService Thread Pool -- 46) JBAS010153: Node identifier property is set to the default value. Please make sure it is unique.
- 22:08:32,348 INFO [org.jboss.as.security] (MSC service thread 1-3) JBAS013170: Current PicketBox version=4.0.21.Beta1
- 22:08:32,397 INFO [org.jboss.as.webservices] (ServerService Thread Pool -- 48) JBAS015537: Activating WebServices Extension
- 22:08:32,442 INFO [org.jboss.as.connector.logging] (MSC service thread 1-13) JBAS010408: Starting JCA Subsystem (IronJacamar 1.1.5.Final)
- 22:08:32,512 INFO [org.wildfly.extension.undertow] (MSC service thread 1-9) JBAS017502: Undertow 1.0.15.Final starting
- 22:08:32,512 INFO [org.wildfly.extension.undertow] (ServerService Thread Pool -- 47) JBAS017502: Undertow 1.0.15.Final starting
- 22:08:32,570 INFO [org.jboss.as.connector.subsystems.datasources] (ServerService Thread Pool -- 27) JBAS010403: Deploying JDBC-compliant driver class org.h2.Driver (version 1.3)
- 22:08:32,660 INFO [org.jboss.as.connector.deployers.jdbc] (MSC service thread 1-10) JBAS010417: Started Driver service with driver-name = h2
- 22:08:32,736 INFO [org.jboss.remoting] (MSC service thread 1-7) JBoss Remoting version 4.0.3.Final
- 22:08:32,836 INFO [org.jboss.as.naming] (MSC service thread 1-15) JBAS011802: Starting Naming Service
- 22:08:32,839 INFO [org.jboss.as.mail.extension] (MSC service thread 1-15) JBAS015400: Bound mail session [java:jboss/mail/Default]
- 22:08:33,406 INFO [org.wildfly.extension.undertow] (ServerService Thread Pool -- 47) JBAS017527: Creating file handler for path /opt/wildfly/welcome-content
- 22:08:33,540 INFO [org.wildfly.extension.undertow] (MSC service thread 1-13) JBAS017525: Started server default-server.
- 22:08:33,603 INFO [org.wildfly.extension.undertow] (MSC service thread 1-8) JBAS017531: Host default-host starting
- 22:08:34,072 INFO [org.wildfly.extension.undertow] (MSC service thread 1-13) JBAS017519: Undertow HTTP listener default listening on /0.0.0.0:8080
- 22:08:34,599 INFO [org.jboss.as.server.deployment.scanner] (MSC service thread 1-11) JBAS015012: Started FileSystemDeploymentService for directory /opt/wildfly/standalone/deployments
- 22:08:34,619 INFO [org.jboss.as.connector.subsystems.datasources] (MSC service thread 1-9) JBAS010400: Bound data source [java:jboss/datasources/ExampleDS]
- 22:08:34,781 INFO [org.jboss.ws.common.management] (MSC service thread 1-13) JBWS022052: Starting JBoss Web Services - Stack CXF Server 4.2.4.Final
- 22:08:34,843 INFO [org.jboss.as] (Controller Boot Thread) JBAS015961: Http management interface listening on http://0.0.0.0:9990/management
- 22:08:34,844 INFO [org.jboss.as] (Controller Boot Thread) JBAS015951: Admin console listening on http://0.0.0.0:9990
- 22:08:34,845 INFO [org.jboss.as] (Controller Boot Thread) JBAS015874: WildFly 8.1.0.Final "Kenny" started in 5259ms - Started 184 of 233 services (81 services are lazy, passive or on-demand)
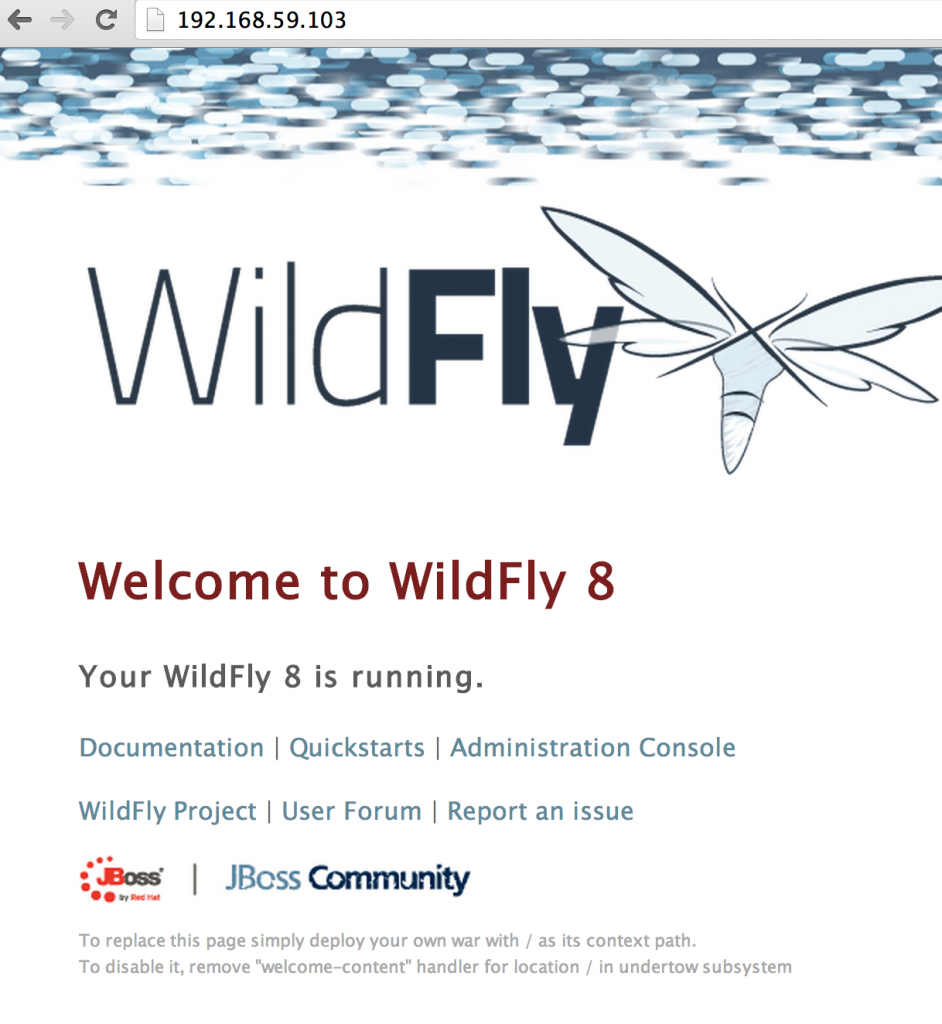
查看container的IP地址,输入:
- ~> boot2docker ip
- The VM's Host only interface IP address is: 192.168.59.103
查看已经启动的container,输入:
- ~> docker ps
- CONTAINER ID IMAGE COMMAND CREATED STATUS PORTS NAMES
- b2f8001164b0 jboss/wildfly:latest /opt/wildfly/bin/sta 46 minutes ago Up 12 minutes 8080/tcp, 9990/tcp sharp_pare
要终止container,可以使用Ctrl + C组合键,或者输入:
- ~> docker stop b2f8001164b0
- b2f8001164b0
这里使用到了指令“docker ps”得到的container id。
更多使用这个镜像的细节,比如以domain模式启动,部署应用等,参考如下链接: github.com/jboss/dockerfiles/blob/master/wildfly/README.md 。
想了解WildFly的其他方面,在 github.com/jboss/dockerfiles/issues 发起议题。
jboss.org/docker上的其他镜像:


 8801
8801

 被折叠的 条评论
为什么被折叠?
被折叠的 条评论
为什么被折叠?
 到【灌水乐园】发言


