简介
本篇讲解opencv video鼠标选中的物体跟踪,使用的是opencv提供的calcOpticalFlowPyrLK。
calcOpticalFlowPyrLK介绍
  void calcOpticalFlowPyrLK(InputArray prevImg, InputArray nextImg, InputArray prevPts, InputOutputArray nextPts,
                              OutputArray status, OutputArray err, Size winSize=Size(21,21), int maxLevel=3,
                              TermCriteria criteria=TermCriteria(TermCriteria::COUNT+TermCriteria::EPS, 30, 0.01),
                              int flags=0, double minEigThreshold=1e-4 );
    prevImg:前一帧video图像。
    nextImg:当前video图像。
    prevPts:前一帧video图像中被跟踪的坐标点。
    nextPts:prevPts保存的坐标点,在当前帧video图像中计算出来的对应坐标,也就是跟踪到的坐标点。
    winSize:在每层的搜索窗口的大小。
    criteria:算法递归停止的条件。
    。。。。。
具体实现
实现代码
#include "opencv2/video/tracking.hpp"
#include "opencv2/imgproc/imgproc.hpp"
#include "opencv2/highgui/highgui.hpp"

#include <iostream>
#include <ctype.h>
#include <stdio.h>
#include <unistd.h>
#include <stdlib.h>

using namespace cv;
using namespace std;

vector<Point2f> point1, point2;
bool left_mouse = false;
Point2f point;
int pic_info[4];
Mat gray, prevGray, image;
const Scalar GREEN = Scalar(0,255,0);
int rect_width = 0, rect_height = 0;
Point tmpPoint;

static void onMouse( int event, int x, int y, int /*flags*/, void* /*param*/ ){
	Mat mouse_show;
	image.copyTo(mouse_show);

	if(event == CV_EVENT_LBUTTONDOWN){
		pic_info[0] = x;
		pic_info[1] = y;
		left_mouse = true;
	}else if(event == CV_EVENT_LBUTTONUP){
		rectangle(mouse_show, Point(pic_info[0], pic_info[1]), Point(x, y), GREEN, 2);
		rect_width = <a href="http://www.opengroup.org/onlinepubs/%3Cspan%20class=" nu19"="" style="text-decoration: none; color: rgb(11, 0, 128); background-image: none; background-position: initial initial; background-repeat: initial initial;">009695399/functions/abs.html">abs(x - pic_info[0]);
		rect_height = <a href="http://www.opengroup.org/onlinepubs/%3Cspan%20class=" nu19"="" style="text-decoration: none; color: rgb(11, 0, 128); background-image: none; background-position: initial initial; background-repeat: initial initial;">009695399/functions/abs.html">abs(y - pic_info[1]);
		x = (pic_info[0] + x) / 2;
		y = (pic_info[1] + y) / 2;
		point = Point2f((float)x, (float)y);
		point1.clear();
		point2.clear();
        point1.push_back(point);
        imshow("LK Demo", mouse_show);
		left_mouse = false;
	}else if((event == CV_EVENT_MOUSEMOVE) && (left_mouse == true)){
		rectangle(mouse_show, Point(pic_info[0], pic_info[1]), Point(x, y), GREEN, 2);
        imshow("LK Demo", mouse_show);
	}
}

int main( int argc, char** argv )
{
    VideoCapture cap;
    TermCriteria termcrit(CV_TERMCRIT_ITER|CV_TERMCRIT_EPS, 20, 0.03); //迭代算法的终止条件
    Size winSize(31,31);

    cap.open(argv[1]);
    if(!cap.isOpened()){
        cout << "Could not initialize capturing...\n";
        return 0;
    }

    namedWindow( "LK Demo", 1 );
    setMouseCallback( "LK Demo", onMouse, 0 );

    for(;;){
        Mat frame;
        cap >> frame;
        if( frame.empty() )
            break;
        frame.copyTo(image);
        cvtColor(image, gray, COLOR_BGR2GRAY);
        if((!point1.empty())){
            vector<uchar> status;
            vector<float> err;
            if(prevGray.empty())
                gray.copyTo(prevGray);
            calcOpticalFlowPyrLK(prevGray, gray, point1, point2, status, err, winSize,
                                 3, termcrit, 0, 0.001); //使用金字塔Lucas&Kanade方法计算一个稀疏特征集的光流
			tmpPoint = point2[0];
			rectangle(image, Point(tmpPoint.x - 20, tmpPoint.y - 20), Point(tmpPoint.x + 20, tmpPoint.y + 20), GREEN, 2);
        }

        imshow("LK Demo", image);
		waitKey(100);
        std::swap(point2, point1);
        cv::swap(prevGray, gray);
    }
    return 0;
}
代码讲解
  1、首先设置了算法calcOpticalFlowPyrLK将会使用到的递归停止条件(termcrit),关于termcrit的具体讲解,可以看这里有具体讲解:
http://blog.csdn.net/yang_xian521/article/details/6905244 ,接着打开视频文件,句柄保存在cap中。然后设置了显示窗口,已经它的鼠标响应函数。
 VideoCapture cap;
    TermCriteria termcrit(CV_TERMCRIT_ITER|CV_TERMCRIT_EPS, 20, 0.03); //迭代算法的终止条件
    Size winSize(31,31);

    cap.open(argv[1]);
    if(!cap.isOpened()){
        cout << "Could not initialize capturing...\n";
        return 0;
    }

    namedWindow( "LK Demo", 1 );
    setMouseCallback( "LK Demo", onMouse, 0 );
  2、鼠标响应函数,主要做的就是,在当前video帧中画一个矩形,然后计算出该矩形的中心位置坐标,保存到point1中。这个位置坐标就是在
calcOpticalFlowPyrLK算法中用来跟踪的点。
static void onMouse( int event, int x, int y, int /*flags*/, void* /*param*/ ){
	Mat mouse_show;
	image.copyTo(mouse_show);

	if(event == CV_EVENT_LBUTTONDOWN){
		pic_info[0] = x;
		pic_info[1] = y;
		left_mouse = true;
	}else if(event == CV_EVENT_LBUTTONUP){
		rectangle(mouse_show, Point(pic_info[0], pic_info[1]), Point(x, y), GREEN, 2);
		rect_width = <a href="http://www.opengroup.org/onlinepubs/%3Cspan%20class=" nu19"="" style="text-decoration: none; color: rgb(11, 0, 128); background-image: none; background-position: initial initial; background-repeat: initial initial;">009695399/functions/abs.html">abs(x - pic_info[0]);
		rect_height = <a href="http://www.opengroup.org/onlinepubs/%3Cspan%20class=" nu19"="" style="text-decoration: none; color: rgb(11, 0, 128); background-image: none; background-position: initial initial; background-repeat: initial initial;">009695399/functions/abs.html">abs(y - pic_info[1]);
		x = (pic_info[0] + x) / 2;
		y = (pic_info[1] + y) / 2;
		point = Point2f((float)x, (float)y);
		point1.clear();
		point2.clear();
        point1.push_back(point);
        imshow("LK Demo", mouse_show);
		left_mouse = false;
	}else if((event == CV_EVENT_MOUSEMOVE) && (left_mouse == true)){
		rectangle(mouse_show, Point(pic_info[0], pic_info[1]), Point(x, y), GREEN, 2);
        imshow("LK Demo", mouse_show);
	}
}
  3、当用户还没有鼠标框选跟踪目标时候,软件会不断的读取出video的数据,保存到frame中,接着copy一份当前帧数据到gray中,并将gray中的
图像灰阶化,然后显示出video frame数据。最后交换了point2和point1中的坐标信息和保存了当前灰阶化后的帧率到prevGray中。
    for(;;){
        Mat frame;
        cap >> frame;
        if( frame.empty() )
            break;
        frame.copyTo(image);
        cvtColor(image, gray, COLOR_BGR2GRAY);
        ...........
        imshow("LK Demo", image);
		waitKey(100);
        std::swap(point2, point1);
        cv::swap(prevGray, gray);
    }
  4、最后当用户框选了跟踪目标之后,也就是point1不为空之后,开始用calcOpticalFlowPyrLK跟踪计算,注意传入该函数的参数:prevGray相当于
之前保存的前一帧的数据;gray是当前帧数据;point1是前一帧中被跟踪的目标位置;point2是计算出来的被跟踪目标在当前帧的位置。
  最后用计算出来的在当前帧中,跟踪目标坐标point2作为中心,在当前帧中画出一个40X40的矩形作为标记,最后显示出来。
        if((!point1.empty())){
            vector<uchar> status;
            vector<float> err;
            if(prevGray.empty())
                gray.copyTo(prevGray);
            calcOpticalFlowPyrLK(prevGray, gray, point1, point2, status, err, winSize,
                                 3, termcrit, 0, 0.001); //使用金字塔Lucas&Kanade方法计算一个稀疏特征集的光流
			tmpPoint = point2[0];
			rectangle(image, Point(tmpPoint.x - 20, tmpPoint.y - 20), Point(tmpPoint.x + 20, tmpPoint.y + 20), GREEN, 2);
        }
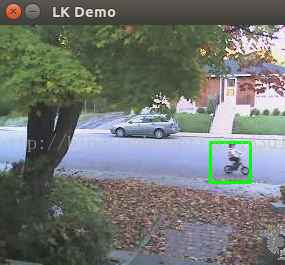
效果演示
对应的效果演示如下:


 4507
4507


 被折叠的 条评论
为什么被折叠?
被折叠的 条评论
为什么被折叠?
 到【灌水乐园】发言


