


从MySQL数据库phx中读取tree表到HDFS
执行命令:
sqoop import --connect jdbc:mysql://node1:3306/phx \--username root --table tree --m 1命令行输出:
Warning: /csh/link/sqoop/../hcatalog does not exist! HCatalog jobs will fail.
Please set $HCAT_HOME to the root of your HCatalog installation.
Warning: /csh/link/sqoop/../accumulo does not exist! Accumulo imports will fail.
Please set $ACCUMULO_HOME to the root of your Accumulo installation.
16/04/10 07:14:24 INFO sqoop.Sqoop: Running Sqoop version: 1.4.6
16/04/10 07:14:25 INFO manager.MySQLManager: Preparing to use a MySQL streaming resultset.
16/04/10 07:14:25 INFO tool.CodeGenTool: Beginning code generation
16/04/10 07:14:25 INFO manager.SqlManager: Executing SQL statement: SELECT t.* FROM `tree` AS t LIMIT 1
16/04/10 07:14:26 INFO manager.SqlManager: Executing SQL statement: SELECT t.* FROM `tree` AS t LIMIT 1
16/04/10 07:14:26 INFO orm.CompilationManager: HADOOP_MAPRED_HOME is /csh/link/hadoop
Note: /tmp/sqoop-root/compile/7c9c9a4ffecefa757a4f2073109cc801/tree.java uses or overrides a deprecated API.
Note: Recompile with -Xlint:deprecation for details.
16/04/10 07:14:29 INFO orm.CompilationManager: Writing jar file: /tmp/sqoop-root/compile/7c9c9a4ffecefa757a4f2073109cc801/tree.jar
16/04/10 07:14:30 WARN manager.MySQLManager: It looks like you are importing from mysql.
16/04/10 07:14:30 WARN manager.MySQLManager: This transfer can be faster! Use the --direct
16/04/10 07:14:30 WARN manager.MySQLManager: option to exercise a MySQL-specific fast path.
16/04/10 07:14:30 INFO manager.MySQLManager: Setting zero DATETIME behavior to convertToNull (mysql)
16/04/10 07:14:30 INFO mapreduce.ImportJobBase: Beginning import of tree
SLF4J: Class path contains multiple SLF4J bindings.
SLF4J: Found binding in [jar:file:/csh/software/hadoop-2.7.2/share/hadoop/common/lib/slf4j-log4j12-1.7.10.jar!/org/slf4j/impl/StaticLoggerBinder.class]
SLF4J: Found binding in [jar:file:/csh/software/hbase-1.1.4/lib/slf4j-log4j12-1.7.5.jar!/org/slf4j/impl/StaticLoggerBinder.class]
SLF4J: See http://www.slf4j.org/codes.html#multiple_bindings for an explanation.
SLF4J: Actual binding is of type [org.slf4j.impl.Log4jLoggerFactory]
16/04/10 07:14:30 INFO Configuration.deprecation: mapred.jar is deprecated. Instead, use mapreduce.job.jar
16/04/10 07:14:32 INFO Configuration.deprecation: mapred.map.tasks is deprecated. Instead, use mapreduce.job.maps
16/04/10 07:14:32 INFO client.RMProxy: Connecting to ResourceManager at node1/192.168.161.11:8032
16/04/10 07:14:43 INFO db.DBInputFormat: Using read commited transaction isolation
16/04/10 07:14:43 INFO mapreduce.JobSubmitter: number of splits:1
16/04/10 07:14:44 INFO mapreduce.JobSubmitter: Submitting tokens for job: job_1460265828636_0005
16/04/10 07:14:50 INFO impl.YarnClientImpl: Submitted application application_1460265828636_0005
16/04/10 07:14:50 INFO mapreduce.Job: The url to track the job: http://node1:8088/proxy/application_1460265828636_0005/
16/04/10 07:14:50 INFO mapreduce.Job: Running job: job_1460265828636_0005
16/04/10 07:15:29 INFO mapreduce.Job: Job job_1460265828636_0005 running in uber mode : false
16/04/10 07:15:29 INFO mapreduce.Job:  map 0% reduce 0%
16/04/10 07:16:15 INFO mapreduce.Job:  map 100% reduce 0%
16/04/10 07:16:17 INFO mapreduce.Job: Job job_1460265828636_0005 completed successfully
16/04/10 07:16:17 INFO mapreduce.Job: Counters: 30
    File System Counters
        FILE: Number of bytes read=0
        FILE: Number of bytes written=137395
        FILE: Number of read operations=0
        FILE: Number of large read operations=0
        FILE: Number of write operations=0
        HDFS: Number of bytes read=87
        HDFS: Number of bytes written=361
        HDFS: Number of read operations=4
        HDFS: Number of large read operations=0
        HDFS: Number of write operations=2
    Job Counters
        Launched map tasks=1
        Other local map tasks=1
        Total time spent by all maps in occupied slots (ms)=42224
        Total time spent by all reduces in occupied slots (ms)=0
        Total time spent by all map tasks (ms)=42224
        Total vcore-milliseconds taken by all map tasks=42224
        Total megabyte-milliseconds taken by all map tasks=43237376
    Map-Reduce Framework
        Map input records=20
        Map output records=20
        Input split bytes=87
        Spilled Records=0
        Failed Shuffles=0
        Merged Map outputs=0
        GC time elapsed (ms)=151
        CPU time spent (ms)=3460
        Physical memory (bytes) snapshot=86683648
        Virtual memory (bytes) snapshot=2083274752
        Total committed heap usage (bytes)=16318464
    File Input Format Counters
        Bytes Read=0
    File Output Format Counters
        Bytes Written=361
16/04/10 07:16:17 INFO mapreduce.ImportJobBase: Transferred 361 bytes in 105.2373 seconds (3.4303 bytes/sec)
16/04/10 07:16:17 INFO mapreduce.ImportJobBase: Retrieved 20 records.
访问 http://node1:8088 可以看到生成一个MapReduce任务

结果:
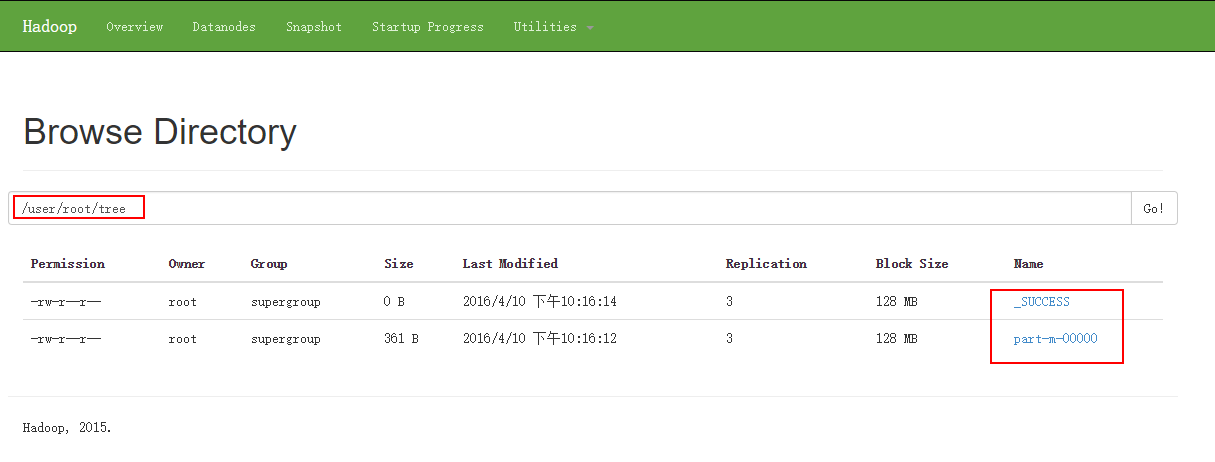
[root@node1 sbin]# hadoop fs -cat /user/root/tree/p*
1,466464684640,1
2,466464684641,2
3,466464684642,3
4,466464684643,1
5,466464684644,2
6,466464684645,3
7,466464684646,1
8,466464684647,2
9,466464684648,3
10,466464684649,1
11,4664646846410,2
12,4664646846411,3
13,4664646846412,1
14,4664646846413,2
15,4664646846414,3
16,4664646846415,1
17,4664646846416,2
18,4664646846417,3
19,4664646846418,1
20,4664646846419,2
导入到指定目录
参数:
--target-dir /directory例如:
sqoop import --connect jdbc:mysql://node1:3306/phx \--username root --table tree --m 1 \--target-dir /sqoop/结果:
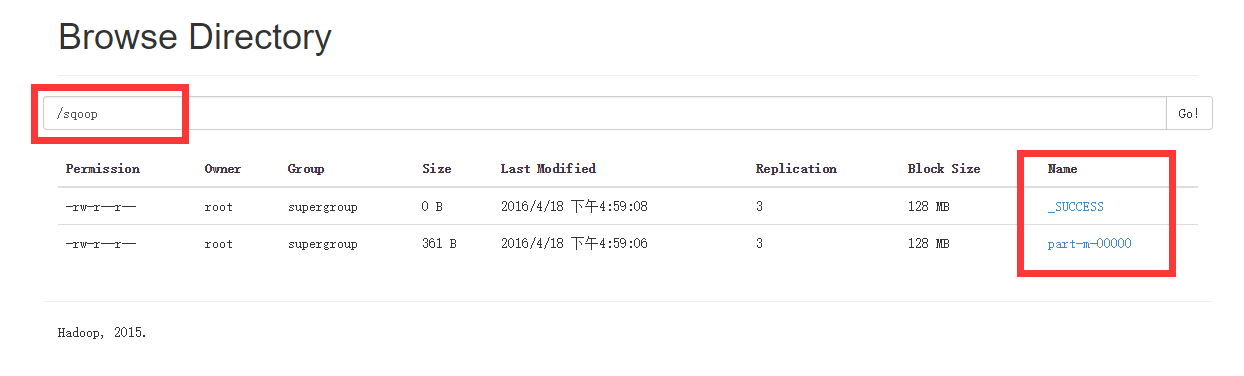
[root@node1 sbin]# hadoop fs -cat /sqoop/p*
1,466464684640,1
2,466464684641,2
3,466464684642,3
4,466464684643,1
5,466464684644,2
6,466464684645,3
7,466464684646,1
8,466464684647,2
9,466464684648,3
10,466464684649,1
11,4664646846410,2
12,4664646846411,3
13,4664646846412,1
14,4664646846413,2
15,4664646846414,3
16,4664646846415,1
17,4664646846416,2
18,4664646846417,3
19,4664646846418,1
20,4664646846419,2
导入表子集
参数:
--where <condition>例如:
sqoop import --connect jdbc:mysql://node1:3306/phx \--username root --table tree --m 1 \--where "productinformationId"='1' \--target-dir /sqoop/tree2/结果:
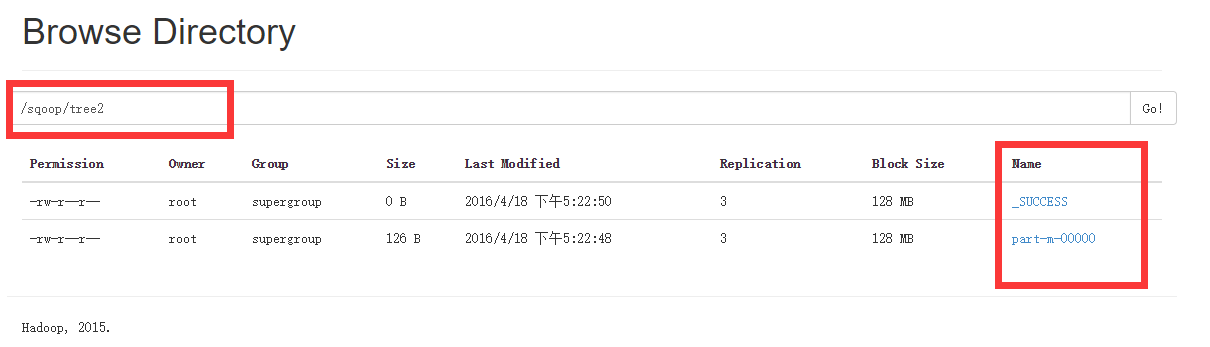
[root@node1 sbin]# hadoop fs -cat /sqoop/tree2/p*
1,466464684640,1
4,466464684643,1
7,466464684646,1
10,466464684649,1
13,4664646846412,1
16,4664646846415,1
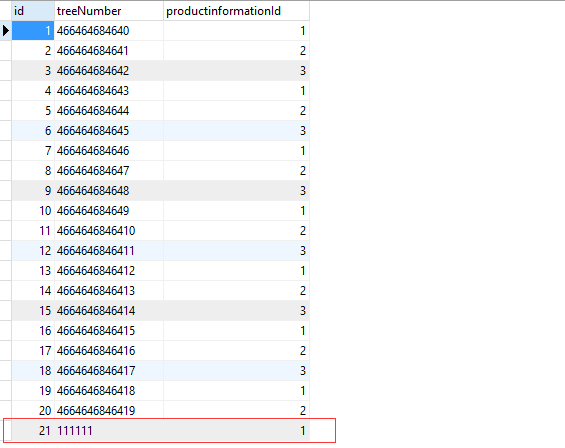
19,4664646846418,1增量导入(即只导入新添加的那部分数据)
参数:
--incremental <mode> 选择模式,有:append 和 lastmodified
--check-column <column name> 检查那一列的元素,比如 id
--last-value <last check column value> 原来数据最后一条的参数,比如 最后一条id为20,则填20
例如:
在数据库表tree中添加一条记录,如下图
运行命令:
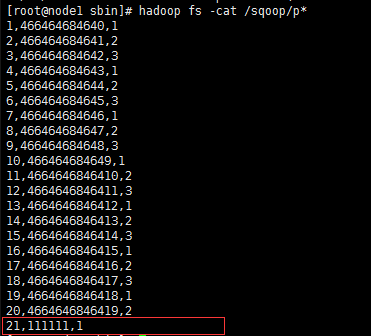
sqoop import --connect jdbc:mysql://node1:3306/phx \--username root --table tree --m 1 \--target-dir /sqoop/ \--incremental append \--check-column id \--last-value 20结果:
参数列表
| 参数 | 说明 |
|---|---|
| –append | 将数据追加到hdfs中已经存在的dataset中。使用该参数,sqoop将把数据先导入到一个临时目录中,然后重新给文件命名到一个正式的目录中,以避免和该目录中已存在的文件重名。 |
| –as-avrodatafile | 将数据导入到一个Avro数据文件中 |
| –as-sequencefile | 将数据导入到一个sequence文件中 |
| –as-textfile | 将数据导入到一个普通文本文件中,生成该文本文件后,可以在hive中通过sql语句查询出结果。 |
| –boundary-query | 边界查询,也就是在导入前先通过SQL查询得到一个结果集,然后导入的数据就是该结果集内的数据,格式如:–boundary-query ‘select id,no from t where id = 3’,表示导入的数据为id=3的记录,或者 select min(), max() from ,注意查询的字段中不能有数据类型为字符串的字段,否则会报错 |
| –columns | 指定要导入的字段值,格式如:–columns id,username |
| –direct | 直接导入模式,使用的是关系数据库自带的导入导出工具。官网上是说这样导入会更快 |
| –direct-split-size | 在使用上面direct直接导入的基础上,对导入的流按字节数分块,特别是使用直连模式从PostgreSQL导入数据的时候,可以将一个到达设定大小的文件分为几个独立的文件。 |
| –inline-lob-limit | 设定大对象数据类型的最大值 |
| -m,–num-mappers | 启动N个map来并行导入数据,默认是4个,最好不要将数字设置为高于集群的节点数 |
| –query,-e | 从查询结果中导入数据,该参数使用时必须指定–target-dir、–hive-table,在查询语句中一定要有where条件且在where条件中需要包含 $CONDITIONS,示例:–query ‘select * from t where $CONDITIONS ’ –target-dir /tmp/t –hive-table t |
| –split-by | 表的列名,用来切分工作单元,一般后面跟主键ID |
| –table | 关系数据库表名,数据从该表中获取 |
| –delete-target-dir | 删除目标目录 |
| –target-dir | 指定hdfs路径 |
| –warehouse-dir | 与 –target-dir 不能同时使用,指定数据导入的存放目录,适用于hdfs导入,不适合导入hive目录 |
| –where | 从关系数据库导入数据时的查询条件,示例:–where “id = 2” |
| -z,–compress | 压缩参数,默认情况下数据是没被压缩的,通过该参数可以使用gzip压缩算法对数据进行压缩,适用于SequenceFile, text文本文件, 和Avro文件 |
| –compression-codec | Hadoop压缩编码,默认是gzip |
| –null-string | 可选参数,如果没有指定,则字符串null将被使用 |
| –null-non-string | 可选参数,如果没有指定,则字符串null将被使用 |
个人博客原文:
Sqoop MySQL 导入到HDFS


 3321
3321

 被折叠的 条评论
为什么被折叠?
被折叠的 条评论
为什么被折叠?
 到【灌水乐园】发言


