


一、什么是注解处理器
注解处理器是一个在Javac中的用来编译时扫描和处理注解的工具。你可以为特定的注解注册你自己的注解处理器。
注解处理器可以生成Java代码,但不能修改已经存在的Java类(即不能向已有的类中添加方法)。这些生成的Java文件,会同时与其他普通的手写Java源代码一起被Javac编译。
二、AbstractProcessor
每一个注解处理器都要继承于AbstractProcessor,如下:
public class MyProcessor extends AbstractProcessor {
    @Override
    public synchronized void init(ProcessingEnvironment processingEnvironment) {
        super.init(processingEnvironment);
    }

    @Override
    public boolean process(Set<? extends TypeElement> set, RoundEnvironment roundEnvironment) {
        return false;
    }

    @Override
    public Set<String> getSupportedAnnotationTypes() {
        return super.getSupportedAnnotationTypes();
    }

    @Override
    public SourceVersion getSupportedSourceVersion() {
        return super.getSupportedSourceVersion();
    }
}
1、init(ProcessingEnvironment processingEnvironment): 每一个注解处理器类都必须有一个空的构造函数。然而,这里有一个特殊的init()方法,它会被注解处理工具调用,并输入ProcessingEnviroment参数。ProcessingEnviroment提供很多有用的工具类Elements,Types和Filer。后面我们将看到详细的内容。
2、process(Set<? extends TypeElement> set, RoundEnvironment roundEnvironment): 这相当于每个处理器的主函数main()。你在这里写你的扫描、评估和处理注解的代码,以及生成Java文件。输入参数RoundEnviroment,可以让你查询出包含特定注解的被注解元素。后面我们将看到详细的内容。
3、getSupportedAnnotationTypes(): 这里你必须指定,这个注解处理器是注册给哪个注解的。注意,它的返回值是一个字符串的集合,包含本处理器想要处理的注解类型的合法全称。换句话说,你在这里定义你的注解处理器注册到哪些注解上。
4、getSupportedSourceVersion(): 用来指定你使用的Java版本。通常这里返回SourceVersion.latestSupported()。然而,如果你有足够的理由只支持Java 7的话,你也可以返回SourceVersion.RELEASE_7。我推荐你使用前者。
在Java 7以后,你也可以使用注解来代替getSupportedAnnotationTypes()和getSupportedSourceVersion()。代码如下:
@SupportedSourceVersion(SourceVersion.RELEASE_7)
@SupportedAnnotationTypes({
        "com.study.CustomAnnotation"
})
public class MyProcessor extends AbstractProcessor {
    @Override
    public synchronized void init(ProcessingEnvironment processingEnvironment) {
        super.init(processingEnvironment);
    }

    @Override
    public boolean process(Set<? extends TypeElement> set, RoundEnvironment roundEnvironment) {
        return false;
    }
}
三、Element
Element是我们获取注解的基础。
Processor处理过程中,会扫描全部Java源码,代码的每一个部分都是一个特定类型的Element,它们像是XML一层的层级机构,比如类、变量、方法等,每个Element代表一个静态的、语言级别的构件,如下方代码所示。
package android.demo; // PackageElement
// TypeElement
public class DemoClass {
    // VariableElement
    private boolean mVariableType;

    // VariableElement
    private VariableClassE m VariableClassE;

    // ExecuteableElement
    public DemoClass () {
    }

    // ExecuteableElement
    public void resolveData (Demo data   //TypeElement ) {
    }
}
四、实现简单的ButterKnife
1、定义注解
新建Module,注意选择Java library,取名为butterknifeannotation。新建注解取名为BindView,代码如下:
@Retention(RetentionPolicy.CLASS)
@Target(ElementType.FIELD)
public @interface BindView {
    int value();
}
2、定义注解处理器
新建Module,注意选择Java library,取名为butterknifecompile。新建ButterKnifeProcessor,继承AbstractProcessor。代码如下:
@AutoService(Processor.class)
public class ButterKnifeProcessor extends AbstractProcessor {
    private Filer filer;
    private Elements elementUtils;
    private Messager messager;

    @Override
    public synchronized void init(ProcessingEnvironment processingEnv) {
        super.init(processingEnv);
        elementUtils = processingEnv.getElementUtils();
        filer = processingEnv.getFiler();
        messager = processingEnv.getMessager();
    }

    @Override
    public Set<String> getSupportedAnnotationTypes() {
        //可处理的注解的集合
        HashSet<String> annotations = new HashSet<>();
        annotations.add(BindView.class.getCanonicalName());
        return annotations;
    }

    @Override
    public boolean process(Set<? extends TypeElement> annotations, RoundEnvironment roundEnv) {
        System.err.println("process");
        //key为一个类(typeElement),value为这个类里被BindView注解的view的信息
        Map<TypeElement, List<BindViewInfo>> bindViewMap = new HashMap<>();
        for (Element element : roundEnv.getElementsAnnotatedWith(BindView.class)) {
            System.err.println("element>>" + element.getSimpleName());
            if (element.getKind() != ElementKind.FIELD) {
                error("注解必须要在field上", element);
                return false;
            }

            //注解上的viewId
            int viewId = element.getAnnotation(BindView.class).value();
            VariableElement viewElement = (VariableElement) element;
            //该注解所属的类
            TypeElement typeElement = ((TypeElement) viewElement.getEnclosingElement());

            if (!bindViewMap.containsKey(typeElement)) {
                bindViewMap.put(typeElement, new ArrayList<>());
            }

            List<BindViewInfo> bindViewInfos = bindViewMap.get(typeElement);
            bindViewInfos.add(new BindViewInfo(viewId, viewElement.getSimpleName().toString(), viewElement.asType()));
        }

        bindViewMap.forEach((typeElement, bindViewInfos) -> {
            System.err.println("↓↓↓↓↓↓↓↓" + typeElement);
            for (BindViewInfo bindViewInfo : bindViewInfos) {
                System.err.println("bindViewInfo" + bindViewInfo);
            }
        });

        generateCodeByJavaPoet(bindViewMap);

        return false;
    }

    private void error(String msg, Element e) {
        messager.printMessage(
                Diagnostic.Kind.ERROR,
                String.format(msg),
                e);
    }

    private void generateCodeByJavaPoet(Map<TypeElement, List<BindViewInfo>> bindViewMap) {
        bindViewMap.forEach((typeElement, bindViewInfos) -> {
            generateJavaClassByJavaPoet(typeElement, bindViewInfos);
        });
    }

    /**
     * @param typeElement   类的节点(MainActivity那个节点)
     * @param bindViewInfos
     */
    private void generateJavaClassByJavaPoet(TypeElement typeElement, List<BindViewInfo> bindViewInfos) {
        String packageName = elementUtils.getPackageOf(typeElement).getQualifiedName().toString();

        ClassName t = ClassName.bestGuess(typeElement.getSimpleName() + "");
        //方法
        MethodSpec.Builder methodSpecBuilder = MethodSpec.constructorBuilder()
                .addModifiers(Modifier.PUBLIC)
                .addParameter(t, "activity");
        for (BindViewInfo bindViewInfo : bindViewInfos) {
            methodSpecBuilder.addStatement("activity.$L = activity.findViewById($L)", bindViewInfo.name, bindViewInfo.id);
        }
        MethodSpec methodSpec = methodSpecBuilder.build();

        //类
        TypeSpec typeSpec = TypeSpec.classBuilder(typeElement.getSimpleName() + "_ViewBinding")//设置类名
                .addModifiers(Modifier.PUBLIC)//添加修饰符
                .addMethod(methodSpec)//添加方法
                .build();

        //通过包名和TypeSpec(类)生成一个java文件
        JavaFile build = JavaFile.builder(packageName, typeSpec).build();
        try {
            //写入到filer中
            build.writeTo(filer);
        } catch (IOException e) {
            e.printStackTrace();
        }
    }
}
在process()方法中生成java文件,生成的Java文件如下图:
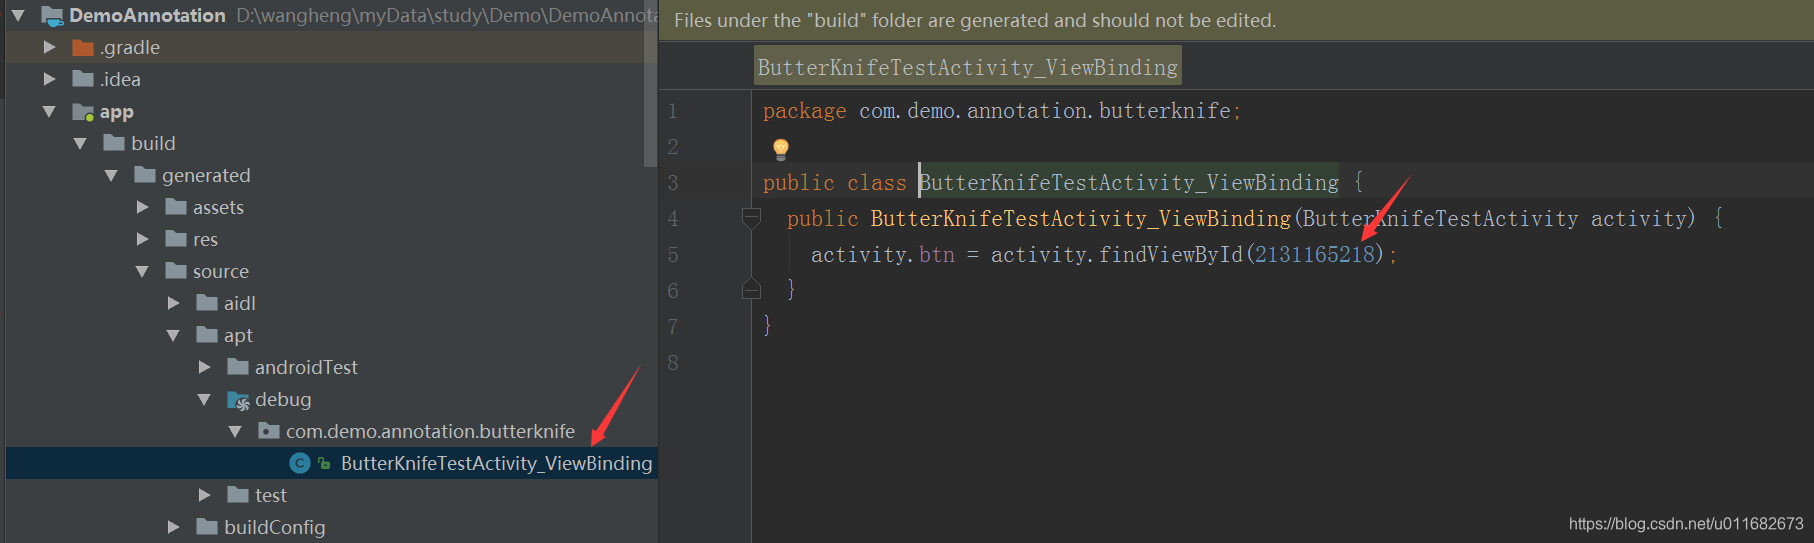
3、定义用户调用接口
上面2中生成的类ButterKnifeTestActivity_ViewBinding不会自己执行,必须使用者在代码中调用。通过反射调用改类的构造函数,就可以执行activity.btn = activity.findViewById(2131165218);获得btn的实例。
新建Module,注意选择Android library,取名为butterknifelib,新建类ButterKnife,代码如下:
public class ButterKnife {
    public static void bind(Activity activity){
        String activityName = activity.getClass().getName();
        String generateClass = activityName + "_ViewBinding";

        try {
            Class.forName(generateClass)
                    .getConstructor(activity.getClass())
                    .newInstance(activity);
        } catch (InstantiationException e) {
            e.printStackTrace();
        } catch (IllegalAccessException e) {
            e.printStackTrace();
        } catch (InvocationTargetException e) {
            e.printStackTrace();
        } catch (NoSuchMethodException e) {
            e.printStackTrace();
        } catch (ClassNotFoundException e) {
            e.printStackTrace();
        }
    }
}
通过反射执行类的构造方法
4、主项目中使用ButterKnife
1)、注解标记控件
    @BindView(R.id.btn)
    Button btn;
在编译阶段就会生成类ButterKnifeTestActivity_ViewBinding
2)、调用ButterKnife.bind()
    @Override
    protected void onCreate(Bundle savedInstanceState) {
        super.onCreate(savedInstanceState);
        setContentView(R.layout.activity_butter_knife_test);
        ButterKnife.bind(this);
        btn.setText("通过ButterKnife实例化的Button");
    }
ButterKnife.bind()就会执行findViewById()方法得到控件的实例


 2156
2156


 被折叠的 条评论
为什么被折叠?
被折叠的 条评论
为什么被折叠?
 到【灌水乐园】发言


