


ReactNative-Cocoapods-Swift-Project项目搭建
github地址:https://github.com/Mad-hu/react-native-cocoapods-swift-project-
Mac下面开发ios应该安装的前置条件,按照步骤走::
1、创建一个xcode工程,single View就行,项目语言选择swift,oc的直接生成就行不用这么麻烦。
2、把跟目录上创建 node的package.json,执行命令
    npm init
    npm install react-native --save-dev
    npm install react --save-dev
3、创建podfile文件,然后执行pod install ,必须第二步完成。代码如下:
source 'https://github.com/CocoaPods/Specs.git'
platform :ios, '8.0'
# Uncomment this line if you're using Swift
use_frameworks!

target 'SwiftDemoCocoapodsPractice' do
    pod ‘React’,:path => './node_modules/react-native', :subspecs => [
    'Core',
        'RCTImage',
        'RCTNetwork',
        'RCTText',
        'RCTWebSocket',
    # 添加其他RN库
    ]

    #其他第三方pod
    pod 'Alamofire'
    pod 'SnapKit'
end
4、创建 index.ios.js,直接复制代码即可,别忘了修改你自己得名字。
import React, { Component } from 'react';
///这里引入需要的库
import{
AppRegistry,
StyleSheet,
Text,
View
} from 'react-native';
///组件,注意名字
class SwiftDemoCocoapodsPractice extends Component {
render() {
return (
<View style={styles.container}>
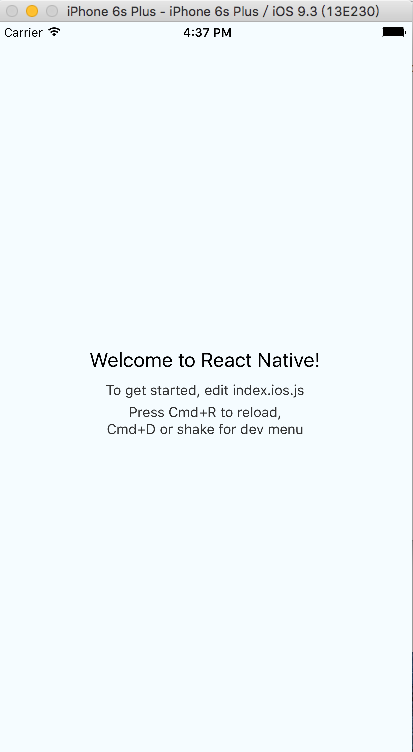
<Text style={styles.welcome}>
Welcome to React Native!
</Text>
<Text style={styles.instructions}>
To get started, edit index.ios.js
</Text>
<Text style={styles.instructions}>
Press Cmd+R to reload,{'\n'}
Cmd+D or shake for dev menu
</Text>
</View>
);
}
}
const styles = StyleSheet.create({
container: {
flex: 1,
justifyContent: 'center',
alignItems: 'center',
backgroundColor: '#F5FCFF',
},
welcome: {
fontSize: 20,
textAlign: 'center',
margin: 10,
},
instructions: {
textAlign: 'center',
color: '#333333',
marginBottom: 5,
},
});
///这里的名字要和swift工程中 AppDelegate中创建的名字一样
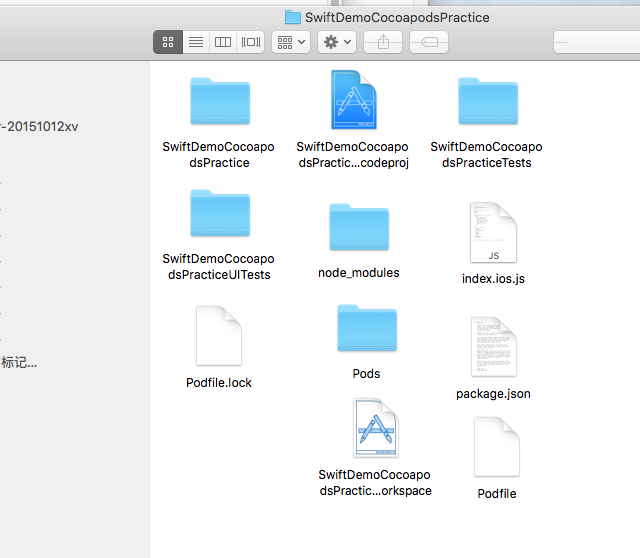
AppRegistry.registerComponent('SwiftDemoCocoapodsPractice', () => SwiftDemoCocoapodsPractice);5、前四步完成项目结构如下
6、打开用pods生成的工程文件:SwiftDemoCocoapodsPractice.xcworkspace
7、在xcode中修改AppDelegate
var window: UIWindow?
    var rootView: RCTRootView
    //地址换成自己得,最好用ip,如果用localhost可能会有问题
    let jsCodeLocation = NSURL(string: "http://192.168.160.129:8081/index.ios.bundle?platform=ios&dev=true")

    func application(application: UIApplication, didFinishLaunchingWithOptions launchOptions: [NSObject: AnyObject]?) -> Bool {
        // Override point for customization after application launch.
        let rootViewController = ViewController()
        rootViewController.view = rootView

        // Set window to use rootViewController
        self.window = UIWindow(frame: UIScreen.mainScreen().bounds)
        self.window?.rootViewController = rootViewController
        self.window?.makeKeyAndVisible()
        return true
    }

    override init() {
//         initialize the rootView to fetch JS from the dev server
//注意这里得名字SwiftDemoCocoapodsPractice别忘了修改成自己得
        rootView = RCTRootView.init(bundleURL: jsCodeLocation!, moduleName: "SwiftDemoCocoapodsPractice", initialProperties: nil, launchOptions: nil)
        super.init()
    }
8、找到server,在node_moduls/react-native/local-cli/server,在此目录中执行npm start 启动服务。可手动 可绑定cocospods,随便
npm start稍后控制台会提示 :React packager ready 成功。
9、在info.plist中添加 AppTransport Security Settings 在其下再添加 Allow Arbitrary Loads选择为 yes,修改网络可以使用http请求。
10、最后在xcode中直接启动模拟器。完成搭建
- [1]:http://blog.leiwang.info/posts/2016-01-17-add-reactnative-in-swift-project.html
[2]: http://blog.csdn.net/quanqinyang/article/details/48765193 [3]:
https://blog.tarkalabs.com/2016/03/02/integrating-react-native-into-an-existing-swift-project/
[4]:
https://github.com/tendant/ReactNativeSwiftDemo/blob/master/index.ios.js
[5]:
https://facebook.github.io/react-native/docs/getting-started.html
[6]: https://github.com/benweet/stackedit


 256
256

 被折叠的 条评论
为什么被折叠?
被折叠的 条评论
为什么被折叠?
 到【灌水乐园】发言


