


- view sourceprint?1 String sAgeFormatString sAgeFormat1= getResources().getString(R.string.alert);
- String sFinal1 = String.format(sAgeFormat1, "李四","首都北京");
<xliff:g>标签介绍:
属性id可以随便命名
属性值举例说明
%n$ms:代表输出的是字符串,n代表是第几个参数,设置m的值可以在输出之前放置空格
%n$md:代表输出的是整数,n代表是第几个参数,设置m的值可以在输出之前放置空格,也可以设为0m,在输出之前放置m个0
%n$mf:代表输出的是浮点数,n代表是第几个参数,设置m的值可以控制小数位数,如m=2.2时,输出格式为00.00
也可简单写成:
%d (表示整数)
%f (表示浮点数)
%s (表示字符串)
使用步骤举例:
1.
<?xml version="1.0" encoding="utf-8"?>
<resources xmlns:xliff="urn:oasis:names:tc:xliff:document:1.2">
2.
<string name="test_xliff">小红今年<xliff:g id="xxx">%d</xliff:g>岁了,上<xliff:g id="yyy">%s</xliff:g>年级!</string>
3.
String test = String.format(getResources().getString(R.string.test_xliff), 7, "小学二");
输出:
小红今年7岁了,上小学二年级!
浏览器中 %3A 代表 : %2F 代表 /
http %3A %2F%2F images.%2F82005team-dcppg01shandianxiawulaibang.jpg
http://images/XXX.jpg
两个 安卓 原生的控件 效果也挺好看的
原生控件 swiperefreshlayout 和 progressbar
效果也不错
布局
<RelativeLayout xmlns:android="http://schemas.android.com/apk/res/android"
    xmlns:tools="http://schemas.android.com/tools"
    android:layout_width="match_parent"
    android:layout_height="match_parent"
    android:paddingBottom="@dimen/activity_vertical_margin"
    android:paddingLeft="@dimen/activity_horizontal_margin"
    android:paddingRight="@dimen/activity_horizontal_margin"
    android:paddingTop="@dimen/activity_vertical_margin"
    tools:context=".MainActivity" >

 <android.support.v4.widget.SwipeRefreshLayout
        android:id="@+id/swipe"
        android:layout_width="wrap_content"
        android:layout_height="wrap_content"
        android:orientation="vertical" >

    <ListView
          android:layout_width="fill_parent"
        android:layout_height="fill_parent"
        >

    </ListView>
    </android.support.v4.widget.SwipeRefreshLayout>
  <ProgressBar
        android:id="@+id/progressbar"
        style="@android:style/Widget.ProgressBar"
        android:layout_width="60dp"
        android:layout_height="60dp"
        android:layout_centerInParent="true"
        android:indeterminate="false"
        android:indeterminateDrawable="@drawable/loading"
        android:padding="5dp"
        android:visibility="invisible" />
</RelativeLayout>
<?xml version="1.0" encoding="utf-8"?>
<rotate
    xmlns:android="http://schemas.android.com/apk/res/android"
    android:fromDegrees="0"
    android:pivotX="50%"
    android:pivotY="50%"
    android:toDegrees="1080.0" >

    <shape
        android:innerRadiusRatio="3"
        android:shape="ring"
        android:thicknessRatio="18"
        android:useLevel="false" >
        <gradient
            android:centerColor="#FFDC35"
            android:centerY="0.50"
            android:endColor="#14CCB2"
            android:startColor="#FFFFFF"
            android:type="sweep"
            android:useLevel="false" />
    </shape>

</rotate>
代码:
public class MainActivity extends Activity implements OnRefreshListener {

	private SwipeRefreshLayout swipe;
	private ProgressBar mProgressBar;

	@Override
	protected void onCreate(Bundle savedInstanceState) {
		super.onCreate(savedInstanceState);
		setContentView(R.layout.activity_main);

		mProgressBar = (ProgressBar) findViewById(R.id.progressbar);

		swipe = (SwipeRefreshLayout) findViewById(R.id.swipe);
		swipe.setOnRefreshListener(this);
		// 顶部刷新的样式
		swipe.setColorSchemeResources(android.R.color.holo_red_light,
				android.R.color.holo_green_light,
				android.R.color.holo_blue_bright,
				android.R.color.holo_orange_light);
	}

	@Override
	public boolean onCreateOptionsMenu(Menu menu) {
		// Inflate the menu; this adds items to the action bar if it is present.
		getMenuInflater().inflate(R.menu.main, menu);
		return true;
	}

	@Override
	public void onRefresh() {
		mProgressBar.setVisibility(View.VISIBLE);
		Timer timer = new Timer();
		TimerTask task = new TimerTask() {

			@Override
			public void run() {
				runOnUiThread(new Runnable() {

					@Override
					public void run() {
						swipe.setRefreshing(false);
						mProgressBar.setVisibility(View.INVISIBLE);
					}
				});

			}
		};
		timer.schedule(task, 3000);
	}

}
浸入状态栏

@Override
	protected void onCreate(Bundle savedInstanceState) {
		super.onCreate(savedInstanceState);
		if(Build.VERSION.SDK_INT >= Build.VERSION_CODES.KITKAT) {
            //透明状态栏
            getWindow().addFlags(WindowManager.LayoutParams.FLAG_TRANSLUCENT_STATUS);
            //透明导航栏
            getWindow().addFlags(WindowManager.LayoutParams.FLAG_TRANSLUCENT_NAVIGATION);
        }
		setContentView(R.layout.activity_main);

		LinearLayout ll=new LinearLayout(this);
	}
代码中设置 TextView 的 drawableleft ,图片 与文字 之间的 间距问题
		findViewById.setText("神");
		findViewById.setGravity(Gravity.CENTER_VERTICAL);
		//在左侧添加图片
		Drawable drawable= getResources().getDrawable(R.drawable.ic_launcher);
		drawable.setBounds(0, 0, drawable.getMinimumWidth(), drawable.getMinimumHeight());

		findViewById.setCompoundDrawables(drawable, null, null, null);
//		textView.setTextColor(getResources().getColor(R.color.gray_textcolor_shen));
		findViewById.setCompoundDrawablePadding(400);//设置图片和text之间的间距
		findViewById.setPadding(-5, 0, 0, 0);
在同一进程的 两个activity 之间传递 bitmap
	Intent intent=new Intent();
	intent.putExtra("Bitmap", saveBitmap);
	Bitmap bitmap = getIntent().getParcelableExtra("Bitmap");
保存bitmap 到本地
/**
 * 保存bitmap 到本地
 * @param path  : 绝对路径
 * @param bitmap:bitmap
 */
public static void saveBitmap(String path,Bitmap bitmap)

{
	  File f = new File(path + System.currentTimeMillis() + ".png");
	  try {
	   f.createNewFile();
	  } catch (IOException e) {

	   LogUtils.d("在保存图片时出错:"+e.toString());
	  }
	  FileOutputStream fOut = null;
	  try {
	   fOut = new FileOutputStream(f);
	  } catch (FileNotFoundException e) {
	   e.printStackTrace();
	  }
	  bitmap.compress(Bitmap.CompressFormat.PNG, 100, fOut);
	  try {
	   fOut.flush();
	  } catch (IOException e) {
	   e.printStackTrace();
	  }
	  try {
	   fOut.close();
	  } catch (IOException e) {
	   e.printStackTrace();
	  }
}
-----------------------------------------------------------------------------------------------------------------------
代码设置 样式
     // 文字
            TextView appNameText=new TextView(UIUtils.getContext());
            appNameText.setTextAppearance(UIUtils.getContext(), R.style.ChannelTextStyle);
            appNameText.setText(appInfo.title);
如何让Android下的多行EditText焦点光标默认在第一行 .
只要加上android:gravity="top"就搞定OK了。
在Android开发中如何移除EditText上的输入焦点 ?
当我们创建一个带EditText 或 AutoCompleteTextView的视图时,在加载视图时总是会把输入的焦点自动移动到第一个输入框。如何改成最终效果呢?且看本文详解。当我们创建一个带EditText 或 AutoCompleteTextView的视图时,在加载视图时总是会把输入的焦点自动移动到第一个输入框。如下图所示:

下面是mail.xml布局文件
<linearlayout xmlns:android="http://schemas.android.com/apk/res/android"
    android:layout_width="fill_parent"
    android:layout_height="fill_parent"
    android:orientation="vertical" >

    <button
        android:id="@+id/Button01"
        android:layout_width="wrap_content"
        android:layout_height="wrap_content"
        android:text="@string/button_text" >
    </button>

    <edittext
        android:id="@+id/EditText01"
        android:layout_width="wrap_content"
        android:layout_height="wrap_content"
        android:hint="@string/hint"
        android:text="" >
    </edittext>

    <button
        android:id="@+id/Button02"
        android:layout_width="wrap_content"
        android:layout_height="wrap_content"
        android:text="@string/button_text" >
    </button>

</linearlayout>
我们如何才能把焦点从EditText上移除呢?最简单的方法是创建一个不可见的(invisible)LinearLayout,LinearLayout将会把焦点从EditText上移走。
我们修改mail.xml布局文件,在EditText之前增加一个LinearLayout ,如下所示:
<linearlayout xmlns:android="http://schemas.android.com/apk/res/android"
    android:layout_width="fill_parent"
    android:layout_height="fill_parent"
    android:orientation="vertical" >

    <button
        android:id="@+id/Button01"
        android:layout_width="wrap_content"
        android:layout_height="wrap_content"
        android:text="@string/button_text" >
    </button>

    <linearlayout
        android:layout_width="0px"
        android:layout_height="0px"
        android:focusable="true"
        android:focusableintouchmode="true" >

        <edittext
            android:id="@+id/EditText01"
            android:layout_width="wrap_content"
            android:layout_height="wrap_content"
            android:hint="@string/hint"
            android:text="" >
        </edittext>

        <button
            android:id="@+id/Button02"
            android:layout_width="wrap_content"
            android:layout_height="wrap_content"
            android:text="@string/button_text" >
        </button>
    </linearlayout>

</linearlayout>
最终效果如下所示:

不需要任何代码就把焦点移除了,是不是最简单的解决方案?
Android 禁止软键盘自动弹出
Android系统对EditText这个控件有监听功能,如果某个Activity中含有该控件,就会自动弹出软键盘让你输入,这个看似人性化的方案有时候并不被用户喜欢的,所以在有些情况下要禁用该功能。这几天做的应用也有这个问题,所以就查了,网上大部分都是如下方法:
该方法确实有用,但只是在刚进入此Activity时能起到左右,如果该Activity中有Tab功能的切换,软键盘又会弹出来,所以有了下面这个解决办法:
在xml文件中加入一个隐藏的TextView:
然后再在Activity中加入:
这样软键盘就不会弹出了。
Android锁屏状态下弹出activity,如新版qq的锁屏消息提示
在该activity的onCreate()方法里:
设置activity的theme属性:
添加点击事件,进入app,突破锁屏:
在menifest中加入该权限:
这样就可以啦,在此保存,以备后用。感兴趣的小伙伴们快去试试吧!
java通过生日得到星座
private final static int[] dayArr = new int[] { 20, 19, 21, 20, 21, 22, 23, 23, 23, 24, 23, 22 };
private final static String[] constellationArr = new String[] { "摩羯座", "水瓶座", "双鱼座", "白羊座", "金牛座", "双子座", "巨蟹座", "狮子座", "处女座", "天秤座", "天蝎座", "射手座", "摩羯座" };


public static String getConstellation(int month, int day) {
    return day < dayArr[month - 1] ? constellationArr[month - 1] : constellationArr[month];
}
onItemLongClick长点击事件
- gridview.setOnItemLongClickListener(new OnItemLongClickListener() {
-
- @Override
- public boolean onItemLongClick(AdapterView<?> arg0, View arg1,
- int arg2, long arg3) {
- // TODO Auto-generated method stub
- Log.e("setOnItemLongClickListener", "setOnItemLongClickListener");
- return true;
- }
-
-
- });
- gridview.setOnItemClickListener(new OnItemClickListener(){
-
- @Override
- public void onItemClick(AdapterView<?> arg0, View arg1, int arg2,
- long arg3) {
- Log.e("setOnItemClickListener", "setOnItemClickListener");
- }
-
- });
- gridview.setOnItemLongClickListener(new OnItemLongClickListener() {
- @Override
- public boolean onItemLongClick(AdapterView<?> arg0, View arg1,
- int arg2, long arg3) {
- // TODO Auto-generated method stub
- Log.e("setOnItemLongClickListener", "setOnItemLongClickListener");
- return true;
- }
- });
- gridview.setOnItemClickListener(new OnItemClickListener(){
- @Override
- public void onItemClick(AdapterView<?> arg0, View arg1, int arg2,
- long arg3) {
- Log.e("setOnItemClickListener", "setOnItemClickListener");
- }
- });
在处理长按时,注意的细节是把onItemLongClick返回设置为true,否则长按是会执行setOnItemClickListener。
Android中如何获取视频文件的缩略图
在android中获取视频文件的缩略图有三种方法:
1.从媒体库中查询
2. android 2.2以后使用ThumbnailUtils类获取
3.调用jni文件,实现MediaMetadataRetriever类
三种方法各有利弊
第一种方法,新视频增加后需要SDCard重新扫描才能给新增加的文件添加缩略图,灵活性差,而且不是很稳定,适合简单应用
第二种方法,实现简单,但2.2以前的版本不支持
第三种方法,实现复杂,但比较灵活,推荐使用
下面给出三种方法的Demo
1.第一种方法:
| public static Bitmap getVideoThumbnail(ContentResolver cr, String fileName) { Bitmap bitmap = null; BitmapFactory.Options options = new BitmapFactory.Options(); options.inDither = false; options.inPreferredConfig = Bitmap.Config.ARGB_8888; //select condition. String whereClause = MediaStore.Video.Media.DATA + ” = ‘” + fileName + “‘”; Log.v(TAG, “where = ” + whereClause); //colection of results. Cursor cursor = cr.query(MediaStore.Video.Media.EXTERNAL_CONTENT_URI, new String[] { MediaStore.Video.Media._ID }, whereClause, null, null); Log.v(TAG, “cursor = ” + cursor); if (cursor == null || cursor.getCount() == 0) { return null; } cursor.moveToFirst(); //image id in image table. String videoId = cursor.getString(cursor .getColumnIndex(MediaStore.Video.Media._ID)); Log.v(TAG, “videoId = ” + videoId); if (videoId == null) { return null; } cursor.close(); long videoIdLong = Long.parseLong(videoId); //via imageid get the bimap type thumbnail in thumbnail table. bitmap = MediaStore.Video.Thumbnails.getThumbnail(cr, videoIdLong, Images.Thumbnails.MICRO_KIND, options); Log.v(TAG, “bitmap = ” + bitmap); return bitmap; } |
2. 第二种方法:
通过ThumbnailUtils的三种静态方法。
1. static Bitmap createVideoThumbnail(String filePath, int kind) //获取视频文件的缩略图,第一个参数为视频文件的位置,比如/sdcard/android123.3gp,而第二个参数可以为MINI_KIND或 MICRO_KIND最终和分辨率有关
2. static Bitmap extractThumbnail(Bitmap source, int width, int height, int options) //直接对Bitmap进行缩略操作,最后一个参数定义为OPTIONS_RECYCLE_INPUT ,来回收资源
3. static Bitmap extractThumbnail(Bitmap source, int width, int height) // 这个和上面的方法一样,无options选项
3. 第三种方法:
MediaMetadataRetriever是android中隐藏的一个类,开发者无法调用,只能实现一个相同的类来完成相关功能。
一种方式是修改android源码,将frameworks MediaMetadataRetriever.java中@hide标签去掉,在current.xml中添加MediaMetadataRetriever到可用.重新编译frameworks,应用就可以调用到MediaMetadataRetriever这个类了…这样是不适合应用开发的。
推荐的方法是实现MediaMetadataRetriever类
第一步:首先需要下载JNI库:libmedia_jni.so
进入SDK的Tools目录下,运行DDMS,
在DDMS中的菜单栏中,执行Device–FileExplore,
在弹出的文件列表中选择: System-Lib-libmedia_jni.so
选中这个文件后, 在弹出的文件列表的又上脚执行PULL file from device,提取出libmedia_jni.so文件
在Eclipse中新建文件夹libs-armeabi-,在里面放入libmedia_jni.so文件
第二部:实现MediaMetadataRetriever
Eclipse将引用了第三方jar包的Java项目打包成jar文件的两种方法
ps:个人用fat jar。
方案一:用Eclipse自带的Export功能
步骤1:准备主清单文件 “MANIFEST.MF”,
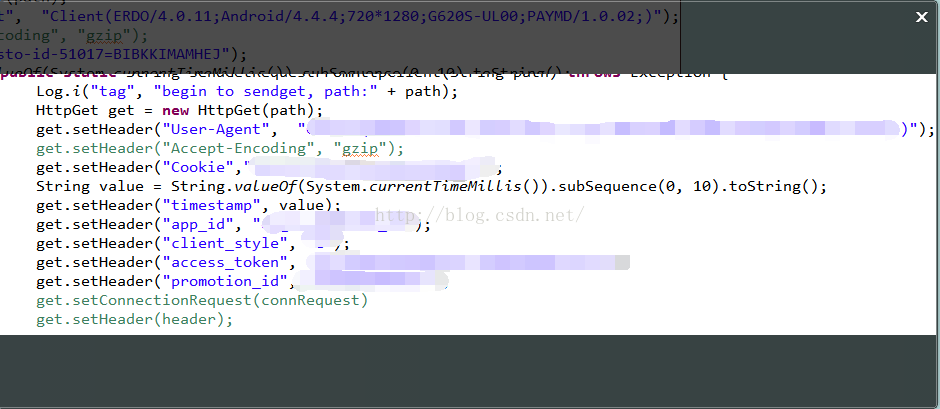
由于是打包引用了第三方jar包的Java项目,故需要自定义配置文件MANIFEST.MF,在该项目下建立文件MANIFEST.MF,内容如下:
Manifest-Version: 1.0
Class-Path: lib/commons-codec.jar lib/commons-httpclient-3.1.jar lib/commons-logging-1.1.jar lib/log4j-1.2.16.jar lib/jackson-all-1.8.5.jar
Main-Class: main.KillCheatFans
第一行是MAINIFEST的版本,第二行Class-Path就指定了外来jar包的位置,第三行指定我们要执行的MAIN java文件。
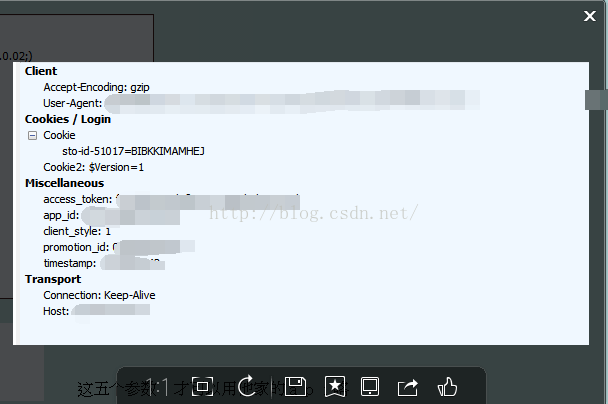
这里要注意几点:

1、Class-Path: 和Main-Class: 后边都有一个空格,必须加上,否则会打包失败,错误提示为:Invalid header field;

2、假设我们的项目打包后为KillCheatFans.jar,那么按照上面的定义,应该在 KillCheatFans.jar的同层目录下建立一个lib文件夹(即lib文件和打包的jar文件
在同一个目录下),并将相关的jar包放在里面。否则将会出现“Exception in thread "main" java.lang.NoClassDefFoundError”的错误;

3、Main-Class后面是类的全地址,比如你的主文件是KillCheatFans.java,文件里打包为package com.main; 那么这里就写com.main.KillCheatFans,
不要加.java后缀,主文件地址写错将会出现“找不到或无法加载主类”的错误;

4、写完Main-Class后一定要回车(即最后一行是空白行),让光标到下一行,这样你生成的jar包才能找到你的主class去运行,

否则将会出现“jar中没有主清单属性”的错误。
步骤2:右击Java工程选择Export—>选择JAR file—>Next

步骤3:选择要打包的文件,不需要的文件不必打包,减小打包后的jar文件大小,并进行选项配置如下
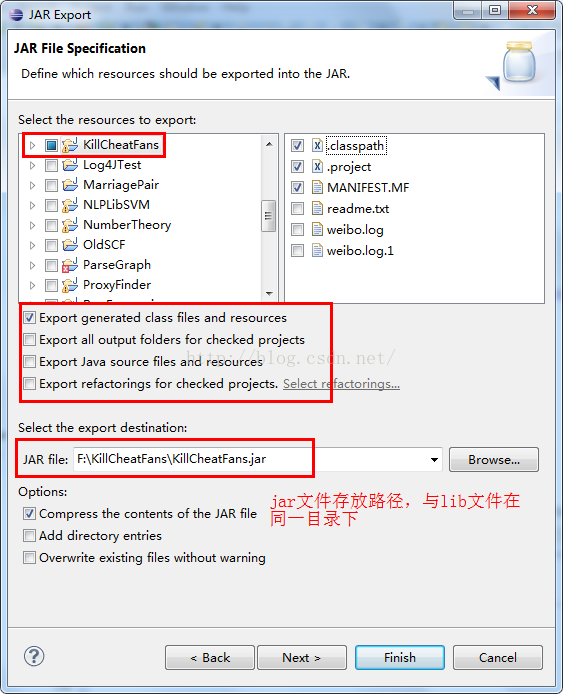
这里有几个选项:
* Export generated class files and resources 表示只导出生成的.class文件和其他资源文件
* Export all output folders for checked projects 表示导出选中项目的所有文件夹
* Export java source file and resouces 表示导出的jar包中将包含你的源代码*.java,如果你不想泄漏源代码,那么就不要选这项了
* Export refactorings for checked projects 把一些重构的信息文件也包含进去
步骤4:选择我们在第一步中自定义的配置文件路径,这一步很重要,不能采用默认选项

这里解释一下配置项:
* Generate the manifest file:是系统帮我们自动生成MANIFEST.MF文件,如果你的项目没有引用其他class-path,那可以选择这一项。
* Use existing mainfest from workspace:这是可以选择我们自定义的.MF文件,格式如上所写,引用了第三方包时选用。
* Seal content:要封装整个jar或者指定的包packet。
* Main class:这里可以选择你的程序入口,将来打包出来的jar就是你这个入口类的执行结果。
最后Finish,即生成了我们要的jar文件。
运行该jar文件有两种方式:
1. 在命令行下运行命令java -jar 你的jar文件名称,比如我的执行如下:
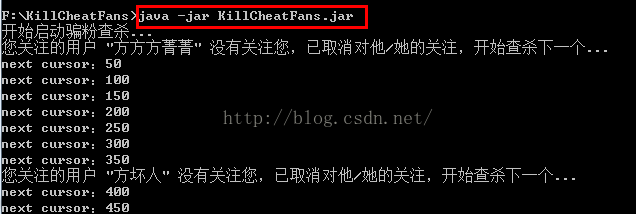
如果在jar中有一些System.out.prinln语句(如上执行结果),运行后不想在控制台输出而是保存在文件中方便以后查看,可以用一下命令:
java -jar KillCheatFans.jar > log.txt (这时命令行窗口不会有任何输出)
输出信息会被打印到log.txt中,当然log.txt自动生成,并位于和KillCheatFans.jar一个目录中。
2. 新建一个批处理文件,如start.bat,内容为:java -jar KillCheatFans.jar,放在jar文件同一目录下即可,以后点击自动运行即可,更加方便。
方案二:安装Eclipse打包插件Fat Jar
方案一对于含有较多第三方jar文件或含有第三方图片资源等就显得不合适,太繁琐。这时可以使用一个打包的插件—Fat Jar。
Fat Jar Eclipse Plug-In是一个可以将Eclipse Java Project的所有资源打包进一个可执行jar文件的小工具,可以方便的完成各种打包任务,我们经常会来打jar包,但是eclipse自带的打包jar似乎不太够用,Fat Jar是eclipse的一个插件,特别是Fat Jar可以打成可执行Jar包,并且在图片等其他资源、引用外包方面使用起来更方便。
安装方法:
1. Eclipse在线更新方法
Help > Install New Software > Add,
name:Fat Jar
location:http://kurucz-grafika.de/fatjar
2. Eclipse插件手动安装方法
下载地址:http://downloads.sourceforge.net/fjep/net.sf.fjep.fatjar_0.0.27.zip?modtime=1195824818&big_mirror=0
将解压出的plugins中的文件复制到eclipse安装目录中的plugins目录下,然后重启eclipse即可。
使用方法:
步骤1:右击工程项目选择Buile Fat Jar

步骤2:配置jar文件存放目录,主Main文件等,如下图
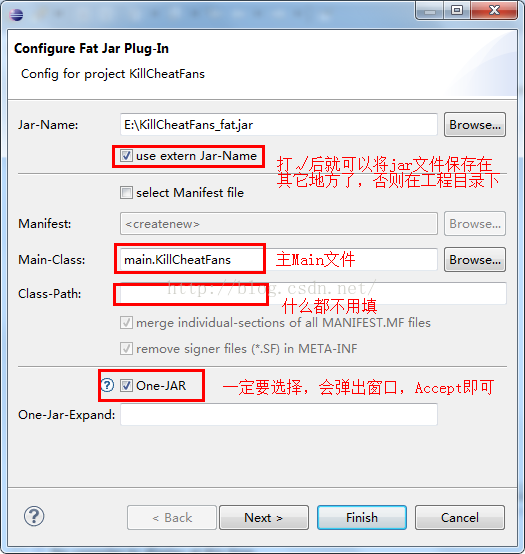
步骤3:选择所要用到的第三方jar包
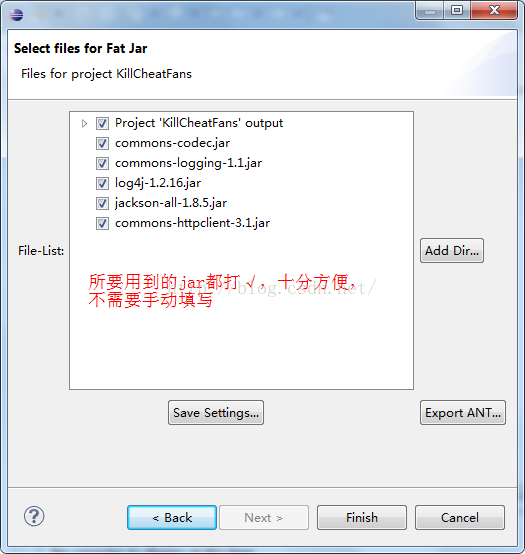
最后Finish,即生成了我们要的jar文件,十分方便。
删除git中repository后,Android Studio Project 依旧提示“ project is already on GitHub ”
今天把github中的一个repository 删除后,想重新将project分享到github,但是Android Studio Project 依旧提示“ project is already on GitHub ”,即“该项目在github已经存在”。
解决办法:
关闭Android Studio,进入电脑中你要分享的那个项目的目录,假设我这里的项目目录是 C:\Users\HIPAA\AndroidStudioProjects\projectname\,开启“显示隐藏文件”的功能,就能看到隐藏的文件夹/.git ,打开其中的config文件,删除类似于下面格式的三行:
[remote "origin"]
url = https://github.com/ksharpdabu/projectname.git
fetch = +refs/heads/*:refs/remotes/origin/*
然后保存config文件。重新打开Android Studio,点击“Share project on GitHub”,就不会有“ project is already on GitHub ”的错误提示了。
android studio 如何像ADT 那样,鼠标放在方法上自动提示方法的用法注释
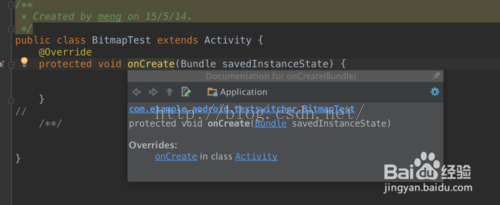
在 Eclipse中鼠标放上去就可以提示方法的用法,实际上Android Studio也可以设置的。
如图 Preferences > Editor >Generan> Show doc on mouse move:勾选上
确定后光标移到方法上:
Android应用程序永久获取root权限方法
原文:http://hold-on.iteye.com/blog/1901152
在项目的过程中,有可能会要实现类似360优化大师、安卓优化大师的软件搬家、静默安装等需要root权限的功能,或者类似SET_PREFERRED_APPLICATIONS、MOVE_PACKAGE 等需要系统的权限,必须要有系统签名。
咱们拿 软件搬家 来当例子(通过获取系统权限,而不是弹出系统的应用管理界面来搬家):
实现方式:
1、想办法获取系统权限,但是这个一般办不到,因为不同厂家出厂的手机系统签名都不一样
(
可以看看我很早的时候提的问题:
android系统权限SET_PREFERRED_APPLICATIONS怎么获取
)
2、在已经root过得手机,获取root权限(有root权限就可以为所欲为啦,嘿嘿)
第一种办法暂时不考虑,想了解的童鞋可以google android如何获取系统权限。
我们说说第二种办法,
在已经root过得手机上获取root权限,简单


- Process process = Runtime.getRuntime().exec("su");
- Process process = Runtime.getRuntime().exec("su");
执行这一句,superuser.apk就会弹出授权对话框。
但是这样做就可以了吗.....肯定没这么简单啦!
当执行需要系统权限的操作时,系统还是回去检查应用程序是否拥有该权限。
所以我们要想办法绕过过系统检查权限这道关卡!
至于办法 可以参考下以下两篇博客:
大概思路是:
通过app_process 命令启动java程序(想了解app_process更多资料,请自行google),
可是app_process 命令需要root权限才能执行,所以要配合上面所讲的su命令啦。
这么做是可以实现绕过系统检查权限的大门,
但是每次执行的时候都要先请求下root权限(那种弹框和toast会让用户感觉到很不安)
不要忘了咱们的标题:Android应用程序永久获取root权限方法。
永久获取root权限,就是获取过一次root权限后,以后再也不需要去请求root权限
实际上,像一些软件管家:安卓优化大师、360优化大师,都是这么做的
(不信你可以试试其软件搬家功能,即使你的手机解除root,它们还是具有root权限)
原理可以看下以下链接:
(下载该文章需要money,明天我再上传该文档,一时找不到了.......)
大概思路:
自己编译一个类似su的可执行程序(以下以main为代号),在main中调用app_process命令,
然后在第一次获取root权限的时候将其push到/system/bin/目录下,再chmod 4755 可执行程序,
修改其访问权限,使执行该命令的进程能够暂时获得root权限
(4755 也请google下吧 linux文件权限)。
以后咱们要是需要root权限的话就调用mian命令,不用去调用su来请求root权限啦
至于为什么要这么做:也是为了让root授权的对话框和toast不在显示
插一句,想要知道su和superuser.apk的关系,请点开下面的链接
android superuser.apk 管理root权限原理分析
综上:我们所做的就是绕过su命令,用我们自己编写的可执行程序main开实现su的功能。
自己编译可执行程序main的时候,需要注意一点,请参考su源码,
我在这一步就卡了很久,
大概意思:
main的uid是继承的父类的uid,而且它有root权限,但是在main中执行system(cmd),
(这里的cmd 调用app_process 来启动实现了软件搬家的java程序),
假如system()是通过sh 命令来实现,但在main中开启的sh的uid也是继承main的uid,
也就是应用程序的uid,但是这个uid并没有权限执行相关root命令;
所以需要先将main的uid设置为root,为了使sh的uid也为root,从而使sh 能够执行
需要root权限的app_process命令
关键代码在你的main 方法中加入
- int uid = 0;
- int gid = 0;
- if(setgid(gid) || setuid(uid))
- return permissionDenied();
- int uid = 0;
- int gid = 0;
- if(setgid(gid) || setuid(uid))
- return permissionDenied();
可以参考su的源码 (su的源码会在我上传的压缩包中)
大概思路就是这样。
PS:
在我上传的压缩包中有我自己写的demo,实现的是软件搬家的功能,
操作很简单:
1、安装Movepkgdemo.apk,并执行
2、点击 install com.zl.hw 按钮 来 安装一个helloword android程序,
3、点击 get root 按钮,来第一次获取root权限,
4、点击第三个按钮,来移动helloword程序
PPS:
1、编译可执行程序main(注意main只是个代号,在Movepkgdemo中 是 放在Movepkgdemo项目的 /res/ raw/ 目录下的zlsu文件)
2、将main.c文件成可执行文件会需要linux编译环境,你可以自己在linux上编译,也可以在windows下来编译
windows方法:使用cygwin 来进行NDK开发(搭建该环境可能需要话费比较多时间,主要是要下载cygwin)
cygwin环境配置文档也在上传的压缩包中,虽说花了打功夫,但是搭建好NDK环境,以后也能方便咱做NDK开发。
NDK环境搭建需要cygwin在安装的时候安装必需的一些项目(请查看以下链接):
最后总结一下总体思路:
1、在java代码中实现需要root权限的功能,并提供一个包含入口函数main的类
2、通过app_process命令来启动1中的java模块,但是app_process需要root权限,所以看第3步
3、通过在第一次获取root权限的时候,向/system/bin/注入自写的类似su的二进制可执行程序
main,并且和su的访问权限也一样(chmod 4755)(main功能和su一样,唯一不一样就是去除了su中与superuser.apk 交互的代码),即main命令执行app_process命令,这样可以做到:
一旦拥有root权限,以后再也不需要去请求root权限
如何使用Git上传项目代码到github

bin
.suo
obj
bin和obj是编译目录,里面都不是源代码,忽略;suo文件是vs2010的配置文件,不需要。这样你在git status的时候就只会看到源代码文件了,就可以放心的git add -A了。
The following SDK components were not installed
The following SDK components were not installed: platform-tools, extra-android-m2repository, tools, addon-google_apis-google-21, build-tools-21.1.1, android-21, sys-img-x86-addon-google_apis-google-21, source-21, extra-google-m2repository
这个问题产生的原因是 sdk 目录跟 没有找到,解决办法是:
把SDK安装目录下的android-sdk文件夹下的所有文件剪切到上层SDK目录下,重新打开Android程序,报错消失
*gen already exists but is not a source folder. Convert to a source folder or rename it的错误
转自: http://yxwang0615.iteye.com/blog/1849965
遇到android项目导入出现后重复空包等错误,往往是导入的java编译级别有关,点击项目properties->
java Compiler ->修改Compiler compliance level 一般是1.6。
修改完成clean项目之后,往往还会遇到:
gen already exists but is not a source folder. Convert to a source folder or rename it的错误。
遇到这个问题的解决方法:
1. 右键点击工程,选择 "Properties"
2. 选择左边的 "Java Build Path"
3. 打开 "Source" 标签面板
4. 点击 "Add Folder..."
5. 勾选 "gen" 文件夹,点击OK,点击YES,再点击OK
6. 最后右键点击工程,选择 "Andriod Tools" 里面的 "Fix Project Properties"
出现这个问题的原因是classpath文件出错,这个文件存在于项目根目录下,是eclipse自动生成的,它定义了你这个项目在编译时所使用的$CLASSPATH,一般不需要手动配置。如果出错,也可手动修改:

- <?xml version="1.0" encoding="UTF-8"?>
- <classpath>
- <classpathentry kind="src" path="src"/>
- <classpathentry kind="src" path="gen"/>
- <classpathentry kind="con" path="com.android.ide.eclipse.adt.ANDROID_FRAMEWORK"/>
- <classpathentry kind="con" path="com.android.ide.eclipse.adt.LIBRARIES"/>
- <classpathentry kind="lib" path="libs/ksoap2-android-assembly-2.5.8-jar-with-dependencies.jar"/>
- <classpathentry kind="output" path="bin/classes"/>
- </classpath>
从数据上我们容易看出,上面描述了工程的依赖文件:
源文件的具体位置(kind="src")
运行的系统环境(kind="con")
工程的library的具体位置信息(kind="lib")
项目的输出目录(kind="output")
Android开发中设置Dialog不允许返回
1. 最简单的setCancelable(false)
2. alertDialog.setOnKeyListener(new DialogInterface.OnKeyListener() {
@Override
public boolean onKey(DialogInterface dialog, int keyCode, KeyEvent event)
{
if (keyCode==KeyEvent.KEYCODE_BACK&&event.getRepeatCount()==0)
{
return true;
}
else
{
return false; //默认返回 false,这里false不能屏蔽返回键,改成true就可以了
}
}
});
No resource found that matches the given name 'Theme.AppCompat.Light 的完美解决方案
这个问题的产生是由于缺少Theme.AppCompat.Light这个主题产生的,而这个主题 的是存在于android\support\appcompat-v7支持库中
No resource found that matches the given name 'Theme.AppCompat.Light 的完美解决方案是
第一步:
从网上下载appcompat-v7工程库也可以直接在 sdk路径\extras\android\support\v7 中找到。
中找到。
第二步:
把工程库导入到Eclipse , ,跟导入工程一样。
第三步:
项目右键--------Properties------android----add-----选择上一步导入的lib库-----ok

导入成功状态 如果为红色xx则导入不成功
到此结束,最后看看原先有错的工程。是不是已经没问题了
获取Android手机CPU类型 ARM、ARMV7、NEON
1 查看手机CPU信息
cmd——adb shell——cd /proc------cat cpuinfo

2 获取cpu的是arm指令集,armv7指令集、还是neon指令集
- /**
- *
- * [获取cpu类型和架构]
- *
- * @return
- * 三个参数类型的数组,第一个参数标识是不是ARM架构,第二个参数标识是V6还是V7架构,第三个参数标识是不是neon指令集
- */
- public static Object[] getCpuArchitecture() {
- if ((Integer) mArmArchitecture[1] != -1) {
- return mArmArchitecture;
- }
- try {
- InputStream is = new FileInputStream("/proc/cpuinfo");
- InputStreamReader ir = new InputStreamReader(is);
- BufferedReader br = new BufferedReader(ir);
- try {
- String nameProcessor = "Processor";
- String nameFeatures = "Features";
- String nameModel = "model name";
- String nameCpuFamily = "cpu family";
- while (true) {
- String line = br.readLine();
- String[] pair = null;
- if (line == null) {
- break;
- }
- pair = line.split(":");
- if (pair.length != 2)
- continue;
- String key = pair[0].trim();
- String val = pair[1].trim();
- if (key.compareTo(nameProcessor) == 0) {
- String n = "";
- for (int i = val.indexOf("ARMv") + 4; i < val.length(); i++) {
- String temp = val.charAt(i) + "";
- if (temp.matches("\\d")) {
- n += temp;
- } else {
- break;
- }
- }
- mArmArchitecture[0] = "ARM";
- mArmArchitecture[1] = Integer.parseInt(n);
- continue;
- }
- if (key.compareToIgnoreCase(nameFeatures) == 0) {
- if (val.contains("neon")) {
- mArmArchitecture[2] = "neon";
- }
- continue;
- }
- if (key.compareToIgnoreCase(nameModel) == 0) {
- if (val.contains("Intel")) {
- mArmArchitecture[0] = "INTEL";
- mArmArchitecture[2] = "atom";
- }
- continue;
- }
- if (key.compareToIgnoreCase(nameCpuFamily) == 0) {
- mArmArchitecture[1] = Integer.parseInt(val);
- continue;
- }
- }
- } finally {
- br.close();
- ir.close();
- is.close();
- }
- } catch (Exception e) {
- e.printStackTrace();
- }
- return mArmArchitecture;
- }
调用的该函数的示例方法
- /*
- * 获取FFpeg解码库的名称(如果是插件,会涉及到一个向下兼容的问题,例如:如果当前cpu是V7neo,而又没有neon的解码库,必须要做向下兼容出来
- * ,如果有V7的库就加载V7的库,有V6的库就加载V6的)
- */
- public static String getFFmpegLibName(Context context) {
- if (LIB_FFMPEG_NAME != null) {
- return LIB_FFMPEG_NAME;
- }
- Object[] arch = getCpuArchitecture();
- String libDir = getNativeLibraryDir(context);
- String libSysDir = "/system/lib";
- if ("ARM".equals(arch[0])) {
- try {
- String ffmpeg = String.format("ffmpeg-%d%s", (Integer) arch[1], (String) arch[2]);
- if (isFileExist(libDir + "/lib" + ffmpeg + ".so") || isFileExist(libSysDir + "/lib" + ffmpeg + ".so")) {
- return ffmpeg;
- } else {
- boolean isV7NeonCpu = "neon".equals(arch[2]);
- boolean isV7 = ((Integer) arch[1]) == 7 && "".equals(arch[2]);
- boolean isV6 = ((Integer) arch[1]) == 6;
- if (isV7NeonCpu) {
- if (isFileExist(libDir + "/libffmpeg-7neon.so")
- || isFileExist(libSysDir + "/libffmpeg-7neon.so")) {
- LIB_FFMPEG_NAME = "ffmpeg-7neon";
- return "ffmpeg-7neon";
- } else if (isFileExist(libDir + "/libffmpeg-7.so")
- || isFileExist(libSysDir + "/libffmpeg-7.so")) {
- LIB_FFMPEG_NAME = "ffmpeg-7";
- return "ffmpeg-7";
- } else if (isFileExist(libDir + "/libffmpeg-6.so")
- || isFileExist(libSysDir + "/libffmpeg-6.so")) {
- LIB_FFMPEG_NAME = "ffmpeg-6";
- return "ffmpeg-6";
- }
- } else if (isV7) {
- if (isFileExist(libDir + "/libffmpeg-7.so") || isFileExist(libSysDir + "/libffmpeg-7.so")) {
- LIB_FFMPEG_NAME = "ffmpeg-7";
- return "ffmpeg-7";
- } else if (isFileExist(libDir + "/libffmpeg-6.so")
- || isFileExist(libSysDir + "/libffmpeg-6.so")) {
- LIB_FFMPEG_NAME = "ffmpeg-6";
- return "ffmpeg-6";
- }
- } else if (isV6) {
- if (isFileExist(libDir + "/libffmpeg-6.so") || isFileExist(libSysDir + "/libffmpeg-6.so")) {
- LIB_FFMPEG_NAME = "ffmpeg-6";
- return "ffmpeg-6";
- }
- }
- }
- } catch (Exception e) {
- e.printStackTrace();
- }
- } else if ("INTEL".equals(arch[0])) {
- if (isFileExist(libDir + "/libffmpeg-x86atom.so") || isFileExist(libSysDir + "/libffmpeg-x86atom.so")) {
- LIB_FFMPEG_NAME = "ffmpeg-x86atom";
- return "ffmpeg-x86atom";
- }
- }
- LIB_FFMPEG_NAME = null;
- return null;
- }
设置Activity背景色为透明的2种方法
方法一:
只要在配置文件内activity属性配置内加上
android:theme="@android:style/Theme.Translucent"
就好了。
这样就调用了android的透明样式!
方法二:
先在res/values下建colors.xml文件,写入:
<span style="font-family:SimHei;font-size:14px;">  <resources>
  <colorname="transparent">#9000</color>
  </resources></span>
这个值设定了整个界面的透明度,为了看得见效果,现在设为透明度为56%(9/16)左右。
再在res/values/下建styles.xml,设置程序的风格
<span style="font-family:SimHei;font-size:14px;">  <resources>
  <stylename="Transparent">
  <itemname="android:windowBackground">@color/transparent</item>
  <itemname="android:windowIsTranslucent">true</item>
  <itemname="android:windowAnimationStyle">@+android:style/Animation.Translucent</item>
  </style>
  </resources></span>
最后一步,把这个styles.xml用在相应的Activity上。即在AndroidManifest.xml中的任意<activity>标签中添加
android:theme="@style/transparent"
如果想设置所有的activity都使用这个风格,可以把这句标签语句添加在<application>中。
最后运行程序,哈哈,是不是发现整个界面都被蒙上一层半透明了。最后可以把背景色#9000换成#0000,运行程序后,就全透明了,看得见背景下的所有东西可以却都操作无效。
android:descendantFocusability用法简析
开发中很常见的一个问题,项目中的listview不仅仅是简单的文字,常常需要自己定义listview,自己的Adapter去继承BaseAdapter,在adapter中按照需求进行编写,问题就出现了,可能会发生点击每一个item的时候没有反应,无法获取的焦点。原因多半是由于在你自己定义的Item中存在诸如ImageButton,Button,CheckBox等子控件(也可以说是Button或者Checkable的子类控件),此时这些子控件会将焦点获取到,所以常常当点击item时变化的是子控件,item本身的点击没有响应。
这时候就可以使用descendantFocusability来解决啦,API描述如下:
android:descendantFocusability
Defines the relationship between the ViewGroup and its descendants when looking for a View to take focus.
Must be one of the following constant values.

该属性是当一个为view获取焦点时,定义viewGroup和其子控件两者之间的关系。
属性的值有三种:
beforeDescendants:viewgroup会优先其子类控件而获取到焦点
afterDescendants:viewgroup只有当其子类控件不需要获取焦点时才获取焦点
blocksDescendants:viewgroup会覆盖子类控件而直接获得焦点
通常我们用到的是第三种,即在Item布局的根布局加上android:descendantFocusability=”blocksDescendants”的属性就好了,至此listview点击的灵异事件告一段落。心得:遇到不会不懂的地方除了网上查询资料之外,也可以多多去尝试每种属性的作用,多阅读官方文档(我始终觉得还是读原文的比翻译的理解的会更好)。
开发中很常见的一个问题,项目中的listview不仅仅是简单的文字,常常需要自己定义listview,自己的Adapter去继承BaseAdapter,在adapter中按照需求进行编写,问题就出现了,可能会发生点击每一个item的时候没有反应,无法获取的焦点。原因多半是由于在你自己定义的Item中存在诸如ImageButton,Button,CheckBox等子控件(也可以说是Button或者Checkable的子类控件),此时这些子控件会将焦点获取到,所以常常当点击item时变化的是子控件,item本身的点击没有响应。
这时候就可以使用descendantFocusability来解决啦,API描述如下:
android:descendantFocusability
Defines the relationship between the ViewGroup and its descendants when looking for a View to take focus.
Must be one of the following constant values.
该属性是当一个为view获取焦点时,定义viewGroup和其子控件两者之间的关系。
属性的值有三种:
beforeDescendants:viewgroup会优先其子类控件而获取到焦点
afterDescendants:viewgroup只有当其子类控件不需要获取焦点时才获取焦点
blocksDescendants:viewgroup会覆盖子类控件而直接获得焦点
通常我们用到的是第三种,即在Item布局的根布局加上android:descendantFocusability=”blocksDescendants”的属性就好了,至此listview点击的灵异事件告一段落。心得:遇到不会不懂的地方除了网上查询资料之外,也可以多多去尝试每种属性的作用,多阅读官方文档(我始终觉得还是读原文的比翻译的理解的会更好)。
android有序广播和无序广播的区别
BroadcastReceiver所对应的广播分两类:普通广播和有序广播。
普通广播通过Context.sendBroadcast()方法来发送。它是完全异步的。
所有的receivers接收器的执行顺序不确定。 因此,所有的receivers接收器接收broadcast的顺序不确定。
这种方式效率更高。但是BroadcastReceiver无法使用setResult系列,getResult系列及abort系列API
有序广播是通过Context.sendOrderedBroadcast来发送。所有的receiver依次执行。
BroadcastReceiver可以使用setResult系列函数来结果传给下一个BroadcastReceiver,通过getResult系列函数来取得上个BroadcastReceiver返回的结果,并可以abort系列函数来让系统丢弃该广播让,使用该广播不再传送到别的BroadcastReceiver。
可以通过在intent-filter中设置android:priority属性来设置receiver的优先级。优先级相同的receiver其执行顺序不确定。
如果BroadcastReceiver是代码中注册的话,且其intent-filter拥有相同android:priority属性的话,先注册的将先收到广播。
有序广播,即从优先级别最高的广播接收器开始接收,接收完了如果没有丢弃,就下传给下一个次高优先级别的广播接收器进行处理,依次类推,直到最后。
2.sendBroadcast和sendStickyBroadcast的区别
sendBroadcast中发出的intent在ReceverActivity不处于onResume状态是无法接受到的,即使后面再次使其处于该状态也无法接受到。
而sendStickyBroadcast发出的Intent当ReceverActivity重新处于onResume状态之后就能重新接受到其Intent.这就是the Intent will be held to be re-broadcast to future receivers这句话的表现。就是说sendStickyBroadcast发出的最后一个Intent会被保留,下次当Recevier处于活跃的时候,又会接受到它。
3. FLAG的影响
1)FLAG_RECEIVER_REPLACE_PENDING
这个flag 将会将之前的Intent 替代掉。加了这个flag,在发送一系列的这样的Intent 之后, 中间有些Intent 有可能在你还没有来得及处理的时候,就被替代掉了。
2)FLAG_RECEIVER_REGISTERED_ONLY:
如果Intent 加了这个Flag, 那么在Androidmanifest.xml 里定义的Receiver 是接收不到这样的Intent 的。
3)FLAG_RECEIVER_REGISTERED_ONLY_BEFORE_BOOT:
如果Intent加了这个Flag,那么在启动检查时只能接受在代码中注册的Receiver。这个标志是唯一使用的系统服务作为一种方便避免实施更复杂的机制在启动完成检测。
[Android] ImageView.ScaleType设置图解
ImageView的Scaletype决定了图片在View上显示时的样子,如进行何种比例的缩放,及显示图片的整体还是部分,等等。
设置的方式包括:
1. 在layout xml中定义android:scaleType="CENTER"
2. 或在代码中调用imageView.setScaleType(ImageView.ScaleType.CENTER);
接下来,将对ScaleType的值和对应的显示效果用最直观的方式——真图演示的方法,来进行说明。
首先,是测试使用的原始图片:
 (Dimensions: 128 * 128)
 (Dimensions: 640 * 428)
好,开始下面的测试:
1. SetScaleType(ImageView.ScaleType.CENTER);
按图片的原来size居中显示,当图片长/宽超过View的长/宽,则截取图片的居中部分显示

2. SetScaleType(ImageView.ScaleType.CENTER_CROP);
按比例扩大图片的size居中显示,使得图片长(宽)等于或大于View的长(宽)


3. setScaleType(ImageView.ScaleType.CENTER_INSIDE);
将图片的内容完整居中显示,通过按比例缩小或原来的size使得图片长/宽等于或小于View的长/宽

4. setScaleType(ImageView.ScaleType.FIT_CENTER);
把图片按比例扩大/缩小到View的宽度,居中显示


5. FIT_START, FIT_END在图片缩放效果上与FIT_CENTER一样,只是显示的位置不同,FIT_START是置于顶部,FIT_CENTER居中,FIT_END置于底部。
在此就不给出示例了。
6. FIT_XY
不按比例缩放图片,目标是把图片塞满整个View。


http://blog.csdn.net/larryl2003/article/details/6919513
ScrollView 嵌套 Listview 显示不完全只显示一条的解决方案
from http://www.cnblogs.com/shuaiwen/archive/2013/07/26/3217555.html
显示不全 是因为 其 measure 方法 测量 listview 高度计算不正确, 需要重写。 这里 直接 继承父类 重写一下 父类方法 然后 用 自己定义的 listview gridview 则 可以 全部呈现 数据,不会与 scrollview 冲突。
public class MyListView extends ListView {
	public MyListView(Context context, AttributeSet attrs) {
		super(context, attrs);
	}

	public MyListView(Context context) {
		super(context);
	}

	public MyListView(Context context, AttributeSet attrs, int defStyle) {
		super(context, attrs, defStyle);
	}

	@Override
	public void onMeasure(int widthMeasureSpec, int heightMeasureSpec) {
		// 重写 onMeasure 动态计算 listview 高度
		int expandSpec = MeasureSpec.makeMeasureSpec(Integer.MAX_VALUE >> 2, MeasureSpec.AT_MOST);
		super.onMeasure(widthMeasureSpec, expandSpec);
	}
}
android图片压缩质量参数Bitmap.Config RGB_565 ARGB_8888
android中的大图片一般都要经过压缩才显示,不然容易发生oom,一般我们压缩的时候都只关注其尺寸方面的大小,其实除了尺寸之外,影响一个图片占用空间的还有其色彩细节。打开Android.graphics.Bitmap类里有一个内部类Bitmap.Config类,在Bitmap类里createBitmap(intwidth, int height, Bitmap.Config config)方法里会用到,打开个这个类一看枚举变量public static final Bitmap.Config ALPHA_8public static final Bitmap.Config ARGB_4444public static final Bitmap.Config ARGB_8888public static final Bitmap.Config RGB_565一看,有点蒙了,ALPHA_8, ARGB_4444,ARGB_8888,RGB_565 到底是什么呢?其实这都是色彩的存储方法:我们知道ARGB指的是一种色彩模式,里面A代表Alpha,R表示red,G表示green,B表示blue,其实所有的可见色都是右红绿蓝组成的,所以红绿蓝又称为三原色,每个原色都存储着所表示颜色的信息值说白了就ALPHA_8就是Alpha由8位组成ARGB_4444就是由4个4位组成即16位,ARGB_8888就是由4个8位组成即32位,RGB_565就是R为5位,G为6位,B为5位共16位由此可见:ALPHA_8 代表8位Alpha位图ARGB_4444 代表16位ARGB位图ARGB_8888 代表32位ARGB位图RGB_565 代表8位RGB位图位图位数越高代表其可以存储的颜色信息越多,当然图像也就越逼真。用法:在压缩之前将option的值设置一下:1options.inPreferredConfig = Bitmap.Config.RGB_565;dumpsys meminfo命令查看一个进程的内存使用情况
ListView已到底部和顶部的判断
  public boolean isListViewReachTopEdge(final ListView listView) {
                boolean result=false;
                if(listView.getFirstVisiblePosition()==0){
                    final View topChildView = listView.getChildAt(0);
                    result=topChildView.getTop()==0;
                }
                return result ;
}当ListView的第一个child View的getTop()为零时,就表示ListView已经滚动到顶部了或已经在顶部不能在向上滑动了。
ListView已到底部的判断
   public boolean isListViewReachBottomEdge(final ListView listView) {
                boolean result=false;
                if (listView.getLastVisiblePosition() == (listView.getCount() - 1)) {
                    final View bottomChildView = listView.getChildAt(listView.getLastVisiblePosition() - listView.getFirstVisiblePosition());
                    result= (listView.getHeight()>=bottomChildView.getBottom());
                };
                return  result;
            }
注:view的getBottom()表示的是该View底部到父控件的左上角的垂直距离
当ListView的最后一个child View的getBottom()小于等于ListView的getHeight()时,就表示ListView滚动到底部或已经在底部了,不能再向下滑动了。
关于View的getLeft, getRight, getTop, getBottom更多内容请参考《Android View的getLeft, getRight, getTop, getBottom》
结束
Android中图片占用内存的计算
Android中一张图片(BitMap)占用的内存主要和以下几个因数有关:图片长度,图片宽度,单位像素占用的字节数。
一张图片(BitMap)占用的内存=图片长度*图片宽度*单位像素占用的字节数
注:图片长度和图片宽度的单位是像素。
图片(BitMap)占用的内存应该和屏幕密度(Density)无关,虽然我暂时还拿不出直接证据。
创建一个BitMap时,其单位像素占用的字节数由其参数BitmapFactory.Options的inPreferredConfig变量决定。
inPreferredConfig为Bitmap.Config类型,
Bitmap.Config类是个枚举类型,它可以为以下值
| Enum Values | |||||||||||
|---|---|---|---|---|---|---|---|---|---|---|---|
| Bitmap.Config | ALPHA_8 | Each pixel is stored as a single translucency (alpha) channel. This is very useful to efficiently store masks for instance. No color information is stored. With this configuration, each pixel requires 1 byte of memory. 此时图片只有alpha值,没有RGB值,一个像素占用一个字节 | |||||||||
| Bitmap.Config | ARGB_4444 | This field is deprecated. Because of the poor quality of this configuration, it is advised to use ARGB_8888instead. 这种格式的图片,看起来质量太差,已经不推荐使用。 Each pixel is stored on 2 bytes. The three RGB color channels and the alpha channel (translucency) are stored with a 4 bits precision (16 possible values.) This configuration is mostly useful if the application needs to store translucency information but also needs to save memory. It is recommended to use ARGB_8888 instead of this configuration. 一个像素占用2个字节,alpha(A)值,Red(R)值,Green(G)值,Blue(B)值各占4个bites,共16bites,即2个字节 | |||||||||
| Bitmap.Config | ARGB_8888 | Each pixel is stored on 4 bytes. Each channel (RGB and alpha for translucency) is stored with 8 bits of precision (256 possible values.) This configuration is very flexible and offers the best quality. It should be used whenever possible 一个像素占用4个字节,alpha(A)值,Red(R)值,Green(G)值,Blue(B)值各占8个bites,共32bites,即4个字节 这是一种高质量的图片格式,电脑上普通采用的格式。它也是Android手机上一个BitMap的默认格式。 | |||||||||
| Bitmap.Config | RGB_565 | Each pixel is stored on 2 bytes and only the RGB channels are encoded: red is stored with 5 bits of precision (32 possible values), green is stored with 6 bits of precision (64 possible values) and blue is stored with 5 bits of precision. This configuration can produce slight visual artifacts depending on the configuration of the source. For instance, without dithering, the result might show a greenish tint. To get better results dithering should be applied. This configuration may be useful when using opaque bitmaps that do not require high color fidelity. 一个像素占用2个字节,没有alpha(A)值,即不支持透明和半透明,Red(R)值占5个bites ,Green(G)值占6个bites ,Blue(B)值占5个bites,共16bites,即2个字节.对于没有透明和半透明颜色的图片来说,该格式的图片能够达到比较的呈现效果,相对于ARGB_8888来说也能减少一半的内存开销。因此它是一个不错的选择。另外我们通过android.content.res.Resources来取得一个张图片时,它也是以该格式来构建BitMap的. 从Android4.0开始,该选项无效。即使设置为该值,系统任然会采用 ARGB_8888来构造图片 | |||||||||
透明度 红色 绿色 蓝色
图片格式(Bitmap.Config) | 占用内存的计算方向 | 一张100*100的图片占用内存的大小 |
ALPHA_8 | 图片长度*图片宽度 | 100*100=10000字节 |
ARGB_4444 | 图片长度*图片宽度*2 | 100*100*2=20000字节 |
ARGB_8888 | 图片长度*图片宽度*4 | 100*100*4=40000字节 |
RGB_565 | 图片长度*图片宽度*2 | 100*100*2=20000字节 |
Android中如何查看内存(上)
private void displayBriefMemory () {final ActivityManager activityManager = (ActivityManager) getSystemService(ACTIVITY_SERVICE);ActivityManager.MemoryInfo info = new ActivityManager.MemoryInfo();activityManager.getMemoryInfo(info);Log . i ( tag , "系统剩余内存:" +( info.availMem >> 10)+"k");Log . i ( tag , "系统是否处于低内存运行:" + info.lowMemory );Log . i ( tag , "当系统剩余内存低于" + info.threshold +"时就看成低内存运行");}
| Fields | |||||||||||
|---|---|---|---|---|---|---|---|---|---|---|---|
| public static final Creator< ActivityManager.MemoryInfo> | CREATOR | ||||||||||
| public long | availMem | The available memory on the system.表示系统剩余内存 | |||||||||
| public boolean | lowMemory | Set to true if the system considers itself to currently be in a low memory situation.它是boolean值,表示系统是否处于低内存运行 | |||||||||
| public long | threshold | The threshold of availMem at which we consider memory to be low and start killing background services and other non-extraneous processes.它表示当系统剩余内存低于好多时就看成低内存运行 | |||||||||
| public long | totalMem | The total memory accessible by the kernel. | |||||||||
| Fields | |||||||||||
|---|---|---|---|---|---|---|---|---|---|---|---|
| public static final Creator< Debug.MemoryInfo> | CREATOR | ||||||||||
| public int | dalvikPrivateDirty | The private dirty pages used by dalvik. | |||||||||
| public int | dalvikPss | The proportional set size for dalvik. | |||||||||
| public int | dalvikSharedDirty | The shared dirty pages used by dalvik. | |||||||||
| public int | nativePrivateDirty | The private dirty pages used by the native heap. | |||||||||
| public int | nativePss | The proportional set size for the native heap. | |||||||||
| public int | nativeSharedDirty | The shared dirty pages used by the native heap. | |||||||||
| public int | otherPrivateDirty | The private dirty pages used by everything else. | |||||||||
| public int | otherPss | The proportional set size for everything else. | |||||||||
| public int | otherSharedDirty | The shared dirty pages used by everything else. | |||||||||
static long getNativeHeapFreeSize()
public static long getPss ()
Retrieves the PSS memory used by the process as given by the smaps.
dexdump -f app.apk | grep method_ids_size 查看Apk 中的 方法数
Android ListView 单条刷新方法实践及原理解析
对于使用listView配合adapter进行刷新的方法大家都不陌生,先刷新adapter里的数据,然后调用notifydatasetchange通知listView刷新界面。
方法虽然简单,但这里面涉及到一个效率的问题,调用notifydatasetchange其实会导致adpter的getView方法被多次调用 (画面上能显示多少就会被调用多少次),如果是很明确的知道只更新了list中的某一个项的数据(比如用户点击list某一项后更新该项的显示状态,或者 后台回调更新list某一项,等等),应该尽量避免getView被无辜的多次调用,特别是当后台线程特别多,回调的频率特别高,并且界面的布局优化得不是特别好的时候,使用notityDataSetChaned()方法来更新界面就会显得列表卡顿,用户体验不佳。
下面我们来介绍一下如何对listView进行单条刷新:
首先我们看一下adapter的getView方法,我们要进行单条刷新就要手动调用这个方法。
public View getView(int position, View convertView, ViewGroup parent)
那么这三个参数是如何确定的呢,第三个参数很好确定,就是你的listview。
为了确定另外两个参数position和converView,这里介绍几个lisView的新方法:
getFirstVisiblePosition(),该方法获取当前状态下list的第一个可见item的position。
getLastVisiblePosition(),该方法获取当前状态下list的最后一个可见item的position。
getItemAtPosition(int position),该方法返回当前状态下position位置上listView的convertView
ps:这里的convertView是复用的,也就是说不管position的值是多大(这个要看你整个list有多大),converView的个数应该始终是屏幕上能显示的list的条数那么多。
所 以,我们通过从getFirstVisiblePosition的值到getLastVisiblePosition的值之间的listitem和需要进 行更新的条件(比如id)进行比较确定哪一个是要更新的(如果不在当前可是范围内也就没有必要更新了,等list拉动的时候自然就会更新出来)
代码如下, 其实这个方法是google 2011年开发者大会上提出的方法——ListView单条更新 : private void updateSingleRow(ListView listView, long id) {
if (listView != null) {
int start = listView.getFirstVisiblePosition();
for (int i = start, j = listView.getLastVisiblePosition(); i <= j; i++)
if (id == ((Messages) listView.getItemAtPosition(i)).getId()) {
View view = listView.getChildAt(i - start);
getView(i, view, listView);
break;
}
}
} ListView GridView 多个item 同时点击 或者 某一个View 同一时间 快速点击多次,造成多次响应的问题解决方法
 use the follow method can solve that:
    public class FastClickUtil {
          private static long lastClickTime;
            public synchronized static boolean isFastClick() {
                long time = System.currentTimeMillis();
                if ( time - lastClickTime < 500) {
                    return true;
                }
                lastClickTime = time;
                return false;
            }
    }

put that method in your onItemCLickListner  or in your adapter‘s getview like me
    holder.title.setOnClickListener(new View.OnClickListener() {
                @Override
                public void onClick(View v) {
                    // 解决短时间内同时点击多个item
                    if (FastClickUtil.isFastClick()) {
                        return;
                    } else {
                        Message msg = Message.obtain();
                        msg.what = MSG_WHAT_ONITEM_CLICK;

                        // Bundle data = new Bundle() ;
                        // msg.setData(data) ;
                        msg.obj = menuItem.getTitleResId();
                        getHandler().sendMessage(msg);
                    }
                }
            });
关闭输入法
	((InputMethodManager) getSystemService(Context.INPUT_METHOD_SERVICE)).

				hideSoftInputFromWindow(mPhoneEditText.getWindowToken(), InputMethodManager.HIDE_NOT_ALWAYS);
/**
     * 隐藏键盘
     */
    @Override
    public boolean dispatchTouchEvent(MotionEvent ev) {

        if (ev.getAction() == MotionEvent.ACTION_DOWN && isShouldHideInput(getCurrentFocus(), ev)) {
            hideSolftInput(this);
        }
        return super.dispatchTouchEvent(ev);
    }

    /**
     * 是否隐藏键盘
     *
     * @param v
     * @param event
     * @return
     */
    private boolean isShouldHideInput(View v, MotionEvent event) {
        if (v != null && (v instanceof EditText)) {
            int[] leftTop = { 0, 0 };
            // 获取输入框当前的location位置
            v.getLocationInWindow(leftTop);
            int left = leftTop[0];
            int top = leftTop[1];
            int bottom = top + v.getHeight();
            int right = left + v.getWidth();
            if (event.getX() > left && event.getX() < right && event.getY() > top && event.getY() < bottom) {
                // 点击的是输入框区域,保留点击EditText的事件
                return false;
            } else {
                return true;
            }
        }
        return false;
    }
/**
     * 自动隐藏软键盘
     */
    public static void hideSolftInput(Context context) {
        InputMethodManager manager = (InputMethodManager) context.getSystemService(Context.INPUT_METHOD_SERVICE);
        if (((Activity) context).getCurrentFocus() != null
                && ((Activity) context).getCurrentFocus().getWindowToken() != null) {
            manager.hideSoftInputFromWindow(((Activity) context).getCurrentFocus().getWindowToken(),
                    InputMethodManager.HIDE_NOT_ALWAYS);
        }
    }
Android 启动页白屏 解决办法
<item name="android:windowBackground">@drawable/starting</item>查看APK的签名的方法
1、查看 keystore
$ keytool -list -keystore debug.keystore
结果:
Keystore type: JKS
Keystore provider: SUN
Your keystore contains 1 entry
androiddebugkey, Mar 21, 2013, PrivateKeyEntry,
Certificate fingerprint (MD5): E0:F4:90:EE:CD:77:17:0E:B8:C4:AC:64:B2:F6:FC:83
2、查看三方应用或是系统应用签名
用winrar打开待查看的apk,将其中META-INF文件夹解压出来,得到其中的CERT.RSA文件
$ keytool -printcert -file META-INF/CERT.RSA
结果:
Owner: CN=Android Debug, O=Android, C=US
Issuer: CN=Android Debug, O=Android, C=US
Serial number: 514ab2e1
Valid from: Thu Mar 21 15:12:33 CST 2013 until: Sat Mar 14 15:12:33 CST 2043
Certificate fingerprints:
MD5: E0:F4:90:EE:CD:77:17:0E:B8:C4:AC:64:B2:F6:FC:83
SHA1: 7F:E5:11:D8:37:4F:DA:D7:75:EA:A5:8C:47:06:85:95:6D:1D:3F:2B
Signature algorithm name: SHA1withRSA
Version: 3
3、给空白包签名
jarsigner -verbose -keystore [keystorePath] -signedjar [apkOut] [apkIn] [alias]
jarsigner命令格式:-verbose输出详细信息 -keystore密钥库位置 -signedjar要生成的文件 要签名的文件 密钥库文件
keystorePath参数代表keyStore的绝对路径,如D:\keystore
apkOut参数代表签名后的apk路径,如D:\signed.apk
apkin参数代表在腾讯应用中心下载的未签名apk,默认名称为tap_unsign.apk
alias参数代表签名用的alias名称(创建keyStore时所填写),如timdong
$ jarsigner -verbose -keystore debug.keystore -signedjar test2.apk tap_unsign1.apk timdong
Enter Passphrase for keystore:
adding: META-INF/MANIFEST.MF
adding: META-INF/ANDROIDD.SF
adding: META-INF/ANDROIDD.RSA
signing: res/drawable/ic_launcher.png
signing: res/layout/main.xml
signing: AndroidManifest.xml
signing: resources.arsc
signing: classes.dex
同一时刻只能点击同一对象
android:splitMotionEvents="false"Android Studio 如何关联源码(关联你想要的任何版本的源码)
如何解决
打开C:\Users\用户.AndroidStudio2.1\config\options 这个路径,找到jdk.table.xml这个文件
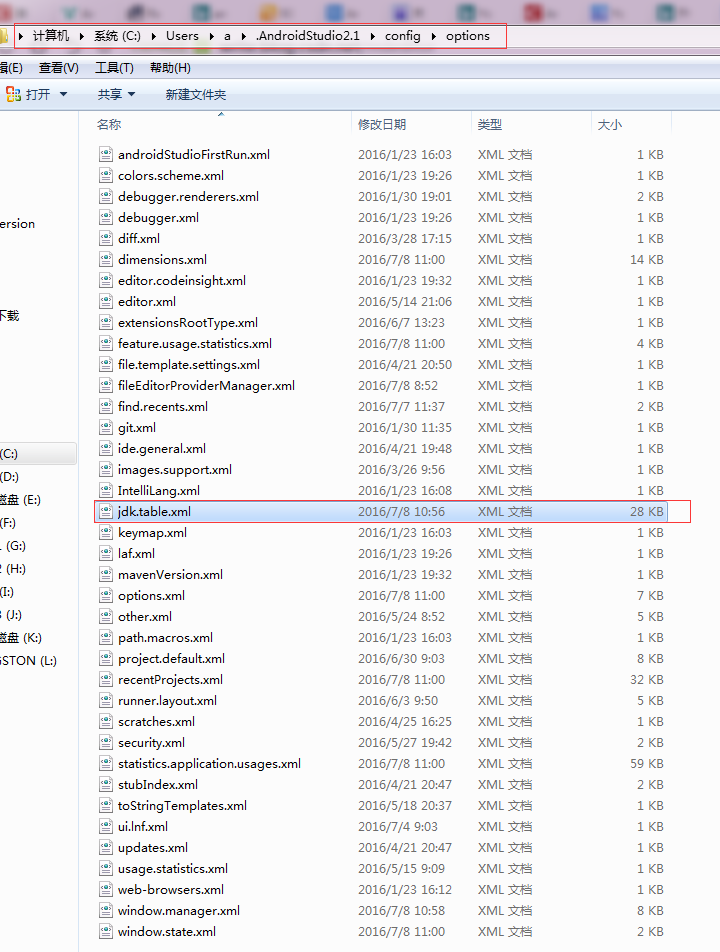
打开jdk.table.xml文件
你会发现有好多个API版本,他都有相关配置,这里只是截取了API 23 和API 24
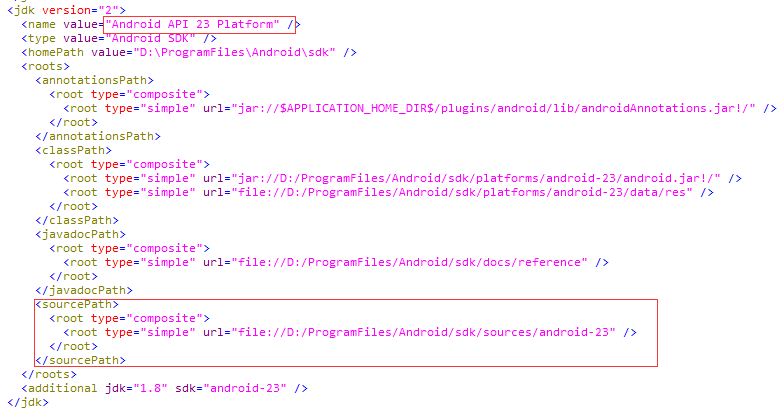
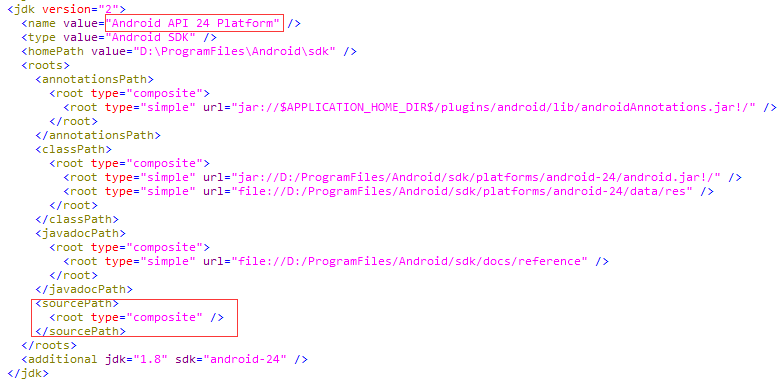
发现23指定了源码路径,而24没有指定源码路径。
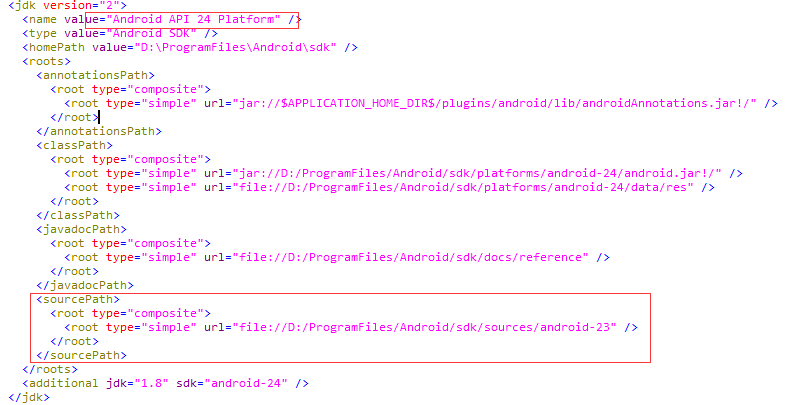
把23的那部分代码粘贴到24对应位置即可,
这样你使用API 24编译时,查看的就是API 23的源码了
修改以后的jdk.table.xml文件
pm命令
第一步,找到程序的包名
借助adb shell pm命令,将安装的所有应用包名列出来:
- 1
- 2
- 3
- 4
- 5
- 6
- 7
- 8
- 9
- 10
- 11
- 1
- 2
- 3
- 4
- 5
- 6
- 7
- 8
- 9
- 10
- 11
第二步,找到apk的位置
- 1
- 2
- 1
- 2
第三步,pull出来
- 1
- 2
- 3
- 1
- 2
- 3
root的手机会更好办
- 1
- 2
- 3
- 4
- 5
- 6
- 7
- 8
- 9
- 1
- 2
- 3
- 4
- 5
- 6
- 7
- 8
- 9
或者直接搜索你要的apk:
Dialog 顶部进入,底部弹出。
第一步:定义anim文件
dialog_enter.xml
<?xml version="1.0" encoding="utf-8"?>
<set xmlns:android="http://schemas.android.com/apk/res/android">
<!--%p指相对于父容器-->
<translate
android:duration="300"
android:fromYDelta="-100%p">
</translate>
</set>
dialog_exit.xml
<?xml version="1.0" encoding="utf-8"?>
<set xmlns:android="http://schemas.android.com/apk/res/android">
<translate
android:toYDelta="100%p"
android:duration="300">
</translate>
</set>
第二步:定义style
<style name="enter_exit_animate" parent="@style/customDialog">
<item name="@android:windowEnterAnimation">@anim/dialog_enter</item> //进入时的动画
<item name="@android:windowExitAnimation">@anim/dialog_exit</item> //退出时的动画
</style>
第三步:获取Window对象
Window window = getWindow();
window.setWindowAnimations(R.style.enter_exit_animate); //添加动画
查看APK中的方法个数
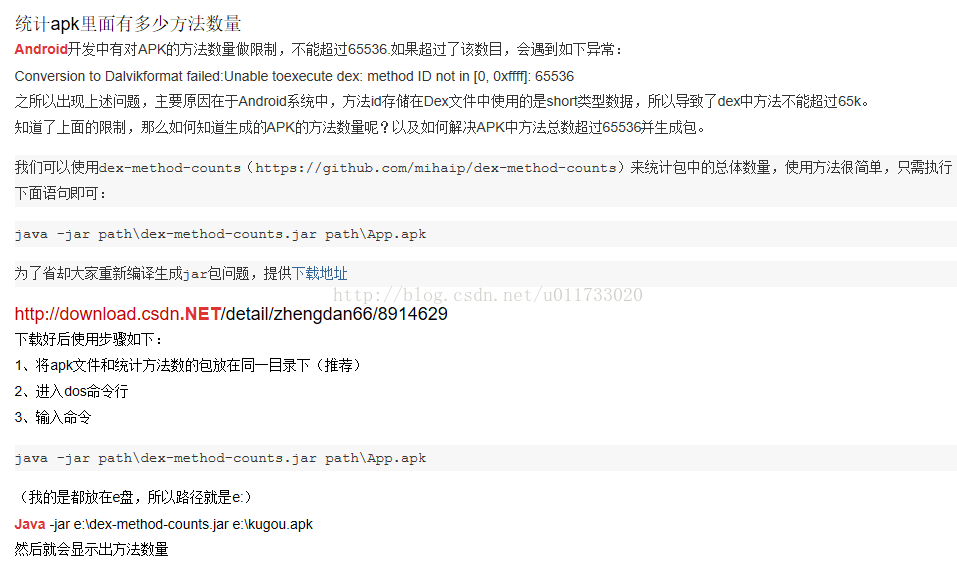


 5932
5932

 被折叠的 条评论
为什么被折叠?
被折叠的 条评论
为什么被折叠?
 到【灌水乐园】发言


