


(一)自定义View的分类点击打开链接
(二)自定义View的构造方法及自定义属性点击打开链接点击打开链接
(三)自定义View的常用方法(测量、绘制、位置)参见本文
(四)自定义View的具体实现
(五)事件分发机制
方法名 作用
onDraw 绘制View
onMeasure 测量View(子View)大小
onSizeChanged 确定View大小
onLayout 确定子View布局
一、测量View大小—— onMeasure
自定义View时,我们使用onMeasure方法来测量View本身或子View的大小。我们通常会在xml文件中指定View的长和宽,或者在代码中动态的设置View的长和宽,onMeasure测量的就是这些值。
既然View的长和宽已经在用户使用时通过xml或代码指定了,那么onMeasure还有什么意义呢?
在onMeasure方法中,我们获取到控件长和宽的测量模式和测量值,并根据具体情况对测量到的长宽值进行调整,最后使用 setMeasuredDimension(widthsize,heightsize)方法设置调整过的长和宽。
①测量View大小
    @Override
    protected void onMeasure(int widthMeasureSpec, int heightMeasureSpec) {
        int sizeWidth = MeasureSpec.getSize(widthMeasureSpec);// 获取布局文件中子控件的测量值
        int modeWidth = MeasureSpec.getMode(widthMeasureSpec);// 获取布局文件中子控件的测量模式

        int sizeHeight = MeasureSpec.getSize(heightMeasureSpec);
        int modeHeight = MeasureSpec.getMode(heightMeasureSpec);

        int width = modeWidth == MeasureSpec.EXACTLY ? sizeWidth : 10;
        int height = modeHeight == MeasureSpec.EXACTLY ? sizeHeight : 10;
        setMeasuredDimension(width, height);
    }
②测量子View大小——继承自ViewGroup的控件
    @Override
    protected void onMeasure(int widthMeasureSpec, int heightMeasureSpec) {
        for (int i = 0; i < getChildCount(); i++) {
            View child = getChildAt(i);// 获取每一个子view
            measureChild(child, widthMeasureSpec, heightMeasureSpec);// 测量子view的宽高
        }
        super.onMeasure(widthMeasureSpec, heightMeasureSpec);
    }
onMeasure方法传入两个int型的参数widthMeasureSpec和heightMeasureSpec,他们并不是View的长和宽,但通过他们可以获取长宽值和长宽的测量模式。
什么是测量模式?我们来看看源码是怎么讲的(\frameworks\base\core\java\android\view$ MeasureSpec.class)
         /**
         * Measure specification mode: The parent has not imposed any constraint
         * on the child. It can be whatever size it wants.
         */
        public static final int UNSPECIFIED = 0 << MODE_SHIFT;

        /**
         * Measure specification mode: The parent has determined an exact size
         * for the child. The child is going to be given those bounds regardless
         * of how big it wants to be.
         */
        public static final int EXACTLY     = 1 << MODE_SHIFT;

        /**
         * Measure specification mode: The child can be as large as it wants up
         * to the specified size.
         */
public static final int AT_MOST = 2 << MODE_SHIFT;UNSPECIFIED(未指定测量模式):
The parent has not imposed any constraint on the child. It can be whatever size it wants.
不受父控件约束,可以是任意大小。
实际运用中比较少用
EXACTLY(确定测量模式):
The parent has determined an exact size for the child. The child is going to be given those bounds regardless of how big it wants to be.
父控件确切的指定了子控件的大小。
当View的长度和宽度是确定值或者MATCH_PARENT时就是这个模式
AT_MOST(最大值测量模式):
The child can be as large as it wants up to the specified size.
在限制范围内(一般指父控件大小),可以是任意大小。
当View的长度和宽度是WRAP_CONTENT时就是这个模式
二、绘制View—— onDraw
   @Override
    protected void onDraw(Canvas canvas) {
        // TODO Auto-generated method stub
        super.onDraw(canvas);
    }
在onDraw方法中,我们完成自定义View的绘制,主要使用到Canvas类和Paint类
这里只给出简单的例子,以后将出专题讲解自定义View的绘制
View 更新
在onDraw方法中我们完成View的绘制,有的时候为了更新View比如添加动画效果,我们可以重绘View。
重绘View自身有两种方法。
invalidate() :用来简单重绘View。例如更新其文本,色彩或触摸交互性。View将只调用onDraw()方法再次更新其状态。
requestLayout():将会从onMeasure()开始更新View。这意味着你的View更新后,它改变它的大小,你需要再次测量它,并依赖于新的大小来重新绘制。
 @Override
    protected void onSizeChanged(int w, int h, int oldw, int oldh) {
        // TODO Auto-generated method stub
        super.onSizeChanged(w, h, oldw, oldh);
    }
我们先看看源码里怎么描述这个方法:
/**
     * This is called during layout when the size of this view has changed. If
     * you were just added to the view hierarchy, you're called with the old
     * values of 0.
     *
     * @param w Current width of this view.
     * @param h Current height of this view.
     * @param oldw Old width of this view.
     * @param oldh Old height of this view.
     */
    protected void onSizeChanged(int w, int h, int oldw, int oldh) {
}在布局过程中,如果View的大小改变了这个方法就会被调用。如果这个View刚刚被添加到视图层,那么oldw和oldh这两个值为零。
其中 w、h表示控件当前长和宽,oldw和oldh表示原来的长和宽
四、确定子View布局—— onLayout
onLayout方法是继承ViewGroup必须实现的方法,在这个方法中,我们依次取出每一个子控件,然后调用layout方法将它放置到我们所期待的位置
     protected void onLayout(boolean changed, int l, int t, int r, int b) {
             int childCount = getChildCount();
             View child = null;
             for (int i = 0; i < childCount; i++) {
                    ……
                 child = getChildAt(i);
                 child.layout(child_l,child_t,child_r,child_b);
             }
}我们重点来看child.layout(child_l,child_t,child_r,child_b);
child_l:View左侧到父View左侧的长度
child_t:View上侧到父View上侧的长度
child_r:View右侧到父View右侧的长度
child_b:View下侧到父View下侧的长度
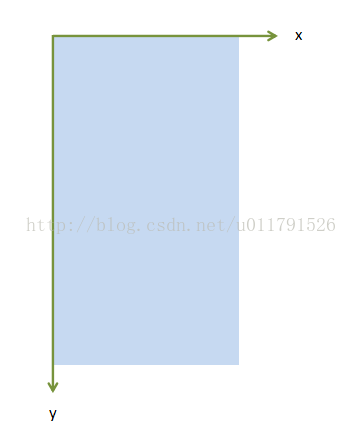
下面补充关于安卓坐标系的相关知识
安卓系统的坐标系有别于数学上的坐标系
下图中蓝色区域为手机屏幕
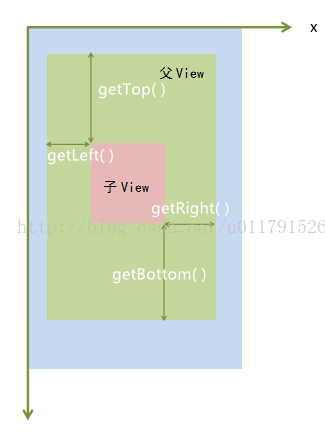
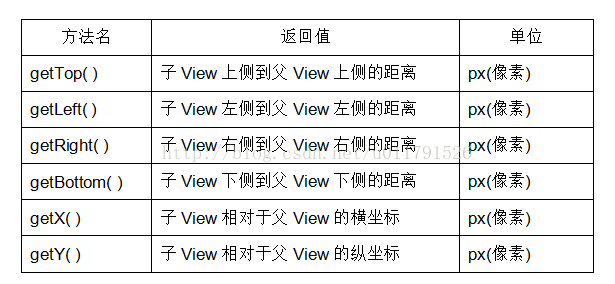
通常我们想要获取一个view的位置信息时会调用如下方法
getLeft():View左侧到父View左侧的距离
getTop():View上侧到父View上侧的距离
getRight():View右侧到父View右侧的距离
getBottom():View下侧到父View下侧的距离
一定要注意,这四个方法获取到的位置信息是相对于当前View的父View而言的,而不是相对于屏幕而言的
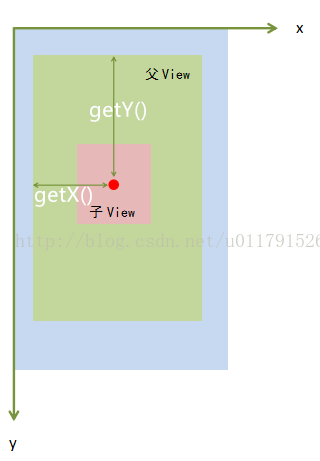
另外,还有两个方法我们也经常用到
getX( ):View相对于父View的横坐标
getY( ):View相对于子View的纵坐标
                Button button = (Button)findViewById(R.id.button);
		button.getTop();
		button.getLeft();
		button.getRight();
		button.getBottom();
		button.getX();
		button.getY();
除了View类提供的上述这些方法,MotionEvent类同样提供了获取位置信息的方法
    @Override
    public boolean onTouchEvent(MotionEvent event) {
        int action = event.getAction();
        switch (action) {
            case MotionEvent.ACTION_DOWN:
                float x = event.getX();
                float y = event.getY();
                float rawx = event.getRawX();
                float rawy = event.getRawY();
                break;
            case MotionEvent.ACTION_MOVE:
                break;

        }
        return false;
    }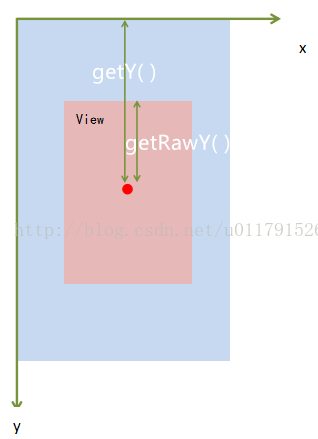
getX();触碰点相对于组件的x坐标
getY();触碰点相对于组件的y坐标
getRawX();触碰点相对于屏幕的x坐标
getRawY();触碰点相对于屏幕的y坐标
到这里,自定义View常用的几个方法已经总结完了,最后给出一个生命周期图,对于了解这几个方法有很大的帮助


 1万+
1万+


 被折叠的 条评论
为什么被折叠?
被折叠的 条评论
为什么被折叠?
 到【灌水乐园】发言


