


上一篇ndroid6.0系统启动流程分析一:init进程博客我们分析了init进程,主要分析了init.rc的解析过程和command的执行流程。我们说Init.rc中配置的service都是在init.rc中的action中使用start命令启动的,start命令对应的处理函数是do_start。我们也分析了这个函数。那么这一节,我们分析zygote进程,zygote进程在init.rc中也被配置为一个服务,那么它是不是使用start命令来启动的呢?我在Init.rc中搜索发现并没有,难道我错了?
zygote进程的启动
看下zygote在rc文件中的定义:
service zygote /system/bin/app_process -Xzygote /system/bin --zygote --start-system-server
    class main
    socket zygote stream 660 root system
    onrestart write /sys/android_power/request_state wake
    onrestart write /sys/power/state on
    onrestart restart media
    onrestart restart netd
这个时候,大家不要忘了class main这行。我们在上片博客中不是说过class的作用吗?用于批量管理service。搜索main果然发现有如下语句:
on nonencrypted
    class_start main
    class_start late_start
on property:vold.decrypt=trigger_restart_min_framework
    class_start main

on property:vold.decrypt=trigger_restart_framework
    class_start main
    class_start late_start
但是发现有三个地方出现 class_start main,所以本菜就迷糊了,不知道是哪里启动的zygote,希望路过的大神能指点下迷津…
class_start 对应的处理方法是do_class_start,该方法定义在system\core\init\builtins.cpp中:
int do_class_start(int nargs, char **args)
{
        /* Starting a class does not start services
         * which are explicitly disabled.  They must
         * be started individually.
         */
    service_for_each_class(args[1], service_start_if_not_disabled);
    return 0;
}
调用service_for_each_class方法进一步处理:
void service_for_each_class(const char *classname,
                            void (*func)(struct service *svc))
{
    struct listnode *node;
    struct service *svc;
    list_for_each(node, &service_list) {
        svc = node_to_item(node, struct service, slist);
        if (!strcmp(svc->classname, classname)) {
            func(svc);
        }
    }
}
遍历service_list链表,没找到一个classname为main的service,就调用service_start_if_not_disabled来进一步处理,service_start_if_not_disabled方法如下:
static void service_start_if_not_disabled(struct service *svc)
{
    if (!(svc->flags & SVC_DISABLED)) {
        service_start(svc, NULL);
    } else {
        svc->flags |= SVC_DISABLED_START;
    }
}
可以看到最终还是调用了service_start方法来启动service,这个启动单个service一样了。这份函数我们在上节已经分析过了,这里就不再啰嗦了。
Zygote进程的native部分
zygote进程的可执行文件就是/system/bin/app_process,源码在\frameworks\base\cmds\app_process/app_main.cpp中。我们从它的main函数看起:
int main(int argc, char* const argv[])
{
    if (prctl(PR_SET_NO_NEW_PRIVS, 1, 0, 0, 0) < 0) {
        // Older kernels don't understand PR_SET_NO_NEW_PRIVS and return
        // EINVAL. Don't die on such kernels.
        if (errno != EINVAL) {
            LOG_ALWAYS_FATAL("PR_SET_NO_NEW_PRIVS failed: %s", strerror(errno));
            return 12;
        }
    }

    AppRuntime runtime(argv[0], computeArgBlockSize(argc, argv));
    // Process command line arguments
    // ignore argv[0]
    argc--;
    argv++;

    // Everything up to '--' or first non '-' arg goes to the vm.
    //
    // The first argument after the VM args is the "parent dir", which
    // is currently unused.
    //
    // After the parent dir, we expect one or more the following internal
    // arguments :
    //
    // --zygote : Start in zygote mode
    // --start-system-server : Start the system server.
    // --application : Start in application (stand alone, non zygote) mode.
    // --nice-name : The nice name for this process.
    //
    // For non zygote starts, these arguments will be followed by
    // the main class name. All remaining arguments are passed to
    // the main method of this class.
    //
    // For zygote starts, all remaining arguments are passed to the zygote.
    // main function.
    //
    // Note that we must copy argument string values since we will rewrite the
    // entire argument block when we apply the nice name to argv0.

    int i;
    for (i = 0; i < argc; i++) {
        if (argv[i][0] != '-') {
            break;
        }
        if (argv[i][1] == '-' && argv[i][2] == 0) {
            ++i; // Skip --.
            break;
        }
        runtime.addOption(strdup(argv[i]));
    }

    // Parse runtime arguments.  Stop at first unrecognized option.
    bool zygote = false;
    bool startSystemServer = false;
    bool application = false;
    String8 niceName;
    String8 className;

    ++i;  // Skip unused "parent dir" argument.
    while (i < argc) {
        const char* arg = argv[i++];
        if (strcmp(arg, "--zygote") == 0) {
            zygote = true;
            niceName = ZYGOTE_NICE_NAME;
        } else if (strcmp(arg, "--start-system-server") == 0) {
            startSystemServer = true;
        } else if (strcmp(arg, "--application") == 0) {
            application = true;
        } else if (strncmp(arg, "--nice-name=", 12) == 0) {
            niceName.setTo(arg + 12);
        } else if (strncmp(arg, "--", 2) != 0) {
            className.setTo(arg);
            break;
        } else {
            --i;
            break;
        }
    }

    Vector<String8> args;
    if (!className.isEmpty()) {
        // We're not in zygote mode, the only argument we need to pass
        // to RuntimeInit is the application argument.
        //
        // The Remainder of args get passed to startup class main(). Make
        // copies of them before we overwrite them with the process name.
        args.add(application ? String8("application") : String8("tool"));
        runtime.setClassNameAndArgs(className, argc - i, argv + i);
    } else {
        // We're in zygote mode.
        maybeCreateDalvikCache();

        if (startSystemServer) {
            args.add(String8("start-system-server"));
        }

        char prop[PROP_VALUE_MAX];
        if (property_get(ABI_LIST_PROPERTY, prop, NULL) == 0) {
            LOG_ALWAYS_FATAL("app_process: Unable to determine ABI list from property %s.",
                ABI_LIST_PROPERTY);
            return 11;
        }

        String8 abiFlag("--abi-list=");
        abiFlag.append(prop);
        args.add(abiFlag);

        // In zygote mode, pass all remaining arguments to the zygote
        // main() method.
        for (; i < argc; ++i) {
            args.add(String8(argv[i]));
        }
    }

    if (!niceName.isEmpty()) {
        runtime.setArgv0(niceName.string());
        set_process_name(niceName.string());
    }

    if (zygote) {
        runtime.start("com.android.internal.os.ZygoteInit", args, zygote);
    } else if (className) {
        runtime.start("com.android.internal.os.RuntimeInit", args, zygote);
    } else {
        fprintf(stderr, "Error: no class name or --zygote supplied.\n");
        app_usage();
        LOG_ALWAYS_FATAL("app_process: no class name or --zygote supplied.");
        return 10;
    }
}
因为zygote是在init进程中启动的,我们的启动它的时候传了一些参数上来,我们看看这些参数有什么:
在system/core/init/init.cpp中的service_start函数中,使用如下代码启动zygote。
            if (execve(svc->args[0], (char**) svc->args, (char**) ENV) < 0) {
                ERROR("cannot execve('%s'): %s\n", svc->args[0], strerror(errno));
            }
svc->args[0]=“/system/bin/app_process”,因为在.rc中就是这么配置的。svc->args=“/system/bin/app_process -Xzygote /system/bin –zygote –start-system-server”,因为svc->args的构造是在service的解析中完成的,具体过程可以参考 Android6.0系统启动流程分析一:init进程。
理清了参数,我们再来回到main函数。main函数主要做的事情有:
1. 构造一个AppRuntime实例。
2. 解析参数,通过解析参数,我们知道:
zygote = true;
startSystemServer = true;
application = false;
3. 调用AppRuntime的start方法。
前面没什么好说的,我们看看AppRuntime的start做了什么。
调用这个方法时,传入了如下参数:
参数一:”com.android.internal.os.ZygoteInit”
参数二:/system/bin/app_process -Xzygote /system/bin –zygote –start-system-server”
参数三:true
下面看看这个start方法:
/*
 * Start the Android runtime.  This involves starting the virtual machine
 * and calling the "static void main(String[] args)" method in the class
 * named by "className".
 *
 * Passes the main function two arguments, the class name and the specified
 * options string.
 */
void AndroidRuntime::start(const char* className, const Vector<String8>& options, bool zygote)
{
    ALOGD(">>>>>> START %s uid %d <<<<<<\n",
            className != NULL ? className : "(unknown)", getuid());

    static const String8 startSystemServer("start-system-server");

    /*
     * 'startSystemServer == true' means runtime is obsolete and not run from
     * init.rc anymore, so we print out the boot start event here.
     */
    for (size_t i = 0; i < options.size(); ++i) {
        if (options[i] == startSystemServer) {
           /* track our progress through the boot sequence */
           const int LOG_BOOT_PROGRESS_START = 3000;
           LOG_EVENT_LONG(LOG_BOOT_PROGRESS_START,  ns2ms(systemTime(SYSTEM_TIME_MONOTONIC)));
        }
    }

    const char* rootDir = getenv("ANDROID_ROOT");
    if (rootDir == NULL) {
        rootDir = "/system";
        if (!hasDir("/system")) {
            LOG_FATAL("No root directory specified, and /android does not exist.");
            return;
        }
        setenv("ANDROID_ROOT", rootDir, 1);
    }

    //const char* kernelHack = getenv("LD_ASSUME_KERNEL");
    //ALOGD("Found LD_ASSUME_KERNEL='%s'\n", kernelHack);

    /* start the virtual machine */
    JniInvocation jni_invocation;
    jni_invocation.Init(NULL);
    JNIEnv* env;
    if (startVm(&mJavaVM, &env, zygote) != 0) {
        return;
    }
    onVmCreated(env);

    /*
     * Register android functions.
     */
    if (startReg(env) < 0) {
        ALOGE("Unable to register all android natives\n");
        return;
    }

    /*
     * We want to call main() with a String array with arguments in it.
     * At present we have two arguments, the class name and an option string.
     * Create an array to hold them.
     */
    jclass stringClass;
    jobjectArray strArray;
    jstring classNameStr;

    stringClass = env->FindClass("java/lang/String");
    assert(stringClass != NULL);
    strArray = env->NewObjectArray(options.size() + 1, stringClass, NULL);
    assert(strArray != NULL);
    classNameStr = env->NewStringUTF(className);
    assert(classNameStr != NULL);
    env->SetObjectArrayElement(strArray, 0, classNameStr);

    for (size_t i = 0; i < options.size(); ++i) {
        jstring optionsStr = env->NewStringUTF(options.itemAt(i).string());
        assert(optionsStr != NULL);
        env->SetObjectArrayElement(strArray, i + 1, optionsStr);
    }

    /*
     * Start VM.  This thread becomes the main thread of the VM, and will
     * not return until the VM exits.
     */
    char* slashClassName = toSlashClassName(className);
    jclass startClass = env->FindClass(slashClassName);
    if (startClass == NULL) {
        ALOGE("JavaVM unable to locate class '%s'\n", slashClassName);
        /* keep going */
    } else {
        jmethodID startMeth = env->GetStaticMethodID(startClass, "main",
            "([Ljava/lang/String;)V");
        if (startMeth == NULL) {
            ALOGE("JavaVM unable to find main() in '%s'\n", className);
            /* keep going */
        } else {
            env->CallStaticVoidMethod(startClass, startMeth, strArray);

#if 0
            if (env->ExceptionCheck())
                threadExitUncaughtException(env);
#endif
        }
    }
    free(slashClassName);

    ALOGD("Shutting down VM\n");
    if (mJavaVM->DetachCurrentThread() != JNI_OK)
        ALOGW("Warning: unable to detach main thread\n");
    if (mJavaVM->DestroyJavaVM() != 0)
        ALOGW("Warning: VM did not shut down cleanly\n");
}
这份函数作如下事情:
1. 启动java虚拟机。对虚拟机感兴趣的,这里或许是一个重要的突破口。我对虚拟机了解不多,这里就不展开了。
2. 注册本地方法。注册本地方式调用startReg方法,这个方法可以看一看:
/*static*/ int AndroidRuntime::startReg(JNIEnv* env)
{
    /*
     * This hook causes all future threads created in this process to be
     * attached to the JavaVM.  (This needs to go away in favor of JNI
     * Attach calls.)
     */
    androidSetCreateThreadFunc((android_create_thread_fn) javaCreateThreadEtc);

    ALOGV("--- registering native functions ---\n");

    /*
     * Every "register" function calls one or more things that return
     * a local reference (e.g. FindClass).  Because we haven't really
     * started the VM yet, they're all getting stored in the base frame
     * and never released.  Use Push/Pop to manage the storage.
     */
    env->PushLocalFrame(200);

    if (register_jni_procs(gRegJNI, NELEM(gRegJNI), env) < 0) {
        env->PopLocalFrame(NULL);
        return -1;
    }
    env->PopLocalFrame(NULL);

    //createJavaThread("fubar", quickTest, (void*) "hello");

    return 0;
}
这个方法中,使用register_jni_procs方法完成注册,该方法如下:
static int register_jni_procs(const RegJNIRec array[], size_t count, JNIEnv* env)
{
    for (size_t i = 0; i < count; i++) {
        if (array[i].mProc(env) < 0) {
#ifndef NDEBUG
            ALOGD("----------!!! %s failed to load\n", array[i].mName);
#endif
            return -1;
        }
    }
    return 0;
}
这个方法传入的一个数组作为参数,这个方法的作用就是遍历这个数组,调用这个数组的mProc方法。这个数组就是gRegJNI:
static const RegJNIRec gRegJNI[] = {
    REG_JNI(register_com_android_internal_os_RuntimeInit),
    REG_JNI(register_android_os_SystemClock),
    REG_JNI(register_android_util_EventLog),
    REG_JNI(register_android_util_Log),
    REG_JNI(register_android_content_AssetManager),
    REG_JNI(register_android_content_StringBlock),
    REG_JNI(register_android_content_XmlBlock),
    REG_JNI(register_android_emoji_EmojiFactory),
     ...
};
也就是说这个方法会调用上述数组中的每一项REG_JNI中声明的函数来实现各个模块的jni函数的注册的。
回到start方法,接下来就是用jni规范,从c++中调用java中的静态方法了,这个方法就是ZygoteInit中的main方法。
Zygote进程的java部分
现在代码从c++转入到java部分了,我们来看ZygoteInit中的main方法:
 public static void main(String argv[]) {
        try {
            RuntimeInit.enableDdms();
            // Start profiling the zygote initialization.
            SamplingProfilerIntegration.start();

            boolean startSystemServer = false;
            String socketName = "zygote";
            String abiList = null;
            for (int i = 1; i < argv.length; i++) {
                if ("start-system-server".equals(argv[i])) {
                    startSystemServer = true;
                } else if (argv[i].startsWith(ABI_LIST_ARG)) {
                    abiList = argv[i].substring(ABI_LIST_ARG.length());
                } else if (argv[i].startsWith(SOCKET_NAME_ARG)) {
                    socketName = argv[i].substring(SOCKET_NAME_ARG.length());
                } else {
                    throw new RuntimeException("Unknown command line argument: " + argv[i]);
                }
            }

            if (abiList == null) {
                throw new RuntimeException("No ABI list supplied.");
            }

            registerZygoteSocket(socketName);
            EventLog.writeEvent(LOG_BOOT_PROGRESS_PRELOAD_START,
                SystemClock.uptimeMillis());
            preload();
            EventLog.writeEvent(LOG_BOOT_PROGRESS_PRELOAD_END,
                SystemClock.uptimeMillis());

            // Finish profiling the zygote initialization.
            SamplingProfilerIntegration.writeZygoteSnapshot();

            // Do an initial gc to clean up after startup
            gcAndFinalize();

            // Disable tracing so that forked processes do not inherit stale tracing tags from
            // Zygote.
            Trace.setTracingEnabled(false);

            if (startSystemServer) {
                startSystemServer(abiList, socketName);
            }

            Log.i(TAG, "Accepting command socket connections");
            runSelectLoop(abiList);

            closeServerSocket();
        } catch (MethodAndArgsCaller caller) {
            caller.run();
        } catch (RuntimeException ex) {
            Log.e(TAG, "Zygote died with exception", ex);
            closeServerSocket();
            throw ex;
        }
    }
这个方法做了如下事情:
1. 注册Zytote套接字。这个套接字是在system/core/init/init.cpp中的service_start方法中创建的,不清楚的请看上一篇博客。service_start方法创建完套接字以后会发布这个套接字,使用publish_socket方法。这个方法也是定义在system/core/init/init.cpp中:
static void publish_socket(const char *name, int fd)
{
    char key[64] = ANDROID_SOCKET_ENV_PREFIX;
    char val[64];

    strlcpy(key + sizeof(ANDROID_SOCKET_ENV_PREFIX) - 1,
            name,
            sizeof(key) - sizeof(ANDROID_SOCKET_ENV_PREFIX));
    snprintf(val, sizeof(val), "%d", fd);
    add_environment(key, val);

    /* make sure we don't close-on-exec */
    fcntl(fd, F_SETFD, 0);
}
这里主要使用add_environment方法把这个套接字添加到环境变量中,添加的结果是一对键值对:(ANDROID_SOCKET_zygote,fd)。那么我们在这里是不是就可以从环境变量中获取呢?
看看registerZygoteSocket方法:
    private static void registerZygoteSocket(String socketName) {
        if (sServerSocket == null) {
            int fileDesc;
            final String fullSocketName = ANDROID_SOCKET_PREFIX + socketName;
            try {
                String env = System.getenv(fullSocketName);
                fileDesc = Integer.parseInt(env);
            } catch (RuntimeException ex) {
                throw new RuntimeException(fullSocketName + " unset or invalid", ex);
            }

            try {
                FileDescriptor fd = new FileDescriptor();
                fd.setInt$(fileDesc);
                sServerSocket = new LocalServerSocket(fd);
            } catch (IOException ex) {
                throw new RuntimeException(
                        "Error binding to local socket '" + fileDesc + "'", ex);
            }
        }
    }
果不其然吧,就是通过System.getenv方法获取到我们在service_start方法中创建的套接字,然后对其进一步封装。并把封装的结果保存在sServerSocket 变量中。
第一件事情就做完了,回到main方法。
2.初始化gc:gcAndFinalize();
3.启动SystemServer。
SystemServer是Android系统非常和核心的服务,它会在创建后启动系统中的其他服务,然后成为所有服务的管理者,向应用程序和其他服务提供服务。这一部分我们放在下一节来分析。
4.进入监听状态:runSelectLoop
Zygote监听套接字
  private static void runSelectLoop(String abiList) throws MethodAndArgsCaller {
        ArrayList<FileDescriptor> fds = new ArrayList<FileDescriptor>();
        ArrayList<ZygoteConnection> peers = new ArrayList<ZygoteConnection>();

        fds.add(sServerSocket.getFileDescriptor());
        peers.add(null);

        while (true) {
            StructPollfd[] pollFds = new StructPollfd[fds.size()];
            for (int i = 0; i < pollFds.length; ++i) {
                pollFds[i] = new StructPollfd();
                pollFds[i].fd = fds.get(i);
                pollFds[i].events = (short) POLLIN;
            }
            try {
                Os.poll(pollFds, -1);
            } catch (ErrnoException ex) {
                throw new RuntimeException("poll failed", ex);
            }
            for (int i = pollFds.length - 1; i >= 0; --i) {
                if ((pollFds[i].revents & POLLIN) == 0) {
                    continue;
                }
                if (i == 0) {
                    ZygoteConnection newPeer = acceptCommandPeer(abiList);
                    peers.add(newPeer);
                    fds.add(newPeer.getFileDesciptor());
                } else {
                    boolean done = peers.get(i).runOnce();
                    if (done) {
                        peers.remove(i);
                        fds.remove(i);
                    }
                }
            }
        }
    }
这个方法开始进入zygote套接字的监听状态了。当zygote套接字接受到写入操作,Zygote进程唤醒,执行ZygoteConnection的runOnce方法。
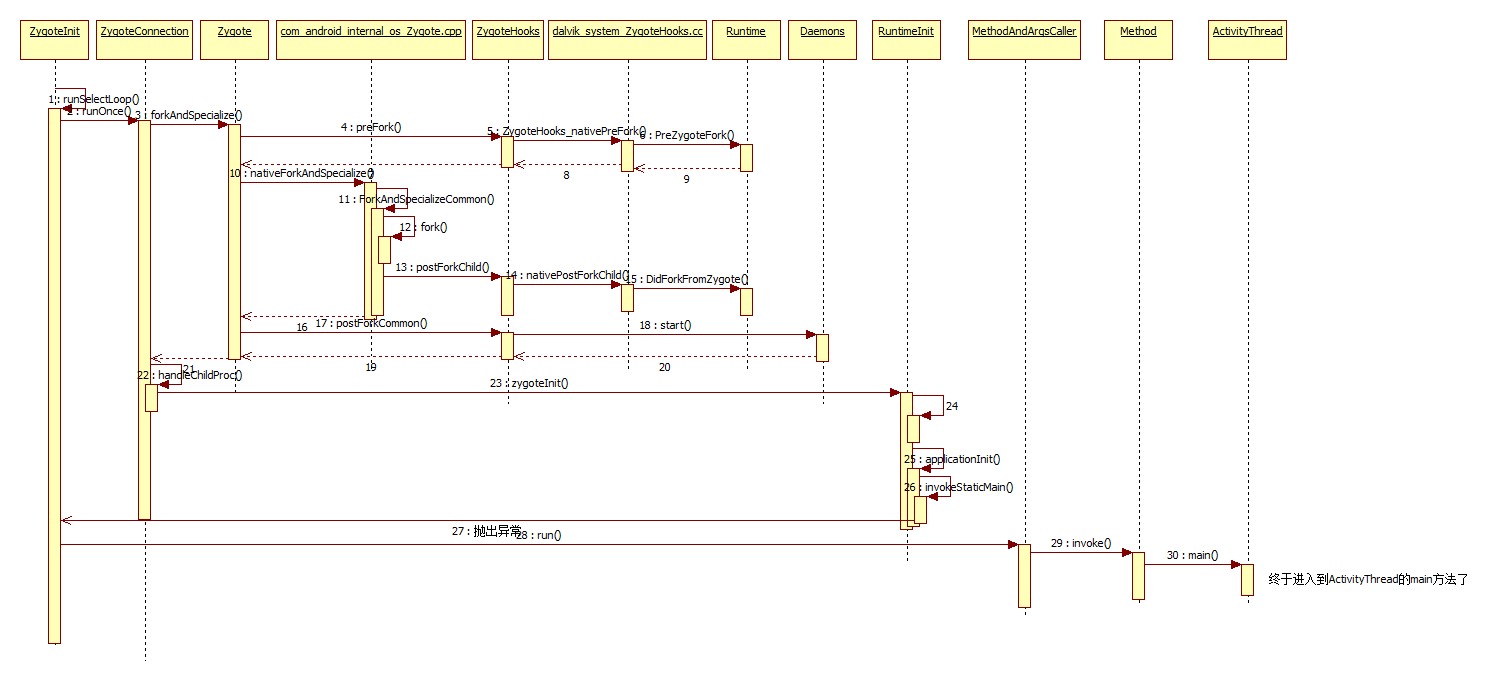
我们知道Zygote俗称“受精卵”,它是所有java进程的祖先进程。这里的runOnce便是创建进程的开端了。虽然暂时不知道上层在什么情况下,如何向zytoge套接字写入数据,从而开启进程创建的,但是没有关系,我们依然可以顺着代码的思路,看看从runOnce开始,是如何创建出一个进程的。
Zygote创建子进程的过程
runOnce方法如下:
  /**
     * Reads one start command from the command socket. If successful,
     * a child is forked and a {@link ZygoteInit.MethodAndArgsCaller}
     * exception is thrown in that child while in the parent process,
     * the method returns normally. On failure, the child is not
     * spawned and messages are printed to the log and stderr. Returns
     * a boolean status value indicating whether an end-of-file on the command
     * socket has been encountered.
     *
     * @return false if command socket should continue to be read from, or
     * true if an end-of-file has been encountered.
     * @throws ZygoteInit.MethodAndArgsCaller trampoline to invoke main()
     * method in child process
     */
    boolean runOnce() throws ZygoteInit.MethodAndArgsCaller {

        String args[];
        Arguments parsedArgs = null;
        FileDescriptor[] descriptors;

        try {
            args = readArgumentList();
            descriptors = mSocket.getAncillaryFileDescriptors();
        } catch (IOException ex) {
            Log.w(TAG, "IOException on command socket " + ex.getMessage());
            closeSocket();
            return true;
        }

        if (args == null) {
            // EOF reached.
            closeSocket();
            return true;
        }

        /** the stderr of the most recent request, if avail */
        PrintStream newStderr = null;

        if (descriptors != null && descriptors.length >= 3) {
            newStderr = new PrintStream(
                    new FileOutputStream(descriptors[2]));
        }

        int pid = -1;
        FileDescriptor childPipeFd = null;
        FileDescriptor serverPipeFd = null;

        try {
            parsedArgs = new Arguments(args);

            if (parsedArgs.abiListQuery) {
                return handleAbiListQuery();
            }

            if (parsedArgs.permittedCapabilities != 0 || parsedArgs.effectiveCapabilities != 0) {
                throw new ZygoteSecurityException("Client may not specify capabilities: " +
                        "permitted=0x" + Long.toHexString(parsedArgs.permittedCapabilities) +
                        ", effective=0x" + Long.toHexString(parsedArgs.effectiveCapabilities));
            }

            applyUidSecurityPolicy(parsedArgs, peer);
            applyInvokeWithSecurityPolicy(parsedArgs, peer);

            applyDebuggerSystemProperty(parsedArgs);
            applyInvokeWithSystemProperty(parsedArgs);

            int[][] rlimits = null;

            if (parsedArgs.rlimits != null) {
                rlimits = parsedArgs.rlimits.toArray(intArray2d);
            }

            if (parsedArgs.invokeWith != null) {
                FileDescriptor[] pipeFds = Os.pipe2(O_CLOEXEC);
                childPipeFd = pipeFds[1];
                serverPipeFd = pipeFds[0];
                Os.fcntlInt(childPipeFd, F_SETFD, 0);
            }

            /**
             * In order to avoid leaking descriptors to the Zygote child,
             * the native code must close the two Zygote socket descriptors
             * in the child process before it switches from Zygote-root to
             * the UID and privileges of the application being launched.
             *
             * In order to avoid "bad file descriptor" errors when the
             * two LocalSocket objects are closed, the Posix file
             * descriptors are released via a dup2() call which closes
             * the socket and substitutes an open descriptor to /dev/null.
             */

            int [] fdsToClose = { -1, -1 };

            FileDescriptor fd = mSocket.getFileDescriptor();

            if (fd != null) {
                fdsToClose[0] = fd.getInt$();
            }

            fd = ZygoteInit.getServerSocketFileDescriptor();

            if (fd != null) {
                fdsToClose[1] = fd.getInt$();
            }

            fd = null;

            pid = Zygote.forkAndSpecialize(parsedArgs.uid, parsedArgs.gid, parsedArgs.gids,
                    parsedArgs.debugFlags, rlimits, parsedArgs.mountExternal, parsedArgs.seInfo,
                    parsedArgs.niceName, fdsToClose, parsedArgs.instructionSet,
                    parsedArgs.appDataDir);
        } catch (ErrnoException ex) {
            logAndPrintError(newStderr, "Exception creating pipe", ex);
        } catch (IllegalArgumentException ex) {
            logAndPrintError(newStderr, "Invalid zygote arguments", ex);
        } catch (ZygoteSecurityException ex) {
            logAndPrintError(newStderr,
                    "Zygote security policy prevents request: ", ex);
        }

        try {
            if (pid == 0) {
                // in child
                IoUtils.closeQuietly(serverPipeFd);
                serverPipeFd = null;
                handleChildProc(parsedArgs, descriptors, childPipeFd, newStderr);

                // should never get here, the child is expected to either
                // throw ZygoteInit.MethodAndArgsCaller or exec().
                return true;
            } else {
                // in parent...pid of < 0 means failure
                IoUtils.closeQuietly(childPipeFd);
                childPipeFd = null;
                return handleParentProc(pid, descriptors, serverPipeFd, parsedArgs);
            }
        } finally {
            IoUtils.closeQuietly(childPipeFd);
            IoUtils.closeQuietly(serverPipeFd);
        }
    }
这个方法比较长,我们先看看它的注释,大概意思如下:
这个方法会从socket中读取一个命令,成功的话就会创建一个子进程出来,并且会抛出一个异常:ZygoteInit.MethodAndArgsCaller 。
也就是说即使创建成功了也会抛出异常,然后会在Zygote的main方法中接受检测到异常,进而调用caller.run()方法作进一步处理。
整个过程有很多地方看不懂,这里主要梳理的是整个流程。大神请绕道…
下面对这个过程做简要分析。
runOnce方法主要调用了 Zygote.forkAndSpecialize方法进一步处理,这个方法执行完成以后 ,子进程就已经创建好了,这个时候pid=0也就是在子进程中执行,在执行handleChildProc时,子进程会抛出异常,异常被捕获后执行MethodAndArgsCaller类中的run方法被执行,这个方法最终会调用到ActivityThread的main方法。这个过程是在子进程中实现的。pid!=0就意味着后面的代码是在Zygote进程中执行,这个时候执行的handleParentProc方法,这个方法会做一些清理工作(从注释了解到的,具体code没能理解)。
接下来看看forkAndSpecialize方法,这个方法定义下Zygote类中,看看它怎么一步步创建子进程的。
    public static int forkAndSpecialize(int uid, int gid, int[] gids, int debugFlags,
          int[][] rlimits, int mountExternal, String seInfo, String niceName, int[] fdsToClose,
          String instructionSet, String appDataDir) {
        VM_HOOKS.preFork();
        int pid = nativeForkAndSpecialize(
                  uid, gid, gids, debugFlags, rlimits, mountExternal, seInfo, niceName, fdsToClose,
                  instructionSet, appDataDir);
        // Enable tracing as soon as possible for the child process.
        if (pid == 0) {
            Trace.setTracingEnabled(true);

            // Note that this event ends at the end of handleChildProc,
            Trace.traceBegin(Trace.TRACE_TAG_ACTIVITY_MANAGER, "PostFork");
        }
        VM_HOOKS.postForkCommon();
        return pid;
    }
三件事情:
1. VM_HOOKS.preFork(),做准备工作。
2. nativeForkAndSpecialize,创建子进程
3. VM_HOOKS.postForkCommon();启动Zygote的4个Daemon线程,java堆整理,引用队列,以及析构线程。
step 1
首先看看preFork方法,这个方法定义在libcore\dalvik\src\main\java\dalvik\system\ZygoteHooks类中。
    public void preFork() {
        Daemons.stop();
        waitUntilAllThreadsStopped();
        token = nativePreFork();
    }
Daemons.stop():
    public static void stop() {
        HeapTaskDaemon.INSTANCE.stop();
        ReferenceQueueDaemon.INSTANCE.stop();
        FinalizerDaemon.INSTANCE.stop();
        FinalizerWatchdogDaemon.INSTANCE.stop();
    }
停止四个线程:Daemon线程,java堆整理,引用队列,析构线程
也就是创建子进程的时候,不能有这几个线程搅和。
waitUntilAllThreadsStopped:
    private static void waitUntilAllThreadsStopped() {
        File tasks = new File("/proc/self/task");
        // All Java daemons are stopped already. We're just waiting for their OS counterparts to
        // finish as well. This shouldn't take much time so spinning is ok here.
        while (tasks.list().length > 1) {
          Thread.yield();
        }
    }
}
当/proc/self/task文件中记录的线程数大于1,就不断的让出cpu,直到只剩下一个线程。
nativePreFork:
这个方法定义在art\runtime\native\dalvik_system_ZygoteHooks.cc中:
static jlong ZygoteHooks_nativePreFork(JNIEnv* env, jclass) {
  Runtime* runtime = Runtime::Current();
  CHECK(runtime->IsZygote()) << "runtime instance not started with -Xzygote";

  runtime->PreZygoteFork();

  if (Trace::GetMethodTracingMode() != TracingMode::kTracingInactive) {
    // Tracing active, pause it.
    Trace::Pause();
  }

  // Grab thread before fork potentially makes Thread::pthread_key_self_ unusable.
  return reinterpret_cast<jlong>(ThreadForEnv(env));
}
调用PreZygoteFork方法,这个方法定义在art\runtime\runtime.cc中:
void Runtime::PreZygoteFork() {
  heap_->PreZygoteFork();
}
这个函数用来初始化堆。
step 2
nativeForkAndSpecialize方法定义在frameworks\base\core\jni\com_android_internal_os_Zygote.cpp中:
static jint com_android_internal_os_Zygote_nativeForkAndSpecialize(
        JNIEnv* env, jclass, jint uid, jint gid, jintArray gids,
        jint debug_flags, jobjectArray rlimits,
        jint mount_external, jstring se_info, jstring se_name,
        jintArray fdsToClose, jstring instructionSet, jstring appDataDir) {
    // Grant CAP_WAKE_ALARM to the Bluetooth process.
    jlong capabilities = 0;
    if (uid == AID_BLUETOOTH) {
        capabilities |= (1LL << CAP_WAKE_ALARM);
    }

    return ForkAndSpecializeCommon(env, uid, gid, gids, debug_flags,
            rlimits, capabilities, capabilities, mount_external, se_info,
            se_name, false, fdsToClose, instructionSet, appDataDir);
}
调用ForkAndSpecializeCommon方法进一步处理:
// Utility routine to fork zygote and specialize the child process.
static pid_t ForkAndSpecializeCommon(JNIEnv* env, uid_t uid, gid_t gid, jintArray javaGids,
                                     jint debug_flags, jobjectArray javaRlimits,
                                     jlong permittedCapabilities, jlong effectiveCapabilities,
                                     jint mount_external,
                                     jstring java_se_info, jstring java_se_name,
                                     bool is_system_server, jintArray fdsToClose,
                                     jstring instructionSet, jstring dataDir) {
  SetSigChldHandler();

  pid_t pid = fork();

  if (pid == 0) {
    // The child process.
    gMallocLeakZygoteChild = 1;

    // Clean up any descriptors which must be closed immediately
    DetachDescriptors(env, fdsToClose);

    // Keep capabilities across UID change, unless we're staying root.
    if (uid != 0) {
      EnableKeepCapabilities(env);
    }

    DropCapabilitiesBoundingSet(env);

    bool use_native_bridge = !is_system_server && (instructionSet != NULL)
        && android::NativeBridgeAvailable();
    if (use_native_bridge) {
      ScopedUtfChars isa_string(env, instructionSet);
      use_native_bridge = android::NeedsNativeBridge(isa_string.c_str());
    }
    if (use_native_bridge && dataDir == NULL) {
      // dataDir should never be null if we need to use a native bridge.
      // In general, dataDir will never be null for normal applications. It can only happen in
      // special cases (for isolated processes which are not associated with any app). These are
      // launched by the framework and should not be emulated anyway.
      use_native_bridge = false;
      ALOGW("Native bridge will not be used because dataDir == NULL.");
    }

    if (!MountEmulatedStorage(uid, mount_external, use_native_bridge)) {
      ALOGW("Failed to mount emulated storage: %s", strerror(errno));
      if (errno == ENOTCONN || errno == EROFS) {
        // When device is actively encrypting, we get ENOTCONN here
        // since FUSE was mounted before the framework restarted.
        // When encrypted device is booting, we get EROFS since
        // FUSE hasn't been created yet by init.
        // In either case, continue without external storage.
      } else {
        ALOGE("Cannot continue without emulated storage");
        RuntimeAbort(env);
      }
    }

    if (!is_system_server) {
        int rc = createProcessGroup(uid, getpid());
        if (rc != 0) {
            if (rc == -EROFS) {
                ALOGW("createProcessGroup failed, kernel missing CONFIG_CGROUP_CPUACCT?");
            } else {
                ALOGE("createProcessGroup(%d, %d) failed: %s", uid, pid, strerror(-rc));
            }
        }
    }

    SetGids(env, javaGids);

    SetRLimits(env, javaRlimits);

    if (use_native_bridge) {
      ScopedUtfChars isa_string(env, instructionSet);
      ScopedUtfChars data_dir(env, dataDir);
      android::PreInitializeNativeBridge(data_dir.c_str(), isa_string.c_str());
    }

    int rc = setresgid(gid, gid, gid);
    if (rc == -1) {
      ALOGE("setresgid(%d) failed: %s", gid, strerror(errno));
      RuntimeAbort(env);
    }

    rc = setresuid(uid, uid, uid);
    if (rc == -1) {
      ALOGE("setresuid(%d) failed: %s", uid, strerror(errno));
      RuntimeAbort(env);
    }

    if (NeedsNoRandomizeWorkaround()) {
        // Work around ARM kernel ASLR lossage (http://b/5817320).
        int old_personality = personality(0xffffffff);
        int new_personality = personality(old_personality | ADDR_NO_RANDOMIZE);
        if (new_personality == -1) {
            ALOGW("personality(%d) failed: %s", new_personality, strerror(errno));
        }
    }

    SetCapabilities(env, permittedCapabilities, effectiveCapabilities);

    SetSchedulerPolicy(env);

    const char* se_info_c_str = NULL;
    ScopedUtfChars* se_info = NULL;
    if (java_se_info != NULL) {
        se_info = new ScopedUtfChars(env, java_se_info);
        se_info_c_str = se_info->c_str();
        if (se_info_c_str == NULL) {
          ALOGE("se_info_c_str == NULL");
          RuntimeAbort(env);
        }
    }
    const char* se_name_c_str = NULL;
    ScopedUtfChars* se_name = NULL;
    if (java_se_name != NULL) {
        se_name = new ScopedUtfChars(env, java_se_name);
        se_name_c_str = se_name->c_str();
        if (se_name_c_str == NULL) {
          ALOGE("se_name_c_str == NULL");
          RuntimeAbort(env);
        }
    }
    rc = selinux_android_setcontext(uid, is_system_server, se_info_c_str, se_name_c_str);
    if (rc == -1) {
      ALOGE("selinux_android_setcontext(%d, %d, \"%s\", \"%s\") failed", uid,
            is_system_server, se_info_c_str, se_name_c_str);
      RuntimeAbort(env);
    }

    // Make it easier to debug audit logs by setting the main thread's name to the
    // nice name rather than "app_process".
    if (se_info_c_str == NULL && is_system_server) {
      se_name_c_str = "system_server";
    }
    if (se_info_c_str != NULL) {
      SetThreadName(se_name_c_str);
    }

    delete se_info;
    delete se_name;

    UnsetSigChldHandler();

    env->CallStaticVoidMethod(gZygoteClass, gCallPostForkChildHooks, debug_flags,
                              is_system_server ? NULL : instructionSet);
    if (env->ExceptionCheck()) {
      ALOGE("Error calling post fork hooks.");
      RuntimeAbort(env);
    }
  } else if (pid > 0) {
    // the parent process
  }
  return pid;
}
这个方法出现了我们非常熟悉的fork方法,然后在子进程中调用Zygote类中的callPostForkChildHooks方法:
    private static void callPostForkChildHooks(int debugFlags, String instructionSet) {
        VM_HOOKS.postForkChild(debugFlags, instructionSet);
    }
这里就不进一步追踪下去了,总之ForkAndSpecializeCommon方法调用fork系统调用创建了子进程,在进程中做了些初始化工作,然后返回了pid。这里会返回两次,子进程返回一次,父进程返回一次。
step 3
返回到nativeForkAndSpecialize方法后进一步返回,最终回到Zygote类的forkAndSpecialize方法,这个方法接下来会调用postForkCommon方法。postForkCommon方法定义在libcore\dalvik\src\main\java\dalvik\system\ZygoteHooks类中:
    /**
     * Called by the zygote in both the parent and child processes after
     * every fork. In the child process, this method is called after
     * {@code postForkChild}.
     */
    public void postForkCommon() {
        Daemons.start();
    }
注意这里子进程和父进程都会执行,也就是都会启动4个线程:Daemon线程,java堆整理,引用队列,以及析构线程。
父进程的线程在fork之前停止了,这里也要重新启动。
子进程和父进程都继续返回。
返回到ZygoteConnect的runOnce方法中,继续往下执行,则子进程执行handleChildProc方法,父进程执行handleParentProc方法。
父进程不是我们关注的,我们关注的是子进程,所以接下来看看handleChildProc方法,这个方法定义在frameworks\base\core\java\com\android\internal\os\ZygoteConnection中:
    private void handleChildProc(Arguments parsedArgs,
            FileDescriptor[] descriptors, FileDescriptor pipeFd, PrintStream newStderr)
            throws ZygoteInit.MethodAndArgsCaller {
        /**
         * By the time we get here, the native code has closed the two actual Zygote
         * socket connections, and substituted /dev/null in their place.  The LocalSocket
         * objects still need to be closed properly.
         */

        closeSocket();
        ZygoteInit.closeServerSocket();

        if (descriptors != null) {
            try {
                Os.dup2(descriptors[0], STDIN_FILENO);
                Os.dup2(descriptors[1], STDOUT_FILENO);
                Os.dup2(descriptors[2], STDERR_FILENO);

                for (FileDescriptor fd: descriptors) {
                    IoUtils.closeQuietly(fd);
                }
                newStderr = System.err;
            } catch (ErrnoException ex) {
                Log.e(TAG, "Error reopening stdio", ex);
            }
        }

        if (parsedArgs.niceName != null) {
            Process.setArgV0(parsedArgs.niceName);
        }

        // End of the postFork event.
        Trace.traceEnd(Trace.TRACE_TAG_ACTIVITY_MANAGER);
        if (parsedArgs.invokeWith != null) {
            WrapperInit.execApplication(parsedArgs.invokeWith,
                    parsedArgs.niceName, parsedArgs.targetSdkVersion,
                    VMRuntime.getCurrentInstructionSet(),
                    pipeFd, parsedArgs.remainingArgs);
        } else {
            RuntimeInit.zygoteInit(parsedArgs.targetSdkVersion,
                    parsedArgs.remainingArgs, null /* classLoader */);
        }
    }
子进程会继承父进程打开的文件描述符,所以子进程中有zygote套接字描述符,这里需要把它关掉。然后重要的是调用RuntimeInit.zygoteInit方法。这个方法定义在frameworks\base\core\java\com\android\internal\os\RuntimeInit中:
    public static final void zygoteInit(int targetSdkVersion, String[] argv, ClassLoader classLoader)
            throws ZygoteInit.MethodAndArgsCaller {
        if (DEBUG) Slog.d(TAG, "RuntimeInit: Starting application from zygote");

        Trace.traceBegin(Trace.TRACE_TAG_ACTIVITY_MANAGER, "RuntimeInit");
        redirectLogStreams();

        commonInit();
        nativeZygoteInit();
        applicationInit(targetSdkVersion, argv, classLoader);
    }
从名字看也是做初始化工作。重点来看看applicationInit方法吧,这个方法定义在frameworks\base\core\java\com\android\internal\os\RuntimeInit中:
  private static void applicationInit(int targetSdkVersion, String[] argv, ClassLoader classLoader)
            throws ZygoteInit.MethodAndArgsCaller {
        // If the application calls System.exit(), terminate the process
        // immediately without running any shutdown hooks.  It is not possible to
        // shutdown an Android application gracefully.  Among other things, the
        // Android runtime shutdown hooks close the Binder driver, which can cause
        // leftover running threads to crash before the process actually exits.
        nativeSetExitWithoutCleanup(true);

        // We want to be fairly aggressive about heap utilization, to avoid
        // holding on to a lot of memory that isn't needed.
        VMRuntime.getRuntime().setTargetHeapUtilization(0.75f);
        VMRuntime.getRuntime().setTargetSdkVersion(targetSdkVersion);

        final Arguments args;
        try {
            args = new Arguments(argv);
        } catch (IllegalArgumentException ex) {
            Slog.e(TAG, ex.getMessage());
            // let the process exit
            return;
        }

        // The end of of the RuntimeInit event (see #zygoteInit).
        Trace.traceEnd(Trace.TRACE_TAG_ACTIVITY_MANAGER);

        // Remaining arguments are passed to the start class's static main
        invokeStaticMain(args.startClass, args.startArgs, classLoader);
    }
调用invokeStaticMain方法进一步处理,这个方法还是在RuntimeInit中:
 private static void invokeStaticMain(String className, String[] argv, ClassLoader classLoader)
            throws ZygoteInit.MethodAndArgsCaller {
        Class<?> cl;

        try {
            cl = Class.forName(className, true, classLoader);
        } catch (ClassNotFoundException ex) {
            throw new RuntimeException(
                    "Missing class when invoking static main " + className,
                    ex);
        }

        Method m;
        try {
            m = cl.getMethod("main", new Class[] { String[].class });
        } catch (NoSuchMethodException ex) {
            throw new RuntimeException(
                    "Missing static main on " + className, ex);
        } catch (SecurityException ex) {
            throw new RuntimeException(
                    "Problem getting static main on " + className, ex);
        }

        int modifiers = m.getModifiers();
        if (! (Modifier.isStatic(modifiers) && Modifier.isPublic(modifiers))) {
            throw new RuntimeException(
                    "Main method is not public and static on " + className);
        }

        /*
         * This throw gets caught in ZygoteInit.main(), which responds
         * by invoking the exception's run() method. This arrangement
         * clears up all the stack frames that were required in setting
         * up the process.
         */
        throw new ZygoteInit.MethodAndArgsCaller(m, argv);
    }
这里会抛出异常,也就重新回到了ZygoteInit的main方法中:
            Log.i(TAG, "Accepting command socket connections");
            runSelectLoop(abiList);

            closeServerSocket();
        } catch (MethodAndArgsCaller caller) {
            caller.run();
        } catch (RuntimeException ex) {
            Log.e(TAG, "Zygote died with exception", ex);
            closeServerSocket();
            throw ex;
        }
这个时候会调用caller.run();也就是MethodAndArgsCaller中的run方法:
 public void run() {
            try {
                mMethod.invoke(null, new Object[] { mArgs });
            } catch (IllegalAccessException ex) {
                throw new RuntimeException(ex);
            } catch (InvocationTargetException ex) {
                Throwable cause = ex.getCause();
                if (cause instanceof RuntimeException) {
                    throw (RuntimeException) cause;
                } else if (cause instanceof Error) {
                    throw (Error) cause;
                }
                throw new RuntimeException(ex);
            }
        }
    }
接着调用mMethod.invoke方法,也就是Method类中的Invoke方法,这个方法是一本地方法,这个方法就展看了。根据Activity的启动流程来看,发起创建进程的请求的地方在ActivityManagerService中的startProcessLocked方法中,有如下代码:
            Process.ProcessStartResult startResult = Process.start(entryPoint,
                    app.processName, uid, uid, gids, debugFlags, mountExternal,
                    app.info.targetSdkVersion, app.info.seinfo, requiredAbi, instructionSet,
                    app.info.dataDir, entryPointArgs);
mMethod.invoke方法中的参数mArgs 是有这里传下去的,感兴趣可以追踪下,总之mMethod.invoke会调用ActivityThread中的main方法。
至此,Zygote进程创建子进程的流程便分析结束。


 2万+
2万+


 被折叠的 条评论
为什么被折叠?
被折叠的 条评论
为什么被折叠?
 到【灌水乐园】发言


